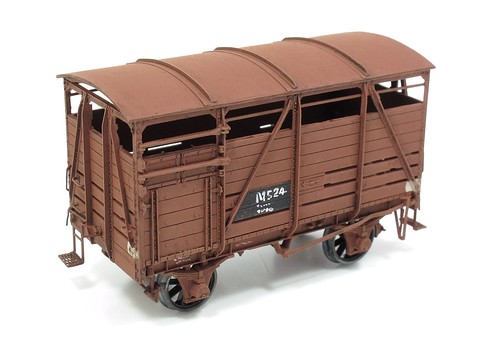
After adding thebrake lever and guide - a couple of ingenous fold-up etched brass components - I could move on to painting.
Livery appears to be rust brown so a quick spray with Humbrol 70 did the job. The white patches indicate the side the brake lever is on, there is only one, and of course there is the black patch for the numbers.
Ideally I'd have used transfers for digits but as I'm only doing one wagon, I'm not going to spend money on a set. As it is, the on the prototype the numbers are applied using a stencil so I tried to copy this with a mapping pen and some ink. It's not perfect but will be fine for now.
Weathering is just a wash of Games Workshop Earth shade ink to excentuate the detail. Left for a few minutes and then wiped away it gives the dusty appearance of the prototype to my eyes.
This is a cracking kit. Lovely crisp mouldings with the added etched parts to improve things futher. I could imagine a small layout with a train of these things looking smashing. Not for now though...
I live in hope that one of our kit manufacturers follow this example of a multi-media kit, some sort of "special edition" with the correct etches for brake gear, sprung buffers etc. to make a museum quality model.
ReplyDeleteCan I put a request in for a Toad with etched framework and brass rod hand rails, Parkside, Cumbrian, anyone?
Mark.
I must admit it would be good to see, and a Toad would be a fine choice. I wonder how financially sound it would be though? The UK market is horribly price sensitive and averse to making things themselves.
ReplyDelete