A daily updated blog typed by someone with painty hands, oil under his fingernails and the smell of solder in his nostrils who likes making all sort of models and miniatures. And fixing things.
Monday, December 31, 2018
Mohan sails
Santa brought the model boat club several thousand gallons of water for Christmas. At least the level in our lake was many inches higher than it had been only a week earlier. All that overnight rain had worked some magic.
This was good news for me as I wanted to give Mohan a proper sail before the end of the year and more water equals less bending down to launch him.
All sort of worked well at first. He moved in all the right directions, but it was obvious that additions to the superstructure resulted in more forward weight than was desirable. Add in the ability to get a bit of speed up and his nose-down attitude was alarming. Water shot through the holes in the front and we ended up with a wet deck.
Back on the bench, I pulled out one of the bags of lead shot inside and tried again. Better, but still a bit nose heavy.
Relocating half the bag (not scientific, I just poured some of the shot out into the carrying box) to behind the battery solved the problem. Even at full chat, the fender is just out of the water. Since a more sensible speed is about 3 notches on the stick, all looks good.
With the levels sorted, he's quite a good sail. Silent on the water (that sound deadening stuff works!) and reasonably manoeuvrable, he pottles around the water perfectly happily. When it gets a bit choppy, he bobs around like a cork, riding each wave nicely.
So, we finish the year with a reasonably succesful. There's still bodywork to do, you might notice the navigation lights are half-fitted, but he sails. I could do with a barge to tow though...
Sunday, December 30, 2018
The thing that anoyed me the most this year...
I'm thinking I might scratchbuild an Argentinian Garratt in N gauge. Can you guys tell me everything I need to know to do this?
Can you tell me what colour a Black 5 should be?
I watch a lot of Facebook groups relating to model railways. It's a good way to keep the mass market audience in view so I aim my writing at real people who make up the majority of the hobby. It's easy to sit on forums where more committed modellers are found and forget that for many people, a layout that works is the dream. They don't worry about prototype fidelity as much as simply having fun. USA "Big Boy" next to a Blue Pullman? Who cares!
But, very vocal in these groups are people who appear, often using one of Facebook's annoying bright backgrounds with big text, and ask either desperately basic question, or a really complex one but in a way that makes you think they don't really understand what they are writing.
I have a feeling that both types don't actually want to know the answer to their query, what they are really saying is, "Look at Me. Look at Me!" In their ideal world, lots of people will scurry around finding the answers, something they could often do with Google in 20 seconds, and then spend more time entertaining them with the answers.
This annoys me because there are plenty of people out there with real questions who will act on the results, but they are drowned out in the noise of the attention seekers who prefer a scattergun approach to information seeking.
The real experts at this will sign up for a group and immediate post a dozen unrelated questions, or post along the lines of, "I fancy building a XXXX, show me yours.". Maybe I'm cynical, but I don't think the actual building part will ever happen, they just like other people digging out photos for them to look at.
Another pet hate is the phrase, "Admins, please delete if not allowed, but..."
This is sometimes followed by a post with limited relevance to the group, but more often than not, something that fits the topic. It's just another "Look at Me" post.
Now, I get that people like to be the centre of attention sometimes, but there are a growing number of attention seekers out there and if this continues, all these groups will just disappear as all the posts will be increasingly shrill cries and what information is there will be lost. Forcing the posters back to Google, which I suppose solves the problem in a way...
Saturday, December 29, 2018
Saturday Film Club: Phil and the TPO
We'll finish this year's video selection with one staring - me!
On a recent filming trip to the Severn Valley Railway, I was shoved into the TPO on display at the Engine House and told to do my pointing at stuff and talking thing. So, with next to no research, off I went...
Friday, December 28, 2018
Mona
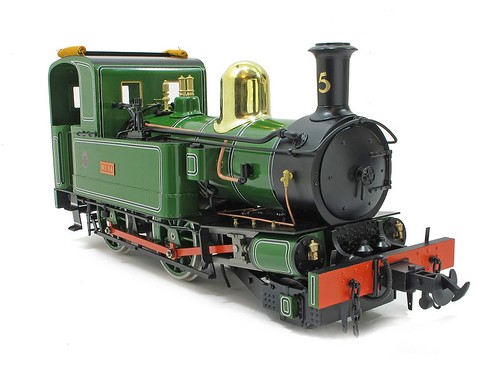
Not a Christmas present sadly, but the latest and last addition to the garden railway Isle of Man locomotive roster.
Mona is a G scale electrically powered model from Accucraft and as with the others in the collection, I think she looks lovely.
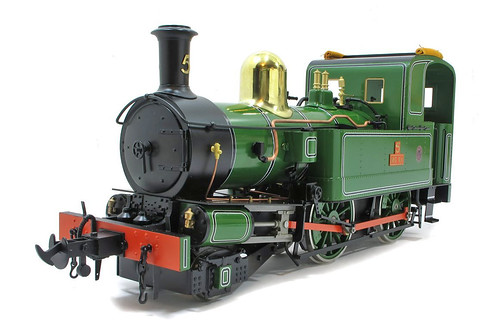
The prototype is an odd bird in that the namesplates and chimney numberal are different on each side.
Talking of plates, these aren't with the prototype any more. One was auctioned recently near to me so I popped along for a look.
The new owner of this plate parted with over £5000 for the priveledge, several times the price the loco was sold (with both plates) for by the Isle of Man steam railway.
Now back with the railway, Mona sits at the back of the shed cacooned in a slowly disintergrating plastic tent. Asbestos issues mean it's unlikely she will return to steam any time soon.
Thursday, December 27, 2018
Greeble spotting for the London
Those who remember the classic BBC TV series Blakes 7 might well recall the first space ship we saw on screen wasn't the Liberator, but a prison barge called London.
For modelmaker Simon Atkinson, this was his first commission. It's now back with him 40 years later, and in need of a full restoration.
The biggest problem with this is greeble.
Greeble is the surface detail used on models to make them look more interesting. In the sci-fi world, there is a lot of plunder of old plastic kits to produce this. Famously, the engines on an X-Wing fighter from Star Wars are Airfix Saturn 5 parts, and there is a great big lemon squeezer on the back wall of Thunderbird 1's launch bay.
Spotting greeble can become a hobby in itself. A nerdy, but fun one.
Anyway, The London needs a lot of work and Simon is trying to remember where he picked up the surface detailing from. A couple of parts have defeated both of us.
There are some bits that look like pulleys toward the front. They are familiar, but I don't have a definite suggestion.
You can see them better from this angle. This has to be from a plastic kit available in 1977, or at least only recently discontinued as this is when the model would have been made.
Next up, something more recognisable.
It's an axlebox, and my first thought was a Lima PGA, but that's not right. Those are very tall springs, so quite distinctive.
Anyway, what we need now are some suggestions in the comments section please. This will get your post-Christmas brain going!
Wednesday, December 26, 2018
Tuesday, December 25, 2018
Merry Christmas
Merry Crimbo everyone. I hope you and everyone you care about have a fabulous day. Now stop looking at my blog and go eat some chocolate!
Monday, December 24, 2018
Painted Mohan
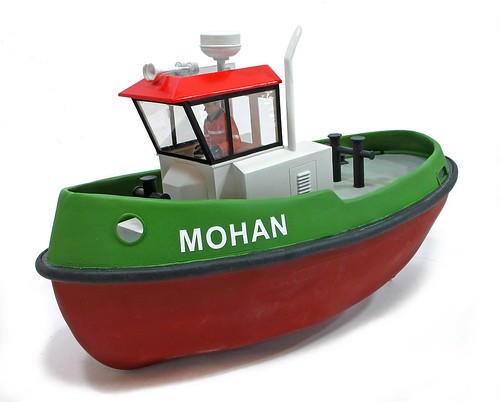
Mohan did make it to the model boat show, and not looking too shabby.
Initial thoughts around the colour were blue, but then I realsied I'd already built a modern tugboat and painted it blue, so a nice bright green bot of Humbrol was found and sprayed over the bulwarks. Below the bumper is Halfords red oxide primer, both of which have been satin varnished.
The cabin roof was to have been flourescent yellow, but the paint wouldn't work, so I found as bright red spray can and used that instead. For some reason we have around half-a-dozen of these so it was good to use some up.
White bits are Humbrol 147 as usual and the black bits Revell number 9.
In this state, the model made it to the display and while I'm sure it didn't excite many people, I saw a couple of photos posted where it appeared, so my policy of bright paint colours paid off.
Sunday, December 23, 2018
NEC Classic car show 2018
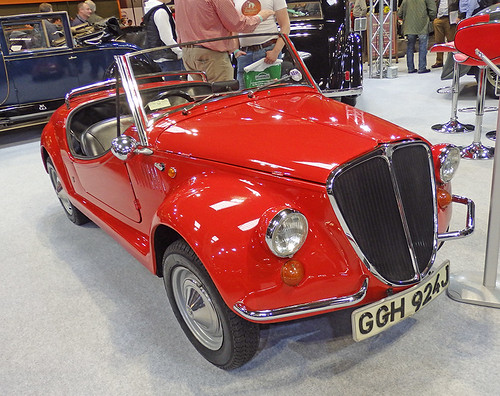
I'm very busy at this time of year, and so I'm sure are you - so today's post is heavy on pictures from the NEC classic car show.
OK, these aren't models, but they are all someone's hobby. There's very little here you just jump in to and drive off every day!
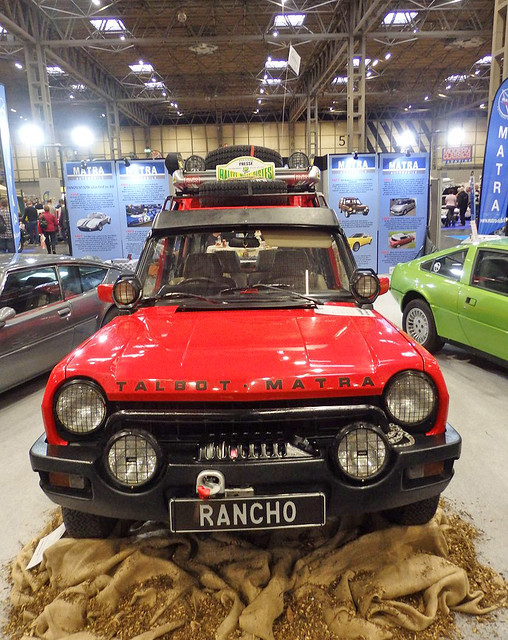
Car of the show for me had to be the Talbot Rancho. Rarer than all the supercar exotica shown elsewhere thanks to lousy rustproofing, this was a beautiful example that I would drive away in an instant.
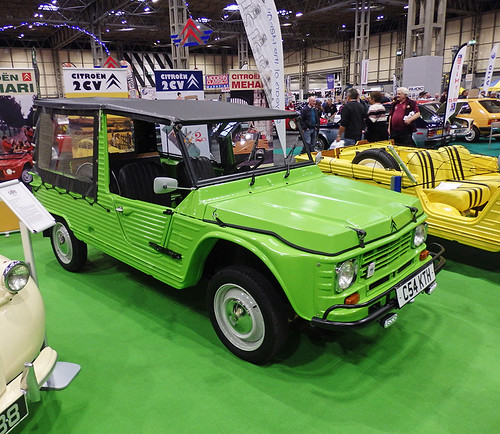
I'm quite partial to a plastic-boy Citroen too. The Mehari owes most of its mechanicals to the famous 2CV, but the body is ABS and so RUST FREE!
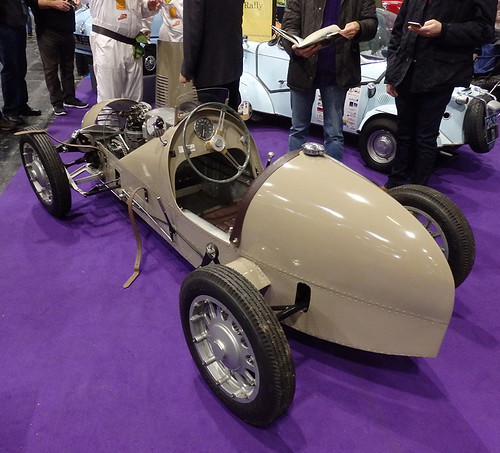
My love of micro-cars was well satisfied, especially this Bond racing model, one of only two made it's cute and I suspect, a lot of fun to drive on a B-road. Less fun on a motorway!
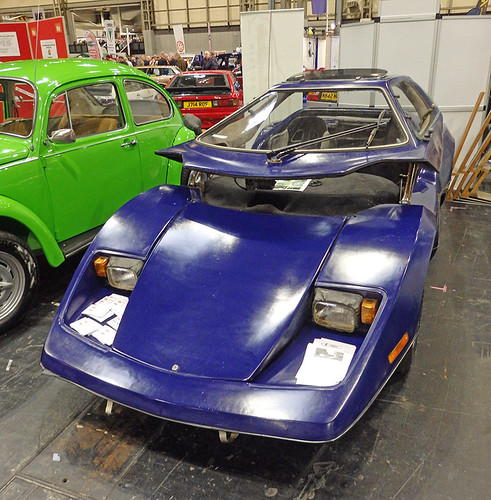
Not a Beetle as such, this is a Nova kit car which used a bug as a donor car. Building a kit car has always appealed to me as long as I could find something that doesn't look too weird, and finish it to a really high standard. Very much a "one day" project, it's nice to dream.
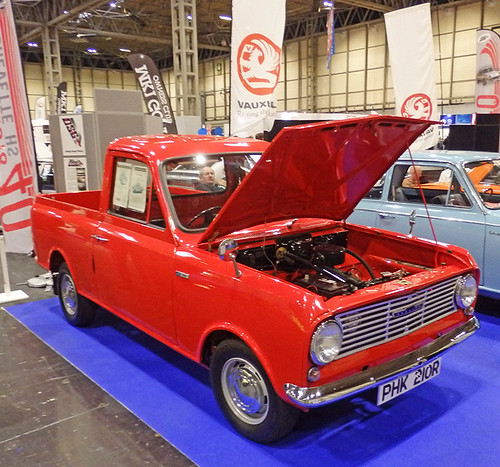
Nice to see mundain vehicles attracting interest. I think this is a Bedford HA pickup and is the sort of car that was used and abused and rusted away when I was a kid. For railway modellers, it's the type you really need a few of on your 70s layout.
There you co, some prety car pictures. If you want more, head over to Flickr where I seem to have posted quite a lot.
Saturday, December 22, 2018
Saturday Film Club: The Butlins Monorail
It's the future!
No it isn't, but that doesn't mean this isn't lovely film showing the Butlins monorail being built and operated.
I like the clean-coated and quiffed workers laying down the fibreglass. Surely the place wasn't that spotless? The lack of face masks during fibreglassing and spray painting is worrying.
Never mind, the colourful film looks great in that very 1960s way colour films did. The sun always shines at Butlins!
Friday, December 21, 2018
RadioLink T8FB RC system
A few weeks ago, I blogged my disappointment with a Turnigy radio system and intention to find a working replacement.
Deciding that I wanted to buy from a proper shop, my web browser was pointed at Howes Models in Kidlington. The bargain basement system I spotted was the RadioLink T8FB. £50 including a receiver, it was worth a dabble.
After arriving in the post (Howes is 3/4 hour drive away, so postage is cheaper than petrol) the receiver was installed in a boat and bound to the transmitter in a few seconds. The process is simple (press a button) and even quicker than the Planet set I already own.
On the water, everything works nicely and a couple of club members commented that also use RadioLink gear.
I'm happy that the company has been operating long enough and offers sufficient products that they won't vanish in a puff of electronic smoke in a hurry. The transmitter provides a multitude of facilities I'll never use of course - all tunable by plugging your mobile phone in, something I have no intention of doing.
I like the stubby and robust aerial, and the turny controls on the top corners that I already have ideas for one day. Basically, it works.
Postscript: I stuck the Turnigy system on eBay and sold it - to a bloke in Liverpool who ticked the "collect in person" box. Needless to say, he claimed this was an accident and would send the postage on. To my complete lack of surprise, he didn't. Still, even this was I got a little bit of cash back on the deal.
So, my radio control future is ensured for a few years.
Thursday, December 20, 2018
Garden Rail - January 2019
The arrival of several articles about building rail buses has allowed me to give the January issue of Garden Rail a bit of the theme. We have freelance, Isle of Man and a weird BMW conversion in the issue. I know that these short trains are always popular with modellers, so hope the readers agree.
We've also got a fair bit of recycling going on with The Biscuit Tin Railway and a Re-Recycled Railway. The former is a fascinating 10mm scale model running on 16.5mm gauge track which I was initially not sure about, but seeing it on the page am glad it's in there are the model is both fascinating and good looking.
We've some proper hard-core engineering too with re-plumbing a steam loco cab and a look at the right sort of water to ensure your locomotive enjoys a long life. As someone who is very much not an engineer, I love this stuff and it's so useful to people in a similar situation to me.
Wednesday, December 19, 2018
Warehouse Wednesday: Garage with roller
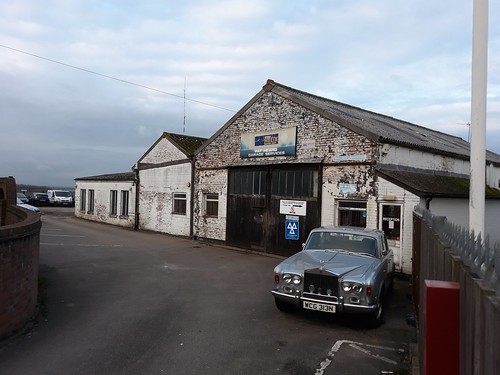
This is England.
A slightly scruffy garage that looks like it's been around for years, with a 1974 Rolls-Royce parked outside. Different roof lines, peeling paint, but generally pretty tidy, the garage is still in use - it looks like the sort of place I like to have cars repaired thanks to a dislike of main dealers (I'm looking at you Citroen and Peugeot) who do a poor job and charge a fortune.
I could also imagine it appearing, looking just like this in a 70s episode of The Sweeny, Minder or The Professionals.
Although this garage is beside a filling station, it could be a useful lineside feature. The roller is a nice touch, available for around £7000 nowadays, they are a bit of a "people's car". I always used to think that you were rich is you owned one of these and an electric toothbrush. The toothbrush won't cost you two grand a corner if the gassy suspension fails though...
Tuesday, December 18, 2018
Servicing a Micro Scalextric Alfa 159
A couple of years, I bought a friend a Micro Scalextric Alfa 159 set as a bit of a joke. She liked her Alfas and driving fast, and it was stupidly cheap. There have been very few presents that I've enjoyed handing over more. I didn't care if it never came out of the box, the gifting was the fun.
But, it turns out that both her young daughter and husband loved it. Lots. Enough that when I mentioned I was at a slot car swapmeet, there was a request for more cars.
It seems that just like the real thing, one of the Alfas has become temperamental. I offered to take a look. How difficult can it be to service?
Sticking a 9V battery on the pickup braids, the motor turned over freely. In fact the only potential problem I could see was the state of the braids themselves. They were a bit ragged but I'm not sure if this is the problem.
Micro Scalextric cars clip together, so I took the body off and blasted the braids and motor with contact cleaning spray. Wiping the excess away, I realsied the braids were clipped in and not soldered to the motor.
Basically, they are folded in half, one end under the car, the other rubbing on a contact for the motor. So, I simply reversed them so the good end is under the car and hopefully this will have solved the problem. The "fluffy" end is still fine at touching the motor contacts - and the battery test still works.
A drop of light oil on the motor bearings to replace anything removed by the cleaner, clip the body back on, and the car is ready to return to it's owner. Let's hope I've cured the problem and it's now reached Japanese levels of reliability.
Monday, December 17, 2018
Mending Ben's Loco (Hornby L1)
For the last couple of years, there has been a project sitting on my shelf - my friend Ben passed me this loco for repair while we were out having a drink. It's a Hornby L1 that has been dropped in it's front buffer beam.
All the buffers were off, and the front bean was a bit of a mess. The backhead rattled around inside and the couplings were lose in the Electroteen box it arrived in.
The obvious starting place was to stick the buffers back in, but somewhere along the way one of them has gone missing. That's a shame, but my spares pile came to the rescue with a set of brass sprung buffers from the old MPD range. Almost certainly older than the model they were to be fixed to, some of the springs had lost their tension so there was more digging around for a couple of replacements.
The square holes needed to be opened out very slightly to take the round back ends - easily achieved with a tapered reamer, with the added bonus the opening out was in the centre of the hole so keep things in place.
A bit of ABS solvent fixed the, thankfully complete, buffer beam back together. Supergluing the brass housings in place further straightened it.
Even though only one buffer was missing, I replaced all four. The shanks are slightly fatter on the replacements and consistency matters.
Handy hint - a litter bin on the modelling board is a godsend when you chuck away an apparently random bit of plastic, only to realise ten minutes later it's the missing lamp iron. So much easier to retrieve it than looking through a proper big bin.
A quick coat of signal red Railmatch paint looked good - a better choice than the same companies buffer beam red which looked too bright to me. At this point, I thought I was done, but no. Checking the loco worked on my test track revealed that the pony truck stuck out beyond the coupling when running backwards.
There is an interesting double-pivot requiring a pair of pegs, one of which was broken off. A 5mm long bit of 2mm diameter rod is a perfect replacement and not the truck swivels, but stays where it should do.
A set of screw couplings from the spares pile finish the job. I'm pleased with it and so was Ben when I returned the model to him. Let's hope he looks after his toys carefully this time!
Sunday, December 16, 2018
Festival of Railway Modelling 2018
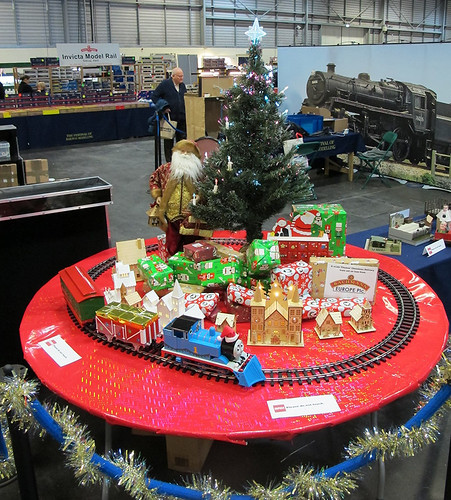
I built a model railway!
The Festival of Railway Modelling this year moved to a new weekend at the start of December and so we decided a Christmas theme would be a good idea. To that end, I arranged to borrow a Thomas' Christmas Delivery G scale train set from Bachmann - this was placed on a gift-wrapped table along with a tree, Santa, a pile of presents and light up buildings.
The effect was enhanced further by the team wearing suitable hats. Most people opted for Santa versions, but I went full elf, although the jingling bell right next to my ear did get on my nerves a bit.
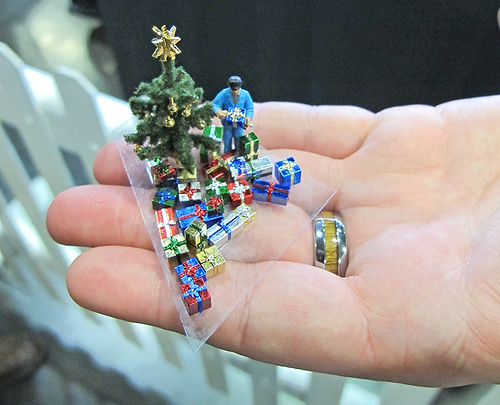
For the kids, a competition was to spot all the festive additions to layouts - and asked to do this, many modellers really went to town with some excellent little models. I hope the spotters enjoyed themselves, I certainly did when I wandered around late on Sunday trying to photograph a few. The trade also joined in with plenty of tinsel and Christmas lights festooning stands.
Maybe all this isn't "proper" model railway, but this show is aimed at a general audience who know it's a payday since the Warley shopping fest and a great time for modellers families to pick up presents to be hidden away for a few weeks.
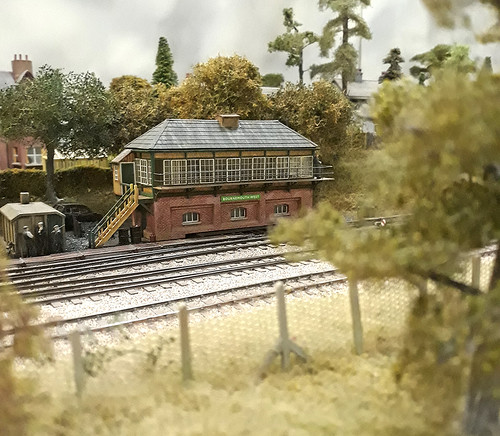
I think the layout selection was one of the best I've seen at any of the Warners shows. For a start, there was nothing simply filling space. Quite the opposite, many were the sort that would be the star attraction at any show. Bournemouth West, with its amazing steaming locomotives, probably attracted the most attention. Even at the end of the weekend, crowds still needed to be shooed away so the show could close.
On our stand, we hosted several Cake Box models on Saturday, my stuff staying under the table until Sunday. We also took part in "Strictly Come Digging" on Campbell's Quarry - which I didn't win due to my clumsiness with the digger controls.
All in all, a good weekend. Lots of chat, several suggestions for future articles. If you dropped by to say hello, thank you for coming, it was nice to see you.
Saturday, December 15, 2018
The Italian Job - in Scalextric form
"You're only supposed to blow the..."
A trip back to June where I saw this model at the UK Slot car show. When I was watching they seemed to be having all sorts of technical problems, so it's good to see that these were resolved and the "stunt show" as it was described went off properly.
Friday, December 14, 2018
Debonder to the rescue
Amazing result. My Dad needed a coupling for a boat project. Finding one in the stash of bits, the only problem was that the brass connector on one end was the wrong size. We had the correct version, but the old one was stuck in using superglue.
I do this because these things slide in and out when you don't want them too. A drop of superglue solves the problem, but in this case, caused another one.
More in hope than expectation, I tried a few drops of Zap Debonder around the joint, but remarkably, a couple of hours later, the brass piece came out easily.
I'll definitely be keeping this stuff to hand in future. Well, I will when I remember where I put the bottle...
Thursday, December 13, 2018
Making holes in the side
Making some holes in the upper levels of Mohan's hull adds character and, depending on their purpose, lets the water run off the deck.
At the front, the holes are to let ropes through to the bollard at the front of the boat. Making these is simple, just drill a hole and then open it out with the largest tapered reamer in my possession. This limits the size of the opening, but as this is a freelance model, if it looks right, it is right.
A thin sliver of plastic is fitted around the inside of the hole and generously washed with solvent. Once hard, I sand it back with an abrasive stick giving a nice, neat finish.
The freeing ports at the back are a little tricker. After drawing the desired lines on the bulwarks, I drill out the corners, then open them with the reamer. Then the straight lines are cut with an Olfa cutter. A little bit of filing and fiddling, then some strip around the edge followed by some filler and the job is done.
The general wonkiness of the hull hasn't made this job easy, but I'm happy with the results. To be honest, the freeing ports aren't going to let much water out as they finish 3mm above the deck, but I decided against cutting through the quarter-round strip bracing the side/deck corner.
Wednesday, December 12, 2018
Warehouse Wednesday: Highland signal box
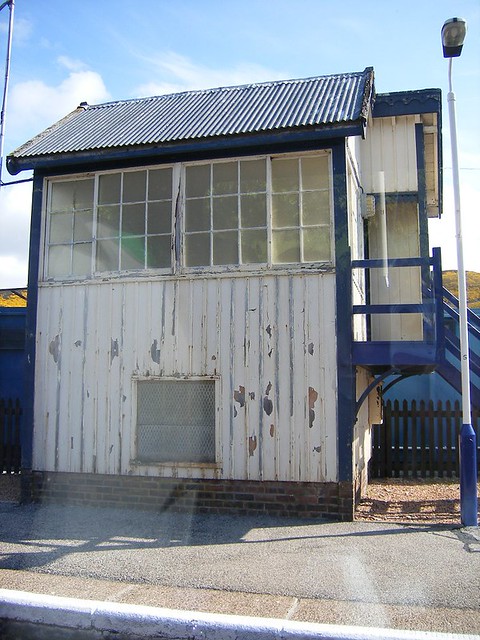
Sadly, I've no idea where this photo was taken, other than Scotland obviously, but it's an interesting shot of a fairly typical Highland Railway signal box.
Presumably because of the "challenging" weather to be found in the area, the gaps between the wooden planking on all the buildings, even platelayers huts, were covered with rounded batoning. I think the wiggly tin roof is a common sight too.
Like all the other boxes on the Highland line, this one was no longer in use in 2008. Radio signalling has replaced semaphores as the traffic levels are low enough for it to work, and you really don't want to be employing vast numbers of people to look after signal wires that can freeze up or break in the most remote locations.
I'm surprised the box still exists, but wonder if it is a listed building by now. It would be nice to think that someone has found an alternative use for it.
Tuesday, December 11, 2018
Hatch cover
Moving on with the tugboat, I need to cover the big hole in the back, ideally with something reasonably flush to the deck, but as waterproof as possible. This rules out any combing around the edge.
In the end, I've used a couple of layers of plastic to form a sort of seal. It's not going to be very waterproof, even if I run some Vassalene around the edges, but hopefully, most of the water will stay the right side of the hull.
Along the back edge, a tongue locates under the deck. The other end is held down with high strength magnets. I can pull it up with finger pressure, especially once the towing post is fitted, but it seems to stay put pretty well, and may even be fine when hauling a light barge in the future.
Monday, December 10, 2018
Changing sticks
One of the more useful things in my bag after the IPMS show was a new pack of abrasive sticks. I'm terrible at changing these things when they are badly worn as you can see from the state of the old ones. In my defence, they still worked quite well when handled properly, but you couldn't sand up to the edges of the stick.
I'm like this with knife blades too. I know a sharp blade is a joy to use, but the parsimonious bit of me (I have both Polish and Scottish blood, neither nation is known for throwing money around) wants to make it last just a little bit longer.
Anyone else do this?
Sunday, December 09, 2018
IPMS 2018
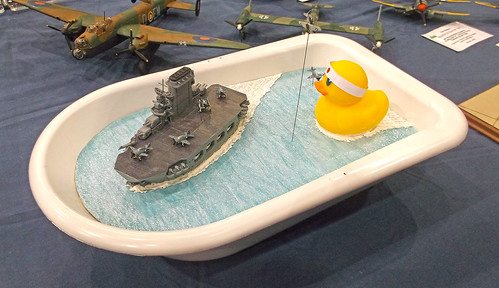
Travelling to Telford can be interesting. Or more accurately, frustrating. A couple of years ago, I arrived at Birmingham New Street to find all the trains to the town cancelled. On that occasion, I turned around and went to the NEC classic car show instead.
This might have been my plan this year as well, but I'd visited the cars the day before, and enjoyable as it was, didn't want a second dose.
So, after consulting the staff, I pressed on with a change at Wolverhampton. This would add over half an hour to the trip, time I knew I'd miss trying to get around a big show. Still, I carried on and an hour later than I had planned to be at the event, thanks to more train pain at Wolverhampton, I arrived somewhat grumpy.
Grumpiness was dispelled almost immediately when I saw the fantastic boat in the bath model above. It made me smile and the rest of the show was brilliant. I still haven't seen the modelling competition, but then I did leave about 10 minutes before the end, tired and with a bag full of kits I don't really need...
Note: If you are wondering why I don't drive instead, it's:
A) A rubbish long jouney
B) You need to be there well over an hour before opening to get a space in the car park. Either that or park somewhere in Wales.
Saturday, December 08, 2018
Saturday Film Club: A tram ride in 1900
A remarkable bit of film showing a tram ride through Rochdale in the year 1900. Amazing film (with slightly dodgy added sound, turn your speakers down if it bothers you), very clear and showing a world that is long gone.
I'm thinking this was shot on a Sunday as everyone is smartly dressed in what I assume is their "Sunday Best".
I also wondered about the man learning to ride a bike part way through. Is his friend really pushing him in front of the tram?
Friday, December 07, 2018
Peterborough bound
I'm on my travels again - this time to the East Of England Showground for The National Festival of Railway Modelling.
You'll find me on the BRM stand most of the time looking after a festive train set and chatting about some of the modelling projects I've carried out this year. Examples of these will be on a table in front of me.
We are also arranging a display of Cake Box models. I'm looking forward to seeing some of these for real.
And, I'll be taking part in the Strictly Come Digging challenge!
So, drop in and say hello. Always happy to chat.
Thursday, December 06, 2018
Painting stuff in BRM
It's painty fingers time in the January issue of BRM. I pick up a couple of old projects that we last saw in the raw plastic and metal and give them a coat of many colours.
My subjects are the Slater's Conflat and Roxey etched shed, both of which I've shown the construction of in 2018. Painting often gets tagged on the end of a build, but it's a topic in itself, so it is nice to be given space to do the job properly.
Digital readers get a bonus video, where I look at options for holding models that are being painted. There are a couple of handy holding tools and some figures glued to a piece of wood. Bonus points for spotting who these figures represent.
On the main DVD, I look at preparing for paint. Another topic glossed over normally, but it can be a mystery for many modellers. If you want to produce a quality finish though, preparation is the key, so hopefully, this is one of those basic skills areas that will be useful.
Wednesday, December 05, 2018
Warehouse Wednesday: Bressingham hut
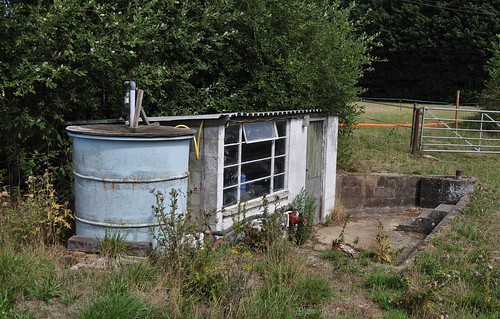
When shooting photos from a train at Bressingham, most people don't aim the camera at a grotty hut with a huge water tank on the side.
It looks like a building cobbled together from stuff lying around. That window isn't in its first location, is it?
I suspect this has something to do with water treatment but can't be sure. It would certainly make an interesting model for a scruffy corner of a layout.
Tuesday, December 04, 2018
Adding weight, losing sound
I think this is a nifty idea. While at a classic car show, I picked up a square of self-adhesive soundproofing material for a couple of quid, and am using it to add weight to the tugboat.
What I'm hoping is that the dense, bitumin-like material will stop any resonance from the plastic hull and deck. It's flexible so not difficult to form around the curves of the hull. I don't really need the shiny, heat resistant side other than to stop things sticking to the black layer, but it looks pretty.
Covering the bottom of the hull and underside of the deck near the motor added valuable weight, but I still need lead to bring the waterline up the hull a bit.
I'm pretty sure the noise killing has worked a bit. The drive system gives a nice, deep "thrum" sound now which is pretty realistic. There's not squealing or odd vibration. I'll be doing this again.
Monday, December 03, 2018
Thinning acrylic paint
Martin asks:
I am trying to be ‘green’ in my modelling. I plan to use acrylics with my airbrush but Ideally do not want to use any chemical thinners. This might sound odd, but can I use good old fashioned water?
Some paint can be thinned with water - Games workshop stuff and I think Humbrol are fine.
Tamya need their own thinners and Lifecolor are better with theirs too, but again, I have used water.
Cheap bottles from The Works etc. are good with water.
I'd suggest experimenting. Hard or soft water is going to make a difference too. If you don't mind trying chemicals, then cheap car screenwash is apparently very good. The military modellers use it and I have tried it with some success, but I didn't check if it was better than water!
However, I'm no expert on this, so throw the question out to readers for further wisdom in the comments section please.


