Showing posts with label "Handyman Hall". Show all posts

Tuesday, March 12, 2019

Minitrains Marvel


Take a bow, Minitrains Plymouth Diesel. 

Two days solid running - well over 14 hours - without a murmur. 

OK, I did give it a dose of light oil, but then it hadn't turned a wheel for several years. After some running, the lubrication reduced any noise to next to nothing. 

Pretty impressive I think. If you are in the market for a 009 diesel, I recommend it.

Monday, March 11, 2019

The return of the Handyman Hall Railway

The Handyman Hall railway

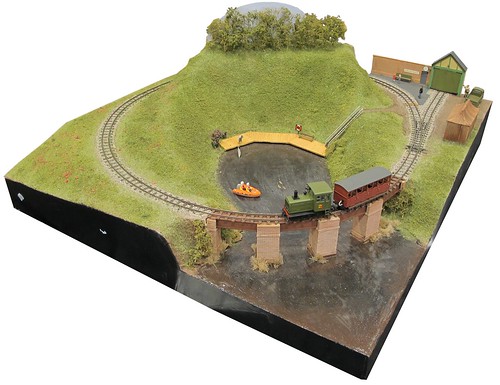
For the Leamington Show, I dug The Handyman Hall railway out of storage. Despite not having seen the light of day for at least 5 years, it is looking pretty good. One loose figure and some discoloured varnish were all the problems found. 

The figure was quickly glued in place, the varnish issue ignored (I pretend it's a running water effect if asked) and after a quick track clean, it was good to go. Testing showed that an L&B loco didn't have a chance on the tight curves, but any of my 4-wheel models were fine. 

 
Power came from a  Beatties controller which apart from a slightly sloppy direction switch, works perfectly still. Plenty of God's own DC available all weekend.  


An amusing moment came when a youngster picked me up on the rescue boat. He identified an RNLI D Class lifeboat and pointed out it would only be used offshore. I excused myself by saying it was a lifeboat day and they were demonstrating it. 

Actually, the model is a pencil topper which isn't a bad match for 4mm scale figures, if a little short. It's bright orange though, so I like it. 

Thursday, September 29, 2011

Facilities for miniature model boaters

Lifebelt and seat in minatureDown at the model lakeside on the 009 model railway, I felt it was time to make sure my model boaters were both safe and comfortable.

The first stage is easy - if anyone is going to fall they will need a lifebelt to keep them on the correct side of the wet stuff (we will ignore the fact that the wet stuff is in fact varnish so if anyone fell in they would get a bump on the head making a crash helmet more useful than a lifebelt). The belt comes from my model boating supplies. Originally it had a set of ropes sticking out from the side but they looked wrong so I cut them off. Real lifebelts do have ropes to make them easy to grab in the drink, but these stuck out at all angles.

Once I did this I realised I could have just cut a disk from plasticard and then knocked a hole in it for the same effect. Never mind.

The support is from scraps of plasticard. They all seem pretty similar, a backboard and small sloping roof nailed to a post. Green is the most popular colour too, presumably to blend in with the countryside.

Since model boaters tend to be old, a nice bench from the Merit range suitably painted will give them somewhere to sit down. People overlook these bits as they have been around since Cyril Freezer was in short trousers, but with a little cleaning up and a lick of paint, they are pretty good. This one looks nicely municipal too.

Finally, I need someone down at the lakeside and handily, Monty's Models produce a suitable figure and his yacht. To be picky, the boat looks more like a traditional pond yacht rather than the sort of radio control boat we now use but it is still possible to build one of these from a kit and you could RC it so it's not out of the question. Maybe I need to build a 1/72 handset to fend of the model boat anoraks (sou'westers ?).

Mini model boater

Wednesday, September 28, 2011

Failed experiments in pagoda painting

Camo pagodaNot everything I try works, but since you lot seem to like to read about failed experiments, here goes.

The plan:
Paint the pagoda in rusty colours.
Slop a bit of wet salt on the surface.
Spray with a creamy colour - just a thin coat.
Remove salt.
Look at wonderful building with rusty base and patched breaking through.

The problems:
The salt wouldn't come off properly and stuck in lumps
The rusty colours didn't show through as I hoped
It looked rubbish.

Result - respray the model properly and attack with weathering powders.

Still, nothing ventured, nothing gained eh ?

Tuesday, September 27, 2011

Whitemetal pagoda

Whitemetal pagoda buildingThe GWR had some funny ideas and one of the odder ones was the choice of pagoda roofed buildings for branch line halts. Distinctive but, why ?

Anyway, I decided that the Handyman Hall Railway should have one of these in the station area. It's not that I'm going all Great Wobbly, just that preserved lines have a magpie like tendency to acquire little buildings and re-erect them in odd places. I think that my miniature volunteers have bagged themselves a pagoda and decided to put it in the yard to impart some big railway atmosphere.

Well, that and I found a whitemetal kit for just such a building in my spares box and thought it would be fun to give it a home on the layout. Please don't ask me who made the kit however as the bag was unmarked.

Even if I did work it out, or someone answered the question in the comments, I'd not loose sleep trying to find another. Wills produce a very nice version as part of a halt kit. One of the RTR firms does a resin version too. Either would be easier to use than the poor-fitting parts I contended with.

To be fair, pagoda's aren't easy to make. There are curves and angles that make the kit manufacturers life difficult. As it was I quickly decided that only low-melt solder would do the job here. Glue is fine if the bits all fit well but soldering is better when you need to fight the kit. It's faster and if a joint breaks it can be remade in seconds. Also, the metal can both attach and fill the gaps between parts, very handy on the roof which would have been a tad leaky if I hadn't worked on it a little.

Thursday, September 22, 2011

Building detailing

Building in the raw

Sticking with card for the time being, the building detail was built up from off-cuts of a sheet intended for use in a domestic printer. It's cheap, reasonable quality and I've got several packs of it.

Cutting strips and sticking them in place with Rocket card glue, the detail appeared quite quickly. As a guide, I built the entire model from start to finish while watching "The Davinci" code film. Scratchbuilding doesn't have to take ages once you get your hand in as long as you don't want to build to Pendon standards.

Most of the job involves cutting strips of various widths and occasionally, such as for the barge boards, building them up in layers. Some needed to be scored with the back of a knife, like the doors. The only plastic is the brickwork and tiny bits for the hinge pins.

You'll also spot that the platform has been built up to two layers of Daler board. I'm glad narrow gauge platforms are usually ground level as it saved me loads of work. Is this why people like it ?

Wednesday, September 21, 2011

Cardboard tile cutting

Tile cuttingNormally I like to top model buildings with Wills moulded plastic slate roofing but for Handyman Hall, I thought that something different was more in keeping with the economy methods employed elsewhere. On that basis I cut out individual tiles from cardboard.

Each tile is a rectangle about 4mm square. Before cutting I marked an extra line about 1mm in from the edge to be the overlap. Then I set too and made a little pile of card.

Fixing is easy enough, smear some PVA on the roof. Pick up each time with the point of a knife and put it in place. It helps if you've drawn some guidelines on the roof first. I know everyone goes on about wavy tile lines being something to aim for, but if you look at real roofs, this is the exception rather than the norm. Maybe on buildings near collapse but this one has been maintained properly thank you very much.

Tuesday, September 20, 2011

Freelance card buildings

Building in the card

One of my ideas behind the 009 model railway was to try and create lots of vantage points to watch the trains from. In the corner of the board I'd put in a siding to the engine shed and while pondering how this would work out, had an idea that this would be near the car park. That way, the boaters could get their models reasonably near the water and the punters who just wanted to ride trains wouldn't have to wander too far from their motors.

Now I don't have space for a car park but if I assume that the Handyman Hall estate has a walled garden or two - something the Victorians liked to build - I could block the view with a simple bit of brickwork. Watching the trains from behind the wall seemed fun and provided a limit to how much of the tiny scene you can see.
Beside this we have a shed based loosely on the ones at the Evesham Vale Light Railway. Again, there isn't space for this in it's entirety but one of the tricks micro-layout use is to model part of a building so we have about 10mm's worth of it. Not ideal but I ran out of baseboard !

With no plans to work with I just drew things until they looked right. As long as the loco will go in the door, nothing else really matters. Sometimes this is more fun than worrying about every last mm.

Friday, September 16, 2011

Grass'n'Flock

GrassnflockStatic grass is nice but I didn't want a lawn on this model railway, I wanted the sort of unmown scrub you see on hillsides.

To get this effect, I waited until my nice nylon fibres had dried and then gave them a waft of hair spray followed by a sprinkle of different shades of green Woodland Scenics flock. Other flocks are available but I had this stuff to hand. For this job I used the finest version but the coarser variants might produce some useful effects if you want the really over-grown ground found where only sheep and goats dare to tread.

Whisper it if you need, but hair spray is basically glue in an aerosol. OK so it has perfume but it's still not a lot different from SprayMount. In fact I bet there are a good few metrosexual graphic designers who've experimented when they are doing a layout and run out. Likewise, how would you explain Jedward ?

Anyway, get the cheapest stuff, I use a can sold as "Clubbers Extra Hold" which is presumably something for Canadian Seal farmers to keep their barnets under control in the icy wastes. Or maybe for those working for Jacobs producing the delicious chocolate covered biscuit (Club Biscuit, keep up. I'm trying to make you laugh as it's Friday).

Whatever, it seems to last for many years in the role of sticking ground foam to stuff. The smell dissipates after a few minutes too although I have wondered if a quick re-application wouldn't be a bad idea when I get certain people in front of the train set at a show...

Thursday, September 15, 2011

Noch Grass

Noch Grass

All that brown paint needs to be covered in something and the fastest and most realistic option is static grass.

Now the fashionable way to do this is with a Grass Master static flocking device.It's good but I'm too stingy to buy one. Anyway, if I did I'd go for the Greenscene version which is cheaper and just as good. However there is an even better priced version - the original Noch puffer bottle. (Yes I know you can make your own, I did but simply prefer this method and it's my blog)

Back in the early days of static grass, this is how we did it. Paint PVA on the area to be grassed. Let it dry a little then puff the nylon fibres out of the bottle on to the surface. Because the bottle is made of polythene a charge is applied to the nylon and it sticks up like, well grass really. When the technique was first described in the august Model Railway Journal, this was how it was done and the results were good. And they still are even though a new toy is on the market.

Cost of the bottle, under a fiver. The fibres are the same as you'd use with other methods so if you find yourself wanting electrical stimulation for your blades, you haven't wasted much money.

Wednesday, September 14, 2011

Crown Textured Emulsion

Textured paintAnother non-trip to the model shop. It seems that after yesterday being spent wondering who wants mud coloured walls, I now have to consider that there are even people who want rough, mud coloured walls. How else do you explain textured emulsion ?

The paint seems to be perfectly normal emulsion that someone has thrown sand into. Someone can pick me up on the precise manufacturing details of how the silica is held in a delicate suspension within the pigment base but let's be honest that's what it is.

Never mind, two and half quid buys a decent sized pot and a quick coat on the untreated plywood of the station area shows it works well. You can see the wood grain has almost gone and we have texture. Exactly as it says on the tin.

Until I put a new label on the tin saying it is "Fine scale non-metaled road surface suitable for P4 layouts" and charge a tenner for it that is.

Textured paint results

Tuesday, September 13, 2011

Brown brown, deeper and brown.

Lots of brown

Do you use proper model making products for all your model railway needs ?

I don't. I prefer to use everything and anything as long as it does the job. Model making stuff is frequently real stuff re-packaged into small tubs with a 500% markup. I know someone who took a tub of Halfords molybdenum grease, some little jars and funded his trade stands tip to the show with the profits. My conversion to real stuff happened thanks to a Blue Peter annual back in the 70's where it showed how to make a wagon load of pipes from pasta. Just as good a Merit ones to someone with little pocket money.

Anyway, the plaster needs a coat of paint as it's not nearly brown enough for my liking. Doubtless there is something sooper dooper available from the trade that all the P4 modellers will flock to buy, but I'm stingy so a couple of matchpots from Wilkinsons will do just as well. I pick the most mud like shades (who has these on their walls ?) and slop them around everywhere. Using more than one shade while wet gets them to mix. I suppose some sort of shading effect could be applied to the hill to make it look even more 3D but I didn't worry.

In fact the hill has me worried. It's looking like something from a film. Close Encounters of the Third Kind to be precise. If you've seen it, you'll know that Richard Dreyfuss builds something very similar in the middle of his train set. And then in his lounge. And then he find the real thing and aliens happen all over the place. Who know what is hiding in the fiddle yard ?

Below the slopes I've started on a lake. At this point it's just a pure coat of the dark emulsion with some black powder paint chucked in it to give some streaks. I'll gloss it up with varnish later to make it look wet but the moment you can see it's all coming together.

Thursday, September 08, 2011

Edging and smoothing

Edging and smoothingThe sides of the Handyman Hall model railway exposed the structure that supported the track and it wasn't pretty. I had expected this and while buying wood, picked up an off-cut of hardboard. This was cut roughly to size and then the final contours formed with a surform. Some blending with filler brought the earthworks up to the edges.

To be honest, I hadn't expected the difference doing something as simple as this made to the look of the model. Suddenly the groundwork's looked solid and substantial. The model looked like it had been cut out of the earth. I suppose it's like stage sets which look terrible if you can see the edges but fine when these are hidden away with the simple expedient of hanging curtains in front of them. They wouldn't provide the protection to the plaster that the wood does of course. And I'd have to iron them which would be rubbish.

While the surform was out, I've been smoothing off any ridges in the plasterwork and filling in any hollows I didn't like. My mix wasn't as good as it could have been so the earth is several different shades of brown, but that won't matter soon.

Wednesday, September 07, 2011

Bent wood fiddle yard

Wood bending 1Even on a pizza box model railway, hiding the trains away for part of the circuit seems like a good idea. I fancied a convex curved wooden section on one corner that the train could disappear into. All I had to do was make it.

From my boat building work, I knew that bending wood was simple enough, just soak it in water and hold in the bend you want while it dries, but wasn't sure how well it would work on plywood thick enough to be self-supporting. Still, nothing ventured, nothing gained, a cut a bit of 6mm ply and left it in the sink for an hour.

Next, the wood was clamped up as shown in the photo. Two clamps were advanced by squeezing the handles to keep the bend constant along the length of the sheet. 24 hours in the sun and it worked ! I had a carefully warped bit of plywood, a bit like the stuff you get from the DIY shed. As it turned out the bend was too sharp but easily eased with a bit of hand presure.

Anyway, holes were cut for the entrance and exit. These had to extend to the edges as the track is very close to the sides of the baseboard. The result left my ply as a giant T-shape but I hacked away some scenery and fitted it anyway, blending the top of the hill into the wood.

Having built it, I'm not sure I like it though. Maybe it will grown on me.

Wood bending 2

Tuesday, September 06, 2011

Just like icing a cake

Plaster slappingMarvelous as insulating foam is, it still needs a surface coat of plaster to smooth things out.

I picked some Homebase own brand filler. Into this I squirted some brown emulsion from a match pot, then made the filler up with water as per the instructions. A stiff mix works better than a sloppy one.

Application is just like covering a cake with icing, which might not help explain but go with it. Take a nice flexible plastic thing - one of those fake credit card things that appear in junk mail is good for this (mine came from LoveFilm). Pick up a dollop of filler and slap it on the foam. Then smooth it around. A tile adhesive comb is handy to have around for sharpening up edges and the little glue spreader gets into the nooks and cranies around the bridge.

Clever modellers will protect the track work with some masking tape before starting. I didn't but only got a couple of blobs in the rails and brushing them immediately with water washed the stuff away. If you don't, clipping it off won't be nearly as easy.

The filler takes 24 hours to properly harden and goes a lighter brown when it does so you can see the state of play. I love this bit of layout building, the model takes shape before your eyes and it's proper messy.

Monday, September 05, 2011

Foam scenery

Faom chopping

Back in the old days, railway modellers would use chicken wire and wooden formers covered with plaster bandage for hills. This works well but chicken wire is nasty stuff in my opinion - difficult to cut and with loads of sharp bits to damage delicate hands. I'm not much cop at making accurate wooden formers either.

Anyway, more modern layout builders moved on to expanded polystyrene. This is really easy to cut either with a saw blade or bread knife. The mess is incredible though. Millions of stupid white balls that get everywhere and are nearly impossible to clean up. Even a good vacuuming will leave some behind.

A hot wire cutter reduces the mess but at a cost of producing poisonous gases so it has to be used in a well ventilated space. Anyway, I don't own one of those and if I did, the shapes aren't that easy to get in an out of the model landscape.

Lucky for me then that our next door neighbours are busy converting their garage to a room. It needs proper insulation and this is carried out using a dense foam covered with silver paper. Being as transparent as a breeze block, a section had to be cut out for the window and so a little bit of skip-diving saw me with a slab big enough for a couple of layout.

The foam cuts with a wood blade in a Stanley knife handle. It's still messy but the mess is heavier than styrene would be so it doesn't spread all over the place. The silver paper peals off but the stuff can be stuck together with "no more nails" glue even if you don't do this.

The job is a bit like sculpture but a heck of a lot easier than chipping away at a bit of marble !

Thursday, September 01, 2011

Bridge building

Bridge building

The more observant amongst you will have spotted that I appear to be building a fairground ride rather than a model railway. Track floating through mid-air looks exciting but in real life, isn't a good idea. Passengers get nervous and you tend to find the rolling stock doesn't last very long.

My bridge is in fact a curved viaduct. Lots of looking through books and surfing the web made me hopeful that I could go for a very simple design without leaving for cloud cuckoo land. Big, fat girders with no sides was what I wanted and that's what I've built.

Box girders were made up from plasticard, I know you can buy these things but it doesn't seem extravagant for such a simple job. Initially they were all the same but then I laid them on the track and worked out where the joins and therefore the angled ends needed to be. All the pencil marks on the baseboard shows you that I took several attempts to decide exactly what I wanted, this isn't just a technical decision, the supports would look prettier if evenly spaced and with the middle one in the centre of the gap. This isn't just engineering, it's art !

Wednesday, August 31, 2011

Ballasting

BallastingHappy with the running, it was time to do one of those jobs I hate in railway modelling - ballasting. It's boring, takes forever and if you don't get it right, can ruin the look of the layout.

The ballast I used is a mix of granite and Slaters limestone left over from the Hellingly Hospital railway. The result is lighter than pure granite and I think is more appropriate for an estate railway. It's probably a bit coarse but the slightly cartoony effect appeals to me.

I like to trickle the stones down the centre of the track and bush it away from the rail sides and sleeper tops with a finger. Brushes tend, in my hands, to lift the stones up whereas number 1 digit pushes them down. Do a lot of it and you can certainly harden the skin on your fingers. Before this you exfoliate a bit, but then I'm worth it.

With the insides done I move on to the sides ad do the same thing on the edges. It's important to keep the ballast line neat and reasonably straight. On the mainline this would be managed by the plate layers and they would be in competition with other gangs for neatness. On an estate these matters are a lot more relaxed but even so, the lord of the manor will want things kept tidy.

Glue is the normal 50/50 mix of water and PVA with a couple of drops of washing up liquid. Dripped on with a pipette, the thing I discovered was that doing this AND taking a photo is harder than it looks !

Tuesday, August 30, 2011

Test trains over the gap

Test commences

This probably looks a little foolhardy. Running trains over track supported by nothing more than thin air ought to be a recipe for disaster. Luckily the Minitrains stock isn't very heavy and Peco track is strong so despite the mid-air curve, nothing bent as the little train ran around.

With the curves being fairly generous(!) I didn't expect any problems and that was the case. Just to be on the safe side I let the train run round and around for several minutes both forwards and reverse. This was proper testing, not just running trains for the fun of it. Heavens, no. And running the stock at top speed was essential to spot any future problems obviously.

From this angle you can see I didn't get my baseboard line into the bridge quite right and the trackbed around the sides is a bit more generous than it needs to be. Both of these can be fixed now I know exactly where the rails are going to be.

Monday, August 29, 2011

Nailing down the track

Tracklaying startsYet another novelty for me - nailing model railway track down. With the hand built stuff we attach one rail to the sleepers, glue these down and then add the second rail. You can't do that with Peco, it has to go down in one go. Glue isn't an option either unless you use superglue as it doesn't grab fast enough.

With a roundy-roundy, the ends of the tracks have to meet up. In this case the main element that was going to affect alignment was the point. Peco have introduced a new range of "mainline" narrow gauge points in response to those modeller who have argued that the hobby has moved on from rabbit-warren layouts to much more prototypical formations. The new points are therefore longer then the old ones and in this case, a larger radius than the rest of the circuit.

With the point being the linchpin, the lengths of flexi were connected to each end of it using fishplates (it's years since I've used these too) ans the who lot shoved around until I was happy everything would line up OK and be reasonably smooth. Peco pins were pushed in through holes drilled in the sleepers. By not hammering these home I was able to pull them out every time I realised the track was in the wrong place - which was quite a lot.

One of the last jobs was to cut the rails back. A peircing saw loaded with a fine blade worked a treat for this and gave me cuts that didn't need cleaning up to fit the fishplates.