Showing posts with label Cravens DMU. Show all posts

Tuesday, May 05, 2020

Painting and lining

Paint time. The shell was primed using some etch UPol stuff that decided to dry with the texture of fine sandpaper on the roof. The sides were OK especially after a coat of acrylic followed by some Humbrol Clear.

The good news is that my airbrush is playing ball. I really thinned the paint with cheap car washer fluid (a trick from the military modellers) far more than normal and it flowed perfectly. The Clear was used neat and again, worked well. The finish isn't gloss by any means, but a nice eggshell.


Then it was transfer time. A fresh packet of lining from Fox and the first line went on OK. 

The 2nd, 3rd, 4th, 5th and 6th broke, twisted and generally behaved hopelessly.  

At this point, I nearly smashed the thing against a wall. It took all my willpower to put it back in the box, tape the lid down, and put it back on the shelf. 

I hate this model. I hate it with a passion. What was going to be a fun project that wouldn't take too long has become a bind. It can go away for another 4 years as far as I'm concerned. Maybe then I'll be in the mood to finish the stupid thing.

Monday, May 04, 2020

Handles on

I have a plan.
I have a pack of grab handles from Precision.
I have some 0.45mm brass wire.
I have a 0.5mm drill bit.

All I needed was a couple of evenings to spend drilling holes and supergluing the brass bits on the side of the DMU.

The job was fiddly and seemed to go on forever, but eventually, it was over. There is a definite reason I don't like building passenger rolling stock. Far too much effort required to fit things that need to be nicely in line or the model will look wrong.

Another handy hint. If your superglue is old and not setting properly, throw it in the bin and get some new stuff. Don't rely on kicker to make it set. I know this, but I never really learn.

Tuesday, April 28, 2020

The best laid plans


This thing is full of jobs I'm not looking forward to. Each time I think, "Well now that's done, the rest will be easy." and each time, it isn't.

So, I have to drill some holes and fit the handrails and door handles. Fiddly, but follow the plan and all will be well.

The plan though. When I measure it, doesn't seem to correspond to the model. A little work with the calculator and it seems it's slightly bigger. By about 5%

But only in one direction. Length-wise, it's pretty much right. Height. No chance.

Bugger.

Fortunately, I have a copy of A Pictorial Record of British Railways Diesel Multiple Units by Brian Golding. It's a pretty dull read, but the pictures are excellent. Loads of accurate* 4mm scale plans for the modeller to work from.

Phew.

*If you are about to tell me something along the lines of "I think you will find that the plan on page..." then don't bother. They are near enough for me. These things are only motorised coaches and anyway, I'm building an MTK kit. Almost the definition of "If you want to go there, don't start from here."

Monday, April 27, 2020

It's the ends


Dry-fitting parts is always a good idea. Put things together without glue and you'll spot potential issues that won't be any easier to deal with when the adhesive is flowing and getting all over your hands.

As you can see, there is a part fit issue with the Cravens DMU floor. Basically, it's too long.

To be fair, this is mentioned in the instructions, but is a bit of a surprise when you see just how bad the situation is. The solution was to lop 2mm off each end of the floor and then thin the ends slightly s they fitted in the pockets in the whitemetal bits. 3mm would probably have been enough but I'm better at measuring whole mm, and the extra 1/2mm at each end wasn't going to be an issue. A bit of wiggle room is welcome.


First though, the interior. On a parcels unit, this isn't much, but I feel that something in the cab is a good idea and had picked up a couple of mouldings from Replica Railways. After a little trimming, they will fit in behind the cab fronts OK.

More importantly, they will fit through the holes in the floor the power bogie occupies. I'll need to fit them after the glazing goes in, and that has to be done after painting. There's a fair bit of thinking ahead required with this kit.

Ayway, floor trimmed and fitted with epoxy glue and I have a model that starts to look like a DMU.

Tuesday, April 21, 2020

Back to the Cravens


Time to pull a part-finished project off the shelf. I had a feeling that the Cravens Parcels DMU was last on the bench last year. It was shocking to discover that the last time it appeared on here was in 2016!

I seemed to remember that all (Ha!) I needed to do was fit the ends and door handles. I even remembered all the bits were in the box. There was also a question over the window frames, which the stamped aluminium body shell doesn't have, but then looking at photos, neither does the prototype so I can stop worrying about finding etched frames.

Digging them out, it's true the bits are in the box, and there doesn't seem to be that much work to do, but I have a feeling that there are still surprises in store...

Tuesday, October 25, 2016

Adding doors


As far as body detail goes on the Cravens, MTK pretty much leave it up to the modeller. What you find in the box is a nicely pre-formed aluminium shell with the windows punched out.

Doors have to be scribed onto the surface following the plan. My CD marker pen is running out of ink but pencil works fine. First I marked a line for the top of the doors. This happens to be the width of a steel rule held against the rainstrip, or at least that is near enough and easy to do neatly.

Next, I marked 1mm either side of the windows for the verticals using a square. It's a bit fiddly around the tumblehome but with practise a straight line can be achieve. Better to get the hang of it with the pencil. Non-window doors are 7mm wide, possibly should be 1/4mm wider but I this is easy to measure and looks right.

A scriber ought to be the ideal tool but I found the line too narrow. The Olfa cutter makes a much better and wider line as well as being easier to direct down the side of the square. Any slips, and there were some, will be sorted with a smear of filler after priming.

Monday, October 24, 2016

Cravens chassis


Clipping a quickly assembled chassis into the body reveals an interesting problem - it's too high at one end. 

This is no surprise, the training bogie is supported by a casting but the instructions provide no clue which way up it should be fitted. I actually flipped it over half a dozen times trying to guess the orientation and in the end gave up, screwed it in place and then filed around 3mm off the support until the model sat flat. 


One "issue" with the kit design is that according to the instructions, the body is painted inside and then glazed and THEN you fit the chassis and build the rest. That's lovely, but how do you spray the outside?

My plan is to glaze after painting which means I need more finger holes, hence the large holes sawn out around the trailing bogie. The nut and bolt fixing of this and the driven end will also help as I will need to be able to remove these.

All nuts are fixed in place with Pound Shop epoxy resin. The whitemetal pivot for the bogie is replaced with a big, fat, bolt. I had to bush the hole in the stretcher with some plastic tube for this to work but I found some in my stocks that was about right - a little reaming in the middle opened it up enough for a slightly sloppy fit so the model handles less than perfect track.


Friday, October 21, 2016

MTK motor bogie

MTK Motor bogie

This is a first for me - a motor bogie from a kit fitted with traction tyres. Admittedly, they look a bit like rubber bands, but then that's what traction tyres are so fair enough. 

The motor is a heafty beast. I'm sure it's a known make but can't place it for the moment. I'm sure someone out in blog land will be able to help as a nice Friday puzzle. 

It turns over well enough with a bit of 12v DC. While not the most sophisticated unit out there, I plan to retain it. The wheels are another matter though. I'm not great fan of traction tyres, although not as madly against them as some on a popular web forum, but for a single car unit? I don't think they are required. 

The wheels look a bit aluminium so I decided to replace them with Romfords. The axles are 2mm diameter and the gears firmly fitted. Waggling the wheels didn't budge them so more effort was required.
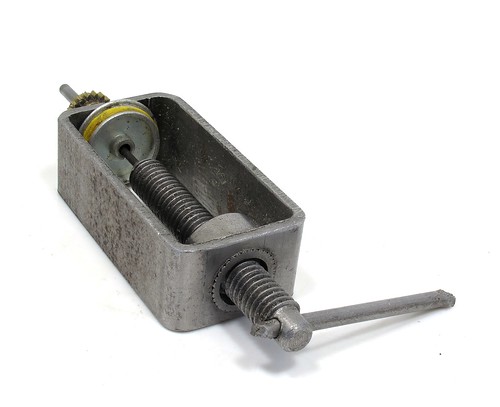
Wheel removal

My GW Models gear puller was the perfect tool for the job. Screwing the plunger down eased the axle from the wheel . The replacements slid into place easily enough, although a dot of superglue has made them perfectly secure. I didn't remember to check them with a back-to-back gauge first!

The re-assembled bogie still works so I haven't broken anything. Time to look at the body.

Thursday, October 20, 2016

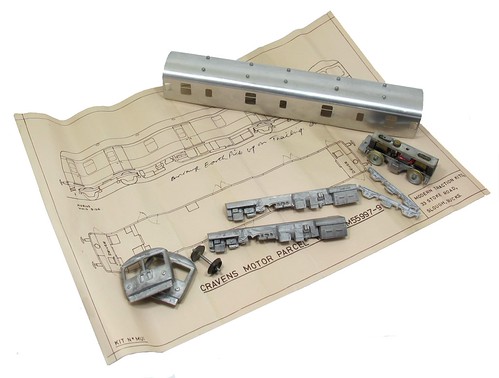
MTK Cravens parcels DMU

MTK Cravens Kit

I love a good model shop. One where the levels of old stock have built up a big and rummaging around unearths nuggets of gold. 

Hereford Model Centre is just such a shop. Many cabinets contain all sorts of good things. Careful studying of the contents is worth taking time over. Far more worthwhile than visiting the Mappa Mundi down the road which I thought very over rated and not nearly as useful as anything by Ordinance Survey. I'm amazed the 3 Wise Men found the stable is that's what they were using. As it was they probably nipped out to Tesco and got lost...

Anyway, at the back of a cabinet, I spotted a small cardboard box labelled:

Modern Traction Kits
Cravens Motor Parcel Van

No.M55997-9 (Class 129)

Kit No. MUI

And priced at a very reasonable £19.50

Once the cabinet was unlocked, I had a poke in the box and quickly left a happy shopper. 

Those who know MTK kits will be wondering if I have gone mad. They have a definite reputation as challenging builds. However, I understand that the trick is to get a first production batch. The owner added models he wanted into the range and the first lot were usually OK. After this he was happy and I'm told quality control could slip. 

I had sneakily plugged the ends into the pre-formed aluminium shell and they fitted perfectly. That says first batch to me. 

My quick check had also confirmed that all the major bits were in the box and there was even a motor bogie (more on this tomorrow). All for under 20 quid. Bargain!

The plan was to build the model to run on the Ruston Quays shuttle in time for Peterborough. Spoiler - I didn't manage that, but the build is fun anyway.