Showing posts with label Pilot Boat - Speedline Kit. Show all posts

Sunday, March 20, 2022

New boat battery makes the difference


New battery ordered from Component Shop on Sunday - Tuesday morning, new 3300mAh, 7.2v battery drops through letterbox. Excellent service. 

It certainly takes longer to charge then the old, knackered one. On the water - 20 minutes sailing with very little loss of speed. Maybe that brushless transplant can wait a while.

Sunday, February 27, 2022

Pilot Boat at "speed"

Pilot boat

The camera never lies? 

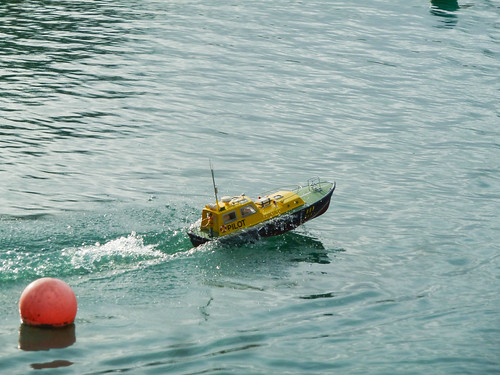
It does in this case. You'd think my Pilot Boat was racing along, blasting everything out of the way with it's wake. Nothing could be further from the truth. It's slower than MisChief, a real Karmann Ghia of boats (all show, no real go) even though the nose is in the air and we seem to be generating plenty of spray. 

Sailing this model is pert of my plan to get a variety of boats on the water, so I dug this out of storage and managed to find a battery that fitted it. Sadly, said battery has been around for years and was bought second-hand from the club. 

All that time with no charge hasn't done it any favours, and despite several charge/discharge cycles, the runtime was not much more than 5 minutes. 

So, time to buy a new battery, but maybe also replace the 540 with something brushless? 

You can read the build of this model here.

Thursday, February 07, 2013

Pilot Boat in Model Boats magazine

It's taken a while, too long to be honest, but the Pilot Boat now appears in Model Boats Magazine. It's not entirely my fault, the kit took a while to arrive and there is an issue (fixed by me in the article) with holding the top down properly.

Never mind, in the latest issue (or on the website for magazine subscribers), you can read a concise version of the build in four pages. Hopefully this will help anyone with the same kit on their shelves. While I showed some of the work on this blog, pulling it together for print does produce a superior result. It's likely to be more comprehensive as well. Before you complain, you aren't paying to read this and I do get some much needed income from the magazine...

The text has come out well, apart from a sub-editor rather keener on exclamation marks than I am and maybe "plastic" didn't need to be in quotes, but then both of these are subjective points and I'm probably being too fussy. Photo reproduction is absolutely top notch and since it's a piece with more pictures than words (each of which is worth a thousand of the other, but you try and tell the editor that when invoicing...) that more than makes up for anything.

I can't complain too much anyway - the model made the cover so I can't have done that bad a job with at least one photograph.

Speedline Pilot Boat

Model Boats Website


Pilot Boat at speed

Saturday, October 20, 2012

Pilot Boat launched

Pilot Boat at speed

The Pilot Boat has launched!

On the water, it's absolutely fantastic. At just over 1/2 power the nose starts to rise. Got to 3/4 and it's fully on the plane. Full throttle sees the nose waggling in the air and looking a bit silly. I don't mind though, it's fun like that. Maybe one day I'll get sensible and pop some weight up in the pointy end to tame it - which should see an increase in top speed.

Maneuverability is also excellent. All in all, a really pleasant boat to sail.

With that brightly painted top, it looks good on the water too. No change of losing sight of it on the other side of the lake!

Conclusion: It's not a perfect kit, but then if you want that you'll need to shell out a heck of a lot more than £99. For the money, it's fantastic and highly recommended.

Friday, October 05, 2012

Pilot Boat Painting Disasters - Part 4, Done and dusted

Pilot Boat Lid

Filling in yesterdays lines with silver paint went well. Even a thin line is easy to paint up to and the slight ridge of dry paint tends to stop the new stuff spreading where you don't want it to go.

After this, I got to the fun stage - sticking the extra bits on. Navigation lights are painted. The searchlight and airhorn are glued in place. A little bit of wire into the back of the later added a little bit of detail.

Needless to say there still was a problem. That radar dome is made of some funny rubbery stuff. After over a week, the paint hadn't dreid on the surface. The same paint that worked so well on the two liferaft pods. What I had was a sticky surface. Maybe there was some mould release or perhaps the material just didn't like paint. The pale blue line worked OK and dried as fast as you would expect.

The word "Pilot" is made up from a BECC vinyl letter sheet. The 20mm tall one that costs a fortune. Better planning would have seen me buy a bespoke sheet at a show but of course, I didn't remember to do this. It took me two goes to put the letter in place too. Attempt one saw the word at different positions along the side. I nearly left it but relented in the end knowing I'd regret not peeling the letters off and moving them later.

Once happy, the whole top recived a spray of Humbrol satin varnish to bring all the tones into line. This seals the letter to the sides, not an essential step, but one I like to make.

If I'm picky, some of the silver window edges aren't pefect but on the water I don't think anyone will notice. I've got to finish this model and so I'll have to accept it won't be perfect in every way.

Thursday, October 04, 2012

Pilot Boat Painting Disasters - Part 3, Making it better

Lines drawnIf you learn more from making mistakes than getting things right, I've learned and learned good.

Once the Pilot Boat superstructure was dry from it's wipe down with white spirit, I needed to start the repaint. All the yellows was gone and so were the silver window frames. I could have repeated the painting process again but to be honest I couldn't face all the frame masking again.

I'd also got an empty pot of warning yellow so took a trip to Halfords and bought a can of Ford Signal Yellow car paint. For a moment I seriously considered florescent yellow but then thought better of it. I also noticed they do a luminous paint and wondered what I could use that for...

Anyway, painting with an aerosol is a lot easier than an airbrush. A few blasts with the paint, some hairdryer heat and another waft gave me a nice yellow boat top.

Windows would be harder. The moulding doesn't provide any sharp edges to work with. Proper painters would probably mask the edges and spray but I decided it would be easier to draw these in with a bow pen and then fill in with a brush.

The results weren't bad. Silver paint is a paint to use - it varies in runniness no matter how much I mix it - but generally I think I got away with following the edges of the windows by hand. The blobs you see in the middle of the window are areas where I was checking how the paint flowed from the pen on the smooth yellow paint. I eshewed the ruler because all those handrails would get in the way but with a little practise and confidence the lines ended up OK. Confidence is the key to using a bow pen. Go for it and you end up with a much better result than you get if you are "careful". Anyway, I could always wipe the mistakes away with a dry kitchen towel before they became permanent.

Tuesday, October 02, 2012

Pilot Boat painting disasters - Part 2. Taking it off again

Rubbing downSo, there I am with a Pilot Boat superstructure covered in paint. Bad paint.

Plan A - Sand the duff areas and re-paint them. I'm sure that's what the experts would do.

A pack of Micromesh sanding things in various grittiness were to hand so I started work.

The effect was interesting. I managed to remove some paint. Dodgy areas were taken back to the bare plastic but looking critically at the result, after a calming tea break, I knew that this was just a patch job. Even if I bought a new pot of paint, the surface would be lumpy and unsatisfactory.

Plan B - Squirt Cillit Bang over the model. On many surfaces, this is a very effective paint stripper. Not here. All I got was a sticky surface with as much paint on as before. You might ask why I didn't use proper paint stripper designed for use on plastic. The answer is simple, I didn't have enough for a part over a foot long.

Washing downPlan C - This occurred by accident. Hoping to de-sticky the surface, I wiped it with white spirit. To my surprise, the paint literately washed away.

A few minutes work with more spirit, clothes and old toothbrushes gave me a largely clean plastic superstructure. Not perfect, but good enough for a second attempt.

Monday, October 01, 2012

Pilot Boat painting disasters - Part 1

Listen to your own advice. That's what I should remember. It's good advice and I do know what I'm talking about sometimes. When I don't, it goes a bit; well, you judge...

The pilot boat top is yellow. Bright yellow with silver window frames. Pondering how to achieve a neat finish, I decided to paint the frames, let them dry, mask them and airbrush the top coat.

Masked WindowsWith brass handrails firmly attached to the superstructure, a quick spray of primer seemed in order and this went well using a can from Halfords (see, I do go in there, despite what I said yesterday). This was allowed to dry and Humbrol silver was applied with a brush. All very nice. Not too neat but that didn't matter.

Again, allowing for plenty of drying time, metallic paints are special in this respect, a hour of masking followed. I used the proper Tamya tape. The good stuff. Trimming the edges with a knife resulted in what I though was quite an impressive job. Well, I hate masking so it looked good to me.

Back at the spray booth, I started with half a bottle of Railmatch yellow. Wafting this on, I discovered it wasn't covering the excess silver poking out from the masking. I had forgotten how rubbish yellow is at covering anything.

Never mind, an extra dose of white primer and the silver vanished. Quite a healthy dose but at least I had a decent base to work on.

Spraying the yellow continued and I remembered my advice: Paint large models with an aerosol. The Badger 200 is an excellent airbrush but doesn't really put out enough paint for a big model. Although I got coverage, I could see that some areas were slightly yellower than others. Attempt to fix this with more paint didn't seem to go well. Eventually, I ran out.

WindowbadNever mind, I let the model dry and took it out to the daylight. It actually looked OK.

So, back to the workbench to peel off the masking. Clever people will work out what happened next.

The depth of paint and primer applied reared it's white and yellow head. Around the windows, the surface cracked and broke away. Think potholed tarmac breaking away in the road, but in bright yellow, and you'll see what I mean.

It was no good, the paint was going to have to come off.

Saturday, September 15, 2012

Adding slop adjustability

Adding adjustmentSetting up the drive train in a model boat is one of the most important steps during construction. The motor shaft and propshaft should be in as near perfect alignment as possible. Anything less than total trueness will result in vibration, loss of power and noise.

Since perfection is unattainable, we put a coupling in the system. This is either a length of tube to join the two, or for more sophisticated models, a universal joint. This allows the motor to point in a slightly different direction to the propshaft and everything to work OK. The aim should still be as little deflection as possible, but at least the model will work.

My problem is, with the motor mount glued in place and the propshaft likewise fixed, why can't we have more adjustment in the system for fine tuning ?

Looking at the Pilot Boat setup, I realised that the holes in the mounting plate were exactly the right size for the screws passing through them. By reaming these out a bit, I could slide the motor around a bit. If I'd realised this earlier, I'd have done the central hole as well.

While on an innovating streak, when I put the crews back in, a tiny O-ring was put inside the face of the mount as well. This held them in place while I added the motor and then, when the screws were tightened, squashed between the plate and motor. My idea was that they would add a flexible coupling between the two, cutting noise. By happy accident, they allow me to alter the angle of the motor to the plate by adjusting the tightness of each screw. Not a lot, but enough to make it worth doing.

Result - I've tuned the drive so it's a lot quieter and hopefully wastes less power producing a noise.

Saturday, September 08, 2012

Chucky handrail construction with confidence

BackhandrailsOne of the benefits of my boat and railway modelling is the chance to "cross pollinate" the skills from one branch of the hobby to the other.

The latest example of this arrived when I had to build the handrails for the Pilot Boat. Brought up in a world of wood, plastic and fibreglass, many boat modellers are scared of soldering metal. It's not something that many of them have need to do anything like as often as we railway modellers, especially those of us who love an etched kit.

The handrails required weren't that difficult but they did need to be chunky, at least compared to the sort of thing I usually get involved with. On a model loco I don't use wire fatter than 0.7mm diameter and even that's for 7mm models. Perhaps on G1 then going to the full 1mm is acceptable but on a 1:20 scale boat, 2.5mm was more like it. At least that was the thickness of wire I found in the material stash, and it looked about right, so that's what I used.

Most of the job just involved a bit of bending and cutting. The soldering posed an interesting challenge - in an ideal world I'd perform this off the model but I couldn't get the positions of the various bits right this way. Instead, the wire was cleaned and tinned then fitted to the hull with superglue. Finally, with plenty of flux and a hit 45w iron, I dodged in and out to make the joins.

Where possible, I gripped the wire nearest the plastic with some pliers to act as a heat sink but mostly it came down to speed and confidence. The confidence that you get soldering near metal held in your fingers. Fingers that you wish to remain un-singed.

Friday, September 07, 2012

Holding the superstructure down

Top loose

When I plonked the Pilot Boat superstructure down on its deck, all wasn't well. The join between the two was poor to the point of being unacceptable.

For testing, I had simply taped the top down. This isn't an option for a completed model. Even if the tape doesn't peel the paintwork away, it's going to look unsightly. I want this to be a good-looking boat so another solution had to be found.

Plan A involved magnets. Glue a couple to the inside of the superstructure and another to the deck lip and they should happily hold each other together. Ideally I'd have used really strong rare earth magnets. I'd bought a few with just this sort of job in mind months ago but could I find them ? Of course not.

Trying conventional alternatives recovered from fridge magnets was hopeless. They simply weren't strong enough. Even the ones from magnet door catches weren't any better.

Top ClipPlan B - clip the two halves together. Sticking some plastic to the outside top lip on the deck and right at the bottom inside the cabin. Sounds easy but there was quite a lot of pondering before I reached this point. An added benefit of this method is it stops the wheelhouse sliding from side to side - it's not a great fit and needs around 5mm taking out of the slop.

Back on the water, the top is secure even in tight turns. So secure in fact that I can lift the model by the superstructure to carry it around. Not something I want to do a lot, but very handy for launching the model and recovering it, especially if the water level in the lake falls again and requires a good reach from the landing stage.

Tuesday, August 28, 2012

First test for the Pilot Boat

Pilot Boat Test

With control issues sorted, it was down to the lake with the Pilot Boat. After a quick check that everything was working, I placed the model on the water and it didn't sink. That is always a good start.

Gently easing the left stick forward, she moved off toward the middle. Waggling the right stick showed steering worked although I needed a lot of trim to get anything like a straight line.

At this point a sensible modeller would carefully increase speed while performing gentle manoeuvres to ensure all is well. They wouldn't just shove the speed up to full.

It went well though. The nose sticks in the air, sorry, she gets up on the plane quickly. If I'm being picky, perhaps the nose is a little too high but dropping the speed back a notch on the control (unsprung stick on a Planet 2.4 controller) sorts this out and provides a nice looking scale speed. The water washes up the sides well enough - possibly more spray rails might help although nothings going inside even with the unglazed windows.

Duration on 1 pack appears to be about 20 minutes. Enough for a play. I might be able to improve this by tweaking the motor position a bit as despite all my best efforts the driveline doesn't sound as well lined up as I'd like. The noise isn't unrealistic though, a bit like the Class 22 on my model railway layout Flockburgh which growls alarmingly and fools some people into thinking a noise chip is fitted.

Steering also needs a look. The rudder position is perfect so I think the requirement for loads of trim is due to torque steering caused by a powerful single prop drive. I would have investigated more but none of the Allen keys in model boat toolbox didn't fit the adjuster.

Anyway, the boat sails, stays dry inside and remains on the topside of the water. Looks good too.

Monday, August 27, 2012

Boat won't go backward !

Viper SportWhen I last blogged the Pilot boat, I mentioned some issues with the speed control - an Mtroniks unit of a type I used many times. This one wasn't playing properly.

Forward control was fine. Reverse on the other hand - well the red light indicating a radio signal lit up but the motor stayed still. After a lot of playing around I discovered that if I pushed the programing button while the light was on, a burst of backward thrust was achieved.

This is not handy. I mean, on the bench it's not a big problem but I'm not following the boat around on the water so I can reach in to push a button...

Anyway, I wondered if the unit was programmable even though the instructions don't mention it. Digging out an old set I found the sequence to push and had a go. No good. You  might think it odd that it's possible to disable reverse like this but I assure you this is the case and I have done it by accident in the past. Presumably it's for aircraft where throwing the motor hard into backward is a bad thing. Or high power buggies with hot motors. The later might not nose-dive to their doom but throwing high currents around can be interesting for electronics resulting in that distinctive smell of burney components

Anyway, the next day I called Mtroniks and was quickly talking to a technician. He asked a few questions and decided it sounded like I had an old software version in the control. Upgrades require the unit to be sent in to the makers so that is what I was asked to do. Apparently as long as you haven't wired it back to front then even replaced plugs and modified leads don't invalidate the guarantee. That's very handy for this sort of device where you are very likely to have to change plugs (I did) before using it in a model.

2 days later, in the post, a brand new speed control arrived. No questions or quibbles.

That's what I call service and one of the reasons I always use Mtroniks speed controls in my boats.

Mtroniks website.

Tuesday, August 14, 2012

Motor, servo, battery and radio

Boat mechanicalsMaybe I'm not the cleverest boat modeller in the world. I don't understand propellers or motors. Making a slow boat go slowly (or scale speed as we like to call it) is easy enough, but Pilot Boats aren't slow boats - they need to nip along at a fair old pace.

Luckily, I have a boat that does just that - my Club 500 racer. This hull is slightly longer but less broad in the beam. On the Speedline stand, the demo model uses a 540 motor, just like the 500.

So, all I had to do was stuff a battery from the 500 inside, wire it all up and volia ! Working boat !

It's not quite that easy of course, the instructions show a pair of battery packs ether side of the motor but by mounting my single pack across the hull, the results should be very similar. Chopping up the mouldings supplied makes for a couple of retainers each side of the propshaft.

So I wired it all up and switched it on. Whereupon the speed control decided it didn't want to work. More on this later.

Monday, August 13, 2012

Pilot Boat

Boat on stand

In my marine modelling career, there are several types of vessel I've always fancied building. Lifeboats form the bulk of the list but related to these is a Pilot Boat.

Regular readers will know that I've been this way before with a terrible vac-formed kit. This time I have located a much better kit to have a go at from Speedline Models. The model is a re-issue of the famous HFM models kit with a few subtle updates. I spotted the kit on the stand at the International Model Boats Show last year and ordered one on the spot.

Pilot Boat Kit bitsA few delays in manufacture delayed delivery from a few months but when the kit arrived, it looked good. Needless to say, a few delays in me finding time to build the thing mean it's only just reached the workbench. A quick mention appeared in Model Boats Magazine back in May along with the promise that a fuller build would appear in due course.

The kit is made up of vac-formed white styrene parts along with a bag of fittings. The builder has to supply a 540 motor and all the electronic bits (receiver, speed control, servo, battery) to complete the model.

Edges JoinedFirst job is to join the deck and hull together. The former is trimmed in line with the diagram shown in the instructions. This clips into a ridge in the hull and is fixed with plastic cement and a wash of Mek-Pak. Being able to glue with normal plastic solvents is a real bonus. Trying  Robbie Dollie kit last year, I found that could only be assembled with superglue despite appearances, not nearly as satisfying to my mind, solvents fuse parts whereas superglue only joins them. Not such a problem with model railways, but on the water, when you may pile the model into a buoy - less clever.

Anyway, once the glue is dry, the excess hull is trimmed to the deck line and smoothed to appear as a single piece, which of course it is.