Showing posts with label figures. Show all posts

Thursday, July 30, 2026

Painting Binface


Count Binface

This blog firmly supports Count Binface in the upcoming Clacton by-election. It is time for an elected representative with sensible policies such as bringing back Ceefax, and stamping down on the price of a 99 ice cream. 

Some time ago, before all this was fashionable, I bought a miniature Binface from Troublemaker Games, and with everything in the news, it was time to paint him up.  

Work started with a coat of black primer from a rattlecan. Then the silver parts were picked out using a steel colour MiG oilbrusher, a handy test of the new painting thing. 

Then the knee pads, gloves etc were painted with either Humbrol 66 or 67, close inspection of the costume shows two shades of grey. Once dry, the finishing touch was a wash of black Citadel ink.

At some point, I must have has a base for the figure, but it's gone missing. I'll make something up. 

Monday, March 23, 2026

Little Brian


I have a fun way to remember my Dad. A miniature caricature of him has been commissioned from Rob Bennet. I ordered four, one for Mum, sister and me, plus a spare to drive a steam engine. They came unpainted at my request. 

We've each kept one of his caps, Dad rarely went out bare-headed, so I've done my best to copy the colours of each of our headgear souvenirs. 

The rest is a beige M&S windcheater, Humbrol 121 dry-brushed with 147. Trousers are a dark blue and antracite mix, with dry-brushing in blue. 

Anyway, we love Rob's work, and are sure that Dad would have as well. 

I have a plan though. 

Little Phil, and Little Brian, will live in my bag as miniature me has been doing for a few years, and we will go on adventures together. Next time Little Phil finds himself on top of a mountain, or an interesting railway location, he will have company. 

Update: The little people have enjoyed their first day out, a visit to someone who was a friend to both of us, and his 32mm gauge garden railway. 

Wednesday, March 04, 2026

Making G scale spectacles


OK. I think I have a solution to making glasses for G and 16mm scale figures. What you see is a first test, but it shows enough progress for me to be confident.  

Looking at real specs, the frame around the rim is (for the sort of glasses my Dad and I would wear, neither of us is Sue Pollard) incredibly thin - a little over 1mm from the front. I can't make that from wire. 

And before you ask, I can't find etched specs in this scale. 1:12 for dollhouse figures, yes, but I'm not that impressed with these either. 

Anyway, what you see is the lenses. So, using a leather punch, I made lots of clear disks. The ones in the photo on the G scale figure are 2mm in diameter. Then I cut the very tops off to produce a straight edge. This is superglued to a 0.45mm piece of wire which makes the top and arms of the glasses. 

The result isn't bad. I could move the lenses in a little towards the nose, but that will be easier when the wire is more firmly held in place. I taped it to his head for the purposes of the experiment. I'm thinking some little holes above each ear, and bending the wire to go into these, will be better long term. 

I'm also pondering paint. I could try to colour the edge of the lenses, but have a feeling this would get messy. Still a little more experimenting to do, but I'm on the right track.  

Tuesday, March 03, 2026

My Dad was not Batman!


While painting the 4mm scale Dad figure for the VER car, I thought I might as well do the 7mm version I have at the same time. 

It looks fine, but without glasses, his face looked a bit empty. Hoping to cure this, I loaded the finest tip in my Bob Moore lining pen with paint, and set about drawing on the specs. 

Trying to draw straight lines proved more than tricky, and to be honest, the results were rubbish. It looks more like a mask than glasses! Even refining things with the finest brush to hand didn't help. Truth is, the frames of his glasses are very thin in real life, and would be narrower than a hair in model form.  

So, the glasses were washed off, and I've decided to live with the slightly empty face. If you look at real people from a distance, you don't really notice anyway. 

However, on the G and 16mm scale figures, I can't escape the problem. So, out with some fine wire. 


This is 0.45mm brass wire on the G scale figure. It would be 10mm thick in real life in this scale. 

Now, the results aren't horrible, but they are a long way from acceptable. I tried thinner wires, but 0.33 nickel silver just broke, and I can't find the brass. Some beading wire sort of worked, but it was very difficult to form. 

This might work for the glasses on characture Little Phil, but it's not right here. However, after a bit of thinking, I might have a solution. Stay tuned... 

Thursday, June 19, 2025

Painting the driver


Sometimes, several of these posts are generated in a single modelling session. But not this one. 

Painting the driver took place over a series of evenings. Nice little, fun jobs that  I was able to keep working on, even after a busy day in front of a screen. 

His head is separate, and supplied in two halves. I used my usual trick of painting his skin with Humbrol flesh, and the dry-brushing with Revell's version.At this scale, picking out his eyes wasn't hard, he's even got pupils from a 0.3mm Rotaring pen. 

The helmet was painted white, masked, and then painted Signal red. I should have used narrower tape, as the masking wasn't perfect. Some narrow Trimline tape hid the worst niggles though, and a generous coat of matt varnish will hold it all in place.  

Monday, July 08, 2024

Loco driver


My loco needs a driver, and digging through my stash of large scale bits, I found this Model Earth Design "Shorter Staff" figure. Cast in resin, from a master by Chris Johnson, it's supplied in two parts - torso and head. 

Painting is simple enough with enamels, followed by a wash of Agrax Earthshade to add some shadows. The effect is over-emphasised in the photo, but it looks great. I even painted the cap in a check pattern, although you can't see it from this angle. 

Since I prefer my large-scale people to be caractures, rather than scale models, this little man is ideal for the job, and was a pleasure to paint.

Friday, December 22, 2023

A selection of Santas


Santas
While we all know there is only one Santa, I seem to be amassing a collection of them!

The latest, at the front, comes from Motley Miniatures, and was picked up at Rowington a couple of weeks ago. He's useful, because he is sitting down, not standing like the two HGLW versions behind. 

He's even a good fit in the HGLW sleigh I mounted on rail wheels. 

Santa in sleigh
I wonder where I can photograph him over the festive season?


Tuesday, September 05, 2023

Painting the "dude"


The Bond Bug driver figure is a pretty good model. Not everyone agrees, and alternatives have popped up on eBay, along with new wheels that operate under the "3D printing good, plastic bad" theory. 

Hanging on the figure seems the trickiest job, so for the skin tones, I sat him on a cushion of Blu Tack in a paint pot. 

For the rest, I l took advatage of a big slot in his back to insert a ScaleModelScenery Professional Folding & Scoring Tool, although a cocktail stick would have worked as well, I just happened to have this handy. 

The downside of close-up photos, is you can see I really need to redo the wonky eyes...

Tuesday, April 18, 2023

Find me a driver


Th tram needs a driver, and the only unpainted figure I had was too tall. As, it seems, and I, in miniature form. 

Digging through my collection of people, I found a couple of G scale crewmembers, that are quite a bit smaller. 

They fit nicely in the tram, but I think are a little too small. Someone about 10mm taller would be nice. Something on the NGRS shopping list I think. 

Of course, I driver this small, is going to need a step on the outside to help him get in through the door!


Friday, February 24, 2023

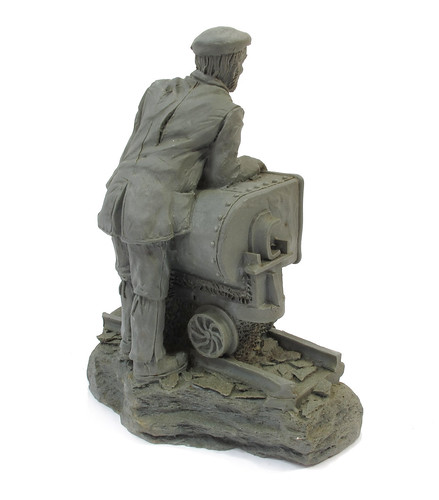
Slate miner

Model slate miner

According to the card beside this in a book/antique shop I visited recently, this is "Quarryman with tipping truck - very accurate (used as illustration in book on slate) - £3 - made of compressed slate."

I looked at it and was inpressed with the quality of the moulding, and the modelling. These things are usuaully rubbish - see the somewhat soft castings of Airfix Pugs produced in coal for example. This one though,it's sharp, and presumably taken from a specially carved master. 

My first thought is that it would make an interesting painting project one day. That, and at three quid, I can afford to buy it for just that reason.

The figure is 100mm tall, so 6' 3" in 16mm scale. A little tall perhaps, but not out of the question. the 18mm track gauge equates to 1' 2", but I think we can call it 1', so again, suprisingly accurate. 
 
On the base is a label "Eden Valley Arts. Quarryman & Tub. Made with slate from Cumbrian Quarry. Tel/Fax. (01768) 899720" - I can find a couple of organisations with similar names, but nothing that suggests they are the source of this miniature, so it's origins are a mystery, as is the name of the book that used this as an illustration.


Wednesday, November 23, 2022

Painted head part 2


There's not a huge amount of detail in this cheapo head, I supposed you don't really need much when it will be viewed from several hundred feet away as the 'plane zooms past. I keep things simple with a couple of coats of Humbrol flesh colour followed (when coat two is tacky) with a dry-brush of Revell flesh to provide highlights. 

Being such a large scale, I picked out the eyes properly complete with pupils. They even had a coat of gloss varnish.


Blu-tacked to the top of my old Liquid Poly bottle, I followed the instructions suggestions with a yellow scarf. The track colour jacket is dry-brushed with a lighter brown for a worn leather look, and the scull cap (is this the right term) rust dry-brushed with the samecolour. 

Finally, the goggles were painted, fixed in place with Glue'n'glaze and a strap added from painted masking tape. 

All this was acomplished by grabbing odd five miniutes here and there while very busy with work projects and provided a welcome distraction. I need to find more of these quickie jobs to do as this one stopped me slobbing around. A little satisfaction gained each time.

Tuesday, November 22, 2022

Painted head part 1

While buying some wood from SLEC at the larger scale aircraft show, I spotted they also sold pilot heads for aircraft. I've looked at these before and thought painting one up would be a bit of fun, so added a 55mm tall model to my order for less than a couple of quid. 

In the packet are a couple of plastic head halves, and some googles. Cleaned up, they are stuck together with plastic cement. Part fit isn't great if I'm honest, you get what you pay for, and there was a bit of manipulation and solvent required to see the halves line up. 


Eventually, I managed to do it, well, near enough. Once the glue had hardened, a couple of hours sanding hid the worst of the joints. A thin abrasive strip was used to re-cut the chanels on the top of the little mans' head. We also needed a little filler on the collar. 

To check the joins were acceptable (a fairly low bar with this model as it's just for fun) I shot some car primer over the whole thing. This showed up a couple of areas requiring more attention, but overall, not too bad. I'm hoping the grey will provide a little pre-shading to the colours too, although a darker shade would be better for this. 

Anyway, now to paint.

Tuesday, September 06, 2022

Mini Phil Painting Guide


Mini Phil
Jacket - 118 dry bushed with 93

Jeans - 144 dry brushed with a 144/147 mix

Hair - 67 dry brushed with 64

Skin - 61 dry brushed with Precision flesh/61 mix

Teeth - 147

Shirt - Precision maroon with 64 lines

Trainers 246 with 67 soles

Laces - Precision warning yellow

Buttons - 70

(This post is to remind me of the colours when I paint the rest of the figures. All colours are Humbrol enamels unless otherwise stated.)

Tuesday, April 14, 2020

Figure fitting


Like all the Groudle Glen locomotives, Polar Bear isn't very big. The cab is definitely compact and bijou. Fitting a model driver in was going to be interesting.

I bought a couple of Modeltown figures because they looked slightly smaller than most. I know cartoony people aren't to everyone's taste, but for a garden, I like them. Realistic people just look wrong to me in unrealistic live scenery. As I say though, this is very much a matter of taste.

Anyway, a bit of testing before the roof went on showed that even these people were fractionally too tall for the cab. However, if I reduced the thickness of the bottom and shoes, I'd get away with it.


I bought male and female figures and after some deliberation, decided that Mrs Engine driver would be best. She's not as broad across the shoulders and so can sit in the corner of the cab, leaving access to the control switch. A quick coat of paint gave her overalls and a matching (sort of) headscarf.

Friday, February 02, 2018

Mr Starboard


Since this is an IP Engineering kit, I thought I ought to use one of their figures.

Obviously, Mr Starboard is perfect since he's looking the right way, I have a Mr Port for another project. Slightly cartoony in the manner of most garden scale people, I don't think the camera has been kind. Painted up, he looks rather nice and the eyes don't look so weird.

Paint is mostly Humbrol with Lifecolor flesh tones. All the colours were applied and then dry-brushed with a lighter shade. Once dry, a quick and thin coat of Games Workshop inks (black and brown) took care of the shadows.

Saturday, October 07, 2017

Making plans for XTC


XTC – THIS IS POP 

A brand-new 70-minute film on one of Britain’s best-loved and most influential bands of modern times, XTC.

Emerging from the late 1970’s new wave punk explosion XTC amassed a devoted following with hit singles Making Plans For Nigel, Senses Working Overtime, Dear God and Mayor of Simpleton.

A colorful and vibrant journey into the world of XTC and their alter-ego psychedelic band The Dukes of Stratosphear – the film features brand new interviews with Andy Partridge, Colin Moulding, Dave Gregory and Terry Chambers.

Through a mixture of animation, archive and specially-shot sequences, the film opens-up the world of XTC and into the brilliant minds of principle songwriters – Messrs. Partridge & Moulding.


"Why are you telling us about a programme covering a 1970s pop group that is broadcast on Sky?", I hear you cry, "It's not like you have Sky yourself so you won't be watching it."

That is true dear reader. But I've known for some time that thanks to the efforts of ModelU and my mate Paul's paintbrush, the stars of the show have been replicated in miniature. They will (apparently) be seen riding trains at Pendon.

It's a bit of a shame I'm missing this as I quite like a bit of XTC, however I shall console myself with a World-shaped biscuit (to feed my face) and all being well, a trip to the pub.

Hold on, they will have Sky...

Thursday, August 31, 2017

Oh the huminiatures!

The railbus needs a driver - well models hurtling around the track without anyone on board look weird to me - but I never seemed to be near suitable traders to buy one. 


Truth is, even if I had, being hidden inside the car, I simply didn't need to spend a load of money on a high-quality model. Rooting around in the cupboard, I found a few sprues of Slater's Huminiatures. OK, they are a bit basic and the mould was obviously worn when this shot was made, but with a little tickling up they would do the job.


I've used the rather oddly shaped man with his arms spread over the bench seat. Chopping around a bit, he sticks really well with Mek-Pak, I narrowed his stance to fit in the confines of the driver seat. Since you can't see his shoulder, I didn't worry about filler. The other arm was more of a challenge as it has to clear the PCB, but sticking out like this he seems to fit.


Lifecolor flesh tones followed by blue overalls, pale grey shirt and dark grey hat'n'boots did the job. I nearly didn't bother with the boots as you can't see his feet but relented when it just seemed off not to do the whole job. A wash of Citadel weathering black finished the look and he's now UHU'd into position.

Tuesday, February 21, 2017

Soldering people


File this one under "Things most people probably do but it's only just occurred to me."

Needing to both assemble and modify a 7mm scale "Heroes of the footplate" figure, I decided to fire up the low-melt soldering iron and fix him together with something other than superglue. 

Why haven't I done this before? It's a heck of a lot easier than using glue - the solder fills the gaps around the arms and more importantly, it's very, very fast. Within 5 minutes, all the bits were in place, including the ones I'd broken off when trying to re-position the legs by clamping them in a vice and shoving the rest of the body hard. The joins were good enough that I could file chunks off the bottom of the feet for final fitting in place. With a coarse file.

A little filler around that leg and he is good for paint. Next time, I'll remember and put the glue away.

Thursday, February 09, 2017

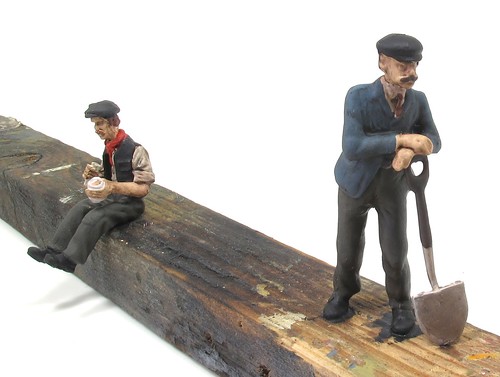
Painted people

People on the painting stick

Due to a tight deadline, the 7mm scale gangers were painted around a trip to the pub. Before I went, the skin received a coat of Lifecolor acrylic - base colour and then a dry-brush of lighter flesh. This was left to dry while I enjoyed a couple of pints. You don't want to be handling wet paint after all. 

Back home, the rest of the work involved Humbrol enamels, except for the spade blade which was left in the raw whitemetal.

For speed, I didn't worry about highlighting the colours. Instead I relied on some shading with Citadel Agrax Earthshade ink to do the work. It is particularly effective on the white (Humbrol 147) shirt of the sitting man. I prefer to shade with brown rather than black as the results are a lot less severe. 

In case you are wondering, the figures are fixed down to the painting stick with superglue. Once dry, they are simply snapped off and fitted into place on the layout.

Tuesday, February 07, 2017

O gauge metal men

I need a couple of 7mm scale figures for a diorama, so while at Stafford I spent a long while at the Ivertrain stand searching through the little packets of unpainted people.

First I've got a "Heros of the Footplate" ganger. He arrives in two parts - head and the rest. His collar needs to be drilled out to accept the neck attached to his head. There's a shovel for him to lean on too.


Whitemetal is soft so it's no great trouble. I always work with a slightly larger bit than required so I have the chance to move the noggin around a bit so he's looking in the right direction. 

Once happy, filling his neck with superglue and popping the head in place and we are done. He's ready to be glued on the painting stick. 


I nipped the tip from the spade so it appears to have dug in the ground under his weight. 

From this shot you can see why it's worth priming figures. Spotting the detail, or that seam line round his head, is hard in shiny metal. 

My other figure is from the S&D Models range. The seated workman arrives in rather more bits. 


More superglue, but no drill bit action this time. Holding the arms in place is tricky, they hang on stubs emerging from his shoulders so I tend to squirt them with superglue kicker to speed up the drying process before they fall off.


On the painting  stick you can see he is more detailed then the HOTF man. None of this is an issue as for model railway purposes, it's proportion and pose that matter more in the context of a larger scene. 

Ironically, I was thinking this when Allan Buttler from ModelU appeared for a chat about a recent DVD appearance I'd filmed for his little people. It seems he is doing some interesting projects, more of which in the future.