Showing posts with label Fowler Shunter. Show all posts

Saturday, April 12, 2014

Finished Fowler

Finished Folwer Front

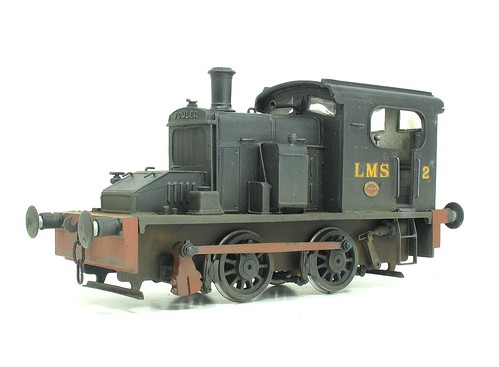
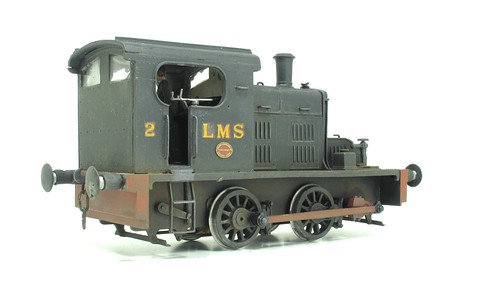
Finally, after over 15 years ownership, my Fowler diesel shunter is finished. The black bodywork has been washed with brown to give those lovely mucky nooks and crannies, then dry-brushed with dark grey to simulate highlights. After this a gentle airbrushing with some earth, dark grey and track colour blended everything together. A light dust of powders just finished the job.

Glazing is Krystal Klear. Plastic would probably have been better but you have to cut it to fit the rebates before glueing the roof in place. This looks OK though even if it was a pain to do.

A driver leans on the controls. I've positioned him so he looks out of the side as though planning to look forward or backward at any moment, well it is a shunter and I think this is better than reversing while looking out of the front. Anyway, he settled like that and the glue dried and I decided he looked pretty good.

All in all, the Eric Underhill kit is very nice indeed. At 615 grammes, it won't need any extra weight to keep the model in the track. It could probably out-drag one of those Ixion upstarts too. Mind you, I didn't anticipate their existence when I bought this!

Finished Folwer Rear

Friday, April 11, 2014

Painted Fowler

Painted Fowler

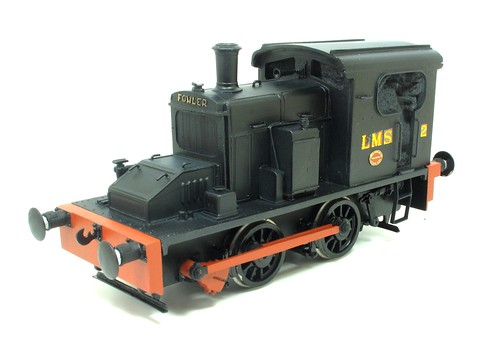
Look at this - I've painted the Fowler shunter at last!

After a blast of Halfords grey primer, the black comes from a Revell spray can - 34302 silk matt Black. Once left to dry overnight, the result was a very nice, smooth finish. I was quite impressed.

The red bits are Humbrol red satin varnished - all applied by brush. The red isn't really a deep enough colour but the easiest way to get this is their gloss paint and that takes an age to dry. Once weathered, it will be fine.

Transfers are some old waterslide ones. The silvering behind the letters doesn't show in real life nearly as much as it does in the photo. Pedants will point out that on the real loco the letters were gold but unshaded and the number should also be sans serief.

I don't care for a couple of reasons:
  • I had these to hand and din't have to go any buy more.
  • I prefer this to the correct versio, especially the number 2 which looks nasty in real life.
If I must have an excuse, I'll say that I'm assuming a repaint at some point before the loco moved to whichever ficticious bit of track I'm claiming it is being run on.

Wednesday, April 09, 2014

Keeping paint out of the cab

Paper maskingNot everything with the Fowler is going to plan.

For its last exhibition, I stuck the roof in place with a few small dots of superglue to stop it falling off while we ran the loco in its "Silver Jubilee Livery".

I'd painted the interior but thought that I could break the weak glue joints later and mask the inside properly.

Stupid superglue. I'd need a chisel to break these joints. Why aren't they this strong when I want them to be?

Anyway, the roof isn't coming off so I've disguised the joins with more glue and a touch of Deluxe Materials filler.

Before I spray the body, to keep the paint out of the cab, I've stuffed it full of small bits of kitchen roll. Not nearly as good as tape but at least they cover the worst of the detail. I just hope it's still there when I gently pull them out later!

Tuesday, April 08, 2014

Priming the Fowler

Primed brass bits

Right - First stalled project to come back to life is the Fowler diesel shunter.

The model is finished and ready for paint so I've started by priming all the brass bits. Normally I like to use an aerosol can for this but this doesn't seem smart around the mechanical bits. Quite frankly, the fact that these work as well as they do is a source of amazement to me and I'm not going to mess that up by squirting paint everywhere.

So, a brush on primer is called for and I dug out a pot of Humbrol number 1 acrylic. While it doesn't seem the grab the metal in the same way an etching primer does, it's fine for areas that won't be subject to handling such as the brake pull rods and guard irons.

Best of all, the brush can be cleaned up using water. I still used an old one though, just in case.

Thursday, March 06, 2014

Cab steps

Fowler StepsWithout the instructions, figuring our the cap steps is a challenge. The prototype photos show them clearly but I could only find the sides and one tread on the etch.

Worse, the tread appeared too wide for the folded up steps.

Never mind, a strip of brass was cut using the Olfa cutter and then trimmed to length with scissors.

Using chip forks and wooden stirrers to hold the bits in place, a few dots of solder fixed everything together.

I like the large glueing area at the top - this makes it far easier to stick them in place. Hopefully that will make fitment reasonably robust, if not, well, hopefully the superglue join will break before the steps bend.

Wednesday, March 05, 2014

Grab rails and handles

Fowler Body TopChassis assembled, it's back to the body.

Not much to do here for finishing touches. Most of the work was drilling 0.7mm holes to fit grab handles on the bonnet and cab side with superglue. At the front there are 4 handles which I made out of the same wire.

Pedants will probably tell me they should be different thicknesses from each other - I'd reply that the difference in size on the model would be tiny, Anyway, finishing the thing for Clayhanger Yards final show is more important.

The cab front is fitted with a honking great horn as the LMS were different from the Great Western in their realisation that modern motive power shouldn't sound the same as steam engines. I like the look of the trumpet anyway and might have fitted it regardless of the adornment of the prototype.

Tuesday, March 04, 2014

Fowler Brakes

Fowler BrakesIf the Pug blogged yesterday was a case of, "fix it to last the last few days of owning an O gauge layout", then the Fowler shunter is, "Finish building it before you don't own somewhere for it to run."

Needless to say, I have loads of work on so time is precious. Still, the deadline is tight and so I better get a move on.

First problem - All the parts are in the box, except for the instructions.

A few days spend digging around doesn't solve this so I dig through my books and peer at photos to try and work out where the remaining parts fit. The brake gear is well hidden but with the combination of guesswork and the CAD pictures of Ixion's version, I think I figured it out.

The vacuum cylinder mounts at a crazy angle, but prototype photos who this to be correct. I couldn't work out how the handbrake connects to the pull-rods but this is hidden between the frames anyway so I don't care. What you can't see doesn't matter I'm afraid.

The biggest problem was that I put the hangers and rods on back to front at the first attempt. Wagging the superglue joints broke some and a bit of judicious use of wire fixed the others and now it all fits together. Not that you can see much anyway. Never mind.

Thursday, September 12, 2013

A pair of Fowlers

Pair of Fowlers

It's a common complaint that as soon as you start building a locomotive, along comes an easier option to produce the same thing.

Scratchbuilders see kits appear. Kitbuilders see Ready-to-Run models appear. Clumsy RTR buyers find models in easier to open boxs pop up on the shelves.

So it was with the Fowler shunter. There I was, happily browsing the trade stands at Kettering show, and there was an announcement from Ixion that they would be producing the loco as a RTR model in O gauge. My first thoughts were to a half-built kit lurking in a cupboard. My second involved burning down the factory to stop this happening.

Anyway, fast forward a bit and I get my hands on the first pre-production, painted version of the RTR model (Thanks to EDM Models) to plonk on Clayhanger Yard. In the stock box is my still half-built kit, so it seems natural to compare the two.

I should point out a few things. The painted loco is due for revision before it goes on sale so the dodgy font will be fixed. My model represents the LMS version, hence the different donkey engine size and position. I'd love to do the GWR version but my painting and lining skills aren't up to it.

The kit is a lot heavier than the plastic version. The cab sides of the later are finer but overall, I don't think there is a huge amount to chose between them. You can decide for yourself whether this is good or bad. I think that it means a well-assembled kit next to a bought in model will look fine. No need to bin hours of construction work, nor feel that there is a better option than buying the Ixion model.

Will I hand of the cash for a RTR version? Nope. I don't need a fleet of these things, one is plenty, but if anyone wants to send one to me, then I wouldn't turn it down.

Sunday, February 03, 2013

Auxiliary engine

Auxiliary Engine

Having decided that the auxiliary engine (used to start the main engine I presume) supplied in the Fowler kit was too small for the LMS version of the shunter, I had to build a replacement.

Needless to say I don't have a plan to hand so I'm working from photos so the first job was to work out dimensions. Height of the box is easy enough as it can be judged from the panel lines on the bonnet. Width was harder. I made a square that ought to be right but on the model it looked too long. It might have been right but it looked wrong.It's half as big again as the original whitemetal part though.

My choice involved going with something that I suspect is a few mm short but looks better in 3D. To be honest, I'm lacking so much detail in this area that anything is only going to be an approximation. I've also cheated even more as when first built the cover features small louvres. It lost those later in life and I'm assuming that when I modelled the engine, they had gone.

Anyway, the box has a 2mm thick plastic core covered with 0.5mm sheet fixed with that nice citrus smelling solvent that doesn't buckle the surface. The lump on the side is whitemetal and comes with the kit. It looks a bit close to the main engine box to me but I can't tell what goes between the two so I'll live with it. Parts are included with the kit but they all look wrong , and don't match the diagram in the instructions, too.

This all sounds very poor but I bet once the engine is finished and running on the layout, no-one notices. Truth is, they probably wouldn't have noticed if I'd just used the old bits.

Friday, January 11, 2013

Fowler diesel body

Fowler Shunter Body

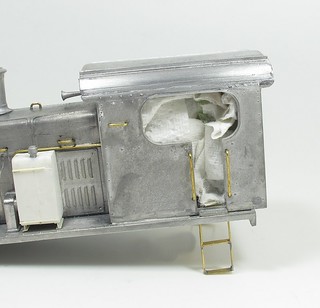
Looking at the Fowler shunters upperworks provides me with a bit of dilemma. On first inspection, I've not done too bad a job with the whitemetal parts. They are soldered together pretty well with really tiny amounts of solder. Smug people looking at the cab roof will be saddened to know that those blobs are Blu-tack holding it in place before detail and paint.

This must have been one of my first attempts at low-melt soldering, a process that separates the men from the boys. The very concept of approaching metal with such a low melting point with a hot iron terrifies most sensible modellers. I probably used a 12V iron run off the back of an old H&M Controller. Nowadays I'd go for my Maplin cheapo variable temperature unit, or for castings this chunky, a normal iron and work fast.

They are massive bits of metal - the entire loco weighs in at 600g with a few more parts to add.

All of this is as per the instructions. Unfortunately there is a slight snag. If you read this excellent web page, then you'll realise that should I wish to model the LMS version of this loco (I do, the livery is a lot easier), there are quite a few differences that the kitmaker ignored. Checking my copy of "LMS Diesel Locomotives and Railcars" shows that while I have placed the auxiliary engine on the correct side of the footplate, this should be half as wide again. Worse, the louvres show above should be half way up the bonnet side and there are only a single line of them. To cap it all, the sandboxes aren't chubby enough either.

This leaves me with a decision to make. The sensible option is probably to dismantle the body by boiling it in water, then re-assemble the model to represent GWR No.1. Trouble is, I think this engine was fully lined out and quite frankly, I am confident I'll mess this up and the results will look horrible. Anyway, what normal person wants a Great Western loco, even one that will offend the purists?

Another option would be to scrape away the excess louvres and make new ones. How do I do that? Well, if we assume I don't have access to machine tools, then probably badly.

Finally, what about an industrial engine that never saw main-line service? That would work as several of these machines were built and a version with the options I'm using isn't out of the question.

After writing all this, I think I have a plan. I do want the LMS machine. I can't alter the louvres so they will be left alone. I could make a new auxiliary engine box, which will balance the proportions up a bit. If anyone spots the other anomalies, then I'll hold my hands up and admit the model is less than perfect. However it is MY model and it's MY train set so I'm not going to worry about it.
Tuesday, January 08, 2013

Fowler chassis

Fowler Shunter Chassis

As soon as I awoke the Fowler locomotive from its slumbers, the model was plonked on some track and fed a dose of 12volts. To my surprise, it sprang into life and trundled around pretty smoothly.

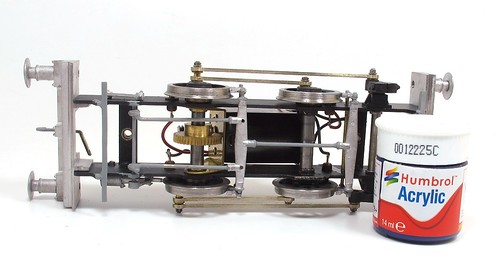
Removing the body, this chassis is a bit different from the norm. For a start, those brass frames are super-hefty milled brass. None of your wafer-thin etchings here. The rods are also milled. Presumably both processes were carried out with terrific accuracy judging by the quality of the running. All I had to do was screw the frame together square and all would be OK.

Another departure from the norm are the sprung plunger pick-ups, something that would have been in the kit and I'd have no choice over. Big holes in the frames would have resulted from me leaving these out. As it happens, I think sprung plungers are a good thing. When they work, they should work well and seems like a much better engineering solution to the job than my normal bent bits of phosphor bronze wire.

Powering the beast is a chunky Mashima can motor driving a set of gear (can't work out the ratio and don't care much) in a robust gearbox. Why the wiring includes a chocolate block is a mystery to me but I suppose there was a reason at the time.

All of this could be for naught if the jackshaft drive didn't work, and they are notoriously difficult to set up, but even this is behaving itself. Whitemetal cranks on the end of a long axle appear to be the order of the day. I'll take a closer look at this some time as I hate making these things yet this one works. Perhaps I can nick some ideas for future models.

Monday, January 07, 2013

Fowler 0-4-0 diesel shunter


Fowler Shunter

While digging in the O gauge stock box to find the Barclay Diesel, I unearthed yet another half-finished project from my collection. This ones an Eric Underhill kit for the Fowler diesel shunter, GWR Number 1.

I bought this model at least 10 years ago from Tennants Trains in Halesowen. At the time it came complete for a nice, round, £100. That might seem like a reasonable price for a 7mm kit but I can assure you that it was a heafty chunk of cash for me to spend pretty much on a whim at the time. Admittedly this is a loco that I've always wanted to build. There wasn't much chance of doing it in 4mm scale either as it's not very big - squeezing a motor in would be "interesting". On the other hand I could afford it, and we were building a club O gauge layout as well as dreaming up a personal project at the time.
Churchill on the Derwent Valley Railway
The model progressed to running stage with the main lumps of body assembled (more on both of these later in the week) but then the personal project was abandoned, others appeared on the workbench and the Fowler was stuck in the box carefully wrapped and awaiting a revival of interest.

Well, that time has come. I need a project for the blog. I need to reduce my stack of unfinished models. I need to complete the little Fowler.