Showing posts with label Miss-Chief. Show all posts

Friday, August 15, 2025

Radio control holiday


With only me in the car, I decided that there would be space to take a couple of RC vehicles on holiday. 

Firstly, the Sand Scorcher. I live as far from a beach as possible, so this was about the only chance it would have to scorch some real sand. On the day I arrived, I decided to spend the evening giving it a run. The nearest beach was Castletown, which isn't really sandy, but I had a good time anyway. 


The car likes a reasonably firm surface. Too much power on softer stuff sees it dig a hole for the back wheels. There were a few rocks I managed to hit too - which rolled the car. I haven't got around to refitting the wing mirror, which was probably a good thing. 

What I was able to do was get the car up to top speed, and turn reasonably gently keeping the momentum up. Spitting tiny stones everywhere, it really looked great. 

I'd planned to try a sandier beach later, but the weather was so nice, all the ones I visited were full of people. Another day perhaps. 


Another idea, was to join the Manx Model Boat club for a sailing session. They sail at Silverdale Glen, a couple of miles from my hotel. Parking is very limited, but it's a lovely pond, usually used for a couple of pedalos. 

One problem was that the club sail on Sunday, and Sunday's are for Groudle, followed in this instance, by the tour of the steam railway shed. Between us was the Southern Agricultural show, which promised to provide traffic issues that weekend, so I sailed one evening instead. Sadly, solo, but at least the boat made the water. 


As I say, it's a lovely lake, and I did my best not to disturb the ducks. The pond is pretty much the same size at the one we have at Knightcote, albeit a different shape with some fencing around the edge. Although you could reach through and pick up a boat this size easily enough. 

And if you take the kids to Silverdale, there is a water-powered roundabout for them! 

I can't be the only person who takes models on holiday, am I?  

Thursday, June 07, 2018

Vintage Speedboat in Model Boats magazine

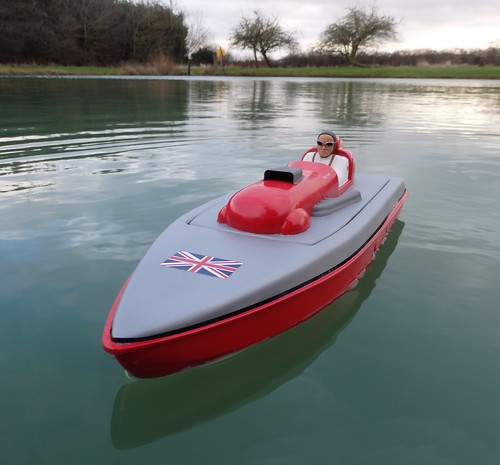
July's issue of Model Boats magazine sees my vintage speedboat Miss-chief appear on pages 66-68.

Since the kit isn't available, I've turned the piece into a description of the trails and tribulations developing the model including the pretty significant alterations I made to the kit.

Those who know me, know I am always happy to admit my mistakes. We all get things wrong and it's daft to pretend otherwise. Worse, it puts off beginners who start to believe that everyone in a magazine is some kind of modelling genius that they can't hope to emulate.

In the spirit of honesty, I'll now admit that a couple of weeks ago, I met kit designer George Turner and he explained how the model should be built. Apparently, the idea is to bolt a Graupner racing rudder unit on the back of the boat. That never occurred to me at the time, but seems so obvious now!

Tuesday, January 23, 2018

Brass prop miss-take

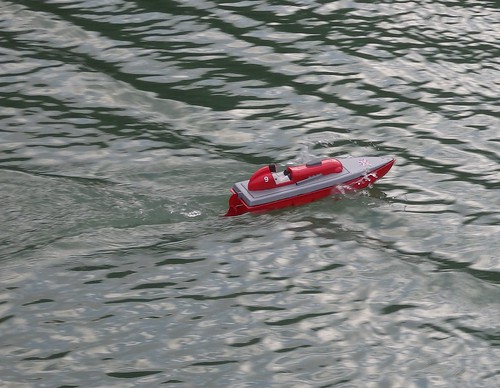
Miss-Chief at speed

A little more on-water action for Miss-Cheif but with a slight difference, I'd managed to buy a brass 2-blade propeller for her. 

Conventional wisdom is the brass props are better than plastic ones. They certainly look nice, but as soon as the boat was on the water, I knew I'd made a mistake. She still moved, but had lost at least a quarter of her top speed. 

The brass prop may be pretty, but the shape of the plastic one shifts more water and that's what matters. Fortunately, I'd taken both and swapping is a matter of only a minutes work. After that, we were off again.

I still think there is room for tuning, but sailed at top speed for well over 15 minutes and enjoyed myself so no complaints. 


Another addition is a set of advertising stickers. I know these boats wouldn't be thick with logos, but a BP shield (I've always thought it funny to use this as they are my Dad's initials) and Champion spark plugs on the side. 

They just add a bit of life to the cockpit, and while it may not be fast, this boat is pretty. 

Monday, January 22, 2018

Miss-chief at speed

Model speedboat

Adding a propeller makes a huge different to my little speedboat!

Miss-chief still isn't the fastest model on the water, but she works well enough for me and is a really enjoyable sail. Even in cross-winds, the top seems to stay put and no water found its way inside. 

I'm not completely finished though. The rudder is the wrong shade of red, a brass prop has been bought to replace the plastic one, and I have some vintage design advertising logos for extra decoration. 

Watch this space.

Sunday, December 31, 2017

Miss-chief on the water


Let's end 2017 with a finished project. After a few bumps along the way, my vintage speedboat, "Miss-Chief" is ready. 

Towards the end, I hit a few snags - the can of red spray I used disappeared with the rudder still to do. Its replacement isn't quite the same shade but close enough that I can live with it until the correct one re-appears. 

As I prepared the model for its launch, the steering servo stopped working. Replacing it wasn't too hard, but a half hour job I could have done without. 

You are, of course, expecting some action shots now. Well, sorry. You see I got the model to the water, and fired it up. The motor made a noise but there was no movement. I tried reverse, still nothing. 

Then I remembered. 

I'd taken the propeller off for painting and not put it back on. Oops.


Friday, December 29, 2017

Paint your driver


There's not much to "come alive" on this boat, but what there is is all here.

I think it was the resin-head driver figure that sold the kit to me as much as anything and so I've enjoyed painting his face. Nothing exciting, just a coat of flesh dry-brushed with flesh+pale grey. Goggles picked out in matt aluminum and leather. Looking at drivers from the 50s and 60s, they weren't the walking billboards todays are but I felt some BP symbols on the chest (I didn't fancy hand painting Castrol ones) would break up the regulation white overalls.

The exhaust and air scoop are painted with a shiny gunmetal, which is really nice, especially since it's brush painted. I couldn't be bothered to mask and spray.

At the back, number 9 is my club racing number and it looks good on the back. The only other lettering being "Miss-Chief" on the side of the cockpit. I wanted a hand-painted feel in the manner of a WW2 aircraft. Not sure this is right, it will stay until I see something better.

Anyway, once I find the can of red paint, I just have to do the rudder and we are ready for final assembly.

Thursday, December 28, 2017

Slow painting


I can be a very impatient modeller. Sometimes this gets me in to trouble when paint or glue aren't given sufficient time to dry.

Working on the boat has had to be shuffled in to odd moments of the day as I've got so much other work on that this isn't a problem. Paint is allowed time to harden fully simply because I slap it on and then have to go and do "proper" work for a few days.

Still, the results are OK. I've gone for Humbrol aluminum airbrushed over the top using Mr Hobby 1000 primer as a base. I do like spraying metallic paint as it gives such a nice finish. One that would be even better if I hadn't tried to extract a hair from the deck. Still, there is a sticker to go over this.

The Red Arrows acrylic red is Humbrol applied from a rattle-can and very nice it is too. With he aid of a hair drier, it was touch dry really quickly. I'm not entirely happy with the line between the two colours, the Tamya masking tape didn't work as well as it normally does, but I feel that a black line delineating the two will look better anyway and hide a multitude of sins.

Now to the fun bit. Getting brushes out to add detail bringing the model to life. . 

Tuesday, December 19, 2017

Magnetic attraction


Not an exciting photo this one I'm afraid, but it is an important step towards completion of the speedboat.

I've been pondering for some time a method of holding the top down on the model. It fits into a recess in the deck, which is fine but there isn't an obvious method of making a waterproof fit short of using tape as I've done while testing.

High-strength magnets bought from eBay seemed a good idea but I wasn't sure how I'd use them. Magnets don't work on plastic so there would need to be some metal around and there isn't space between deck and top for this.

Trying things out over a few evenings, I came up with the following solution:
  • At the front of the boat, a "clip" slides under the deck. Simple and effective as long as the back end is secure. 
  • At the back, a screw fitted into the cover and hidden by the back of the cockpit, is grabbed by a magnet fitted under the deck. Drilling a hole in the deck allows the screw head to locate. 
  • At the sides, pushing magnets down the exhaust pipes and then glueing matching ones under the deck adds extra strength. It's important that these are aligned correctly (drop them in place and they do it automatically) for the strongest attraction. 
 Now the cover is just about held in place well enough to pick the model up by, but can easily be slid back and removed. I'll add a safety wire between the two just in case - bad enough if the cover comes off while sailing without it heading to the bottom of the lake!

Tuesday, November 28, 2017

Speedboat testing


It was with some trepidation that I put the vintage speedboat back on the water. If I'd not done a good job sealing up the back of the hull, all my efforts would end up on the bottom of the lake entertaining the fish.

Maybe worse, what if none of these modifications had made any real difference to the way the model handled?

As well as the rudder replacement, I'd also re-positioned the batteries further forward under the prop shaft to move the centre of gravity forward. I don't want to put weight in the nose, but the front needs to be kept down.

On the water, despite my lack of testing in the bath, the model sat pretty level. A good start.

Opening the throttle, it slipped across the water. I say slipped because it seemed so much smoother than previous sailings. There is no box dragging behind and it shows. The nose kept down enough.

Steering was good too. I'd been worried that there wasn't enough movement in the rudder but it's pretty much perfect. I don't expect the model to be as maneuverable as my Bantam Tug, but it can still be swung behind the overflow pipe in out lake without hitting the bank - my standard test as it's the tightest turn you can make to dodge things.

Battery duration is really good. I got 15 minutes out of the set with more to come. Not bad on only the second charge.

Speed is OK. It looks about right for the model although I'd like a bit more. Maybe a more aggressive prop is the answer as I don't have any obvious space for more cells to give more volts.

Anyway, I'm happy. Now I can think about some paint.


Thursday, November 23, 2017

Big brass rudder fitted.


Taking a deep breath, I hacked the rudder support box off the back of my vintage speedboat. Reaching the point of no return, I sawed it off and looked at the resulting hole.

I'd done a really good job of sealing up the inside of the box with epoxy glue. Sadly this was now on the workbench and my hull would now float in exactly the way a brick doesn't* what with a gurt big 'ole in the back.

Plastic sheet built up in layers and ABS glue made a big difference. This was followed by more epoxy to seal things up. The flange around the edge was built up to match the rest of the model - I know this isn't a prototypical feature but I'm not deseaming the hull now.

Next, Milliput was applied lavishly and left to dry for a couple of days. I never have a lot of luck with this stuff normally, but this time it was OK. Most of the filler was filled and sanded away and the results feel smooth.

Finally, a plastic post supports the new rudder. The boat side of the hinge is soldered to some brass U-channel and the plastic fits inside this.

A new piece of wire connects the sterring servo to the blade. It doesn't seem to have much movement, but we'll find out when the boat goes back on the water next week. 

 *thank you Douglas Adams.

Tuesday, November 21, 2017

Brass rudder

If I'm going to mess with the speedboat, I might as well do it properly.

And since the feature I like least is the ugly rudder-support box hanging on the back, I'm going to cut it off and replace it with something nicer.

Nicer, in this case, means a brass rudder with curves based on a roll of insulation tape knocking around the workbench. Using this and a pen to mark the lines, a piece of brass was cut out with a piercing saw (6 blades broken) and then fitted with a tube up the back edge.

This was cut with the saw and two sections removed to be fitted to some square u-shaped channel. Dropping some wire down this turns the whole lot into a hinge.

Operation will be by the angle brass lever attached to the side. I've beefed up the join with some rod that fits through the blade, I don't fancy just relying on the solder.

A quick clean up and all looks OK. I fancy a coat of red paint for this but I'll need to apply that without gumming everything up. 

Friday, November 10, 2017

Much better on the water


Sorry for the fuzzy photo - steering and taking pictures isn't easy, especially when the boat nips along at speed.

All my efforts re-working the drivetrain seems to have paid off. The boat is now a lot closer to the speed it should run as. Even with the battery running down (Note to self: Charge it up before you go) I wasn't unhappy with the pace.

There is more to come too I suspect. As you can see, the model runs with its nose in the air and that means the prop is firing down as much as it is along. A bit of weight in the nose should bring things down. I'll look at moving the battery too, at the moment it's held in with Blu-Tack.

I still think that ugly box on the back for the rudder isn't helping either, but I have some ideas for a replacement.

Tuesday, November 07, 2017

Rip it out and start again


It might not look like much, the getting the speedboat to this stage took loads of work and quite a bit of nerve.

On the basis that the propshaft exiting the hull at the bottom of the V was leaving it flapping around in the air, I decided a more conventional position under the boat would be a good idea. There is a reason things are conventional I suppose - because the work.

Of course this meant I had to gently prise the well glued in components away from the ABS hull, something I managed to do without breaking anything. I have a nasty feeling this glue isn't sticking to the plastic as well as I might light, but for the moment I'll live with it.

Ascertaining the correct place for the shaft to come out of the hull was done by trial and error, which explains the long Milliput lump underneath it. My idea was to keep the shaft as horizontal as possible with the propeller just clearing the bottom of the hull as it spins.

A little plastic support seemed like a good idea, although I don't think it's essential.


Inside, the motor has to move upwards, just under the deck. It fits more by luck than judgment but the drive train is aligned pretty well, Everything rotates freely so for the moment I'll live with that.

Best of all, the servo can go back in the same position so that's one job saved.

Now I need to test it on the water.

Tuesday, October 10, 2017

Try, try again


With things not looking good, it was time to spend a bit more money. First, a new prop - something in red this time because red things go faster. Also, slightly smaller than the old propeller and without the hasty scissor modifications.

While I was at it, the rudder support box has been opened up properly both at the back and sides. Much neater, no longer will it work as a parachute. I've also shortened the rudder as there's no need for it to be lower than the bottom of the prop and I reckoned it might be increasing drag. Yes, I am a bit desperate.


Next, some weight loss. The C-cell battery pack has been replaced with an AA-cell one which weighs half as much. Moving it to the front of the battery box moves the centre of gravity forward too.

Back at the lake, does any of this make a difference?

Not really. The boat moves but once underway, the prop is still thrashing around in a void created by the hull. Hang on to it and with plenty of water, the thing really pulls. Let go and it's a bit rubbish.

Once thing, I've never, ever seen one of these kits made up. I'm beginning to understand why. 


Monday, October 09, 2017

First sea trials


Down to the lake with the speedboat for its first proper sail. I hadn't wanted to do this in the bath as I hope it will fly away so fast the length of the tub could be traversed in micro seconds.

Sadly, pretty much as I had expected, the model moves, but not very fast. Certainly nothing like as fast as it looks like it should. As soon as the motor revs, the model sits down at the back and cavitates like crazy. This is not good.


Scratching my head and taking it back in the clubhouse, I decide that there are two potential issue. The first is that the prop is too large. When this is the case, it simply can't move enough water and blows holes in it. No problem, I bodge a fix by taking the tips off with a pair of scissors.

Second, the rudder support box is filling with water and acting like a parachute. With my pen knife, I open a crude hole in the back.

On the water again and things have improved, but only a tiny bit. We are a long way from being more looks than operation.

Friday, October 06, 2017

Building a battery box


The biggest problem with this kit?

I've never seen one built up. In fact this is the only example of this model I've ever seen - and I have looked long and hard.

All this, combined with the lack of instructions, means I'm working things out as I go along. 

I have no idea how much battery power is required so I use my Club 500 as a guide. 6 C cells sounded about right so that's what I've fitted.

To keep the boat level in all directions, it became apparent that the pack had to sit quite well forward and I am worried that this would block access to the motor to propshaft coupling.


My solution, which I'm very pleased with, is a box on legs that straddles the shaft. Locating strips of plastic in the hull hold it in place and then underneath, on a big blog of silicon sealant, is some Velcro to hold the box down.

Will it work? I'll wire the model up and give it a go next week.

Thursday, October 05, 2017

Brushless motor


Fast boats used to mean an IC motor with all the attendant noise and pollution. Then we moved to electric power but the motors were still pretty chunky. Now we have brushless motors is pretty simple - rather than have a commutator whirling around with pickups (brushes) bearing on it, switching on and off of the poles is handled by a small computer in the speed controller.

To be honest, it all seems like magic to me. I see boats at the club powered by teeny tiny motors that generate enough power to hurl the model around the lake. People have tried to explain the power classifications to me, something to do with astronomical rotation rates I believe, but the whole thing is still a bit of a mystery.

Anyway, the first impressions of my motor are incredible. The thing arrives packed in a padded box rather than (if you are lucky) a plastic bag. Price wasn't too scary either from Component Shop. 


Originating in the model aircraft world, fitting one of these is "interesting" as the body rotates. You have to provide a plate for the stationary end to be fixed to. Easy in a 'plane but harder in a boat. I cut a piece of plastic to fit in one and screwed the unit to this. That's a bit harder to do than say but everything seems to line up at the moment. 

Friday, September 29, 2017

No longer rudderless


Starting at the back end with the job that's taken loads of head-scratching. My plan involved fitting a big rudder through the rear extension and hoping I could run and operating rod through the back end without leaving holes to let water in.

I think the vac-formed hull is made from a sort of ABS. It's strong but once I hacked a hole in the rudder support, I didn't feel it was strong enough. A lining of 2mm plastic firmed things up and also filled in the big gap to keep water out of the hull.

I should have used a pillar drill for the vertical holes for the rudder but couldn't be bothered to dig it out of the cupboard. Careful measuring, not easy when there are so few hard edges to play with, and drilling seemed to give an acceptable result. The hole was opened out to take a rudder, all the parts being epoxied in place. In fact, there is quite a lot of Pound Shop Epoxy going on here. Gloopy glue is ideal for sealing up gaps, especially where you can't see them.

The operating rod is a lovely fit in some brass tub so I reckon a smear of glue or grease will keep absolutely all the water out. Movement is limited but as this is a fast boat I don't want it to turn too hard. We'll see though, my plan is to get on the water quite early in this build as there are a few imponderables.

Thursday, September 28, 2017

Vintage speedboat


Another kit from the pile, this time a vintage speedboat - well it's a change from all the toy trains.

The kit is from George Turner, bought as part of his sale of models when he gave up making boats to concentrate on slot cars years ago. It sat in the stash of projects for a long while before in a fit of enthusiasm, I hauled it out for what I hoped would be a quick build (regular readers will know how this goes) when I ordered all the mechanical bits.

Depressingly, I see from the receipt this took place in September 2016. Still, after cluttering up the place for a year, I've finally made a start.

A few details - the model is around 43cm long and 14cm wide. It's a freelance vintage speedboat with concessions to building an operating model. One of these is the main reason I didn't crack on earlier, the rudder is apparently (there are no instructions and I've never seen a built example) supposed to hang out the back. Modern racing RC boats do this with some aluminium stuff but to fit that would require the lump to be cut off the back so I'm going to improvise instead. 


This isn't going to be a super realistic model. It can't be with that back end. Instead it will end up a little cartoonish but hopefully be a fun model to take for a spin on the lake.

Lots of thinking has gone into the name and I'm currently in favour of "Miss-Chief" in the manner of a 60s custom car.