Some wise advice from my good self, all hidden behind a thumbnail chosen by one of my rotten colleagues! I will get my own back...
Showing posts with label scenery. Show all posts
Showing posts with label scenery. Show all posts
Saturday, August 15, 2026

Thursday, March 06, 2025
Dealing with my bald spots

No, not the ones my barber insists on showing me in the mirror at the end of a haircut (Why? I've not got my glasses on.) but those along the front of the NG7 layout.
I'm not sure if the static grass just didn't take properly, of if its been worn away by people stroking it at shows. Whatever the reason, suddenly, I can see brown paint.
Time for some remeadial work. PVA is splodged over the brown patches, and then out comes the static grass puffer bottle to blast fibres into the glue. A couple of hours later, and the glue has dried. My bald spots are gone!

Saturday, March 01, 2025
Saturday Film Club: Using Humbrol Smart Mud
I had a lot of fun with this one - using Humbrol's "Smart Mud" product to produce a farm track, complete with tyre marks and cow prints.
Wednesday, July 24, 2024
Brewing up watered-down PVA

My jar of watered-down PVA is nearly empty, so it's time to brew up a new batch. The recipie for this most useful of modelling mediums is simple.
Mix equal parts of PVA glue (woodwork version prefered, not the shiny stuff for kids) and warm water. Add in a couple of drops of washing up liquid, to reduce the surface tension, and give it a good stirr.
And then, my little trick, leave it alone for at least a day. This seems to ensure the stuff mixes properly, and you don't end up with too many lumps of neat PVA when spreading it around.
I know there are more modern glues, and some use rubbing alcohol to reduce the surface tension, but this works for me, and I love the simplicy.
Saturday, July 20, 2024
Saturday Film Club: Modelling a hill
Another of my old BRM videos has been released into the wild, so I can bring it to you here. From 2017, I attack some expanded polystyrene to make a bit of scenery.
Tuesday, March 26, 2024
Making a diorama base

Handy, because most of the time, what goes on top first, is some ready-mix DIY wall filler, smoothed with a wet pallete knife. Plywood would go all wobbly.
Much of the time, I'm building a slice of scenery, which needs a raised edge along the back, and this time it occured to me that it I made a gaffer tape wall around the edge, it would be less faff than piling the filler up, and then sanding it back.

And it worked!
The trick seems to be to split the tape so it's only sticking to the side of the MDF. I used a full bit at the back, tucked under the board to fill the gaps between the split stuff, and it leaked a little. Also, harder to remove. The trick for this is just like masking tape, almost fold it back on itself when you peel it away, and it doesn't bring the plaster with it.
I'll be useing this technique again...
Monday, July 18, 2022
Flat finish grass?

After my look at The Army Painter Matt Varnish last week, Mark asked:
How do you reckon it would work on scenery? The newly laid static grass on my layout is a bit on the shiny side so I need to tone it down without losing the effect of standing fibres. Some reviews on Amazon comment that it came out shiny but you've achieved a nice flat finish.
To be honest, I've never had a problem with shiny grass. I tend towards Woodland Scenics stuff or Greenscene, both of which have nice, matt fibres. However, others aren't so lucky, and since I have a handy micro diorama left over from some filming, covered in static grass, I gave it a blast.
Results look pretty good. It's not clumped up the fibres (click on the image to enlarge it) and the result is still matt. The colours haven't changed either.
The secret to a matt finish is to shoot light coats on from a distance of 25-30cm as it says on the can. I assume this gives the varnish time to harden slightly so you get the requisite micro texture. 25-30cm is quite a bit further then you might naturally work. I instinctivly spray at 20cm if I'm not thinking. Normally this isn't a problem.
So, ignore the people on Amazon I say!
Monday, January 10, 2022
Where's my Nutmeg Spice?
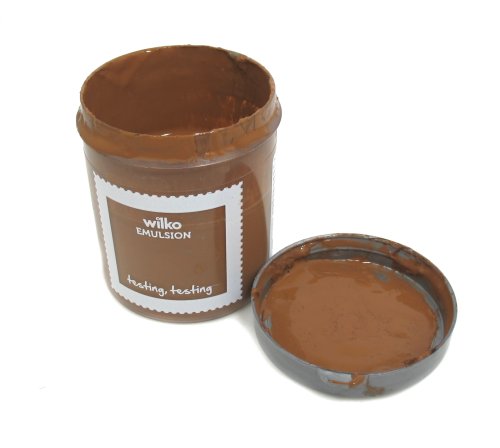
In the run-up to Christmas, I ordered some picture fromes from Wilko online. The local branch seems to mostly stock empty shelves and I need three identical ones. When filling in the order, I stuck a couple of emulsion match pots in the virtual basket since I wanted to add to my stocks.
To my surprise, my favourite shade "Nutmeg Spice" wasn't in the list. I use this "dog poo brown" as the basis for all my scenery as it's a nice mud colour. I'd hoped to bag a couple more pots as I was down to my last 3/4.
Not to worry, obviously an online thing - but dropping in to the physical shop last week, they not only didn't have any, but there's no longer a space on the rack for it.
Nutmeg spice has been discontinued!
My search for a replacement saw a quick trip to Homebase. There I could have endless shades of beige, but brown? Farrow and Ball do a nice "London Clay", but it's a fiver a pot. Four quid gets you "Cecily" from Craig and Rose. That's still over twice the price of the proper matchpots.
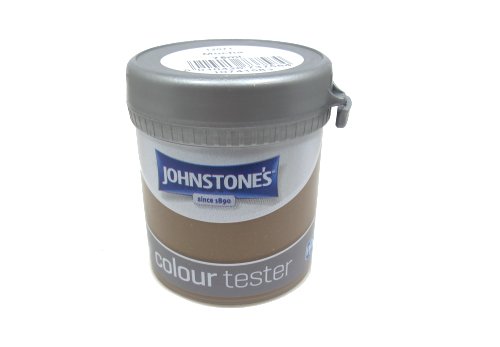
On Saturday, my parents were heading to Stratford, a town much better supplied with shops than Leamington, with a dried up pot of the "spice" and instructions to look for colours like mud, or dog poo.
They returned with Johnstone's paint "Mocha" which looks like an even better earth colour than "Nutmeg Spice". And B&M stock it for £1.49 a pot. Result!
You might wonder why this matters - well, when I produce a project for a magazine, the whole point is the readers can replicate my work. That means easily available products, not poncy paint. It's why I stick to Humbrol as much as possible, and why I wasn't interested in mixing colours for this job. Keep it simple, and the projects are accesible - which is the point of what I do.
Tuesday, December 28, 2021
Festive Film Club: Applying electrostatic grass
With everyone full of festive food and looking for some non-challenging stuff to watch, I thought I'd pop a few of the videos I've made for BRM on the blog.
Is there anything that has changed the look of model railway layouts more than the introduction of electrostatic grass?
Here, I show how I apply the magic fibres to a test piece and waive my hands around a lot.
Monday, November 08, 2021
Save the boating pool!

Storage has not been kind to the boating pool on the Handyman Hall Railway. The varnish had developed long white streaks. In a river, I could have told people these represented white water, but no-one was going to believe me here!

It's a long while since I built the layout, but my usual method for representing water involves coats of Ronseal Yacht varnish. Lovely stuff, but slow to dry and I was on a deadline. As well as the yacht varnish, I always keep a can of Interior floor varnish, and decided a coat of this might just cover up the white bits.
The stuff normally dries within 20 minutes, but of course as I was on tenterhooks, it took well over an hour.

But - it worked!
I'm now wondering if I used interior varnish in the first place. Yacht varnish is slow drying enough not to show brush marks, and these are definitely evident. I wonder if I can get away with a coat on top now?
Thursday, August 19, 2021
Russell Lupins

Another quickie practical over on World of Railways, this time making one of my favourite additions to a layout, Russell Lupins.
I've used these flowers on pretty much every layout I've built, and an awful lot of the dioramas, because they add some detail and colour to any scene, and yet are simple to make.
Tuesday, August 17, 2021
Planting model trees
A little video I recorded while working on a magazine project. With so many channels, we need to generate quick little bits of content alongside the full-fat magazine stuff, and this is a bit of an experiment in doing just that.
Nothing heavy, but hopefully, something useful for the beginner.
Monday, August 02, 2021
A nice place to fish

For my latest Hornby Collectors Club project, I was asked for something with water.
No problem I though, a slice of countryside with a small bridge would do the job. Greenery always looks nice on the page, and the techniques are applicable to all model railways.
The trouble is, Hornby don't have a small bridge in their range. So I had to improvise.
Next, water. I can't use anything from the Woodland Scenics range for a start, and Skaledale doesn't have anything suitable. Which is why I experimented with PVA glue in June.

This did not go well, or at least as well as I needed it to as quickly are required - the perils of working to a deadline!
In the end, I've reverted to the old favourite - Ronseal Yacht varnish. It looks good, dries fast enough to allow for multiple coats and does the job. Sometimes, that's more important than innovating.
The finished scene looks really nice and will make a useful photo plank too.
Thursday, June 10, 2021
PVA water experiments

With a project involving water on the horizon, I fancied trying a different method to a commercial product or my usual yacht varnish - and I'd heard about employing PVA for the job.
A few YouTube videos later, I decided to give it a go. Rather than pile in on a project for the page, I made a small test piece with a blob of wall filler on some cardboard. Once dry, and painted with emulsion, I applied a thin coat of 502 Wood Adhesive - my go-to glue of choice at the moment.
It dried clear, as expected, so I put a thicker coat on. This started to clear and so, in a rush, another thick coat was slapped on.
Two weeks later, it's not gone clear. A lesson has been learned.
According to YouTube, PVA's differ and it looks like the one I have to hand needs to be put on in very thin coats if it's to remain clear. That's not very looming deadline-friendly, so I went with the varnish. It's smelly, but I know it works for me.
However, I've not acquired some clear PVA. Time for another test piece...
Sunday, March 07, 2021
Wednesday, February 03, 2021
Waste ground

In front of the station side road, there is a section of ground with no real purpose. Literally "waste ground", and since this sort of land was quite common in the 1970s, that's exactly what I've decided it will be for now. If I come up with another idea, just like the prototype, it can be redeveloped.
Several colours and lengths of static grass were laid on the "mud" and once dry, scrubbed away on patches with the toothbrush to reveal the earth colour. I'm quite pleased with the look this gave the model, especially considering how easy it was to do. Like hairspray weathering, the technique seems to produce a natural finish almost automatically.
After that, it's more Forest in a Box around the corners and a couple of clumps in the middle. A bit of grass and perhaps some smaller undergrowth using scatter over poitin in the future, but for now, I can leave this bit.
I'm tempted by a burnt out vehicle, but wonder if that's a bit cliche. Dunno. One to consider later.
Tuesday, February 02, 2021
Really thick undergrowth

For the embankment at Selly Oak, I wanted some really thick, scruffy undergrowth. More texture than static grass alone could offer. The sort of horrible, spiky bushes that self-set in ground no-one cares about, forming a thick and impenetrable barrier if you try to walk through them.
After a little bit of pondering, I decided to use lots and lots of small pieces of "Forest in a Box". Green Scene supplied me with a box marked "S" which contained shot, but dense material. All I had to do was cut it up even smaller, dunk in PVA and press home on the embankment.

What should have been a quick job took more time than expected as the Seafoam needed to be cut into small pieces and quite a few of the less dense stalks were discarded. It looks nice though, in a horrible, wouldn't want to have to retrieve my school cap from there* sort of way.
Bad primary school memory involving a rose bush.
Wednesday, January 27, 2021
Tidy up the sides

In our stock of wood is some LitePly about 3mm thick. More expensive than normal ply, it has the advantage of being cutable with a heavy craft knife. Since I wanted the top to follow the contour of the hill, this seemed worth it. Besides, I wasn't looking at big chunks of the stuff - and anyway, there's no point in buying these materials if you keep saving them "for a special job".
Anyway, the hill had to be trimmed back to allow the ply to be fitted, but I clamped it in place with a wodge of filler behind it and then tidied up the top (yes, I should have cone this before working on the mud) for a neat job.
It looks stupidly good. Eventually, I'll paint it grey. Matching the colour of the rest of the boards won't happen so a contrast will look a lot better.
As well as looking good, the ply will protect the polystyrene from knocks as the model is moved around in the future - another win!
Tuesday, January 26, 2021
Building a hill for a model railway
A quick step-by-step guide showing how I made a hill on the corner of my Selly Oak project.

The basis of the hill is expanded polystyrene blocks fixed together with PVA glue and then carved to shape. Ideally, you do this with a hot wire cutter, but a less smelly, if considerably messier, method is to use a bread knife.
To give the hill a hard shell, pieces of plaster impregnated bandage, often sold under the trade name Mod-Roc, are dipped in water and then laid on the hill. By overlapping them and then smearing around the wet plaster with your fingers (another messy job) the whole hill is covered and left to dry overnight.

I like quite a thick "crust" on my hills and while I could achieve this with extra layers of the plaster bandage, using some DIY store wall filler is cheaper. Apply it with a palette knife or one of these spatulas used for icing cakes. Wet the tool as you work, it makes the filler go on a lot smoother.
Once the hill is covered to 2-3mm, leave it to dry overnight.

You might be better at plastering than I am, but generally, the surface needs sanding to get it smooth.
We're not looking for perfection, just to take the worst lumps and bumps out of the surface. Imagine you are a scale person standing on it and then think about a real hill. They might have the odd crevasse or cliff edge, but generally the land is smooth thanks to years of weather and erosion.
This is another messy job. Have a vacuum cleaner to hand and use it constantly. You really don't want this stuff in your pointwork.

Unless you are modelling s now scene, your ground needs to be mud coloured. I use emulsion paint to give me a basic shade. If you mixed your own filler for the previous step, it's not a bad idea to put a dollop of it in there, but I cheat with ready-mix for time and mess reasons.

Finally, it's time for greenery. This is the first coat of static grass. I'm just giving it a base colour as the greenery will be more detailed with extra layers of grass and some scatter to replicate weeds. However, this makes a big change to the look of a layout, so even if the detailing is a way off, it's worth doing to show progress and inspire you to carry on.
I hope this quick guide has helped. Don't forget if you want to know more, you can always Ask Phil.
Thursday, January 21, 2021
Mud, glorious mud

There's quite a lot of scruffy ground on Selly Oak. My normal method of reproducing this involves lots of Wilco "Nutmeg Spice" emulsion, but I wanted to up my game this time, so added "Chocolate dream" and "Earthy Hue" to the palette.
Mixing the three on the model gives a much better effect - but still too smooth.
Not to worry, sifting some fine sawdust into the paint does the job. The stuff doesn't sink in, you have to work it with a stiff paintbrush.

I know there are "proper" modelling paints for this sort of job, but they cost a fortune for the amount I'd needs, and I'm not convinced they are that much better. Maybe if you build a 1/32nd scale tiny diorama, but for a layout where most of it will be covered with undergrowth, stick to the matchpots.

Subscribe to:
Posts (Atom)