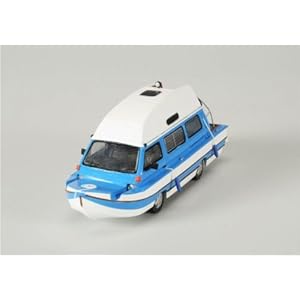
This blog does not normally cover die-cast releases, I can't get over the idea that's it's just blokes buying toy cars. However there is a new release that I covet - The "Top Gear" Damper Van.
Those with long memories will remember that I was so inspired by the combination of VW van and boat, that I had a go at building my own. If you don't remember then you can read about it in the archive. Be warned though, it wasn't one of my successful projects.
Anyway, Oxford Diecasts have licenced the entire set of amphibious Top Gear vehicles and these are now appearing in the shops. The cars/boats are based on those that the team tried to sail across the channel. This shows up in the Damper because of the colour (blue not green) and the higher pointed bow. The Mk1 I tried to model had a pointed end more akin to the canal barges normally produced by it's builders M&P Steelcraft.
Needless to say, this van will float about as well as my version did. All I need, is to find an excuse to put it on a model railway layout. Maybe a dockside scene as it's nearly 7mm. Or perhaps a boatbuilders with this part-finished in the shed. Hmmm.
Oh, and if you've just won the lottery, then the model is on my Amazon Wish List
A daily updated blog typed by someone with painty hands, oil under his fingernails and the smell of solder in his nostrils who likes making all sort of models and miniatures. And fixing things.
Showing posts with label Damper Van. Show all posts
Tuesday, July 26, 2011
Friday, February 12, 2010
Damper decisions
A slab under the middle of the van plus a couple of blocks at the back end were stuck in place with suitable solvent-free glue. Once dry, the van was launched again.
This time the waterline was very nearly there. OK, so the back is still a bit saggy but the front could be weighed down a touch with the mechanical bits. On some real water it might even be acceptable.
But at what cost ? To get the model this high on the water I've had to stick great chunks of polystyrene underneath it. To make a practical model, even bigger lumps are really required. On dry land it no longer looks like the prototype damper. The compromises and disfigurement to get this far are huge. Too big for me I think.
The problem is fundamental. I had assumed that because plastic floats, a plastic camper van would float. In reality, the kit is just too heavy to be seaworthy. That's not the manufacturers fault, they didn't intend to make a boat after all. If I want to build a working model of this vehicle, it will take far more work than the "quickie" project I'd originally intended this model to be. Therefore I need to move on and do something else. Unless some fancies taking this on (and if you do, drop me a line) I'll pack the model up and one day it will re-appear as a static item. The modifications so far look OK so this should work out but it won't be nearly as much fun.
Tuesday, February 09, 2010
Starting again
So, the motor and rudder have been removed. The prop shaft hole has been bunged up with Blu-tack (a small Dutch boy with a finger not being available) and the model launched again.
Result, it's still very stern heavy but the back platform is now clear of the water with the front nicely afloat. I still think it's a bit low, the waterline should be the tops of the wheel arches if possible.
Just as a check I weighed the components I removed:
Rudder - 10g
Motor drive unit - 58g
Fitted with all the gubbins you saw yesterday, the model has a weight of 261g.
I think what this proves is that the scale option isn't an option. I need more buoyancy and this has to come from somewhere. Favorites at present are a sealed section under the middle of the van and a large extension of that below the rear platform. It could be that what I've done is prove why the prototype sank, and why the second version had more hull. Mind you, that sank too albeit in rough seas.
Monday, February 08, 2010
Fully loaded Damper
But only just. The water is at the very top of the rear platform. If I add a figure then he'll get wet feet.
At the front end things are a bit better but the waterline is still far too high. I want to sail this thing on open water, not just the bathroom sink. That means a radical rethink methinks.
Friday, February 05, 2010
Battery options
The Damper van sailed OK last time but only if ignored the gentle sinking going on. My feeling is that the battery pack at the front was too heavy. At the very least it was too large so I need options.Digging through my stash of batteries, I found the ones you see. A few minutes with the scales gave me this:
4 AA's in holder- 101g
Yellow 4AA pack - 84g
Slingshot battery - 129g
Rechargeable PP3 - 42g
So it looks like 9 volts of rechargeable battery it is then. Best of all, the lump is physically smaller than the AA set in it's holder so I can move it back a bit in the boat. Let/s hope this works.
Thursday, January 21, 2010
Second sail
Back in the test tank (basin) my hopes were dashed. While the van floated OK, the bow was just under water. Admittedly I had added a set of AA batteries but there is still a receiver and speed control to be fitted so this boat isn't going to get any lighter !
Water also found its way in through the grille. This isn't a big problem as I've not sealed this up yet, but you don't really want water anywhere inside a boat. On the plus side, it didn't sink, and the water ingress wasn't huge so the project is still worth pursuing.
So, the next move is to find some lighter batteries. Obviously 4 AA's are too heavy so a smaller pack will be required. There's a lot of choice here, I just need to find one. If all else fails a set of AAA's won't weigh as much. Power requirements won't be huge as this isn't a fast boat. I'm only after 6 volts as the electronic require a certain amount to work.
Tuesday, January 12, 2010
More styrene
It's a smelly job as the plastic solvent eats polystyrene. That smell is bad news too as I'm pretty certain it's highly poisonous. Work in a well ventilated area and don't do too much at a time I think is the advice (actually, don't do it at all is probably the correct advice but then who reads instructions). With a bit of luck this "belt & braces" attitude will do the job. If the plastic box leaks, the amount of water that can be taken on board is limited by the polystyrene lump contained in it.
This is actually quite a contentious move. Within the model boat community, there are many who will argue vociferously that you shouldn't use any buoyancy devices as the hull should be properly watertight. That's true, but if any problems occur this will mitigate against them a bit. Just don't use it as an excuse to skimp on the hull.
Monday, January 11, 2010
Damper nose
The flat top went first - I scaled the length from the card kit and then used lots of curved items to try and draw the curves. After 6 different tins I found one that looked OK and cut around it.
The vertical bit is made in two halves, the idea being I could check they were identical. A bit like those butterflies you make as a kid by folding some paper after splodging paint inside. OK, not much like that but I know what I'm on about.
Lots of careful work with a pair of compasses later I think I've got something that looks right. The bow dips so the headlights can be seen - the car may have not travelled many miles on land but the BBC couldn't be seen to use something obviously non-MOTable. There is also a slight peak at the front not a continuous curve. Finally at the back end the sides taper to match the shape of VW intended for the front of the van.
I just glued the plastic in place and lobbed some filler around, filing this to shape with a coarse file once it had dried.
Wonder if this improves the aerodynamics of what is a rather brick shaped vehicle ?
Thursday, January 07, 2010
Platform for the back end
Since I don't have a plan I'm scaling parts like this from the cardboard model. My version is about 75% of the card one which makes calculations easy. Well it does if you use a calculator anyway.
The biggest problem is that the back end of a T25 doesn't have any straight edges. I know it looks like it does but that is deceptive. The back verticals are actually slightly curved as is the bottom lip of the tailgate. This is a common problem - most people think that a diesel railway engine is nothing but a box on wheels whereas it's more often a subtle mass of curves and angles. Try and replace these with straight bits and the result looks crude in comparison with the prototype.
I'll admit some cheating with my work, there's a bit of filler and epoxy making good in the gaps. This is entirely prototypical if you look at the shots showing the real thing being built. In fact I used far too little filler, the prototype is a tribute to Ispon. In comparison I've used only the vaguest hints of Squadron Green and Araldite. Well since I sanded off the excess anyway !
At the back you'll notice the spaces left in an overlay to take the VW's lights. Also the curved edges achieved by gluing some plastic inside the corners and then filing the curves. Not perfectly symmetrical I suspect but near enough for this model.
Tuesday, January 05, 2010
Test tank trials
Anyway the van floats. OK the stern is a bit low thanks to the weight of the engine. Hopefully a battery pack at the front will fix this as will adding the big hollow box for the captain to stand on and steer at the back. It's difficult to work out the correct waterline as the prototype spent most of its time sinking...
Some water trickled in. I think this is from the engine hatch and will chuck more glue in here. but generally things are looking good. The model stayed mostly above the surface which is all I can ask at this stage.
Monday, January 04, 2010
Adding bouyancy
Since this will be detrimental to the finished models performance I've been stuffing them with bits of polystyrene and then sealing this in with epoxy glue. Some of this has been run around anywhere I think water might make it's way in.
Lets hope it works. I think on the real thing they used filler foam and killed the engine.
Thursday, December 31, 2009
Dampervan rudder
It's only when I came to fit the thing I realised that they are designed to be used in boats with nice deep keels and decks and no campers with only a thin bit of plastic between the inside and outside. This left the nylon tubed far too long. In fact even when I shortened it as much as possible, so that there was only just enough threaded section for the retaining nut to grip there was about 10mm of tube above the plastic.
While I could have abandoned this and scratchbuilt a rudder, or acquired a Robbie version which I think is more amenable to this sort of application, I just fitted some plastic tube around the nylon shaft so that the nut could be tightened up fully onto this and grip the interior. Then copious amounts of epoxy glue were smeared around to keep the water out of the van. Leakiness is not something I want to emulate from the prototype !
Standing the model on its wheels required some trimming of the brass paddle with tin snips though.
Purists will note that the real vehicle was controlled using a barge style tiller hinged on the back or an outboard motor when the van engine failed. My rudder may be in the wrong place but one painted black I doubt anyone will notice the subterfuge. And if they do I don't care as making a tiller work is much harder and as I always say, this is my model, if you don't like it, build your own !
Tuesday, December 29, 2009
VW Wheels
What with the propeller sticking out of the bottom of the Damper van, the model now won't sit properly on the workbench. I can't be bothered to keep sticking it on a small box, this vehicle needs wheels.In the kit some very nice two part wheels are provided that fit inside rubber tyres which have a good tread patter. The only problem is that they don't look like Volkswagen wheels. If you wish to pretend your plastic campers have blinged up their van with some new alloys, then you're fine. Sadly Top Gear didn't do this, they stuck with the original VW steel items.
A proper modeller would at this point head off in search of the correct wheels for the model. I can't be bothered. A reasonable version ought to be achievable by simply sticking a decent size hub cab in place. That would leave the holes round the edge and cover the incorrect boss. All I needed was a hubcap.
Back on the workbench I removed the backs and pupils leaving a suitably curved plastic part. Sticking this in place with epoxy gave the desired results. OK so something 2 or 3 mm smaller would have been better but these are near enough for this model. You won't see then when it sails anyway.
Thursday, December 24, 2009
Pleasure in plastic
In fact I'd forgotten just how much pleasure there is in simply chopping a part of a sprue and sticking it to the other bits. The front end suspension assembly took me just over 20 minutes to put together and that involved paying some attention to the instructions. The results look pretty accurate as far as I know and if they don't well I don't care very much as when the model is in action as it will all be under water.
Of course there is a bit of concern at the strength of the parts. The kit is designed as a static model after all. Everything is well washed with Mek though to ensure everything is well stuck so hopefully all will be OK. If it isn't some blobs of superglue will sort things out.
But this was 20 minutes of of pleasure. All the bits fitted. No fettling was required. No test and fit, just fit and glue. At the end of the job I had a complicated looking assembly that would have taken forever in brass of whitemetal. Makes me fancy an Airfix Spitfire next...
Never mind, I have kit for a VW engine to put together as well just for the fun of it. Well it seems a shame to waste the bits.
Wednesday, December 23, 2009
Power !!!
Fitting was surprisingly easy. Drill a hole in the back of the tub that forms the interior and poke the shaft through. A couple of bass wood lumps carved a bit are glued under the lugs sticking out of the sides of the gearbox. More glue (5 Star adhesive epoxy) seals the shaft/plastic exit.
I wasn't sure what size propeller to use. The unit comes with a 30mm one which I worried might bash the bottom of the model so a 20mm version was put on order. However I think the larger version will be OK as it just clears the plastic bits. The engine cover (a part I wish was fitted to early Bay Window vans, especially the 1971 model) isn't fitted until I am confident that the prop is OK.
You might have guessed that this is all a bit unplanned. I make something and see if it fits. Perhaps some working drawings and proper planning would be better but this is a fun project. Besides, I'm rubbish at drawings.
Tuesday, December 22, 2009
Stoppering holes
Scraps of plasticard have been glued under the gaps left to fit gear levers and other detail parts. I'm not planning an interior so these won't be glued up in the normal way. The plastic is fixed in place with tube glue (Revell Contacta) and then a wash of Mek Pak. I want to make sure there are no gaps !
Of course I did remember to test fit the chassis so I knew which ones had to be left uncovered. It would have been very easy to have these up with a well glued plate and then have a tough job scraping the stuff off again.
Friday, December 18, 2009
Ingredients: 1 plastic kit
Anyway, plastic floats better than paper so my starting point is the biggest injection moulded kit I can find for the base vehicle. After discovering that the Revell kit I sought was out of production, I tracked one down on eBay, where I paid rather more than the 2 quid written on the box ! This is of course prototypical as the Top Gear version was also sourced from the famous on-line auction !
At 1/25 the model is smaller than the card version but I reckon there is still space for radio gubbins. I'll be ignoring the left hand driveness of the kit and will have to scratchbuild the correct roof but at least the fiddly bits are done for me.
And before you ask, no it won't work on land. Reading the article on building a 1/10 DKW in Model Boats magazine would have dissuaded me from trying this even if I was daft enough to think I could make a proper amphibious vehicle. I'm sure it's possible but that way involves many, many hours of hard work and development not to mention proper engineering. This is to be a boat. Admittedly one that is camper van shaped but a boat most definitely.
Thursday, December 17, 2009
Damper Van
You are right. This is a badly made card kit. I put it together pretty quickly from one of the spin off products from the BBC TV series Top Gear found in a charity shop. For those who don't know the programme, this is an amphibious camper van "built" by Richard Hammond for one of the teams challenges. It's based on a VW T25 or Wedgie and proved to be pretty hopeless as a boat, sinking in the reservoir pretty quickly.
Of course this didn't worry me. I love VeeDubs and I love model boats. As soon as I saw the programme I knew I wanted to build one of these.
As with any project you need to start by amassing some prototype information. The real Damper Van was built by M&P Steelcraft (Not Richard Hammond) based on a knackered VW picked up by the production team on eBay. It was converted and then trailered to the site for filming. The shots on the road were (as many Top Gear stunts are) staged purely for televisual purposes. In fact the telly people broke the rudder doing this as it was never supposed to be attached when on terra firma !
Real anoraks will also spot that a subsequent challenge to cross the channel involved a different van with a higher bow and slightly wider hull. This was just as successful as a boat. If you want one of these, them Marks & Spencer make a toy that doesn't appear to be available in the UK.
Anyway, with no plans available I was chuffed to find a well engineered card kit on sale in a cheap book shop. A couple of hours work and I have a 3D model suitable for taking measurements from. If I was really keen, gluing the parts rather than relying on the clever locking tab system would produce a good looking model. A bit of bracing and some varnish and I reckon it would even float. I have a better idea though...
In the meantime, if you want to see the real vehicle, visit the Beaulieu motor museum. And send me some photos please !
You can buy the kit from Amazon if you fancy having a go.
Subscribe to:
Posts (Atom)