I have a plan.
I have a pack of grab handles from Precision.
I have some 0.45mm brass wire.
I have a 0.5mm drill bit.
All I needed was a couple of evenings to spend drilling holes and supergluing the brass bits on the side of the DMU.
The job was fiddly and seemed to go on forever, but eventually, it was over. There is a definite reason I don't like building passenger rolling stock. Far too much effort required to fit things that need to be nicely in line or the model will look wrong.
Another handy hint. If your superglue is old and not setting properly, throw it in the bin and get some new stuff. Don't rely on kicker to make it set. I know this, but I never really learn.
A daily updated blog typed by someone with painty hands, oil under his fingernails and the smell of solder in his nostrils who likes making all sort of models and miniatures. And fixing things.
Monday, May 04, 2020
Sunday, May 03, 2020
Money raised, cakes eaten
Last weekend, we were hard at work with the RMweb Members Day 2020 in aid of NHS Charities Together.
By the end, a lot of people had enjoyed themselves immensely and we'd raised £7919 for charity.
There's not much to add, other than go and have a look at the web pages. Many people put a terrific effort in making videos and taking photos of layouts as well as proving virtual demonstrations. (I've summarised them here if it helps).
While there are people who enjoy being loudly sniffy about the forum, you can't argue with these results. We are all proud of this.
As a part of the process, I had to learn how to tie a bowtie. Education is important, so from the weekend, here's how to make Millionaires Shortbread.
Saturday, May 02, 2020
Saturday Film Club: Railway sushi
I can't explain this, other than it's delightfully mad. I won't spoil it for you, just sit back and wonder. Why?
Friday, May 01, 2020
Hornby beer
I've never been one for drinking at home much. Beer is a social thing for me, so pubs, beer festivals etc. - great. Otherwise, I'll have tea.
This has changed with the world in lockdown. I've been enjoying a beer with mates via the Interweb. Trips to the local supermarket usually involve coming back with something interesting and alcoholic in my bag. And yes, I do think it's essential.
The is a beer in my collection that isn't going to be drunk any time soon - a bottle of Blow-Off Steam HPA.
Why? Because it's part of my Hornby collection.
Yes, genuine Hornby beer, not available in the shops. I picked this up at the London Toy Fair in lieu of cake earlier this year. I'm sure it's lovely, but I'll be lodging this next to the giraffe cars in the collection. Doubtless it will be worth a large fortune one day...
This has changed with the world in lockdown. I've been enjoying a beer with mates via the Interweb. Trips to the local supermarket usually involve coming back with something interesting and alcoholic in my bag. And yes, I do think it's essential.
The is a beer in my collection that isn't going to be drunk any time soon - a bottle of Blow-Off Steam HPA.
Why? Because it's part of my Hornby collection.
Yes, genuine Hornby beer, not available in the shops. I picked this up at the London Toy Fair in lieu of cake earlier this year. I'm sure it's lovely, but I'll be lodging this next to the giraffe cars in the collection. Doubtless it will be worth a large fortune one day...
Thursday, April 30, 2020
Lockdown Project: Glass animal repair
I've always loved my parents' collection of glass animals. As a child, apparently, I used to stare at the china cabinet for hours. If I was very good, I might be allowed to have the door open, but I never tried to grab anything from it. I knew these were precious and fragile.
Despite this, some of the animals have broken over time. The lamp post, bought on Brighton pier apparently, is at least 60 years old!
Sticking glass back together seems to defeat most glues, but recently, we've seen superglues that are set by UV light appear on the market.
I think this stuff comes from the dental world. My dentist has set a couple of fillings with UV and I understand they have similar glues claimed to be incredibly strong.
Revell's version arrives with two tubes and a marker pen with UV torch on it. In theory, all you do is apply the glue, fire light at it for 5 seconds and the job is done.
In practice, I found that the 5 seconds thing is rubbish. Think nearer 30 for a workable joint. My first attempts fell apart quickly and I found that while the edges had hardened, most of the glue was still liquid. This is especially odd as the glass is transparent, although the colour may block the correct light wavelength.
Where we had a clean joint, the glue worked well. The delay of a few years between breakage and mending meant that a few slivers of glass had long gone, but I did my best and at least all the pieces are attached. Not good as new, but good enough not to throw away.
I've since tried the glue on a couple of other jobs and been reasonably impressed. Not cheap, but a very useful addition to the toolbox.
Wednesday, April 29, 2020
Waterborne Wednesday: Freedom on dry land

Want a boat, but don't need the hassle of modelling water?
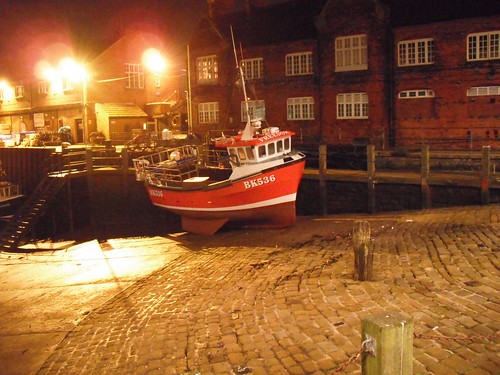
Allow me to introduce BK536 "Freedom". Built in 1991 in Falmouth, the hull of this trawler allows her to sit on the cobbles so the crew don't need to get their wellies wet when coming ashore.
I'm kidding, boats sometimes need to be able to sit in port when the tide has gone out. I've seen older vessels with a leg on each side to achieve the same effect. The design of this hull presumably provides stability when at sea as well as supporting it on land.
Model this and at least you are spared the worry of cutting a hole in the sea, or lopping the hull off at the waterline.
Sadly, just after taking this shot, I managed to drop the camera on those very hard cobbles, something that did it no favours at all. Don't do it kids, unless you like spending money on photographic equipment.
Tuesday, April 28, 2020
The best laid plans
This thing is full of jobs I'm not looking forward to. Each time I think, "Well now that's done, the rest will be easy." and each time, it isn't.
So, I have to drill some holes and fit the handrails and door handles. Fiddly, but follow the plan and all will be well.
The plan though. When I measure it, doesn't seem to correspond to the model. A little work with the calculator and it seems it's slightly bigger. By about 5%
But only in one direction. Length-wise, it's pretty much right. Height. No chance.
Bugger.
Fortunately, I have a copy of A Pictorial Record of British Railways Diesel Multiple Units by Brian Golding. It's a pretty dull read, but the pictures are excellent. Loads of accurate* 4mm scale plans for the modeller to work from.
Phew.
*If you are about to tell me something along the lines of "I think you will find that the plan on page..." then don't bother. They are near enough for me. These things are only motorised coaches and anyway, I'm building an MTK kit. Almost the definition of "If you want to go there, don't start from here."
Monday, April 27, 2020
It's the ends
Dry-fitting parts is always a good idea. Put things together without glue and you'll spot potential issues that won't be any easier to deal with when the adhesive is flowing and getting all over your hands.
As you can see, there is a part fit issue with the Cravens DMU floor. Basically, it's too long.
To be fair, this is mentioned in the instructions, but is a bit of a surprise when you see just how bad the situation is. The solution was to lop 2mm off each end of the floor and then thin the ends slightly s they fitted in the pockets in the whitemetal bits. 3mm would probably have been enough but I'm better at measuring whole mm, and the extra 1/2mm at each end wasn't going to be an issue. A bit of wiggle room is welcome.
First though, the interior. On a parcels unit, this isn't much, but I feel that something in the cab is a good idea and had picked up a couple of mouldings from Replica Railways. After a little trimming, they will fit in behind the cab fronts OK.
More importantly, they will fit through the holes in the floor the power bogie occupies. I'll need to fit them after the glazing goes in, and that has to be done after painting. There's a fair bit of thinking ahead required with this kit.
Ayway, floor trimmed and fitted with epoxy glue and I have a model that starts to look like a DMU.
Sunday, April 26, 2020
What day is it?
Is anyone else struggling to remember what day it is at the moment?
Working from home has been my thing for several years now. I'm so expert at it, I recently wrote some tips for readers of my writing blog. As such, I've no truck with weekends or bank holidays. If a job needs doing, it gets done at a time that suits me, but if I want to skive off in the week for a nice lunch or to do something for me, then I don't feel guilty about it. I have a phone, so if anything is urgent, and I don't think writing about toy trains is in any way an emergency service, then I'm contactable.
But without the daily school run outside the window, no chance to get out and about, days all merge in to one. I go for a paper on Sunday and a quick milk/bread stroll on Thursday, but that's it. The allotted hour's stroll isn't working for me as the silence outside is deafening, so I give it a miss.
What has this to do with the blog? Well, as some of you know, I write posts well ahead of the day they will be published. At the moment, I'm trying to keep myself two weeks ahead. My thinking was originally that if I fell ill, a couple of weeks gave me a chance to get through the worst of it. Enough not to leave a break in posting, providing both comfort and an incentive to feel better.
There is also a pattern to my postings - Mon/Tue projects, Wed Boats, Thu something random, Fri something historic or collectable and Sat a video. Sometimes a magazine appearance on Thursday drops in and maybe the current project demands more space, but generally, this is my timetable.
Except that it's not always working like this. I'm trying to plan ahead but sometimes it all just gets mixed up. That's why you didn't get a film yesterday. Not that it matters, but it niggles me.
All this extra time isn't doing much for my project progress. Lots of people are making things, sales reports from many of the trade tell us that, but I'm often finding it hard to focus. I know I want to make things, but after a day staring at the computer, my brain is fried. I have watched many telly shows with people spannering cars in the evening, just because I can't get into anything else.
They say every journey starts with a single step and sometimes that's the hard one to take.
The good news is I have managed to make a few things. As we adjust to the new normal, I'm getting better at ticking off a few jobs that have been kicking around for a while. These are appearing as "Lockdown projects".
I'm sure everyone out there is busy doing workouts, learning new languages AND assembling Airfix Spitfires. I'll be happy if I don't have to look at my phone to work out if it's Tuesday!
Working from home has been my thing for several years now. I'm so expert at it, I recently wrote some tips for readers of my writing blog. As such, I've no truck with weekends or bank holidays. If a job needs doing, it gets done at a time that suits me, but if I want to skive off in the week for a nice lunch or to do something for me, then I don't feel guilty about it. I have a phone, so if anything is urgent, and I don't think writing about toy trains is in any way an emergency service, then I'm contactable.
But without the daily school run outside the window, no chance to get out and about, days all merge in to one. I go for a paper on Sunday and a quick milk/bread stroll on Thursday, but that's it. The allotted hour's stroll isn't working for me as the silence outside is deafening, so I give it a miss.
What has this to do with the blog? Well, as some of you know, I write posts well ahead of the day they will be published. At the moment, I'm trying to keep myself two weeks ahead. My thinking was originally that if I fell ill, a couple of weeks gave me a chance to get through the worst of it. Enough not to leave a break in posting, providing both comfort and an incentive to feel better.
There is also a pattern to my postings - Mon/Tue projects, Wed Boats, Thu something random, Fri something historic or collectable and Sat a video. Sometimes a magazine appearance on Thursday drops in and maybe the current project demands more space, but generally, this is my timetable.
Except that it's not always working like this. I'm trying to plan ahead but sometimes it all just gets mixed up. That's why you didn't get a film yesterday. Not that it matters, but it niggles me.
All this extra time isn't doing much for my project progress. Lots of people are making things, sales reports from many of the trade tell us that, but I'm often finding it hard to focus. I know I want to make things, but after a day staring at the computer, my brain is fried. I have watched many telly shows with people spannering cars in the evening, just because I can't get into anything else.
They say every journey starts with a single step and sometimes that's the hard one to take.
The good news is I have managed to make a few things. As we adjust to the new normal, I'm getting better at ticking off a few jobs that have been kicking around for a while. These are appearing as "Lockdown projects".
I'm sure everyone out there is busy doing workouts, learning new languages AND assembling Airfix Spitfires. I'll be happy if I don't have to look at my phone to work out if it's Tuesday!
Saturday, April 25, 2020
J15 upgrade in Hornby Collector Club magazine
Hornby's OO gauge J15 is a really cracking model, but like all RTR, it can be improved IMHO with a bit of dirt and few personal touches.
In the Spring 2020 issue of "The Collector", I've taken the model and performed a few very standard tweaks - renumbering, adding a crew, coal and tools in the tender, light weathering - to provide a generic guide that anyone could follow on their own model.
To be honest, I can't get away from the idea that people are paying - handing over real money - to have someone put coal in the tender of their loco.
I get paying for DCC, that's witchcraft and therefore not something you should practise at home, but coal? People have been doing that for over 6o years.It's simple and fun. Don't pay someone to have fun for you!
Friday, April 24, 2020
It's the Virtual RMweb members meetup this weekend
Sunday should see the annual RMweb members day in Taunton. Obviously, this isn't going to happen.
Don't worry though - you can enjoy the Virtual RMweb members weekend with layouts, pasties, cake (I hope), interviews, an auction and loads of other fun stuff. All this will be raising money for NHS Charities Together, so a good time and a good cause.
Thursday, April 23, 2020
Shunting, an office and track cutting in BRM - plus Melbridge Dock!
Time for a bit of loco kit building in the May 2020 BRM. Nowadays, people aren't so likely to dig out a few sheets of brass and a soldering iron so I was pleased to find a newbie-friendly alternative.
Planet Industrials new Planet Shunter kit provides a 3D printed body on to which you attach etched panels. This makes the best of both technologies and saves an awful lot of sanding to try to give a 3D print the smooth finish we see on modern RTR. Sat on top of a SPUD, it's as easy to build a kit as you can find. Superglue is the adhesive of choice, so the thing should be within the grasp of anyone capable of building an Airfix Spitfire.
Rather more involved is my contribution to the Runcorn Salt Union project - the office block is scratchbuilt and was my first serious use of the silhouette cutter. I'm pleased with the result and look forward to seeing the completed layout.
Sadly, having just brought the DVD back for all issues of the magazine, Coronavirus issue means we can't guarantee a supply for the time being, so BRM TV is only (currently) available to digital subscribers. Not ideal, but in a quickly changing situation, there's not much we can do. It will be back, but obviously, we don't know when yet.
Anyway, the expensive bit of the job has been completed - the content is filmed and edited. This month is one of my very basic pieces where I look at cutting track. We all do it, but it's another job that can be offputting to beginners.
Finally, since this is an industrial themed issue, the Get The Look pages at the front feature my layout, Melbridge Dock. I provide a quick rundown explaining how you can produce something similar, sometimes with more modern kits making life even easier!
BRM May 2020 on RMweb
Planet Industrials new Planet Shunter kit provides a 3D printed body on to which you attach etched panels. This makes the best of both technologies and saves an awful lot of sanding to try to give a 3D print the smooth finish we see on modern RTR. Sat on top of a SPUD, it's as easy to build a kit as you can find. Superglue is the adhesive of choice, so the thing should be within the grasp of anyone capable of building an Airfix Spitfire.
Rather more involved is my contribution to the Runcorn Salt Union project - the office block is scratchbuilt and was my first serious use of the silhouette cutter. I'm pleased with the result and look forward to seeing the completed layout.
Sadly, having just brought the DVD back for all issues of the magazine, Coronavirus issue means we can't guarantee a supply for the time being, so BRM TV is only (currently) available to digital subscribers. Not ideal, but in a quickly changing situation, there's not much we can do. It will be back, but obviously, we don't know when yet.
Anyway, the expensive bit of the job has been completed - the content is filmed and edited. This month is one of my very basic pieces where I look at cutting track. We all do it, but it's another job that can be offputting to beginners.
Finally, since this is an industrial themed issue, the Get The Look pages at the front feature my layout, Melbridge Dock. I provide a quick rundown explaining how you can produce something similar, sometimes with more modern kits making life even easier!
BRM May 2020 on RMweb
Wednesday, April 22, 2020
Waterborne Wednesday: Wolverhampton canal with rail bridges

If you fancy building a model railway layout without a station, this might be worth a look.
Looking along the canal in Wolverhampton, we see it pass under two different railway bridges. I imagine the layout would be mostly fiddle yard with a relatively small viewing window in the front. Trains would thrash over the bridges to entertain those looking on.
OK, that's probably a mad idea, but the view is interesting.
You can see an aerial view on Google maps here.
Tuesday, April 21, 2020
Back to the Cravens
Time to pull a part-finished project off the shelf. I had a feeling that the Cravens Parcels DMU was last on the bench last year. It was shocking to discover that the last time it appeared on here was in 2016!
I seemed to remember that all (Ha!) I needed to do was fit the ends and door handles. I even remembered all the bits were in the box. There was also a question over the window frames, which the stamped aluminium body shell doesn't have, but then looking at photos, neither does the prototype so I can stop worrying about finding etched frames.
Digging them out, it's true the bits are in the box, and there doesn't seem to be that much work to do, but I have a feeling that there are still surprises in store...
Monday, April 20, 2020
Polar Bear
That's it - Polar Bear is finished and working.
The kit is a bit of curate's egg. Some bits work really well, others less so. The end result looks OK as long as you don't really know the prototype. I'll enjoy running the model once the 32mm gauge line in the garden is finished, but I know the definitive version is still waiting for me to scratchbuild.
What I have is a nice and rugged model locomotive that will look pretty on the track. It rumbles along at a fair lick, but in that respect is a lot like the prototype.
Even with the limitations of the kit, I'm glad I added some detail on the wheels and brake gear. That was worth it just to add some relief. The Revell Anthracite black contrasts with the cream and scarlet bodywork nicely, just like the real thing.
And why did I chose to model Polar Bear? Well, Garden Rail readers will know there is a 3D printed kit for Sealion awaiting my attention one day.
Sunday, April 19, 2020
Test running the garden railway
I've been doing a bit of maintenance on the garden railway - basically, it's not seen much use recently, but work is going on to build some reliability in. I'll cover this in future posts.
Anyway, after building, there needs to be testing. I got a bit carried away and dug out every fun* loco we have for a few circuits.
*fun locos are those that won't be damaged if they derail because I've not fettled the track yet. LGB Toy Trains, Playmobil and others. No live steam of the posh Accucraft Isle of Man locos. Those come later.
Saturday, April 18, 2020
Saturday Film Club: Moon effects
Blog posts about the recent death of Bill Pearson pointed me at this interesting video. I saw "Moon" at the cinema and was really impressed with the effects. Here, Bill explains how they were done, and that models can be cheaper than CGI.
Friday, April 17, 2020
Lockdown Project: Flashing light
With plenty of time on my hands, I'm going to try to be motivated enough to work through a few projects that have been kicking around for ages. I don't know about you, but I'm finding staying focused on anything tough right now and have to resist the urge not to watch rubbish on TV when I'm not working.
Anyway, I have a flashing warning light that I picked up for a fiver at a car show. It attaches to your roof with a rubber sucker and has the hallmarks of a cheap 1970s or 80s accessory. Cheaply made, I'm sure it was sold as a safety aid if you broke down.
Tatty chrome and a busted battery box in the base seemed to be the main issues. While the chrome is beyond me, I reckoned the wiring would be fixable.
First job, remove the old box. No problem there, drilling out a couple of aluminium rivets saw the plastic bits and other remains removed and in the bin.
For some reason, power was to come from 3 D-cells. I wired one compartment out of a 4-cell AA battery box and connected it up. The bulb is a special old-style torch bulb that includes a flashing unit. I guess this is a bi-metallic device as part of the filament. I tracked a couple of these down on-line.
I was particularly pleased with my connection to the body - a hole drilled through a rivet and the wire poked through this with a blob of solder. All connected up, the unit worked, but not very reliably. I wasn't happy with the switch. Even afer a bit of WD40, it didn't seem quite right. Until it exploded.
Maybe exploded is putting it a bit strong, but falling apart into several pieces isn't as exciting, and the Interweb is all about excitement isn't it.
The rivets holding the switch in position were drilled out and I set to, to repair the slider with superglue, bracing the joins with the thinnest plastic sheet I had. This was glued and trimmed to shape later. Once happy, the unit was rebuilt with brass bolts. I did the connection to the case this way at the same time as there wasn't any point in trying to hide the repair any more.
A quick clean of the chrome with some Brasso and the lamp is ready for service. After a few seconds warm-up, the light starts to flash. It's a bit intermittent to start with but seems to settle down eventually. One day, it will live in the back of my Beetle as a decorative item. If I ever get the car back on the road that is - it's a bit harder to fix than this!
Anyway, I have a flashing warning light that I picked up for a fiver at a car show. It attaches to your roof with a rubber sucker and has the hallmarks of a cheap 1970s or 80s accessory. Cheaply made, I'm sure it was sold as a safety aid if you broke down.
Tatty chrome and a busted battery box in the base seemed to be the main issues. While the chrome is beyond me, I reckoned the wiring would be fixable.
First job, remove the old box. No problem there, drilling out a couple of aluminium rivets saw the plastic bits and other remains removed and in the bin.
For some reason, power was to come from 3 D-cells. I wired one compartment out of a 4-cell AA battery box and connected it up. The bulb is a special old-style torch bulb that includes a flashing unit. I guess this is a bi-metallic device as part of the filament. I tracked a couple of these down on-line.
I was particularly pleased with my connection to the body - a hole drilled through a rivet and the wire poked through this with a blob of solder. All connected up, the unit worked, but not very reliably. I wasn't happy with the switch. Even afer a bit of WD40, it didn't seem quite right. Until it exploded.
Maybe exploded is putting it a bit strong, but falling apart into several pieces isn't as exciting, and the Interweb is all about excitement isn't it.
The rivets holding the switch in position were drilled out and I set to, to repair the slider with superglue, bracing the joins with the thinnest plastic sheet I had. This was glued and trimmed to shape later. Once happy, the unit was rebuilt with brass bolts. I did the connection to the case this way at the same time as there wasn't any point in trying to hide the repair any more.
A quick clean of the chrome with some Brasso and the lamp is ready for service. After a few seconds warm-up, the light starts to flash. It's a bit intermittent to start with but seems to settle down eventually. One day, it will live in the back of my Beetle as a decorative item. If I ever get the car back on the road that is - it's a bit harder to fix than this!
Thursday, April 16, 2020
Off to the Isle of Man in the latest issue of Garden Rail
Something unusual in the May issue of Garden Rail - a photoshoot by me for the lead layout.
While on the IOM last year, I got chatting to Ian Beech, builder of The Lighthouse and Gorsebank Railway. This amazing G scale line runs around his cottage and operates completely automatically. I don't just mean the trains circle as a procession either, they run at different speeds so have to interact with each other stopping as required to let others past.
The day I visited was a bit damp, and since the line is right at the northern point on the island (get to the lighthouse and you've just missed it) but even so, it looks great.
We've also got a conversion of an LGB Stainz to a steam tram, making your own people, building a sawmill, making FR Bugbox coaches and restoring a Caradoc.
Full contents listing, link to buy the issue and video content on RMweb.
The day I visited was a bit damp, and since the line is right at the northern point on the island (get to the lighthouse and you've just missed it) but even so, it looks great.
We've also got a conversion of an LGB Stainz to a steam tram, making your own people, building a sawmill, making FR Bugbox coaches and restoring a Caradoc.
Full contents listing, link to buy the issue and video content on RMweb.
Wednesday, April 15, 2020
Waterborne Wednesday: River container vessel
Not a great photo this one, and sadly not a shot of a real boat. This model in the Hong Kong Maritime museum shows a river container boat - the tiniest container boat you're likely to find and a definite candidate for a radio-controlled model.
Normal container ships are massive, but since I have seen these smaller versions in real life, even if I didn't get a picture, I could see the fun in making one. I'm pretty sure this isn't even the smalled variant out there, I'm sure I saw a 4 container version with them stacked at 90 degrees to those on this model.
Subscribe to:
Posts (Atom)