Wednesday, August 31, 2016

Warehouse Wednesday: Wolverhampton Low Level Station

Low Level station

On Saturday, I mentioned that I'd been for a stroll around Wolverhampton looking at old railway sites. When the trip was mentioned, the site at the top of my list was the Low Level station.

For those who aren't familiar with the site, Wolverhampton has two stations. High Level is still in operation, but next door, and down about 50 feet, Low Level closed to passengers in 1972 and parcels in 1981.

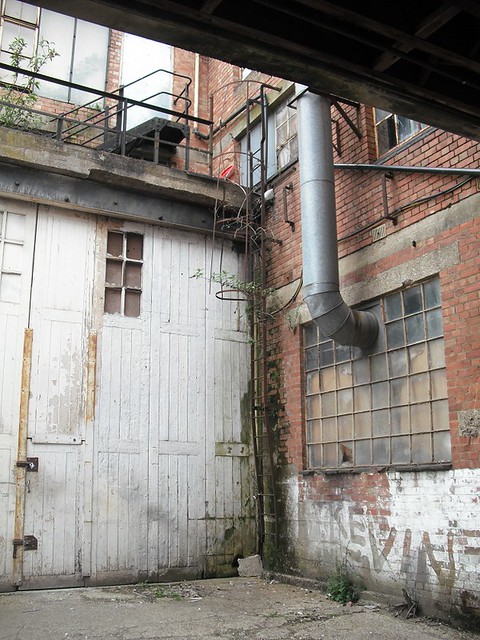
I remember seeing the station when spending a week on a railcard tour in the mid 1980s. For some reason, a complete set of steam loco wheels were sat on the track running through it, but the building itself was firmly out of bounds.

Inside Low Level station - Trackside

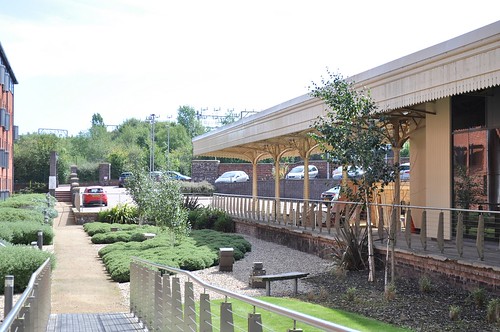
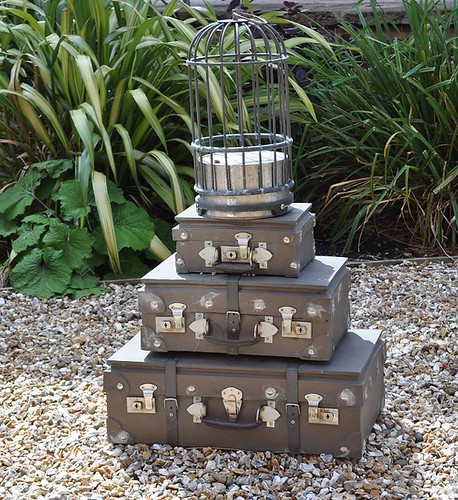
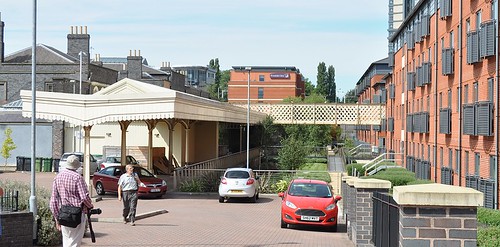
Now the tracks are gone, replaced by a garden with some rather nice arty models of luggage dotted around.

Bird cage

On one side there is a hotel and student accommodation. On the other, the station complete with canopy has been converted into an exhibition and function space.

Inside Low Level station - Trackside


Trackbed

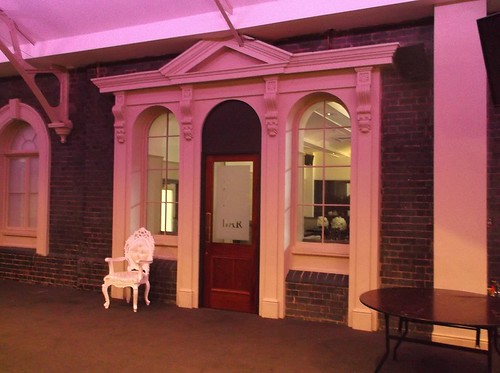
The conversion is very impressive. Although not normally open to the public, we managed by asking nicely, to be allowed in. The entrance is the old ticket hall which as been well restored, although I'm not sure the chandelier is original.

Inside Low Level station - entrance hall

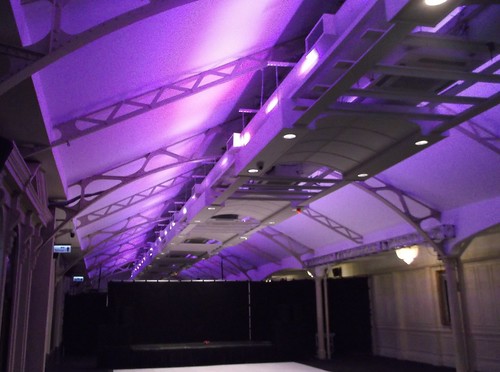
Most of the platform has been walled in along the track side. From the outside it looks like black glass, but inside there is a normal wall. The inside of the canopy roof is intact.

Inside Low Level station - on the platforms

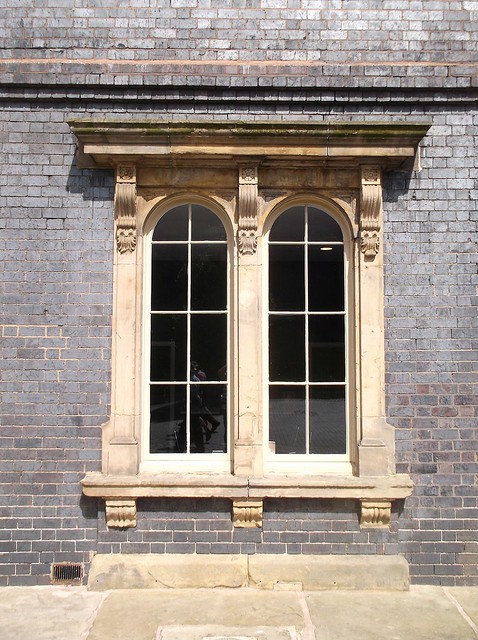
Along the building wall, all the original doors and windows have been restored and are in use.

Inside Low Level station - the bar

This would make a fantastic venue for a model railway exhibition. There's a nice flat floor, rectangular room and parking for exhibitors vans. 5 minutes stroll from the High Level station and 10 minutes from the city centre. OK, there's not enough parking for the visitors on site, but the city can help with that. The adjascent pub, The Great Western, is worth a trip too with good food, beer and walls full of railwayana.

Inside Low Level station - window

While the station hasn't been restored and turned into a railway museum as originally planned, what has been done is very impressive. 

Thanks to the owners of Grand Station as it's now called. A trip to their website brings up loads more photos and is well worth a look. 

Tuesday, August 30, 2016

Lined out


The Barclay would probably look fine in plain green, but I need the practise at lining models out so I've loaded up the bow pen with paint and had a go.  

To help me, I made a little ruler from plastic that could be hooked over the tank edges - it's easier than measuring and as long as I don't lose it, it will be around for future efforts. The edge the pen will run along was chamfered to stop the paint creeping under it, something that happens if you have a plain edge. 

I'm quite pleased with the results. The paint was a bit thick so I thinned it, a little too much as it turns out. Corners were painted in with a brush and then cut back on the outside edge with another brush loaded with turps. Maybe I'm a long way from a Rathbone but once weathered, it will look OK.

Monday, August 29, 2016

Molten metals paint


Metal is tricky in model form. Ideally you'd make whatever it is in the right material and just polish it, but that's not always possible. 

At the IPMS last year, I came across Darkstar "Molten Metal" paints and was very impressed. Unlike enamels, the pigment doesn't drop out of suspension all the time so there's no need to stir constantly.

Airbrushes.com now stock the paint, which makes it easier to get your paws on. After arranging for a  review for MREmag, I've had a go on the Barclay where I needed to paint the copper pipes and brass valves. While the pipes really are copper, and the brass bit are cast brass, cleaning either up was more trouble than it was worth. 

The paint initially didn't want to stick to the smooth, sprayed enamel base but constantly working it solved this and after a few minutes it had coated perfectly. Ideally I should have used a primer base which would have solved the problem. 

The results look pretty good to me. For copper, I used copper colour. Brass is "Regency Gold". Both will have a wash of black come weathering time which should make them look even better. 


Sunday, August 28, 2016

Hotline train sets

Searching eBay for monorail stuff, I discovered that in the 1970, Mattel produced a futuristic train set called Hotline. The range included track, a loco, wagons and coaches. Powered by an onboard rechargeable battery, the loco was a 4-2-0 although since it was supposed to be jet powered, I'm not sure Whyte notation applies!

Anyway, a little digging and I find these videos:


Fantastic stuff. Who wouldn't want one of these?

I notice that they were only sold in the US and that might be because the space required for the track is as big as most UK lounges. The film maker has had to clear his of furniture to install the track. Mind you he also makes reference to running out of time and I wonder if there is a family on the way back who wouldn't be too pleased to see futuristic train set all over the floor.

Saturday, August 27, 2016

Broad gauge rail - still in use!


Earlier this week, I joined a group on a walk around Wolverhampton looking for the remains of old railways. 

More of this later, but one quick surprise find was some broad gauge rail, which is still in use. 

Admittedly, it's in use as a gatepost, but that's not bad for metal over 100 years old. Two lengths have been bolted foot to foot and filled with concrete. Painted blue, the post still stands down a path from the Low Level station.


Friday, August 26, 2016

Dumb buffers made of wood


Narrow gauge locos don't often have buffers outside of Talylln land. Mostly there is some sort of chunky centre coupling. The Barclay kit comes with some brass fold-up buffers and these look suitably industrial, so I decided to use them. 

Except that in real life I suspect they would be made of wood rather than solid metal.

Not a problem, in the material stash there is some strips of hardwood. I removed the buffer sides and stuck the faces to the wood. Once dry, this was sawn and sanded to match. 

For extra industrial appearance, I added bolt heads using fine brass pins. These are fitted into holes drilled in the face and wooden bloc but not through the buffer beam. Doing what I did cost me 3 drill bits which is plenty thank you. 

To be honest, I'm not sure about the bolts. Surely they would stop the buffer faces sliding? However, I found real locos fitted with them and the metal faces would have to be held in place some how. It's not likely that they'd have used a big pot of epoxy glue!

Thursday, August 25, 2016

Plumbing the cab


Cab plumbing is simple enough - some (supplied) 0.8mm copper wire is fitted into  0.85mm holes drilled in the lost wax castings fitted in the cab. A few dots of superglue hold everything in place. 

Drilling cast brass requires a nice sharp bit. The first one I tried wasn't man enough for the job but a change to a fresher tool allowed me to carry on even though I was using a pin vice rather than a power tool. Am I the only one who can't be bothered to plug something in for jobs like this?

Wednesday, August 24, 2016

Warehouse Wednesday - Square chimney

Modern Chimney

A few weeks ago, I was asked if I had any pictures of chimneys. 

Digging through my photos, I was amazed to discover that you could count the number found on one hand's thumbs. Since then, I've become a little obsessed with photographing tall stacks. 

One of the more unusual is found in Wolverhampton - this square (and very modelable) structure appears to be made out of a pile of concrete cast squares. I'm sure I used to have something similar in plastic as a toy many years ago.

I'd say that while it looks modern, it might date back to the 1970s, but would be happy to be corrected by anyone who knows more. I'd also be interested to know if it's unique.  


Tuesday, August 23, 2016

Sandbox handles


Normally once I start sticking castings on a locomotive, the model begins to come to life, but not this time. The odd proportions of this beast mean the chimney and dome don't add nearly as much as they would on a "normal" loco. 

Still, I'm quite pleased with the sandbox handles. Each is the top of a brass pin superglued in the hole. 

To ensure each is the same height, I gripped them in a pair of tweezers and shot the glue with kicker. This seemed to fix them but give me enough time to extract the tweezers. 

Monday, August 22, 2016

Time to turn the soldering iron off


Happy days. The soldering on the Barclay body is complete. Everything else can be glued on. 

Last job was the cabside handrails. These are brass pins supplied in the kit.

Each was tacked in place, fluxed up and then blasted with a gas torch to melt the solder faster than the surrounding brass could draw the heat away. 

After a quick wash, I couldn't resist and bit of polishing with fibreglass pencils, just to get rid of the worst of the kettle descaler experiment. Well, it's nice to have a shiny model...

Sunday, August 21, 2016

Sail the Bismark!


Mention a partwork publication on any forum and within 3 replies, an “expert” will tell you that the things never complete their run and that no-one ever builds the models.

This will of course be based on absolutely no facts, but it won't stop them.

Well, just to prove the experts wrong, here's my dad's Bismark hull on the water a couple of days ago. Made from the “Build the Bismark” partwork that was out a few years ago, we've finally got paint on and gubbins in.

Progress has been intermittent as he's done other things along the way. Work takes place in fits and starts and there is more than you see here with most of the superstructure assembled and in boxes.

Anyway, the hulls is leak free and sails very nicely. Top speed is slightly higher than scale but not much. Quite a bit of lead was required to get the buoyant hull near waterline – a pound in the back and more in the front, with more to come when the model is ready for final weighting.

Steering is good with a reasonably tight turning circle of between 6 and 10 feet. Even at full lock, the narrow hull doesn't heel over much, although I'm sure this will change a bit once the upperworks are on.


Saturday, August 20, 2016

New bumper required

Tug repair required

No good deed goes unpunished. 

The Bantam tug makes an excellent rescue boat - it's manoeuvrable and strong, but after helping shove a yacht with a duff rudder towards the bank, I find one of the wooden bumpers has fallen off. 

The stupid thing didn't even have the decency to be floating on the water either, so I'll have to make another one...

Friday, August 19, 2016

What a difference 19 years makes


Lead photo in the Melbridge Dock article in the current BRM is this shot by Andy York showing the Y7 shunting behind Dougie and a seagull. 

Back in 1997, Tony  Wright took a very similar photo.

Andy's pic was taken on a digital camera. He's post-processed it to make sure everything is in focus and then delivered it to the editor via the Internet. 

Tony took his on a medium format camera which had an adjustable back to improve the depth of field - the first model railway photographer to use this sort of kit. Photos were taken on transparency, 72 by 60mm. He would take three of each shot - one for the mag, one for his records and the third for the layout owner. Transparencies had to be scanned in for use. All the work had to be done "in camera".

Andy does take more than one shot, or at least his camera does. Most photos are now made up of multiple images taken with different focus points - and staked to produce the infinite depth of field required by today's mags. Fiddling with images to remove dust or unwanted backgrounds is standard practise.

Digital has certainly accelerated the work though. Tony produced 12 images in half a day at my house. Andy shot 34 in about an hour at the show.

I wonder how things will change in the next 19 years?


Thursday, August 18, 2016

Melbridge Dock in BRM


While we exhibited Melbridge Dock at Doncaster earlier this year, Andy York took the chance to point his camera at it. The results can be found in the September "Layouts Special" issue of BRM.  

Since the rest of the magazine is full of normal layout articles, this one is heavy on pictures and captions. I've tried to show that building a small layout means plenty of chance for details. It's true, only around half of Andy's photos have been used as he snapped so many- more will be on RMweb for your enjoyment plus the two here which I've nicked from his secret store of images. 


Wednesday, August 17, 2016

Warehouse Wednesday - Valves in a box

Box with handwheels

Tucked away behind Alexandra Palace, I found this black box with hand wheels. Most people would ignore it, but I thought it was worth a picture. 

While I've no idea what it does, a future model may need just such an addition.

Tuesday, August 16, 2016

Barclay chassis testing


Barclay chassis test

A quick coat of Railmatch "Weathered Black" followed by a bit of cleaning up the next day and the chassis is ready for a test. 

Powered an half-century old H&M Clipper, it thrashes away on the rolling road nicely enough. Control will be more subtle on a better controller. I like the rolling road though as it gives all the Romford bits the chance to unscrew themselves. Two crankpins did - fixed with a dot of superglue on the threads - and one wheel nut - re-tightened with a bit more force.

Only one chip has appeared in the paint, possibly because the metal wasn't perfectly clean before priming, apart form the the hand painting has worked OK. 

Back to the body now. 

Monday, August 15, 2016

Painted primer


Stripping this chassis down will be a faff so I've treated it to a brush coat of lovely Humbrol primer. I did buy a new pot, but only because I can't find the old one. 

The sticking power of this stuff amazes me. OK, I've kept the metal clean but it does seem to work well. An etching primer would be better but I find the brushable versions too thick, and you can never clean the brush out afterwards. This stuff comes out with water - how it works so well is witchcraft. 

Sunday, August 14, 2016

A little bit of stop-motion animation


It's another free book Sunday and this week I've been working with the Sport Bulldog I built last year and "Parker and Wild" builders yard that's quite a lot older, to produce an advert.

The slightly (deliberately) clunky animation is a GIF rather than a video as that seems to be thing for Twitter and other image sharing websites. All I did was take a series of photos and chuck them in to JASC Animated GIF maker. A bit of tweaking with the finished shots and here we have it.

It's amazing how useful these 4mm scale models can be.

Anyway, as the advert says, head over to Amazon to download the book for free now. And if you like it, please leave a review.

Saturday, August 13, 2016

It just needs a bit of T-Cut...


After a slightly random conversation at the model boat club, I find myself custodian of this GWR station lamp. The previous owner had inherited it and didn't want to throw it away. He had no desire to  own a rusty relic though - so passing it on to me for free solved all his problems. 

I can't resist a bit of railwayana but this isn't without it's issues. The main one being that quite a lot of it is composed of rust. The frame around the glass is OK, but both the bottom and top are basically knackered. 

Sensible people would throw this away - or at least find some other numptie to pass it on to. 

I'm not sure what to do. Replacing all the rust wouldn't leave much of the original. There's little metal to weld to so replacing rust with steel isn't likely. My initial thoughts involve some automotive glue. Maybe if I stabalise the rust, I can glue metal inside the rotten bits. 

Dunno. For the moment it's in store while I think. Suggestions welcomed.

Friday, August 12, 2016

Pickups


No problem fiddling the electricity in this loco. Once side is uninsulated, so the chassis is live. The other needs some phosphor bronze (supplied) pickups. 

These are fitted to a plate bolted underneath the frames.  I filed the bolt head down a bit bit you're going to have to be no higher than track level to see it anyway. Using a bolt allows adjustment off the loco, although I just bent the wire with it in place. Where the pickups are close to the chassis at the back, superglue painted over the wire should avoid short circuits. 

Barclay Chassis

Now I have a sweetly running chassis. A bit more clean up and it's ready for paint. Where did I put my tin of brushable primer?


Thursday, August 11, 2016

Brakes


Braking on the Barclay is a bit limited. We get some rear shoes and nothing in the middle. Is this prototypical? 

Anyway, the whole lot hangs together OK with everything attached to wires poking from the chassis. I did wonder if the operating gear would look better if the oval cam thingy pointed down rather than up as the instructions show. There's little in it, so I followed the manufacturer. Most of this is hidden behind the back steps anyway. 

The brake shoes are plain so I bent some square plastic strip and superglued it in place. Then I filed it back a bit to reduce the thickness. I could have used thinner plastic but it's easier to bend a square cross section without it buckling. 

Wednesday, August 10, 2016

Warehouse Wednesday: Industrial corner


Industrial Corner

When I look at my viewing stats on Flickr, this photo is often in the top ten most popular for the day. In the last 3 years, it's garnered 3,273 views.

Why? Don't know. It's certainly an interesting image though and shows a lovely detail-packed corner in Prices Risborough, near the model railway club. I love the jumble of very modelable detail such as the flue poking out of those steel framed windows. 


Tuesday, August 09, 2016

Wrap the cylinders


Hard nickel-silver cylinder covers aren't ideal. Much as I love this metal, it's a pig to bend. 

A few moments with the gas torch warming it up helped a bit. Maybe if I'd been less lazy and used the gas hob it would have helped even more. Anyway, I bent them around a screwdriver and tried them in place. 

Handy hint, burnish them clean before bending, it's a lot easier that way.  

Clipped in place, I would have liked them a millimetre longer as the grip on the ends is tenuous. Mind you, I'd have preferred them in brass so perhaps I should have made new ones. Running solder around the ends and finishing this with a file and fibre pen looks OK though. 

I'm ignoring the cylinder ends as I've fitted front footsteps on the body which hide the detail and mean the chassis won't fit if you fit it. Not sure if this is the right move yet, but if I take the steps off, the end plates can be glued in place at a later date.

Monday, August 08, 2016

Boiler won't sit down


I always hope that these posts will help people. If you are building a kit, it's useful to read about potential problems before you encounter them. 

Which is why I mention that all did not go well when I first mated the Barclay body to the chassis. It wouldn't sit down properly. 

At first I though this was due to the motor hitting the inside of the firebox. Que lots of squinting down the boiler and worrying how I was going to grind the shaft even shorter. 

Then I spotted the real problem. The boiler bottom sticks below the footplate and hits a couple of chassis spacers - the ones I've coloured red in the photo. 

A few moments with a mini-drill and cutting disk removed the front spacer, and cut a chunk out of the boiler to clear the one by the motor. I had wondered if the front one should sit in the slot in the boiler, but to do that would move the later forward exposing a hole in the footplate and clashing with the motor. 

Anyway, all the work is invisible and not the body sits where it should. 

Sunday, August 07, 2016

Free book!

Phil's Novel


Outside my railway modelling life, I'm a bit of a novelist - you might have spotted the link to my literary blog on the right hand side of this one.

Well, for one day only - I and my co-author Candice are giving away our book as a free download. Just click on the image and you can bag an electronic copy from Amazon to read on your Kindle, or Kindle reading software available for all sorts of devices. If you enjoy it , all we ask is you go back and review it. More reviews should mean more sales in the future.

Rather than try to give out the plot, I can't do better than quote the 5 star review from Alan Fisher:

This isn't my regular genre of literature at all - but I found this an engaging and fun read with a good story arc and engaging characters. Being someone who works in a corporate environment it was interesting to get under the skin of the usually teflon-coated and dreaded management consultants who form the main cast of this tale - indeed, a fashion magazine obsessive hatchet wielder is typically the last kind of character I'd expect to be able to feel a bit of empathy for!

The 'whodunnit' element remained a surprise until the reveal, and it's difficult not to be hugely satisfied with possibly the only book out there to feature a tension-ridden vehicle chase involving... two tractors! There's plenty of wry amusement in here, particularly for folk who work in offices and observe the different characters and politics at play in such places - but there's a compelling story too.


I was still rooting for the Dirtboffins, though...  


So, get yourself a copy now!

Saturday, August 06, 2016

Denny's workbench


People have long memories. A couple of days ago at the model railway club, Graham approached me brandishing a bound edition of Railway Modeller magazine.

He had remembered a post from 2010 when I'd mentioned Peter Denny's kitchen table workshop, and had found the issue of the mag with the details.

Page 135 - June 1961 is the one to go for.

I love the practicality of this. You've all the tools needed to scratch build models for a start - and that selection is rather smaller than most people expect. Probably the most important tools are the boxes to keep parts for the current project safe.

This is a very portable setup and can be lifted away from the table when cooking is taking place, without having to pack everything away. Packing and unpacking is one of the biggest deterrents to getting modelling done, so this must account for Denny's prodigious output.

I wonder what happened to it?

Friday, August 05, 2016

Boiler fitted


As suspected, a great big hole had to be opened out in the bottom of the smokebox to enable the boiler unit to sit down properly. 

Being whitemetal, my getting it in slightly the wrong place at first didn't matter, a sharp knife was enough to carve the hole in the direction required. It's underneath, so no-one will spot it. 

Lashings of C&L 100 degree solder hold everything in place. This includes the pair of triangular supports at the front. The curves are a hopeless match for the boiler and even solder wouldn't bridge them, so there will be filler action later on. 

I am disappointed by just how tarnished the brass is looking. It's being cleaned after every session with Shiny Sinks and has even been doused in Cilit Bank. Can anyone suggest anything else? I'm not going down the Brasso route, I'd like a dip of some sort. 

Thursday, August 04, 2016

The Barclay's back

6 months in a box while I was too busy on other projects hasn't done the Barclay too much damage. 

With a little more time to finish personal projects, I've hauled it out, hoping to finish the model off. I don't remember there being huge amounts to do. The chassis works, although it needs finishing. The main bits of the body are built. Can't take long can it? 

First up, one of the more important jobs - fitting the chassis retaining nut. I've forgotten this before and had to bodge a solution. Not this time, with the bolt covered in permanent marker and doused in oil, the nut was held in place and then tacked in place. The bolt didn't stick so was removed and the nut finally fitted.

Next, I'll fit the boiler although this looks like it needs a little modification to fit at the front. And I'll sort out the wonky sandbox by knocking it off with my clumsiness.

Wednesday, August 03, 2016

Warehouse Wednesday: Camouflage


It's a little known fact that moch of the design and development of military camouflage was developed in Leamington Spa. A new exhibition in the art gallery Concealment and Deception: The Art of the Camoufleurs of Leamington Spa 1939 - 1945 celebraites this as well as providing behind-the-scenes pictures of the artists at work. 

I'd assumed that camo was randomly painted but according to the exhibition, there was a lot of planning involved. Scale models were built of major projects and then fitted to a rotating table in the requisitioned roller skating rink. They could then be viewed in different light conditions at all angles to see what worked. 

A similar set-up was created in the town museum with a water tank for ships. 

Those developing the schemes were artists and so they naturally painted scenes from the job. Above we can see a factory being disguised. The original belongs to the Imperial War Museum and is on load, along with several others, to the exhibition. You can see the full listing here

Building camouflage isn't something I've seen modelled very often. Presumably the paint hung around for many years after the end of the conflict so those models set in the popular steam/diesel transition era could justify some interesting roof colour, albeit very weathered.

Tuesday, August 02, 2016

MERG speed control part 2


Half an hour's relaxed work while listening tot he radio and look what I have - a working speed control!

4 pages of instructions lead the builder through the job. Starting a with a circuit diagram, we move on to a parts list with 7 items on it and then on to the exciting bit, construction. 

A nice clear diagram shows the top view of the veroboard. All you do is poke the legs of each component in turn through the correct holes, solder to the copper strip on the back and by the end, all should be fine. A couple of components (diode and the big capacitor) must be fitted the right way around and this is covered in the guidelines. I like the way you are also told when it doesn't matter. 

I nearly went wrong by putting the 12v input and + output on the same track. They should be on adjacent tracks, which makes sense if you think about it, the input power runs through the circuitry before reaching the output. 

Soldering is a little fiddly. The correct way to do this is hold everything, heat the join and introduce the solder. That's a 3-handed job but you quickly work out how to hold things. That's part of the skill!

With such a simple circuit, it's well worth having a cup of tea after building and then re-checking every component with the plan. That's how I spotted my error with the input and output wires. 

After this, a dose of 12V in should see a voltage out that varies when you turn the knob on the variable resistor. I used my simple meter to check this and then tried it with a Bachmann Junior loco. Despite the lowest voltage being 1.2V (a limitation of the regulator) the loco stopped and started as required. If you have high-efficiency coreless motors this might be more of an issue, but then you should stop being tight-fisted and pay more than 2 quid for a controller!

Anyway, a lovely little project. I fancy building it into a battery electric loco for the garden railway one day. But then I also bought the shuttle unit and it could drive that too...


Monday, August 01, 2016

MERG speed control part 1


For reasons that need not concern us here, I have joined the Model Electronic Railway Group, (MERG)

This gives me access to their range of kits. Many are complex projects that if I'm honest, are over my head, or at least offer facilities that I'm not likely to need for the sort of layouts I build. However, there are also some pocket money numbers and as it's been a while since I did anything like this, I'm starting with one of these. 

The PMP 10 Speed controller is connected to a 12V DC source and provides a variable output from 1.2V to 12V. Suggested uses are running operating accesories such as a windmill, variable voltage supply for the workbench or even a simple railway controller. 

In the bag for £1.32 is a piece of pre-cut veroboard and the required components. Instructions are downloaded from the website. The builder needs to supply wire and solder. Quite frankly, for this money, even if you ruin it, it's not the end of the world. 

I'll heat up the soldering iron and let you know how I get on tomorrow.