Showing posts with label Puffer. Show all posts

Tuesday, July 27, 2021

Clyde Puffer back on the water

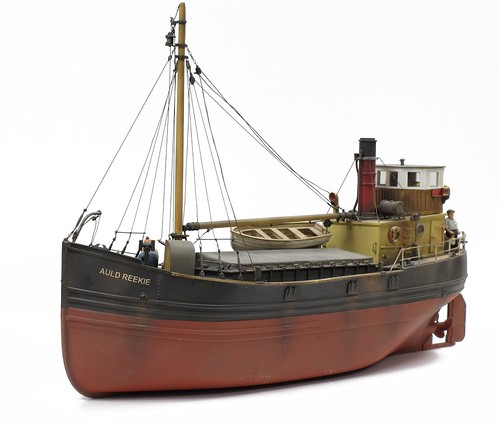
Deans Marine radio controlled 1:72 Clyde Puffer

A whopping 5560 posts ago, this 1:72 scale Clyde Puffer was the first proper post on this blog. 15 years later, it's back, because I need to bring the radio control gear up to date for some filming. 

The model is a Deans Marine kit built a very long time ago, and now a shelf queen in its display case. For various reasons, I wanted to be able to show that it worked, which meant either finding a working 26mHz transmitter, or replacing the reciever with something more modern. 

In theory, this is easy. But since it was the afternoon after yesterday's hose reel debacle, it wasn't. 

What I had forgotten, was that binding a RadioLink TX/RX is different from the same job with a Planet set. On the Planet, you switch the boat on, press the bind button and then switch on the transmitter. 

RadioLink, it's transmitter on, boat on, press bind button. 

But if you get this wrong, 'cos you are doing the same as the Planet, it still binds, or at least appears too. But the RX just ignores controls from the TX. This is immensely annoying.

Once I had read the instructions, suddenly all was well. At the same time I swapped the 4XAA battery box for a 4XAAA flat version, aiming to lower the centre of gravity. There was also a bit of rigging repair required, the elastic thread having become brittle.

On the water, the boat lists like a yacht every time it turns and so the sail wasn't relaxing, or very long. Fortunately, I didn't need it in the water for my filming. 

For the moment, the RX has been removed again and the boat reverts to Shelf Queen duties. Maybe one day I'll fiddle with the ballast a bit more, but it's not like I'm short of boats!

Wednesday, February 26, 2020

Waterborne Wednesday - VIC 27

Vital spark

From 2005, this photo shows VIC 27 in the guise of the Vital Spark languishing at Ardrishag. It sat there for many years after use in the BBC Para Handy TV series. 

Puffers are the perfect prototype for railway modellers. At 60ft long, they fit into the sort of areas most of us have on our layouts - most other vessels being far too large.They also enjoyed a very long life from the end of the 19th Century with the last commercial boat calling it a day in the 1980s. 

Victualling Inshore Craft (VIC) were built during the war based on Puffer designs to service warships that couldn't berth. The design being a small ship with a large hold and a derrek for unloading proved to be perfect and over 100 were built. 

The good news is that VIC 27 is now being restored. You can read more on their website. 

Years ago, I compiled a list of Puffer models. It's a bit out of date, but have a look.

Saturday, July 25, 2015

Puffer pictures

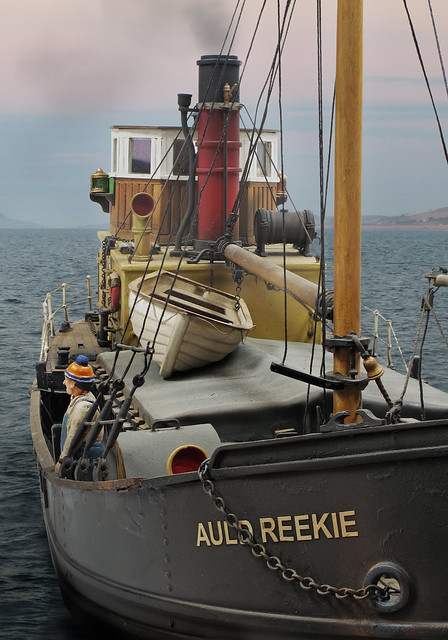
Auld Reekie

You know how it is. Working in out clubrooms with BRM's Andy York taking some photos and you happen to have a 1/32nd scale Clyde Puffer handy. And well, we had a large photo booth set up. It seemed a shame not to get him to take a few photos.

Strangely, he seems all at sea for one of them...

Puffer at sea

Thursday, July 11, 2013

Clyde Puffer and Boiler House in Hornby Magazine

Hornby Mag arrives this month and inside I'm hard at work in Clayhanger Yard installing a boiler house and several feet of factory building.  This end of the layout is looking good now, which is a relief as it's off to a show this weekend.

BoilerHouse

Parker's Guide sees me heading out to sea with a Clyde Puffer. You might wonder why we are building a boat in a model railway magazine, but only if you've never seen my layout Melbridge Dock. A pair of puffers adorn the layout and it's a very practical and popular ship for railway modellers.

Being only 60ft long in real life, they are small enough for your average layout. The real things are surprisingly large.

PufferBack

Sunday, February 15, 2009

2mm scale Puffer in RM

Readers of the current Modeller can enjoy my review of the Gramodels 2mm scale Clyde Puffer model.

If you are interested in such things you'll enjoy the preceding 4 pages by James Pottinger which give a history of these vessels and include many superb historic photos along with a waterline plan of the typical boat. This alone is worth the cost of the magazine !

Friday, December 26, 2008

Dirty Puffer


Puffer 3
Originally uploaded by Phil_Parker.

For more years than either of cares to remember, my Dad has had a Clyde Puffer under construction. It's a Caldercraft kit which has proved to have many shortcomings a problems for the unwary model maker. For much of the time the boat has sat on the shelf while he's worked on other things but every so often the plan was blu-tacked up and another burst of activity occurred. The project has advanced in fits and starts but finally has been completed.

My role has been to offer encouragement and a bit of helpfull (sometimes) advice. Buying a completed Puffer from the same kit was also very useful as we could see where another modeller had made adjustments to get the thing built. I've also been in charge of painting and just before Christmas I had to set up the airbrush to perform the final weathering.

My brief was to make a mucky model. The guide was to be a set of photos taken of the "Vital Spark" from the 1990's BBC TV series. On a trip to Scotland years ago he'd taken some photos of the vessel tied up in Crinan harbour. For TV purposes the boat had been weathered heavily and looked good in this guise. The only change we wanted was a different name - everyone has built a "Vital Spark" so we picked "Auld Reekie" which was the boat's previous name and much more redolent of Puffers.

While this isn't a big model in boat terms, for me it's larger than anything I've ever weathered before. I knew that there was no point in trying to do much with dry-brushing techniques as this would take forever. My best option appeared to be to drift dirt on with the airbrush. That way I could build up the effect gradually and hopefully stop work before reaching the point where a repaint would be required to sort things out !

Normally I mix up a weak paint in a paint cup and use this. For the puffer I half filled a paint jar with white spirit and poured in some Humbrol 170 (Dark brown). After testing the result on newspaper more spirit went in to bring the level up to 3/4 of a jar. This was sprayed from a distance of at least 12 inches and often 18. That was to allow drying time from brush to boat which hopefully would impart a little texture to the results. The entire model was treated to this but unevenly. The photos showed that dirt seemed to work up from the waterline and anyway I liked the effect it had on the nicely detailed hull.

Puffer 2Any leftover paint was poured into an old jar and a new mix made up with rust colour. The paint jar wasn't cleaned out so some of the old paint contaminated the new, helping the blending process and avoiding sharp changes of colour. Extra attention was paid to hatches and holes in the hull with rust running down from these a feature very obvious on the real thing.

Finally some Precision "Weathered Black" was made up and smoke residues blown on across the wheelhouse roof and mast where you'd expect the smoke to stick. The areas around the coaling hatches took a shot too as I don't suppose the crew were too careful or cleaned up after fueling !

I think this job only took about an hour - shockingly quick for such a large task. A little finishing up on some detail work, the cap steps were dry-brushed with metalcote steel to represent wear of example, did the job. Close up the weathering look OK but on the water and at a slight distance I've really pleased with it.

Monday, December 22, 2008

Making letters


Auld Reekie
Originally uploaded by Phil_Parker.
My Dad is just finishing a Clyde Puffer kit and since he is colourblind, I've been handling the painting duties. I also get to apply the name to the boat since "You get on better with those letters than I do.".

So yesterday I was using my normal method of letter a boat when I hit a snag. The part used BEC lettering sheet may have had enough E's on it, good news considering the number of them in the name, it didn't have enough U's. I was precisely one short.

Now I want to see this boat finished, it's been 10 years in the building thanks to some long periods on the shelf while other projects take precedence. It's very nearly there though and this is the final push. Ordering a new sheet of sticky letters during the Christmas period wasn't going to be a good idea.

Scanning the sheet for something I could make a U out of I decided after a fair bit of measuring that the best bet was the bottom curve of an S (the last on the sheet) with verticals from the supplied dashed line. Several other characters were either slightly too wide or too narrow. To be honest the variety of letter widths both surprised and frustrated me.

A bit of poking around with a sharp scalpel has given me a reasonably neat result. This vessel is intended to sail rather than live in a glass case anyway so anyone close enough to notice will have wet feet !

Tuesday, September 09, 2008

2mm scale Clyde Puffer


2mm scale Clyde Puffer
Originally uploaded by Phil_Parker.

Only I could go to a 7mm scale Model Railway show and come back with a 2mm scale boat...

What I have is a very nice little resin kit from Gramodels for a Clyde Puffer. Cost £12.50.

You get a lot of bits for your money but the first thing you see is the hull which is moulded as a single part. It needs some flash cleaning off the bottom but is a good shape and nice and sharply cast. The hold cover is a separate part so you could model it open if you wanted although an interior would be required which extended below the bottom of the waterline hull.

The wheelhouse is an open version with wires cast into the top legs for strength. I've always preferred to give my crew a roof and so added one from a bit of plastic and a couple of extra microstrip window bars.

No railings are included so some were made up from wire. Ideally an etch would be good for this but that would push the cost up and while it's reasonably priced for what you get, the British modeller is notoriously stingy.

Apart from this, what you see is what you get. A few hours pleasant assembly and painting results in a very nice little puffer to add to my collection.

For more Clyde Puffer models and books, try my Puffer pages.

Thursday, June 12, 2008

Puffer article


Model Boats - July 2008
Originally uploaded by Phil_Parker.

See the current (July 2008) issue of Model Boats magazine for a page on the Clyde Puffer I bought from a charity shop. I suspect it might give a few older modellers pause for thought !

For those to stingy to buy the magazine, my piece on naming boats also appears on their website so you can have a free read.

Thursday, April 26, 2007

Brass Prop


brass prop
Originally uploaded by Phil_Parker.
The perceived wisdom in the model boat world is that brass propellers are better than whitemetal ones. Therefore a sensible upgrade for my Puffer would be to get rid of the prop that came with the kit and fit something shiny.

In theory this is an easy job. Unscrew the unwanted prop and then replace it.

Why is nothing that easy ? To effect the change I had to take the motor out so the shaft would move back a bit so I could work between the hull & rudder. Because the nut at the motor end of the shaft was rusted on and the one at the prop end didn’t seem to want to come all the way off it was a really struggle.

Eventually I managed the job. To make sure it stays put the prop has a little bit of superglue on the threads. This should stop it unscrewing. I know that doing the nut hard up against it is supposed to do this but I’ve had things go wrong before and with the price of brass propellers these days I don’t want it to descend to Davy Jones Juniors locker at the boat pond !

Sunday, April 15, 2007

Puffing on open water


puffer on lake
Originally uploaded by Phil_Parker.
The final big test for the Puffer is to get it on the lake. Trying it out on a pool is fine but if anything fails or falls off you can reach over and do something about it. On the lake there is no chance unless a deep paddle & swim in muddy water is contemplated.

So with some trepidation the boat was launched for the first time.

And it works. Pretty much.

OK, I need some more weight at the back as it is still a little high – burying the propeller a bit more will help especially in reverse. It’s not that I want to go backwards much, just be able to slam the brakes on without spraying water everywhere.

The Electrolize speed control needs more adjustment as well. It doesn’t seem happy running the motor slowly. We’ve got an identical unit in the 40 year old boat where it works well but then that boat runs at speed all the time.

Finally the propeller will be changed for a brass one. The whitemetal version works but there is a lot of noise from the drive and I think it’s cause by an unbalanced prop. Hopefully the brass one will be quieter and, if the stuff I read in magazines is to be believed, give more power.

On the plus side the boat shrugs off even a stiff breeze with hardly any listing. Best of all though it looks superb on the water. My Dad sailed for most of the time and he was entranced, weaving around the water for nearly three-quarters of an hour. We both love the boat and hope that’s it’s first trip on the water is one of many – a fitting tribute to the original builder.

Friday, April 13, 2007

Steering gear


Steering gear
Originally uploaded by Phil_Parker.
After its trip around the pond I had a few little jobs to finish on the Puffer. One was that the steering was moving on its tiller. Not much but it’s not something you want. I tried glueing it but that wouldn’t hold forever. A mechanical solution was required.

In theory this is simple. Drill a hole through the “tiller” (sorry I can’t remember the proper term, it’s the bit the servo is pushing on the rudder shaft) and the shaft. Insert a bit of brass wire and the two will be inexorably fixed.

Of course real life isn’t so simple. Drill off centre and you miss the shaft, probably weakening the tiller at the same time. The shaft is steel and the tiller whitemetal so if the drill skids on the shaft you’ll chew up the softer metal and ruin the part.

I started the hole with a pin vice but wasn’t making headway into the steel so I replaced my hand with an electric screwdriver and hoped. The whole arrangement, drill it, pin vice, chuck & drill was longer than desirable but amazingly it seemed to work.

A little bit of brass wire fixed in with superglue finished the job. Had I made sure the tiller and rudder were perpendicular and not a few degrees off then the job would have been perfect, but then you can’t remember everything.

Tuesday, April 10, 2007

Puffer on the pool


puffers on the pool
Originally uploaded by Phil_Parker.
With all the gubbins installed it was time to test the Puffer on the water. I’m lucky in having access to a 15ft diameter swimming pool for this sort of thing. Mind you this took a hell of a lot of assembly so I think I deserve a good sail from time to time !

Anyway, the boat sits OK in the water with a slight list toward the side the speed control is sitting. It’s pretty level though so something’s right for a change.

Under power it becomes obvious that more weight is needed at the back. Drive is next to useless with massive cavitation. Time to come back to the side for some more lead art the side and back.

Next time things are lot better. Although there is no obvious sitting down at the stern the propeller moves the boat forward instead of creating foam.

Suprisingly the steering is good enough to sail in circles. I wasn’t sure what the turning circle was going to be but it less than 15ft – nearer 6 which was good news. Sailing any sort of model boat in a confined space is nerve-wracking enough and this one has a lot more detail than most.

After 20 minutes or so the battery, which like an idiot I forgot to charge up properly for the test, is giving up. But I’m confident that the next launch can be on the boating lake.

Thursday, April 05, 2007

Steering


servotray
Originally uploaded by Phil_Parker.
With the Puffer’s drive system sorted I looked at the steering system. Fortunately my Dad is building the same kit and on the plan that shows how this works. Basically a servo is mounted under the bridge with a wire running across the deck to the rudder.

The plan doesn’t show how the servo is to be held in space so I improvised the tray shown with some bits of balsa. The long bars are one servo wide and my plan is to glue the ends under the deck.

Because the balsa was a bit soft I varnished it a couple of times with some quick drying domestic varnish found in the garage. If it ever needs protecting from water than this boat is in bigger trouble than anything some varnish can solve !

Wednesday, April 04, 2007

Alignment tool


coupling tool
Originally uploaded by Phil_Parker.
Turning the static Puffer into a full working radio control boat isn’t too difficult. The first job is fitting the motor.

All the experts stress the importance of keeping the motor shaft and propeller shaft in line. Although any slight disparity is taken care of by the coupling , the less this has to do the more efficient the drive will be.

I’ve used a coupling that is basically a universal joint with inserts in the end for the prop and motor shafts. Keeping this straight while fiddling around in the hull wasn’t going to be easy. So I made a tool.

The alignment tool is pretty simple. All it is is a brass tube slit along its length with four holes drilled in the sides to let the pivots poke through. The tool slides over the coupling and is clamped up solid.

I screwed the coupling in place and attached the motor. It still flopped around a bit but was held in place well enough to allow bits of wood to be shoved under to support it. Silicone sealant provides the “glue” holding things in place. Hopefully this combined with soft balsa supports will give a quiet drive system.

Sunday, April 01, 2007

Ballast


lead weigh
Originally uploaded by Phil_Parker.
How much lead does it take to get a Caldercraft Clyde Puffer down to the waterline ? About 4.5kg.

To work this out I have the advantage of being able to borrow my Mum’s scuba diving weights. These are nicely marked and come in 1kg sizes. Simply pile them into the hull until it’s at the right level and you know how much lead is required.

The final ballast was cut from sheet and weighed on some Anthony Worral Thompson scales. Not his own you understand as he’d doubtless moan about lead poisoning or something, but some cheapo one with his mugshot and imitation scribble on the outside. I assume that having the cookery elf grinning out of the box put people off, hence the bargain price for a very nice digital weighing machine.

Tuesday, March 27, 2007

Puffer Crew


puffercrew
Originally uploaded by Phil_Parker.
These resin figures from George Turner paint up ever so well. I used suitably muted colours for them, then applied a weak black wash and then toned this down with some dry-brushing and a dose of talcum powder. Between each stage I left the paint alone long enough to dry properly. Rushing things means the new coat lifts the old one and the results looks terrible.

All paint was Humbrol enamel applied with a brush. I don’t think anyone air-brushes figures do they ? If they do then the masking must take forever.

At this size you can even paint the eyes properly. All my boat crew have pupils ! Now that is taking detail too far as you won’t see this from the other side of the lake, but at least I know they are there

Saturday, March 24, 2007

What happens to your models when you die ?


puffer
Originally uploaded by Phil_Parker.
The picture shows a 1/32nd CalderCraft kit for a Clyde Puffer. It’s been beautifully built as a static model. The current cost of this kit is in the region of £250.

I bought the model in a charity shop for £40.

Obviously what happened was the builder died and the model was donated to the charity shop. They saw it as nothing better than the Chinese solid hull boats that appear in every gift shop in the country and priced it appropriately. It’s so much more than that. The quality of the modelling is superb. The rigging alone is a masterpiece. Even little details such as spare wooden chocks scattered on the deck are present.

I would be proud to build the kit to this quality.

Yet people who can’t recognise it for the masterpiece it is effectively dump it in a charity shop. The builder must have invested 200 hours or more in construction, a real labour of love. If I hadn’t bought it, the model could have ended up on a shelf getting dusty and damaged, or worse given to a kid top play with in the bath ! At least I will fit it out with radio control, make a proper box and treat it with the respect it deserves. Apart from the mechanical bits my only changes will be to add a crew and change the name from the one supplied in the kit – I fancy “Sunny Jim” for this one.

The boat went to the Knightcote Model Boat clubs last social evening where we discussed what people’s plans were for their models in the future. The question was, “How do you make sure that your nearest & dearest appreciate your work ?”

Some people will be lucky enough to have family who will think as much of the models that you have created as you do. Most though, will think that the models are little more than toys that they were slightly embarrassed that Dad/Mum etc. spent so much time and money making. Worse, there will be people out there who resented the time and/or money invested and will be delighted to chuck the whole lot out as an act of revenge.

Imagine yourself looking down from your cloud and seeing all the models you put your heart into going down the tip or sitting on the table at a car boot sale while punters haggle over pennies. Your relatives might also miss out on the value of the models if they don’t want to hang on to them. This model would easily have sold for much more than the price of the kit yet the owner received nothing for it. Good for the charity but if they could use the money to supplement a pension…

Wednesday, March 21, 2007

Crew


crewmen
Originally uploaded by Phil_Parker.
For reasons that will become clear to you soon dear reader, I need a crew for a Clyde Puffer. So I sent off to George Turner for one of his sets of 1/32nd people. After more than a little deliberation I chose my set, send off just over a tenner and a few days later received a package in the post.

The model sailors contained inside were made of polyester resin. A little flash was present but nothing gentle scraping wouldn’t remove easily. They also seemed to be more slippery than resin usually is – I took this to be a residue of release agent and gave then all a scrub with washing up liquid but it didn’t really make a difference.

Resin in the raw isn’t the easiest material to see detail in. Normally I wouldn’t bother to prime it but this time I did to reveal the detail properly. Cheapo car primer worked fine. Since most modern cars are made of plastic I suppose it is what it’s designed for nowadays.

Anyway, here is the crew in their glory. With a bit more painting they will adorn a suitable model boat in a few days.