Tuesday, January 31, 2017

London Toy Fair 2017

Last week, I made my annual trip to the London Toy Fair to bring back all the latest news. There were stands from Hornby, Oxford and even Bachmann under their Toyway guise.

Over on the Albion Yard blog, Paul has published a couple of serious reports covering proper model railway stuff, so if that's what you are interested in, read part 1 and part 2. I was also there to do that sort of thing, but having done it for paper publication, I'd rather show you some of the fun stuff.

Red Locomotive

Is it an A4? I hear you cry. No, it's from Hape and as well as looking fantastic and being compatible with other wooden train systems,the loco is battery powered. The propeller rotates and it makes noise. All controlled from the buttons on top. Brilliant fun. Hape won the wooden toys award for the fair with a mountain railway toy which should provide hours of entertainment for those too young for a proper train set.

Maglev toy train

The scale wallahs will want to have a word with the chaps at Great Gizmos as this Maglev flies higher than the real thing does. The prototypes only levitate about 10mm from the rails which is probably why they are a lot more stable than this. I enjoyed shoving it back and forth though.

Battleship

I've seen this battleship kit advertised before. Aimed at the nostalgia market, it's not (as I recall) too badly priced as a toy. At about a foot long, I reckon you could squeeze radio control into it and it's not so detailed you'd worry too much about racing around the lake with it. 

brmcars

What I want to know is, why were there loads of steam trains on show, when most kids won't have seen one? Is it the same reason I could fine loads of VW Beetles despite this being just as obsolete a design?

Python

Possibly the highlight of the day was stroking this python on the Tobar stand. I'm not actually sure why it was there, and just as I was about to ask, someone turned up to have their photo taken with the snake. Pity really as there were fried crickets and meal worms to try as well but I thought it best to find out what that was all about before tucking in.

Toy Fair London - as usual, it was Very Good M'lady

Parker


Monday, January 30, 2017

R2D2

It was the DeAgostini stand that did it. We chatted to a man building a Millennium Falcon and before I know it, my father is signing away a chunk of my inheritance on an R2D2.


So, in two years, we'll have a working droid. It's got a camera and lights and clever computing so it can respond to either voice or smartphone commands.

At least it isn't as big as his Bismark and since the whole thing is screw together, I can probably avoid getting involved too much. Which will be a shame as this thing looks like a lot of fun. 

Part 1 is the "processor state indicator", a multi colour light on the front that will flash. Assembly simply involves screwing a board covered in surface mount LEDs into a plastic housing then plugging in a wire. Testing equipment comes in a few issues time. 

The magazine that accompanies the pasts is quite fun. There are concept drawings for R2D2, some made up stuff about the real droid's history and an article on LEDs explaining how they work. You buy this stuff to build the model, but it's an interesting read all the same. 

Anyway, watch out for future bits of R2D2 build. I'll not cover every week, just bits where we make stuff. And then perhaps I'll bring the finished model to shows as more fun than toy trains...

Sunday, January 29, 2017

London Model Engineering Exhibtion 2017

Lego trains

Time for a test-run driving in the capital. The MEE show provides a great way to do this with a fun show at the end of it.

Unlike the Midlands version, London's emphasis isn't on hard core engineering, but a more general modelling hobby show. Less lathe work, more stuff that most of us could do.

So, we get boats:

Workboat Jubilee - Small

Plastic kits:

Goblin

Radio control cars and lorries:

Green beach buggy

As well as large scale trains:

EMU

Which might explain why the audience looked more normal than you see at other shows. There were loads of families wandering round, including (the horrors) gurls! 

Partly, this can be explained by the Imagineering section of the show aimed at kids and trying to get them interested in electronics or engineering. Young Phil would have had to be dragged away from there! 

It's not just official efforts though. Several engineering clubs have established junior sections with structured programmes to get the kids involved. One lad has bagged a job with Jaguar after a senior manager spotted his RC Landrover with scratchbuilt chassis at a show. Model making pays off sometimes!

Trade was pretty much as you expect - heavy machine tools and lumps of metal - but a stand out stand was from partwork publisher DeAgonstini.


Millenium Falcon

There were the models from several series on display. A Millennium Falcon looked pretty impressive and was being built by a proper model maker. He was explaining how he weathered the base model to make it look even more realistic. Somehow, my dad has signed up for their R2D2 model after all...

An excellent and enjoyable show. Very much in the style of the old MAP magazine Model Maker. Lots of different, but related hobbies, all in one place. 


Saturday, January 28, 2017

Saturday Film Club: Sydney Monorail


When I visited Sydney a couple of years ago, I was gutted to discover that the city had enjoyed a monorail service, but this had all finished 2 years before I arrived. All that was left was a few stations with no connecting rail system. 

I understand that the monorail wasn't universally popular with residents. For the Sydneysider, the system didn't go anywhere useful and there was quite a lot of visual clutter associated with a high-level system. However, as a tourist staying in Darling Harbour, it would have been brilliant for me and not just because I've never actually ridden on a monorail. 

At least we can enjoy some video and watch another bit of the future, along with Concorde, which has already become the past.

Friday, January 27, 2017

Book Review: Creating Cameo Layouts by Iain Rice

Publisher: Wild Swan

ISBN: 978-0953-877-171

A4 Softback

120 pages

£24.95

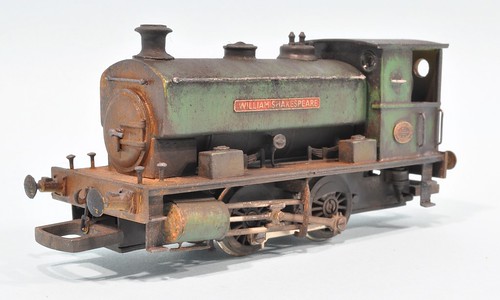
I've always been a bit of an Iain Rice fan. Most of his books and magazines can be found on my shelves somewhere. Generally, he does the sort of modelling I try my best to emulate. The early MRJs he was involved with were a delight with plenty of brass bodgery resulting in character filled models that the current magazines don't seem match, no matter how technically perfect the current crop of miniatures are.

This isn't to say Rice is perfect. While his books on detailing RTR wagons and the follow-up on kits were superb, the third in the series on locos was (to extend the metaphor in the book itself) over-garnished with it's quality ingredients swamped in a sea of florid prose. What it needed was an editor to say, "Look here old chap, I think we need to make a few changes..."

So, when I saw Creating Cameo Layouts advertised, I knew I was going to have to buy a copy - it's a subject that I'm very much into - but I wondered which Rice I would find inside.

I needn't have worried. This is Rice back on top form.

What we have is a treatise on the theory and practise of building tiny model railway layouts. Much of this has been developed from his previous design books and if you have those you will recognise some of the idea although not the material. I don't have a problem with this, these books are written over a long period and it's likely there will be many readers coming to the subject cold.

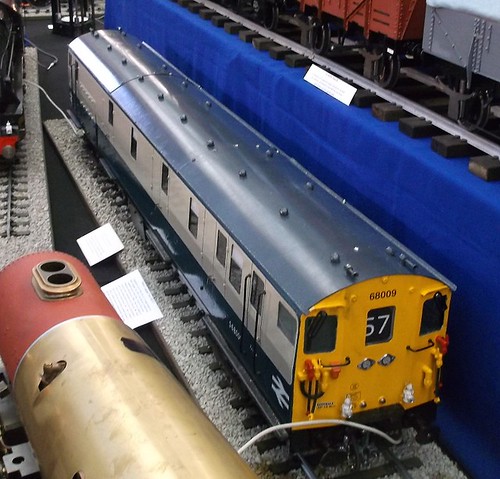
This book also benefits from improvements in photography and is well illustrated throughout with plenty of eye-candy layouts, and less eye-candy layout operators. Visually, this is Wild Swan at their best too.

Add to this, Rice's own excellent sketches to illustrate points throughout and this is well worth it for the pictures.

The text assumes you are interested in the subject (why else would you have bought the book) but makes suggestions rather than hard and fast rules. I'm sure there will be MRJ articles which grandly state "I followed the principles from Iain Rice's seminal Cameo Layouts book" but that's just showing off in the same way chicklit writers include Louboutins. The point is, Rice has taken a long look at ways to present a small layout and tells you how he's done it but also how others have gone about the task differently.

You won't be short of hard facts though. While every layout design book mentions building curves into the corner of your backscenes, here are told HOW to do this. I've not seen this anywhere else in the past and now will be doing the curved corner thang on my next project. Probably.

As this is a review, we better have some criticism. There are a few hints at finescale snobbery - you CAN build cameo layouts in OO as several of Mr Nevard's models illustrating the pages show. The "shot-gun peppering" application of layout plaques overlooks the pride people have in attending shows too, although the context it is used in makes perfect sense and I can see and agree with the point being made.

I wonder too how much difference all the lighting ideas will make when the model appears at a normal show with light spill from windows and other illumination. That's not to say it isn't interesting and nothing will defeat those NEC lights. It's also very reasonable to assume most layouts will never see a show but deserve the sort of quality presentation espoused when at home. I'd suggest that if you follow the techniques shows here, the model will enhance the domestic environment and "normal" people will suddenly understand what we enjoy about the hobby.

If you are inspired to have a go, the book finishes up with a series of projects to inspire. I'd happily have a go at several of them and would recommend anyone contemplating a "serious" model project to start here rather than launch straight into their magnum opus. Not that they will take any notice but it's worth a go.

Looks good. Reads well. Interesting subject. What more is there to say?

You can buy the book from Amazon.

Thursday, January 26, 2017

Railings

My dad is building a 1:72 model boat that needs railings around the edge of the deck. Obviously we started by looking in the model railway world.


First up, we have scalemodelscenery.co.uk with LX097-OO Tube Style Safety Railings.  Roughly 558mm in length and 16mm tall, these are laser cut from laserboard. I like the joins between the tubes with representations of the joining tube bits. Possibly they are a bit modern for this boat, but they would be ideal for a modern image layout. 

Ratio have also produced some nice railings. 

Pack 44 Stanchions Double Rail includes 20 stanchions (the vertical bit) and many 75mm long lengths of wire to run between them. Being plastic, I think they might be a bit more model boat friendly but perhaps not as "nudgeable" as the ones above. Plastic isn't that strong, but if we are careful, probably strong enough.

All this is a lot cheaper than the turned brass from model boat people, no matter how nice it looks. After all, when you need railings, you need quite a lot of them.


Wednesday, January 25, 2017

Warehouse Wednesday: Fishing huts

Scarborough fishing sheds

Spotted in Scarborough a few years ago, these "huts" for fishermen are part of a new-ish quayside development. The roof is a walkway presumably so the tourists can watch the traditional goings on from a safe distance, or perhaps to get them out of the way of locals who don't appreciate having cameras pointed at them as they do the day job. 

Whatever, they are very neat, but I wonder what actually gets stored in the buildings. There's so much stuff outside on the front that is too big to go in those single doors, I can only assume that there are valuable tools to be kept under lock and key. 

The "stuff" is interesting, although for modellers there is a the challenge of reproducing lobster pots in small scale. I know someone makes cast resin ones but they miss out on the see-through effect that gives the pots their look. 

I don't know what UMBUDAMIDLUN is either...

Tuesday, January 24, 2017

Weathering resources

Barclay Shunter
Richard asks:

I notice from your latest entry on your Workbench that you are about to weather the water tank wagon. I want to try my hand at weathering. Can you recommend any books or DVDs that will show me how to go about this (in simple terms)?

This is more difficult than I thought.

By default, as an occasional finescaler, I'm required to mention Martyn Welches, "The Art of Weathering" from Wild Swan. Trouble is, it's not the right book for a beginner and I'm not convinced you can't get 80% of the results a lot more simply. Once you get into weathering, it's an essential buy and it IS well writen and a pleasant read.

More pragmatic is Tim Shackleton's book on weathering locomotives which I reviewed back in 2011. It's not all airbrush work which I think is vitally important. Yes, an airbrush is a boon but not essential. You can do a lot with normal brushes and powder.

Iain Rice's wagon books from the 1990s cover a bit of dirty rolling stock work and George Dent has done much in this area in his books too.

Monthly magazines are always covering weathering, sometimes to the annoyance of those reader who wouldn't consider mucking up a model. They better learn to live with this as it's a subject not going away any time soon. I always make models dirty in my articles.

You can of course, find lots of help on the web. I've mentioned weathering loads of times on this very blog. There are, I understand, other web sites available.

Assuming you are thinking about rolling stock, here's a few suggestions:
  • Buy some really cheap wagons. Your first efforts will be unsatisfactory but an excellent learning experience so don't work on anything good.
  • Learn to dry-brush.
  • Play with weathering powders. You can always wash the results off the wagon if you aren't happy.
  • Everything on the railway goes brown. Track colour enamel and powder is your friend.
  • Have a go. You can't learn this stuff from a book, only practise will work. Don't be scared, this is toy trains not brain surgery. No-one dies if it goes wrong.

More suggestions from readers in the comments please. This is one of those topics where there are a wide range of experiences so let's share them.

Monday, January 23, 2017

Rusty water tank wagon

A cruel enlargement but at least you can see the finished water tank wagon in all its "glory". 

Weathering was kept simple - the model was dry-brushed with Humbrol enamel tank grey (69), rust (70) and track colour (173). I worked quickly, not letting each coat dry. That way the colours merge a little so nothing stands out. 

To finish, I experimented with Citadel Typhus Corrosion, a rust paint with texture. Paint on and wipe most of it off again. The stuff thins with water and so a wet brush will work most of it off, stroking downward to represent weather. 

It's collected in the corners quite nicely and definitely added something to the tank sides. Lots of potential for the future I feel. 

The only problem was the water-based weathering removed my carefully applied with a mapping pen, ink numbers. Never mind, they used to get weathered off the real thing too. 

Couplings are Greenwich. They are supplied in the kit but I soldered them up solid so had to have a second go on a spare etch. The last job was to glue some lumps of lead in the tank as it weighs practically nothing.

Nice little kit and a pleasant project. You could really build it as a "Knightswork"  although I suggest that painting is another couple of hours spread over later evenings. For now, my model will sit in the box with the other 009 rolling stock. At least it's a kit off the pile!


Sunday, January 22, 2017

More Meccano fire engines

A few years ago, I told you about a talk I'd seen on Meccano fire engines. Well, after the latest boat club AGM, the same gentleman came back to see us again. He's been busy and we thoroughly enjoyed his latest models.

First up, we have a modern Warwickshire Iveco fire engine.


These engines replace a slightly larger design  which is apparently life expired after 10 years. The reduction in size is to allow the appliance to squeeze down streets full of lardy 4X4 cars leaving only a narrow lane down the centre. There is also an issue with female fire fighters being a bit shorter than the men apparently - probably an asset in some situations but not when trying to get equipment out of the higher shelves in the lockers. 

Next, from Northamptonshire, we have a go-anywhere Unimog. 


 Getting information on this vehicle was trickier than normal apparently. An FOI request was politely declined but as our intrepid builder know the Warwickshire deputy chief, a request was sent that way and then details were forthcoming.

The model has several stilages in the back which are loaded with Meccano made. The chainsaw was the most ingenious and popular!


Saturday, January 21, 2017

Saturday Film Club: Blue Pullman


Did any of the Blue Pullman's survive the cutter torch? According to a corespondent on Facebook this week, one still exists converted to an Army command centre. Part of the mysterious strategic reserve hidden in a bunker somewhere.

Fanciful? 

Probably. For the moment though, let's glory in this train in its prime.

Friday, January 20, 2017

Superglue and paint


Once the wagon has been cleaned up, it was time for superglue. I know "real" modellers only use solder but I'm pragmatic and know when to stop burning my fingers. 

First up, the axlebox cover pieces were fitted. One needed a little modification to fit around the brake lever I'd previously soldered to the tank side. A quick snip of the corner with scissors sorted this and you can't see the fudge. 

Next, although a piece of nickel silver is supplied to be rolled for the tank filler body, I used a length of fat plastic rod topped with the disk from the kit. 

Next up a coat of etching primer and followed by some Halford's matt black. This is more of a satin shade but I reckon it will look OK after weathering, which is the next step. 

Thursday, January 19, 2017

Soldering done


Dinky little wagon this one. 24mm long and weighing next to nothing. 

Soldering wasn't painful. All the joints were made inside the box, a job possible because there isn't a floor to get in the way. Bearings were fitted with the axles in place and then quickly soldered to ensure they were the correct distance apart. Fast work with plenty of flux required to avoid toasting the plastic wheels. 

Amazingly, after all this the model sat flat on glass. If not, a quick twist would have fixed it I'm sure. It ran freely too. I must be having a good day!

The brake lever is provided, but no method of joining it to the wagon. A bit of wire would have done, but I used a brass pin. The head is a bit chunky in the photo but looks OK on the model. 

Next up, superglue time.


Wednesday, January 18, 2017

Warehouse Wednesday: Uckfield watermill

Uckfield water mill

When I'm at shows, I like to go for a stroll. And when I stroll, I take a camera and photograph interesting buildings. At Uckfield show, I spotted this one.

Uckfield water mill back view

A little research on the web tells me this was a water and roller mill. 

Nowadays, well 5 years ago, the place has been gentrified but not to heavily altered.It's a business centre now.

Uckfield water mill side view


Uckfield water mill underneath


Tuesday, January 17, 2017

The first job is riveting


Most of the building of this kit took place while I watched Sherlock on TV. Watched is a bit strong perhaps as I'm rubbish at actually sitting still and gawping at the box like we are all supposed to, but it was on and I enjoyed it in the same way I enjoy a book during a train journey - I like to look up from time to time to see the scenery change.

Anyway, there was much concentration for the first part of the wagon build - rivet pressing.

There are an awful lot of little half-etch marks to be turned into dimples on the sides. I used a GW Models Press but I'm sure a blunt nail would have done just as well.

By the end of the job, Sherlock had done something (I forget what) and I had a slightly buckled component with lots of fake rivets. A little massaging with fingers straightened things up so I could move on to soldering.


Monday, January 16, 2017

A Knightswork?

Looking for a quick and easy project to kick off the modelling year, I dug out something bought at ExpoNG a few months ago.

Described by Mercian Models amusingly as "A Knightswork" , I bought the kit from the Parkside Dundas stand - pretty much a one-stop-shop for the 009 modeller. I'll be honest, I was inspired by the show and felt I ought to leave with at least one kit and this appealed.

Of course, once you start, you can't always stop. More of that in the future.

Anyway, in the packet is everything you need to complete the kit apart from solder, glue and paint. I don't know the prototype, but it appears to be a box on wheels for carrying water.

A quick look on-line reveals this photo by Roger Marks:

Ffestiniog Brine Tank Wagon

which claims it to be a brine carrying wagon, for hauling water for a swimming pool.

Interesting, but there are detail differences with the kit such as the tank body being wider than the chassis.

Not to worry, like most NG modellers I'm not looking for a model of a particular wagon, just something that can be "typical" for a freelance operation.


Sunday, January 15, 2017

Vintage steam boats

Vintage Boats

Vintage model making has always interested me and this week a friend sent me a link to a fascinating blog post about Ted Vanner, model boat builder in the early part of the last century

We tend to think of travelling with models and taking part in events around the country as a relatively modern thing but Ted and his fellow members of the Victoria Park Model Steam  Boat Club got around a lot, including a trip to Paris. All this by train or horse drawn conveyance of course. 

Proper modelling too, with strips of tin being soldered using an iron heated up over a gas flame! Makes the sort of thing we do look very easy indeed!


Saturday, January 14, 2017

Saturday Film Club: Roadrail Landrover


Mr Macdermott has come up trumps with this selection for our Saturday films, and by that I don't mean a fluffy haired American President to be. 

A road-rail Landrover would make an interesting model and not too difficult to scratch build. Watching this one in action I wonder how practical it would really be though. You need some embedded track to put it on the rails for a start. A dirt level crossing would probably do I suppose. 

The film starts with another fascinating machine, a tracked (rather than on-track) vehicle. Best of all, it still exists and I photographed it last time I was in the motor museum for a model show. 

Tracked Landrover


Friday, January 13, 2017

If you want your photos in print, get them on-line


The latest edition of the Collectors Gazette includes a few photos of my APT models, both Hornby and wooden. 

Many people would like to be able to say the same. Even for those of us who do this for a living, there is a certain amount of pleasure in nipping into WH Smiths and picking up a magazine with your stuff in it.

The way to do this used to involve submitting images to an editor and hoping they would like what they saw. If you were lucky, the pictures fitted with something they were working on an you got in. If there wasn't anything suitable to hand, they would head to a photo library and buy in images. 

The world has changed. My pictures appeared because the author found them on Flickr. I'd put them on the site, properly titled and tagged, a simple Google search bringing them up. A couple of e-mails later and all is arranged.

In the magazine world this is happening more and more. I've used the web to source pictures for articles several times in the last few months. In fact I filled most of a bookazine a few years ago this way. 

I would offer a few hints for anyone hoping to do this:
  • Old images are especially interesting as the writer can't just nip out with a camera and bag them themselves. Your old collection of slides might be interesting if you scan them in.
  • Tag your images with relevant keywords. This is easier in photo libraries such as Flickr, but you can also do the job with the metadata on your web page if that's the way you prefer to work. 
  • Don't put publication quality images on the web. I normally shrink mine by at least 75%. That's big enough for a blog and on-screen use, but unless the picture will be tiny on the page, or rubbish quality, the user will need to ask for the proper file, so you find out who is using it and where.
  • If publication rather than payment is your aim, use Creative Commons licensing in your photo library of choice. That way, the photos can be used for free (appealing to editors) but normally with a credit.
  • You might like to put a watermark on the image to stop people just pinching it. This is more of a problem on-line, but it's worth thinking about. I don't bother personally.
  • A web address in the corner of an image might be a useful advert for your website if the shot is used elsewhere on-line, but it won't appeal to print editors.
  • If someone asks to use a photo, reply to their e-mail. It's very frustrating not to be able to get a response. Normally all I'm asking for is permission and a file, in return for money for the repro fee. 
  • Get over yourself. You are not the only person with a camera out there. You will not retire on the proceeds of the odd sale. Just enjoy seeing your work in print, the money (if there is any) is a bonus. 
  • The media won't spend money when they don't have to. Some of the time it's because there is little money in the publication, if you are reading this then you probably aren't taking photos for Vogue where cash flows like water, you are aiming at specialist publications with limited reader numbers. Personally, I think all photographers should be paid for their work but sadly that ship has sailed. The interweb is full of people who will work for free sadly. This allows big media (I'm looking at you BBC) to source free photos. 
  • If your picture appears in a magazine, buy two copies and squirrel one away in something to keep it mint. Use the other to bore everyone with your skilz. And do show off, people really will be impressed.
Update: This week I also received the following e-mail:

I am contacting you from the Dr. Phil talk show here in the U.S. There is a photo we found on Wikipedia that may be yours that we would like permission to use in our show.

To give you some background, we are taping a show with a guest named Annie, who is delusional and believes that she is the 'Annie' that Michael Jackson wrote about in his hit song, ‘Smooth Criminal.' In actuality, an audio engineer who worked on the album disclosed that Michael Jackson wrote the song about the CPR doll named CPR Annie. We would like to show this still of “Resusci Anne” in our stage monitors when Dr. Phil talks about the origin of the song.

Reference link:
Does this photo belong to you and can we use it in our show?

OK, no money, but I get a mention in the programme credits. Not bad for a snapshot taken during some first aid training.

Thursday, January 12, 2017

British Rail design references


Last week, I mentioned the discussions I'd had over the choice of colour for a station name. At the time I mentioned the BR design guide at £75 being a bit outside my pocket.

The good news is that it is also available on-line:

www.doublearrow.co.uk

Thanks to Chris Hoskin for pointing this out. As well as the manual itself, there is also a very useful list of books on the subject, some of which I have an will try to review on here in the future.

If the background to the famous arrows of indecision logo interests you, there is an interesting article on the BT website that explains more


Wednesday, January 11, 2017

Clapperboard warehouse

Corsham warehouse

Looking through folders of old photos taken at exhibitions, I found this building. I like to go for a stroll around during shows and snapping buildings as I pass. Sadly, I'm less good at noting where I was when I took them. 

The folder is from Trainwest 2009, so I assumed the building was probably in Corsham, but after posting the photo on Flickr, Andy tells me it's actually in Chippenham. More that that I can't tell you - it's a mystery.

No mystery why I took the picture though. A lovely mix of clapperboard over a stone base. No idea what it was built for but that doesn't matter. Plenty of character and if you are happy scribing your own stonework, not that difficult to make.

Tuesday, January 10, 2017

Cheap tools aren't a bargain


On my workbench I have a plastic dial vernier. It's an invaluable tool for matching drill bits in my miscellaneous box of leftovers with piece of wire or plastic rod. So useful a tool that it doesn't have a place to be put away as I'll only get it out again.

It's also handy for checking measurements on models and other stuff I might be writing about, so sometimes it migrates to the computer. This is a nuisance and I then don't have it to hand at the bench when I'm making stuff. 

So, at the last show I attended, I bought another plastic dial vernier. It wasn't as good quality, but it was cheap. Less than a fiver as I recall. (In case you wonder why I don't by an electronic version, I did. The battery always seems to be flat when I want to use it) whereas the original was £15 back in the days when £15 would get you a tram ride to Blackpool and back with fish & chips on the front etc.

There is a reason this thing was cheap. It's rubbish. 

The gears driving the pointer are waaaayyy out. Look at the photo, 3.5mm out in 25mm? Imagine what it says at the end of the slider!

So, useless. I don't care how cheap this thing it, it's NOT a bargain. This is the difference between something not costing a lot of money and something being cheap. My original was cheap because it's given years of service. This cost a lot less but is expensive 'cos it's hopeless. Lesson learned, I should have paid attention when handing over money. Please learn from my mistake. 

Monday, January 09, 2017

Why do modellers hate model shops?

The recent news story about a bookshop owner asking people for a 50p entry fee to his shop has appeared at a time of interesting comments on the Interweb.

I first heard about it on the Radio 2 phone in. The host mentioned how he had seen people browsing books in shops and then firing up their smartphone to order said volumes cheaper online. I can well believe this happens, something confirmed by the following days TV news covering the story. A retail expert was explaining how this is becoming more and more popular, a phenomenon known as "showrooming".

Well, we get the same in the modelling world. Take this comment from a Facebook model railway group:

I usually contact Olivia's Trains in Sheffield for advice, then go shopping around for the best price.

So Olivia's are expected to provide free advice to people who take it and then decide to buy from a vendor who can afford to offer lower prices because they don't employ staff spending time answering questions from numpties. 

Then a few days later, there is a thread about the closure of another model shop on a model boat forum. It contains the following discussion (edited for length):

Lots of people on here are just pleased with the very low prices they can get from China. They are not willing to spend a bit more to keep the UK trade afloat whether retail or internet/mail order. - C

And when said local model shop sells items from China at a big mark up . All people are doing is cutting out the middle men ,no harm in that. - J


I suggested that ALL products are sold at a mark-up, that's how the shop earns money to stay open. Along the way they take the risk of stocking stuff that might not sell, having it to hand so we don't need to wait for shipping and offering advice and assistance.

Cutting out the middle man is fine if you are happy to see the demise of the model shop. Just don't complain when the middle man isn't around to sort out problems and the man in China couldn't care less about you.

Apparently though, it is wrong to make a mark up on products above a certain (not defined) limit and the poster had worked on a model shop so he knew. Presumably this is very well paid work with all that rampant profiteering.

Along side all this there are people moaning they don't have a local shop and it sometimes seems, delighting in the closure of another place they can't visit. I remember a corespondent to a magazine gloating that he didn't care as there wasn't a shop near him. He lived on Shetland.

It will be no surprise that I really like model shops. If I see one, I go in. Once I'm in, it's very rare that I don't buy something, partly because I know they have overheads and if I don't, they won't be there next time. That and I love the occasional bit of retail therapy, especially if it involves a dusty box found at the back of the shop.

But little bits aren't enough. We need to buy the big ticket items. I'm pleased to say my Peckett came from the local shop. I didn't test run it, but I could have. You can't do that on-line.

So, please support your local model shop, whatever they may be. I know a local outlet spends £500 a year on the business rates for the space occupied by the doormat, the Airfix range only just covers the cost of space thanks to recent margin cuts by Hornby and yet people still walk around taking photos of items that they will then go away and buy on-line.

And we will pay money to go into a toy fair or swapmeet, so does 50p refundable on purchase, seem so bad if it keeps the shop viable? 

Sunday, January 08, 2017

Appliance repair

From xkcd earlier in the week.


Across the world, tinkering types recognise the problem and are nervously laughing...

Saturday, January 07, 2017

Saturday film club: Making model cars

New feature time!

For the next few Saturdays, I'll be highlighting interesting videos found on the web. Most will be railway based, but I'll include some more general model making stuff too. Basically, if it interests me, I'll put it up here for you to enjoy. 

If anyone wishes to suggest a video, go for it. Brian Macdermott is helping me out a bit with some of the videos scheduled for the old MREmag "Tea Time Videos" that don't fit the new format of that magazine. I know people enjoyed them though, so we'll do this over here, albeit with a wider brief.

First up, have you ever wondered how diecast cars are made? 


Friday, January 06, 2017

A frozen lake doesn't stop play

Frozen tug

Yesterday morning, the car had to be scraped clear of a thin ice layer, but the day dawned sunny and bright so I decided to head down to the model boat club for some fresh air anyway. All the time stuck at the workbench or in front of a computer needs to be countered with a breath of nice country air regularly. 

The lake was frozen as expected. Fortunately, a bit of hard prodding with one of the clubs stouter boat retrieving poles broke enough that I ended up with an area of water about twice the size of a bath with a few bits of ice floating around. Not sure if the fish got a headache but at least there is air going in there again. 

My boat of choice was the Bantam tug. Small, heavy and able to turn in its own length. I managed about 20 minutes sailing in my puddle, happily bashing mini icebergs around in the sunshine. OK, it's not what you might call exciting, but a pleasant enough way to spend some time.

Air boats

Our secretary, Derek, had other ideas. Rather than clearing the ice, he ignored it with a home-brewed airboat. Fitted with a couple of runner under the hull and propelled by a ducted fan unit from a broken model aircraft, the model skated around at great speed on the ice. 

Offered the chance to have a go, I careered around until the battery gave out. In the middle of the lake. 

A commercial airboat proved to be a bit useless, the lack of runners made it impossible to control. Eventually Derek managed to nuzzle it against the first boat but the fan didn't provide enough grunt to move it. 

Not to worry, the club is prepared - a long length of rope dragged across the ice gathered both models and brought them home in time for us to depart for a nice hot cup of tea.

A morning well spent I think.

Thursday, January 05, 2017

Station refurb, a grounded coach and painting people in BRM

Bit of a mystery around part of this month's BRM.I've been refurbishing the Stamford East station building we have acquired. Lots of sticking old materials back together and upgrading some of the finishes - modelling techniques change over the years and what we used to be happy with now doesn't pass muster.

Part of the upgrade has involved adding some 1970s signage. My first attempt was this:


A station sign with a blue background and white text. My inspiration was a photo of Market Harborough station which looks just like this. 

When I sent the article over, the response was that it should be black text on a white background with a red logo. Now, this is the colour scheme I'd originally planned, but seeing the photo (I do do some research, honest!) had changed my mind.

Not a problem, the sign was quickly changed, but I'm not sure why it's wrong, or even if it is. A look in the reprinted BR design manual for the period shows that blue IS a legitimate colour, but I couldn't quickly spot what the rules were in the shop, and while £75 isn't unreasonable, I can't justify it right at the moment so I can have a proper read. 

Can a reader of this blog help? I'm sure black and white was more common, but blue isn't unknown. Was this a local decision? 

Elsewhere, we have some Ruston Quays work with a grounded coach body. 

 This is a model I'm really quite pleased with. If anyone can guess the origins without reading the piece, I'll be impressed. Suffice to say, there is a decent bit of modelling to get this far. 

On the DVD, I'm painting little Phils. 


Painting figures isn't that televisual, so I'm covering a little theory too with the help of a Thunderbirds puppet. A puppet I misidentify as Virgil, when he is of course, Scott. That's nearly as big a mistake as wearing a checkered shirt when you are being scanned and subsequently have to paint it on a tiny figure.
 
We filmed this piece at the Wonderful World of Trains and Planes in Birmingham. It was a fascinating place, which sadly closed down a couple of weeks after we had visited. Too late to alter the DVD, but perhaps the video is a fitting tribute to an interesting attraction now lost to the city. 


Wednesday, January 04, 2017

Warehouse Wednesday - The Elephant

The Elephant

We'll start the year's prototype building photos with something a bit different.

"The Elephant" as it's commonly known, after the creature in the centre of the city coat of arms, is an extension to Coventry's 1966 swimming baths and was completed a decade after these opened. Designed by the council architects team lead by Arthur Ling, there were the sort of building problems and design issues that we still hear of today.

The Elepant - back view

Sadly, while the baths themselves are listed, even though they will be demolished as too expensive to maintain, The Elephant isn't. Apparently one of the issues that it isn't by a proper, famous architect. It seems that listing is driven by celebrity rather than architectural merit.

I'm not going to claim this is a beautiful building - it's isn't. What it is is an interesting one.The shape would easily fit into a 1970s sci-fi series. There is also a hint of the much-lauded Selfridges store as it's a odd shape that doesn't immediately fit into the surrounding landscape. Mind you, that landscape includes the infamous ring road, so that's no bad thing.

Modellers might be put off by the building being so iconic, but at least it would reasonably simple to build. Made from flat surfaces clad in lead, the hardest decision would be whether to add all the individual sheets or scribe the surface and then add the raised strips.

Even after 40 years, the lead hasn't weathered much. In miniature, you could get away with a slightly mottled spray painting rather than attacking each panel.

The Elepant cladding


I'll admit I'll be sad to see The Elephant vanish. It will doubtless be replaced with a dull building that looks just like everything else. Coventry isn't awash with interesting structures, can they afford to lose this one?

Tuesday, January 03, 2017

Partwork season again

'tis the season to start buying models installments, or so the TV and boxes of part 1's in Smiths tell me.

First up, we have Build the Back to the Future Delorean from Eagle Moss.


Over half a metre long, this 1:8th scale model is full of detail and covered in working lights. Easy to assemble with no more than a couple of (supplied) screwdrivers, in around 2 years you will be the owner of a really impressive miniature. 

"Around" 2 years? I hear you say. Yes. Because interestingly, it's not obvious from the website exactly how many parts there are in this model - not even in the FAQ section where you'd reasonably expect it to be. Even the TV advert on-line doesn't seem to contain this info. The advert on telly does though (130 parts) and a quick calculation put the final cost at over £1100. That's an awful lot of money even if the finished product looks brilliant - which it does. 

£124 buys you a model of the car about half the size over on Amazon or for those who like a plastic kit, Polar Lights do a 1:25 snap together kit. No lights on that one, nor on the Ashoma 1:24 version either. 


With the latest Star Wars film out, now is also a good time to release a partwork allowing readers to build their own half size R2D2. 


De Agostini are up front about the cost - 100 issues will cost you £893 in total. For this you get an easy to assemble robot that is motorised, illuminated, projects a "hologram", packs a camera and reacts to humans and control from a mobile phone. The late Kenny Baker has been replaced with some micro electronics, arguably making the model more accurate than the original!

The supplied magazine claims to be educational too, with articles on electronics and computing. Oddly, an electronic version is available. Surely this is superfluous as you are buying the series for the physical components of your model strapped to the front? 

R2 has been available in model form for many years. Off the top of my head, I know there is an excellent 1:12 kit from Bandi, one of which is in my pile to be built. There was also a Lego version.  If you want it to work, then Hasbro have something, although it doesn't have the functionality of the partwork version. Real enthusiasts will find at least 3 guides to scratchbuilding a droid on-line.

Product information has been gleaned form the Build your own R2-D2 website.

Both of these models look great fun to build, I'm not going to spend that sort of money (I always dream the makers will decide they would like someone building one on a popular blog and send me one, but it never happens) on either. Given the money, I'd probably built a steam-powered partwork.