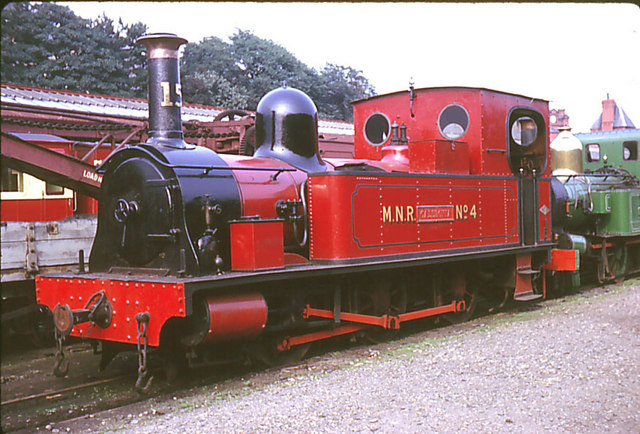
This book is unashamedly for Isle of Man railway anoraks. Which is why I bought it as soon as I saw a copy.
The book contains the photographs of David Odabashian who took them on his holidays to Mona's isle. They aren't simple holiday snaps though. What we have is an amazingly comprehensive set of images covering the rolling stock on the steam railway. There are some shots of stations and a few but he seems fascinated by the rolling stock. So much so, that there are compete sets showing every single wagon in its own photo. Likewise, we get the vans and coaches and of course, locos.
Line side features aren't forgotten, I've never seen so many signals, in fact I didn't realise there were that many on the island.
There is only one omission I can see and that is that there's nothing for the Foxdale branch, but I think I can't complain about that (well, I could long an boringly but that is for Internet forums) since there simply isn't a resource around as comprehensive as this for rolling stock.
Photo reproduction is as good as the black and white originals will allow. Fortunately these are pretty good and show details that are far from likely to be modelled by normal people.
Top marks to Peco Publications to putting this book out too. OK, so at a tenner for 66 pages, some will suck the breath through their teeth but it's never going to sell millions. For anyone who aspires to model the IOM steam railway, or even has a serious interest, it's a must-buy.
The Isle of Man Railway at Peco
A daily updated blog typed by someone with painty hands, oil under his fingernails and the smell of solder in his nostrils who likes making all sort of models and miniatures. And fixing things.
Showing posts with label IOM. Show all posts
Wednesday, February 06, 2013
Wednesday, June 06, 2012
Shuttle operation on the SMR
Over on the sunny Isle of Man there is a little bit of motorbike racing taking place. Should you find yourself in certain southern residential areas of Douglas and on a motorbike, you better be doing 180mph or you haven't got a chance of a place on the podium.
The TT races are the biggest event on the island each year and with the course being just over 37 miles long, it's not surprising that the riders encounter one of the historic railways.
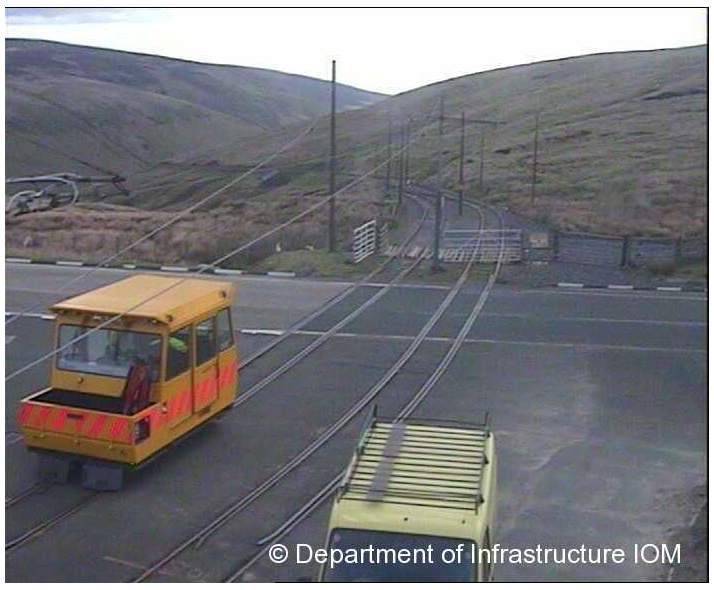
Up on the mountain section of the course, the road is crossed by the Snaefell Mountain Railway. Since racing bikes and hundred year old trams don't make good bedfellows, an interesting service has to be run on the tramway.
As you can see from the photo, the trams stop on one side of the road. Passengers disembark and then walk over the road on a footbridge to the right of the picture. They then pick up another tram that stops beside the camera position to continue their journey to the summit of the mountain. The second tram operates a shuttle service while the bungalow crossing is closed. It returns to the depot at the end of the day.
On a clear day, this is a popular trip as you can see the course for a good distance. On a normal day you can't see your hand in front of your face.
Official TT races website.
Wednesday, May 16, 2012
Snaefell Mountain Railway wagon
The Snaefell Mountain Railway is a tramway that runs up the only mountain on the Isle of Man. As such, it doesn't have a lot of good stock. There was a car specifically designed to haul coal to the boilers but nowadays you get trams and not much else.
However, there is a webcam pointing at it and I have this on my iGoogle home page so when I switch the computer on, I get a view of Manxland. A couple of days ago, I screen grabbed this sequence of pictures. The cafe at the top of the mountain has no road access, so if a new display unit, or supplies of food have to be delivered, these are pushed up the hill on a small wagon by a tram.
Does anyone know of a plan for this vehicle ? It would look rather fabulous on my garden railway.
However, there is a webcam pointing at it and I have this on my iGoogle home page so when I switch the computer on, I get a view of Manxland. A couple of days ago, I screen grabbed this sequence of pictures. The cafe at the top of the mountain has no road access, so if a new display unit, or supplies of food have to be delivered, these are pushed up the hill on a small wagon by a tram.
During the off-season, there is still a need to get to the top of the mountain - the RAF have a couple of large transmitter aerials that need to be serviced after all. Thus, when the trams aren't running, there is a Wickham railcar to act as transport for people and supplies.
Does anyone know of a plan for this vehicle ? It would look rather fabulous on my garden railway.
Thursday, March 22, 2012
Track testing with TT wagons
This isn't a problem to a resourceful modeller. In my box of "stuff" is quite a lot of vintage TT, all with lovely 12mm gauge wheelsets. Looking at the wheels, the Triang version is a bit course but Peco did a lot better. These "Wonderful Wagons" have much narrower treads and the back-to-back is withing a smidge of that set by the gauge. They are certainly close enough for me to accept than as test vehicles.
Another advantage is that despite their vintage, there are loads of them out there. If the cardboard bodies get a bit scuffed then I'm not going to lose any sleep. The Mazak that it's attached to won't be damaged unless I hit it with a hammer anyway. Should I want to restore these wagons at a future date then the card is probably still to be found in Devon or at least on the 3mm Society second hand stand.
The pair of wagons are now whizzing around the trackwork as my Dad gradually refines the running. As laid there are a few lumps and bumps but with the help of the little Peco's, these will be ironed out. If only the chassis could be removed and put under a 4mm scale kitbuilt wagon !
Wednesday, March 21, 2012
Laying some IOM track at last
The track is code 75 nickel silver rail soldered to copper-clad sleepers. All the pointwork was constructed off the board and is being stuck down with PVA glue. The plain sections are made with a single rail and laid, the second one being added once the alignment is known.
Plenty of weight is sued to to make sure the track is firmly in place. I this case this means a couple of V-block holders and some of those really useful angle things that Squires sell. I know the engineers are cringing at their use for this but the metal doesn't touch the glue and none seem to have suffered any ill-effects so far. You buy special tools for holding track down if you want, I'll use what comes to hand !
Friday, February 03, 2012
Isle of Man Test track Mk 2
The materials remain the same - plywood top with softwood framing - but without the fancy corners from the first attempt that I feel might have caused some of the problems. The corner blocks that keep the boars apart in transit have been fixed to the ply tops with thin ply slabs on the side to brace them. Easier to do and just as effective as my joinery attempts. We've varnished the wood very early on in the process too. If there is any moisture in there, it's staying put this time.
So far, things are looking fine. After the next coat of varnish dries I'll be screwing the metalwork in place. Then it goes off for the track to be laid followed by some wires and perhaps even a bit of scenery.
Thursday, January 19, 2012
Next stop the bonfire
After 36 hours drying, I checked the board on a flat surface. Resut: still warped. Maybe things had improved slightly but not enough to be any use.
So, as a last attempt at fixing the problem, a length of softwood was cut to length and glued in diagonally between the corners. Plenty of weight to make the board flat again and lashings of Resin W wood glue to fix the wood were my last hope. The whole lot was left overnight.
Result: Still warped.
Would you like to guess who has been down the wood shop again ?
Monday, January 16, 2012
Trying to avert baseboard disaster
Looking along the woodwork it was obvious that the wood had warped quite badly. One board had moved a few millimetres but the other was over a centimetre up in one corner. Both were quite useless for laying track. At first sight the bonfire seemed the most likely destination.
With nothing to lose, I decided to try something desperate. The store box was placed in the bath, the boards put back in and then the box filled with water. A heavy weight on the top of them kept them under the surface.
To try and persuade them to stay this way, every available weight was placed on top and they were left for 36 hours to dry out again. This meant fish'n'chips rather than cookery for tea but sometimes you just have to suffer for your art...
Anyway, the boards are now up and look OK. I'll check and let you know how they have fared. In the meantime, would any wood fiends out there care to comment ? My feeling is that storage in a plastic box has dried the plywood out and that caused the twist. If I get them flat and varnish both sides, hopefully this will sort things.
Friday, October 28, 2011
Putting a big baseboard in a small box
Ta Daaa ! A folding baseboard - That's how I get a layout 148cm long into a box half that length.
Construction is simple enough. 6mm plywood cut to size by my friendly local wood shop. Stripwood from the mouldings rack in the same shop is fitted around the bottom edge. Some leftover 2 by 1 from the shed slots into the corners through holes cut in the ply. The folding is thanks to a pair of brass hinges from the leftover hinge drawer in the garage. Locking from a pair of brass catches - I had to buy these as we don't have to hand.
Woodwork is made much easier thanks to getting the ply cut and owning one of those cheap mitre saw things from a DIY shed. It's nice to be confident that the cuts are at 90 degrees in the softwood. I was keen to ensure the baseboard tops were level at the join, so spent a bit of time making the hinge supports as near the same height at possible. Those supports should allow me to fit low buildings (did I mention this test track will probably get some scenery) as long as they don't clash when the board folds.
I'm particularly chuffed with the corners which are strengthened by insetting the 2 by 1 by thinning it on two corners so it fits nicely. The horizontal cuts were performed on the mitre and the verticals in a vice using a hacksaw with a metal blade - the finer teeth are great for this sort of job as they don't tear the wood - then finishing with a chisel using techniques I picked up on the woodwork course I attended a couple of years ago. Cabinet makers will scoff but this is a step up for my tree hacking.
The whole lot fits in the box tightly. I could have done to allowed a few more mm over the width for those catches or found some that folded flatter, but it works so I'll not worry too much.
Thursday, October 27, 2011
A new plastic box, a new layout.
Layout 1 is being built for a reason - while working on the Foxdale project, I'm concerned that persuading the rolling stock to work as well as I would like will require lots of testing. Now I could use the layout but it's going to be 5ft long and quite wide so not ideal to have set up all the time. What I need is a test track.
So, the plan is to knock up something that will fit in the box. It will have plenty of points and some bends. If a loco or wagon runs around on it, then it will be considered fit for the main layout. We learnt the hard way when building Flockburgh that untried rolling stock and an untried layout do not make for harmonious or pleasant modelling. I reckon any time spent on this project will be more than saved on the main one.
Sadly, I will have to do something clever with the baseboard design as at 74cm long, the box isn't big enough for a run round loop, but I already have and idea how this is going to work.
Talking of plans, this one was run up using AnyRail 4, which looks pretty good especially as you can download it for free with a few limitations. My effort isn't to scale but it is easy enough to pull scale track sections out of the pallete and plan away. It's certainly good fun for those who just want to daydream a train set.
Tuesday, July 19, 2011
Foxdale progress
Over on the Foxdale desk, my Dad is making great progress on the fancy crossover section of the track. All the points around the crossover are in place and some even have switch blades.
The wagon I completed at Hartlepool runs as well as my original test item and we now have a nice little train on the layout. If I can get around to sorting out the couplings, maybe we can even connect it up.
On a technical note, Parker senior was really struggling with the soldering until I spotted he was using a cheapo lead free solder. Switching it for some normal lead/tin stuff helped enormously. If he was using something bigger than an 18W iron, or the solder had been made up with solver in the mix, all would have been well. As it was, it wasn't. So kids, get some old fashioned solder, just remember not to suck the end of it.
Saturday, July 02, 2011
Foxdale track progress
As is his wont, the 5 points will be made in one lump. The idea is to have the longest lengths of continuous rail possible. The section on the photo includes 2 points and the sidings at the end of them. The rail carries on from the bottom of the picture and should fit in the next points as well. Electrical continuity will be assured and running improved, or at least that's what we've found to date.
Construction takes place on a slab of softboard with plans stuck to it. The track is lifted every so often for a trip to the sink and scrub to remove the flux. That;s why it's not sitting on the plan in the picture.
Friday, July 01, 2011
Powered Caledonia chassis
The chassis works, the gearbox works. Time to bring them together.
First, any bearing inside the chassis frames has to be filed away so the 'box will slip in to place. Then there was a bit of fiddling around to get all the holes (2 frames, 2 gearbox bearings and the final drive gear) lined up so the axle would go through.
A quick test and the wheels rotated nice and smoothly. I always carry this out using an H&M controller as the lack of sophistication shows up tight spots with a feedback controller might overcome.
Then the rods go back on. You can see the horrors in the crank pin areas - those holes should be round not oblong - but it still worked. Pedants will also spot the rods are back to front. They work better this way despite the original jig being set up with them the correct way around (I checked, I really did. Several times). It doesn't matter, the thing runs acceptably well.
Finally I've fitted pickups to the rear 4 wheels. This is a live chassis model, that's why one of the motor terminal is covered with insulating tape, so only one set is required and these are 28swg phosphor bronze wire attached to veroboard bolted to a frame spacer. I'd like to say that I only did 4 as this will highlight electrical "issues" better than if all 6 wheels were grabbing electricity, but the truth was I couldn't be bothered to do the front pair. I'll sort this out later. For the moment the chassis is good enough for track testing.
And testing it did. Back and forth over the longer point crossover without any problems. No lumps or bumps or stalling. I wish the Isle of Man had bought more of these things rather than the more complex to build 2-4-0's !
Wednesday, June 29, 2011
Point testing again
Many years ago (OK, probably 2) we built a 12mm gauge test track on a plank. It's about 4 ft long and has two parallel tracks and a crossover. The points on this are longer then the last ones tested and I hoped that they would prove easier for the stock to negotiate.
This turned out to be the case in spades. I sat the 0-6-0 chassis on one end of the track and tilted the board. It ran down the line, through the crossover and down the next bit of track without even a hint of a derailment. I did it again in the other direction with the same result. In fact I spent a happy half hour (I'm easily pleased) eating wine gums and tilting the board to make the chassis run. At no point did we even bump through the points never mind leap from the track.
This means that:
A) I'm not completely useless at building chassis.
B) We need to re-plan Foxdale around less tight point work.
So good news and not so good. I just hope it all still fits on the board.
Tuesday, June 28, 2011
Jigging the Caledonia chassis
Wrong.
First up I laminated the rods. These are very thing in places as per the prototype. No complaints there although I suppose the tags holding them to the etch could have been a bit thinner.
Then I used these to set the axle positions on the jig. The holes were too small for the ends of the jig axles but I reckoned I'd got them set properly anyhow. Despite this I had to move one axle bearing over 1mm inboard by filing the ole out a bit. At least the jig kept things flat I hoped.
Then with the wheels fitted, I tried the rods. They bound. OK, so try one pair of wheels at a time. After lots of hole opening I managed to get these to rotate. Then the third axle. More hole opening. At the ends of the rods, the holes are oval slots rather than round.
The chassis now runs when pushed along the bench but I have a nasty feeling that a new set of rods will be required to get it moving under power. What I can't work out is where the problems come from. Did I set the jig up wrong ? Is there a problem with the kit ? Was I just having a bad day ?
Monday, June 27, 2011
Caledonia
One benefit of building a model railway based on the Isle of Man is you know what your locomotives are going to be. There will be two types - 2-4-0 Peacocks and one 0-6-0, Caledonia. I have a Peacock chassis so it seems sensible to build the other one as well. That way we know our track-work will be suitable for all the chuff chuffs.
Branchlines produce a kit for Caledonia. It's mixed media - nickel-silver for the chassis, whitemetal for the body and cast brass for a lot of the detail parts. Mechanical bits are a Tenshodo motor, Branchlines gearbox and Romford wheels.
Saturday, June 11, 2011
A quick H wagon
The Branchlines Isle of Man 3-plank drop-door "H" series goods wagon is supplied moulded in whitemetal with a plastic floor. It comes with wheels and non-working couplings.
I built the model using Zap-a-Gap superglue in a hurry.
First up, the floor has to be trimmed to size. In the instructions this is 24mm by 53mm. That's too short as I discovered when putting the ends on. A couple more mm would be better.
The body assembled easily enough after this - although I made a pigs ear of the corner in the photo. Never mind, I'm sure this is fixable. Underneath the solebars have to be straightened (mine were a bit wavy but the metal is soft enough to tweak) and shortened a touch.
Axlegauards are drilled for bearings and then glued in place. Care must be taken to get the axles parallel and ensure the wagon sits level.
Finally, the door stops. I couldn't find a decent photo that showed them so the parts are in the spares pot at the moment. Once I'm happy they survived to the period I'm modelling - something many of the 3-plank wagons failed to do - I'll fit them.
At the moment the wagon stays unpainted as it's role is to be shoved back and forth over the trackwork. No point in damaging the paintwork by handling it with flux covered fingers after all !
Monday, June 06, 2011
Making narrow gauge points
Anyway, a few basics. A quick note on the Isle of Man forum established that the sleepers are 6ft 6 inches long and 2 and half foot centres. This is the sort of detail that matters - the track needs to look right after all - but it surprisingly difficult to find out.
The sleepers are OO ones chopped to length and then the first point is assembled on a plan. To ensure reliable spacing a little jig has been made up from cardboard. This seems to be working and a longer version for plain track.
Thursday, May 26, 2011
Foxdale planning session
Planning proper has now begun on Foxdale. When the Parker's build layouts, that means taking some point plans and scattering these over the board until we like what we see.
The station features and interesting bit of pointwork with four turnouts facing each other to preform the same role as a double-slip would do on a main line model. It's this that really got us interested in the station. To aid construction, the plans for this central section have been laid out and stuck to a sheet of paper. This is them plonked on the board to give us something to work around.
Other aids to planning are the flat stock mentioned on Tuesday, and a mock-up of the station building. It's the only one we have a plan for and since there are only three structures on the model, we had better get it right.
The photo also shows a couple of plans from books that only slightly contradict each other and every photo I could find on the web.
From all this we have worked out that it is possible to build the model in the space available. This is determined by the size of board that will fit in the back of the Berlingo without splitting the model into several boards. The overall plan is for a letterbox style model with integral lighting. It's not going to be perfect, the length will be condensed to get it to fit, but we are looking for a pleasing representation. Go somewhere else if you want a perfect model.
One happy surprise is that this will be an interesting model to operate. Sidings pointing in both directions proliferate, not something you find elsewhere on the Isle of Man. Despite out condensing, sensible trains can operate - choosing the Manx Northern helps a lot in this respect as the longest passenger service is likely to be the railcars which as two units with a van in the middle. 2 coach trains or 4 wagon freights will be OK and possibly a little longer once we get building.
Some work will be required on ground contours. There is a huge pile of rubble at the back and the line to the mines needs to rise up by a centimetre or more. That doesn't sound too scary through so things are looking good. Stay tuned for more updates as they say !
Sunday, May 15, 2011
Foxdale
After years of prevarication, we've started work on the long promised Isle of Man layout. I'm not quite sure how this happened, one day my Dad fancied making some track and I needed to persuade him away from a main line station. For a while now I've been wondering about picking Foxdale as a prototype and when we sat down and did a little research, it seemed to fit the bill.
Firstly, there mustn't be too many coaches. I hate building them and the kits cost a fortune. Luckily there is "The Foxdale Coach". One vehicle, even I can enjoy making that. Apart from this, trains on the Manx Northern were short - no Douglas style 12 vehicle trains with a loc on each end.
Next, there is shunting. Wagons go in and out of the mines over the most interesting track formation on the island.
It's not a pretty station, surrounded as it is by spoil tips, but then we like industrial settings. Anyway, if we bend history a little and model it in the very early 1960's, plenty of vegetation will be present. It's not too much of a stretch anyway as the last train ran in 1961 as far as I can tell and the track lasted another 10 year.
So, that's a new project (note I didn't say THE). It should be a quickie but no doubt progress will be in fits and starts. I don't know when it will be finished but we'll probably book it into a show or two before its ready and then have to rush to get things done.
So far we have a 5ft by 2ft baseboard. And half a plan.
Anyway, for those who don't know the prototype, visit this website.
Subscribe to:
Posts (Atom)