After a trip to Howes yesterday I'm the proud owner of a MFA 850 Torpedo motor, new coupling, water cooling jacket and sundry other bits. And about 80 quid less than I had before. Still, it's cheaper than the £1600 one of the guys there pays every year for a Chelsea season ticket and said like that it seems a bargain.
Fitting the motor is harder than I hoped - the gearbox on the old one put the drive shaft out very low so I have to fabricate something new. As you can see, the shafts didn't line up very well otherwise !
With the motor in I lined things up as well as I could, not perfect but pretty good. It runs well with the new 12V battery and that prop pushes lots of air out from behind the hull. Hopefully it will do the same with water !
Wiring up I discovered that the speed control I had found in the bottom of the boat bits box was there for a reason, it didn't work properly. Once it failed I remembered that that's why we'd replaced it in another model boat a couple of years ago. However it had worked when I tested it yesterday on the old setup.
Anyway, I've just spent what must be the cost of a Luton Town season ticket on a new controller and hope desperately that the money pit this boat has become will now be full and I can get stuck in with the pretty bits.
Saturday, May 31, 2008

Friday, May 30, 2008
Y7 Pickups
All the mechanical gubbins has been reinstalled in the chassis. Since it worked OK all that was left was to fit the pickups.
It's a fiddly pain in the backside job that I've never found a good way to do. My methods involve 0.27mm phosphor bronze wire bent to shape and soldered in place. The result works but doesn't feel right. I want something with a more engineering feel to it.

It's a fiddly pain in the backside job that I've never found a good way to do. My methods involve 0.27mm phosphor bronze wire bent to shape and soldered in place. The result works but doesn't feel right. I want something with a more engineering feel to it.
Thursday, May 29, 2008
Weathered chassis
I'm trying an experiment with the Y7 locomotive chassis. One it had been cleaned with Hob-Brite and then etch primed I hand painted it with Humbrol matt black. Then weathered it before any of the gubbins went back in.
This way I can get behind the wheels to get an oily sheen. I'm not sure if this will make a difference to the look of the finished model much but it's worth a try.
The colours used were tank grey followed by a rusty red and then dark earth. All were dry brushed on with an old, large, bristly brush to try an impart a bit of texture as well as colour.
Not quite so slow Huntsman

So with it's new brass propeller the Huntsman made it down tot he lake for a proper sailing.
Result: It's faster. Nothing like as fast as I might like but definitely a step in the right direction. The gearbox makes a horrible noise though. Time to get some motive power to drive the shaft directly I think.
I shot some video on my compact camera for your delectation.
Wednesday, May 28, 2008
Y7 chassis bits
With the body soldering complete I've headed back to the chassis. The whitemetal castings for the sandboxes were attached with the rather excellent C&L 100 degree solder. This is magic stuff - you can fix castings to brass without tinning the brass first.
Finally the brake hanger & shoe castings are fixed to their wires. Then the pull rods are soldered to these. The C&L solder did the trick again being far less trouble to use than the traditional methods.
Next, I'll strip the chassis down for painting. I was about to do this and then realised that I'd forgotten to put the PCB strip in for the pickups. Glad I remembered this or I'd be trying to solder to the painted parts, never a good idea...
Back to the Y7
There is a hiatus in other projects while I wait for parts so I'm cracking on with one of the many half finished jobs that litter my workspace.
A dig through the bits showed I was a lot further down this road (track ?) than I thought. The only etched part to be soldered on was the roof. This needed some gentle forming around handy pots of flux and then the rainstrips were added from wire.
After this the fun with castings begins. Happily those supplied are really excellent and need next to no cleaning up. Some of the holes had to be enlarged to take the spigots but that's a quick job with a reamer. Then out with the low-melt solder and on they go.
Not everything can be soldered. the smokebox door and tank fillers will be glued as I can't get at the back of them to solder but that isn't a problem. The backhead will stay out until after paiting as it makes the brushwork so much easier.
New brass prop
In the quest to get the Huntsman moving on the water I've replaced the undersized 2 blade plastic propeller with an 80mm diameter 4 blade brass number. The low reving motor isn't suitable for a 2 blade prop IMHO. Anyway, it looked stupid - the brass one appears a whole lot better and looks like it belongs to the boat.
On our garden pool the model certainly moves faster. I don't think we are on the plane but in a 15ft pool you can't tell. A trip to the lake later this week will give me a better idea.

On our garden pool the model certainly moves faster. I don't think we are on the plane but in a 15ft pool you can't tell. A trip to the lake later this week will give me a better idea.
Monday, May 26, 2008
Flying Scotsman bits
Sean wrote:
Can you help me, I don't know how to go about getting parts that are missing from The Flying Scotsman Loco Mag. I am short two spaces and four screws,from main chassis, (issue four). This is my first attempt at modeling.
My first suggestion would be to get the appropriate back-number of the magazine from the publishers. Try the website: http://www.buildtheflyingscotsman.co.uk/
There is an FAQ:
Q : How can I get back copies?
A : To order back copies, please contact our Customer Care Team. Please note that it can take up to 21 days to deliver your back copies from receiving your request.
Hotline number: Call our hotline on 0871 472 4240
If this doesn't work, you'll need to try some model railway suppliers. My first suggestion would be to buy a copy of Railway Modeller magazine and ring around some of the smaller suppliers to see what they can do. A good starting point would be Modelex (http://www.modelexmodelrailways.co.uk/) who are listed as a supplier in the first issue.
I'd also call Squires (http://www.squirestools.com/) and get a copy of thier catalogue. They sell bolts and other useful tools.
Good luck.
Sunday, May 25, 2008
Durrans Model Shop - Thurso
Sorry for the lack of posting this week, I've been exploring Scotland by train. One of my objectives was to visit the most northerly station in the UK - Thurso.
Wandering around the town I found a model shop !
Durran's is a bit odd - there is a good range of RTR model railways for such a small place, an eclectic selection of railway kits, plastic kits, modeling materials and loads of Games Workshop.
Obviously you're not likely to find yourself in a town four hours north of Inverness by accident, but if you do Durrans is definitely worth a visit. At least you should be able to get the glue or paint for that modelling project you took on holiday.
Wednesday, May 21, 2008
Quality die-cast coffin nails
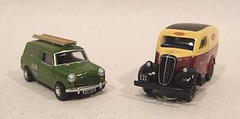 Look at these. Aren't they lovely. A couple of ready to use die-cast cars fresh from the model shop. Neither cost very much, certainly less than a whitemetal kit for the same vehicle would be.
Sadly, to me they represent another nail in the coffin of railway modelling. It's yet another part of the layout that the "modeller" doesn't have to build. No skill is required other than remembering your PIN.
I know I sound like a real curmudgeon writing this. And yes I remember being a beginner who hated hearing how easy it building a chassis from cast iron you make yourself etc. while I struggled to get a plastic wagon to run. And I know there will be a crowd of people crying, "But I don't have time to spend making and painting kits.".
But this is a craft based hobby. If you don't get to make anything, is there a point ?
For many people the essence of model railways is playing with the train set. Turning a knob and seeing a locomotive move. Do you need to build a model for this though ? There are plenty of computer based simulators that give you the same experience in a lot less space. You can have an infinite number of layouts as well without filling your house. The models will be perfect too and if they aren't then you can download an even better one or edit the one you have.
The rest of us like making things. There is a learning curve to this which is a good or bad thing depending on your point of view. Good if you want the satisfaction that comes with achievement. Bad when you simply can't make your hands do what you want. But when the ready to use items are better than anything even a reasonably competent modeller can produce, how surprising is it that the easy option is so appealing ? Why bother trying when you are bound to fail in the early days ?
I'm not saying that all good RTR is bad. I'm also not stupid enough to think the genie can go back in the bottle and we can return to the happy days of the 80's when there was acceptable RTR but still plenty you could do with it. That's gone and I wonder if this glut of goodies will be worse for us than we think.
If we don't make models does the hobby become a stereotype ? Outsides characterise model railways as grown men playing with toys. If they realise that most simply visit (in real life or virtually) a specialist toy shop and buy the bits we don't even have the excuse that there is skill involved in the creation of the scenes. I know I like to point out the carpentry, metalwork, electronics, painting etc. involved in my models. When you bought the lot what is left ? How long before you buy the whole layout off the shelf ?
Note: There is work to do on the cars. The ladder should be on a roof rack and the wheels are too wide on the Mini. Both need spraying with satin or matt varnish to make them look less toy-like.
Red Beetle
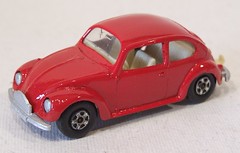 Since I've never been any good at spraying gloss paint, the Beetle has been the perfect opportunity to practise. Normally the paint runs or doesn't stick properly. Then I get annoyed because I'm working on a model I care about so I put more paint on, which makes things worse...
Of course because this is a little model and I'm not worried about sticking it back in the paint stripper everything goes fine first time. The paint was let down with thinners as usual. I sprayed it and dried the paint with a hair drier immediately. The body was left overnight and was fully dry when reassembly time came around.
Putting the car back together was unsurprisingly easy. The worst problem was that the clear plastic had gone very brittle and broke. Superglue fixed this but it won't stand handling. I'm guessing that the plastic has been affected by the UV light.
All I need to do is make up some stickers for the doors and rally sign on the bumper and it will be nearly as good as new. Saved from the bin by me.
Monday, May 19, 2008
Resin crates
Having finally got the resin crates cast after earlier grief making the mold, I now have too many for the layout.
So, if you want a set, I've listed them on eBay. Go on, you know you want them !

So, if you want a set, I've listed them on eBay. Go on, you know you want them !
Sunday, May 18, 2008
Ruston brakes
With the brake shoes and hangers made up, all I had to do was pop some 0.7mm brass wire throught the chassis to hand everything on.
The holes needed a little reaming out because of the cust on the thick metal. Nothing much, just a couple of turns for a good snug fit.
After this a bit of threading of components and a few spots of solder hold everything together.

The holes needed a little reaming out because of the cust on the thick metal. Nothing much, just a couple of turns for a good snug fit.
After this a bit of threading of components and a few spots of solder hold everything together.
Friday, May 16, 2008
Lamp irons
On 4mm model locomotives I've always chosen to ignore the lamp irons as being too fiddly to bother with and likely to be damaged by handling. In gauge 1 I don't get this option as even I would miss them.
Happily those in the kit were easy to fold up and solder. You need to ignore the convention that half etch lines are always on the inside of the fold but this doesn't seem to be a problem. Running some solder around the edge makes everything solid and ready for the loco.
To attach them to the bufferbeam I used a resistance soldering unit - a tool I very rarely break out. This time it was just the job, working far better than a conventional iron for this task.
Thursday, May 15, 2008
Sailing in the rain
This morning it wasn't raining. OK so there sky had filled with cloud but they hadn't started falling to earth.
So, knowing that a few other KMBC members would be sailing and having nothing better to do in the morning I headed out to the lake. It seemed like a good idea to test Splodger as this model boat had been packed up for the winter once completed and had never made a trip across our water.
Of course once I was at the lake and chatting the heavens opened. Rain did not stop play though and despite it we still enjoyed a laugh together. The boats will take a bit longer to dry out than normal though.
Cabside handrails
I need to pay attention more often. There I was about to get on the phone to Trevor and point out a missing hole for a handrail knob on the cabsides. Then I took a proper look at the photos and realised that the real loco had a special, weird handrail support which held two handrails.
What's that about ? Do the designers of these locomotives not consider the problems of modelmakers ?
I suppose it does save the cost of two turned brass handrail knobs so someone benefits...

What's that about ? Do the designers of these locomotives not consider the problems of modelmakers ?
I suppose it does save the cost of two turned brass handrail knobs so someone benefits...
Ruston bonnet part 3
Now for the biggie - attaching the bonnet. There is a lot of metal here and I knew soldering would be challenging.
At the front a couple of slots take the tabs on the front for location. At the back a half etch line (that I'd previously ignored) shows there the back should go. That is a nice touch and works really well.
I tacked the front on by blobbing solder in the bottom of the tabs as they emerged from the footplate. Then did the same at the back and made sure everything was lined up.
Finally, out came the gas torch again and solder ran around the inside back and along the front below the fan. I was surprised how easy this was - that nickel really solders well. A quick blast of flame and I was blowing molten metal along the join.
Ruston steps
Attaching the steps to the Ruston was interesting. For a start there is plenty of step to get hold off with the sprung tweezers so manipulation was easy. And as mentioned before, they are sturdy so you don't end up bending all the treads.
The front steps are no problem to locate - they go between the two handrail holes. The rear are a bit harder and they go on relative to the door. I used the fillet in the corner (lifting ring ?) as an aid 'cos the photos show they don't overlap these. As it was I got every step in the right place first time - I think that is a first for me.
I did need to use a gas torch for this task. The footplate is large and soaks up heat but the torch gave me nice quick, local solder melting and made the job easy. I can hear engineers repeating the mantra, "The right tool for the right job..."
Wednesday, May 14, 2008
Top speed
Wiring a model boat seems to scare people silly but it's not that hard. Plug the speed control and servo into the receiver and wire the control to the motor. It didn't take me long and I even made a reasonably neat job.
The plan was to test the boat on the lake tomorrow but according to the weather forecaster on telly to do that we'll have to stand in the rain. So as the evening was nice a quick trip saw the boat afloat.
First problem is the superstructure won't sit down properly. My neat wiring was in the way at a couple of points. A but of a shove and it went on and wasn't going to fall off easily. I need to look at this.
That's the easy bit though. Once on the water I made a couple of slow turns just to test everything worked OK. Then I pushed the stick up for full speed.
And the progress was what might be politely termed "stately". Not in any way fast or exciting. I don't care what the sticker on the motor says, there is no way that prop is rotating at 6000rpm. It's not digging into the water much either.
A faster motor and four, or at least 3, blade prop are called for I think.
Ruston bits
Time to make up some sub-assemblies for the Ruston.
First up the brakes. These are a central part with a etching on either side to represent the shoe. A light tin on the back of these, plenty of flux and some sprung tweezers acting as clamps had these assembled quickly and pretty cleanly. With bits this size lining up is easy and you have something to hold on to !
The steps are similar. The only difference from a 4mm kit is that the bend in the nickel tread takes more effort as the metal is thicker. I started the bend with little pliers and then popped them in a vice to finish the fold with a tiny hammer. If I'd used bigger pliers I'd have done it in one move.
This effort means that unlike the smaller scales the bits stay bent ! I hate it when you solder things up and then have to tweak them back to shape. This model will stand up to handling and the slightly rougher environment most G1 is likely to encounter.
Aside from the bend, assembly was easier than the small scale. You have something to grip and the nickel solders exceptionally well even to brass. I tinned the vertical on each step and just heated the joint when made and the solder flowed with no mess. Lovely - I think I could get to like this scale.
Bits of Beetle
I do little jobs like this as experiments and because I feel stupidly sorry for the battered little car.
The experiment this time was with paint stripping. I've had success using brake fluid recently so I wondered how it would work on the sort of paint die-casts are covered with. In this case the answer is - none at all. A scrub with a pan scourer did the job though and removed most of the colour.
Then a shot of Halfords grey primer which dried think and lumpy. I wonder if they have added some filler to the mix to make it wore suitable for the domestic market ?
Another scrub and a shot of Eastwood etching primer did the trick. I'll know to stick with this on future important projects !
The glazing took a bit of cleaning up with Brasso but is now reasonably clear. The rest of the bits are fine. Since the chassis has lost it's chrome plating I've painted the visible bits silver. This isn't as good as chrome but brightens it up considerably.
Tuesday, May 13, 2008
Fairey Huntsman
A few weeks ago I bought a job lot of model boats at an auction. To say they went for a song would be an understatement.
The sensible financial part of me said, "Stick them on eBay and make a quick profit." But the sad modelmaking bit that means I will alway be poor insists that at least of of the 3 hulls becomes a project. Since the 46" Fairey Huntsman is the nearest to being complete, that's the one I'll do.
The model is pretty well made. The motor is installed and to get it on the water I just need to fit radio gear and a servo. Before doing this I think a waterproof hull would be nice and getting rid of the brown paint that is where a proper Huntsman has white would be good too.
So on a sunny morning I took the boat outside and sanded the hull down. That paint isn't coming off but I quickly had the hull ready for a couple of coats of varnish. I suspect it's pretty watertight already but you can never be too careful. Anyway, the shiny wood looks nice in the sun so I'm happy.
VW Beetle restoration
While I was in Bridgenorth I picked this up from an antique centre. I wouldn't normally bother but 35 years ago the centre was a garage and it sold my camper van to it's first owner.
So I'd have preferred to buy a Type 2 but this was all they had. A Matchbox VW 1500 Beetle. Condition - more than a bit tatty.
Still I suppose I can rebuild it...

So I'd have preferred to buy a Type 2 but this was all they had. A Matchbox VW 1500 Beetle. Condition - more than a bit tatty.
Still I suppose I can rebuild it...
Sunday, May 11, 2008
Cleaning the airbrush
I'm a bad person. I don't really clean my airbrush properly. OK so I blast some brush cleaner (cellulose thinners I think) through it after use and then squirt some airbrush cleaner in as well. But I don't strip it down and give it the love I think you are supposed to. And sometimes it plays up because of clods of paint in the mechanism. Not often but once is too much.
So I though, why not put the mucky bits in some brake fluid to loosen the paint ?
I had planned to leave them in overnight. I got distracted and I think they got nearly a week. Still, the paint was loose and with a bit of a scrub previously painty items have come up shiny and clean. You can even see through my previously filthy mucky turps jar...
Saturday, May 10, 2008
The Ruston runs !
After a lot of peering at photos and a quick phone call to Trevor I've figured out how the Ruston works. It seems that the rods I made up aren't all required for the model. Apparently some prototypes didn't have the jackshaft drive so two different sets are provided. I had been wondering how to fit both of them !
Anyway, the jackshaft is made up from laminations and attaches to the Slaters square ended axle. I would like a bit more thickness - a couple more laminations should do it. That would get the retaining screw below the level of the crank face and stop the wobble.
Apart from this, it's all pretty easy. The holes in the rods are about 1mm larger than necessary but don't seem to affect anything. Long crankpins are needed on the crank and rear set of wheels. I only had one set so improvised by glueing the retaining nut on the pin otherwise it unscrewed after a few revolutions.
Pretty quickly I had a chassis that worked. It has run a few miles held in mid air on a couple of flux tubs with nothing jamming or falling off. With a jackshaft drive this is pretty good as I've encountered some horrors in the past.
Bridgenorth Model Shops
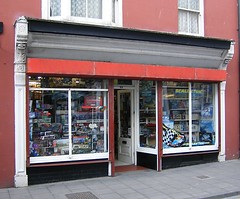
For a tiny town, Bridgenorth certainly has a lot of model shops. Head down Listley Street and you quickly trip over Hobby Horse. It's not a big shop but stocks a small range of plastic kits. There are also paints, railway (Hornby), Warhammer, Playmobil (?) and modelling materials. Lots of Britains and Timpo figures too. I considered buying a 4 foot length on 6 inch wide balsa for my entry in the plank competition but then thought better of trying to carry it around on my wanderings.
 Further down the road, Spartan Trophies carry a much bigger range of kits plus Tamya paint. Plus you can get trophies engraved - who could ask for more ?
If that's not enough, there is even a shop specialising in collectible toys. It's half Steif teddies and half vintage diecast. Prices are very reasonable (for the cars, I know nothing about teddies).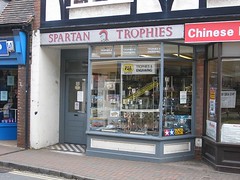
Friday, May 09, 2008
Real Ruston Locomotive
After a sunny day out on the Severn Valley Railway, I've now seen a prototype version of the Ruston locomotive I'm building a model of. OK so the picture was taken from a moving train but at least I've seen one now.

Thursday, May 08, 2008
Ruston bonnet part 2
Here's the tough bit. The bonnet top has to be formed and fitted over the skeleton. My first thoughts had been along the lines of doing all the bends off the model and then simply soldering it on. Of course I'm far too much of a bodger for this. The top curve went OK but I couldn't get the sharp corners where I wanted them.
So, plan B. Solder the bottom edge in place and force the metal to shape over the formers using brute force and ignorance. With big bits of metal like this you can sometimes get away with this and I was lucky this time. The trick is to tack solder the metal as you go and hope this holds everything in place.
At the end I was about 1mm short of where I wanted the metal to be - nothing in a model of this scale.
Wit the difficult bit done, the doors etch is attached by soldering from the back using the provided holes. Then the radiator wrapper is formed around the front. The fit on this was excellent. Finally I made up the grille as the individual parts are a bit flimsy on their own and I worried that they would be damaged if I left them any longer. The grille will stay off for the moment so the inside and fan can be painted.
Tuesday, May 06, 2008
Ruston bonnet part 1
The first stage of forming the bonnet for this model locomotive is to fold up the inner former. That's a job that needs some bending bars or similar, I used a Hold'n'Fold, as the line must be accurate. I know it's half etched but there is a lot of metal here and tidy folds matter.
An end former is than attached plus four interior guides. I took time to make sure they were all vertical as this is going to matter at the next stage.

An end former is than attached plus four interior guides. I took time to make sure they were all vertical as this is going to matter at the next stage.
Monday, May 05, 2008
Ruston cab
The sign of a good kit is that there isn't much to say about some bits of the build. For example, the cab is simply four parts that make a box.
Before assembly, the modeller needs to punch the rivets out using (in my case) a blunt screw against some lead. This results in some lumps that resemble rivets- the ones on the real locomotive are surprisingly small - and a wobbly edge of the pieces.
I straightened the edge with my fingers and the soldered the front to the footplate. A couple of tabs and slots are provided for this. The rest of the cab builds around the back. Half etched lines are provided in the font and back to help locate the sides.
The only "problem" was the amount of heat needed. Although I tacked the bits together with my soldering iron, a gas iron provided the necessary grunt to get nice neat joins. That's not a problem though, it's physics.
Sunday, May 04, 2008
Slingshot number
Repainting this model boat has taken longer than normal because I've struggled to find suitable numbers for the front.
On my boat I was able to use the sort of number you have for house doors. Not a problem with a single digit. Because my Dad has been given race number 10 this doesn't work. I know - I tried.
Wandering around the town inspiration (desperation ?) struck as I left a local car bits shop empty handed. Par Pack Party time sell sticky numbers for balloons so you can celebrate birthdays with the right number on the inflatables. These are just the right size for the boat.
Cheap too - 15p a digit. I bought 3 sets so I could try them to decide which colour looked best.
With the numbers in place and a bit of silver Letraline hiding my dodgy masking, the boat has been sprayed with gloss varnish to seal everything in. The makers of these stickers didn't design them for use in boat racing so I thought it best to try and keep the wet out.
Saturday, May 03, 2008
Aberystwyth Model Shops
 Yesterday I visited Aberystwyth. Astoundingly it has not one but two model shops. Good ones too ! Weirder still, they are both in the Pier street about 100 feet from each other.
The first (as you wander in from the station) is "The Art Shop". The window is a riot of colour with souvenirs joining the other goodies on sale. It's not a big shop but well stocked with a huge range of plastic kits at the front. I wish we had somewhere locally with a similar range - it's a long journey for me to visit this one !
Towards the back there is everything the RC aircraft modeller could want including fittings and a ceiling full of servos. I didn't spot these at first until I turned round and realised that there were RC stalactites above me !
Obviously there are art materials as well but these take up less than half the shop - and lets face it which modeller hasn't dug through the local art store anyway so all the products compliment each other.
 Nearer the pier is the second shop. No name on this one but it's still worth a visit. Another huge range of plastic kits awaits along with a good stock of Games Workshop figures and Sci-fi memorabilia plus all the major model railway ranges. Like "The Art Shop" a full range of paints, glues and toolds is available although the former had a slightly wider range of sticky stuff, presumably to cater for the flyers. This shop though, had the only RC boat kit I saw - a faded Billings tug. I'm surprised that there is enough support for aircraft and plastic kits but not boats being so close to the sea. Perhaps the seafarer is fed up with things that float when not at work...
Thursday, May 01, 2008
Big fat cable

I've hung on to this post for a couple of weeks to try not to jinx myself.
My van is fixed.
At least the "losing all the charge in the battery after a couple of days" problem is. First of all I replaced the main cable between the battery and the starter motor. I had tested this and proved that it was leaking charge even when not attached to anything else. The replacement was sourced from Lucas Electrical who made a special up for me for 17 quid. It needed to be about 6 inches longer than anything I could buy off the shelf otherwise I'd have gone down that route.
I also had the battery tested. The test device said "Charge and test again". Since I'd charged it several times in the previous few days I decided that this didn't help and bought a new battery. It was about 20 pounds cheaper than Halfords !
Anyway, despite experiencing cold, damp, foggy weather the charge has remained good and the cab voltmeter says 12v even after a week of no usage.
Writing this probably means a flat battery in the morning of course...
Subscribe to:
Posts (Atom)