Showing posts with label M Wagon. Show all posts

Friday, July 01, 2016

M wagon finished

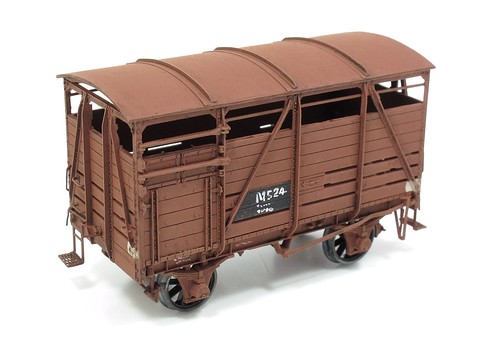
Victorian Railways M Wagon

After adding thebrake lever and guide - a couple of ingenous fold-up etched brass components - I could move on to painting. 

Livery appears to be rust brown so a quick spray with Humbrol 70 did the job. The white patches indicate the side the brake lever is on, there is only one, and of course there is the black patch for the numbers. 

Ideally I'd have used transfers for digits but as I'm only doing one wagon, I'm not going to spend money on a set. As it is, the on the prototype the numbers are applied using a stencil so I tried to copy this with a mapping pen and some ink. It's not perfect but will be fine for now. 

Weathering is just a wash of Games Workshop Earth shade ink to excentuate the detail. Left for a few minutes and then wiped away it gives the dusty appearance of the prototype to my eyes. 

This is a cracking kit. Lovely crisp mouldings with the added etched parts to improve things futher. I could imagine a small layout with a train of these things looking smashing. Not for now though...

Thursday, June 30, 2016

M wagon body

Four plastic sides, easy enough you might think, and you'd be nearly right. They have to be made into a 2 L-shaped parts as there is a gap along the bottom edge of each side. Only the door touches the floor.  It's not rocket science though and I like the way the angle irons on the side neatly match as they curve around onto the solebars.

At the ends, a lever is bent up from wire with the aid of a jig on the sprue. I managed to ping one length of the supplied 0.3mm wire into the distance. The replacement 0.33mm from Gibson proved to much easier to bend accurately. Maybe a different blend of metals? 

From the etched part selection there's several handrails which on a British kit you'd be expected to bend from more wire. I'm not sure which is best, although the etched ones are nice. All metal is stuck in place with Zap green glue, which seemed to be working faster than normal, just when I needed a little wiggle time!

Tuesday, June 28, 2016

M wagon chassis


Australia and Britain are two countries separated by half a planet and a common language.  According to the excellent instructions with this kit, down under what we call a "solebar", they call a "sill". There's also the Americanism of numbering drill bits, so we make a 0.7mm or #70 hole for the cross wire. 

Apart from this, chassis construction is pretty conventional to anyone familiar with a Parkside or Cambrian kit. Bearings are provided but moulded in derelin rather than turned from brass. They pop straight in the axleboxes though so no difference. 

Interesting that there are only 4 brake shoes and that they act on the outside of the wheels as opposed to the inside as you find in Britain.

Monday, June 27, 2016

M wagon

A bit more in the way of Aussie projects this week. Tucked away in a box of souvenirs, is a Steam Era Models Victorian Railways 'M' Wagon.
The kit is a modern multi-media production. Most of the parts are very well moulded plastic, with crisp detail. There's also some wire and a small fret of etched details. 


To be honest,I know nothing of the prototype. The kit was bought in a model shop visited in Victor Harbour, the first of many during the trip. I picked it because I liked the quality of the mouldings and the finished model on the packet was suitable "Aussie". 


To be honest, I can't do any better than point you at than this excellent web page over at victorianrailways.net so for more details, head over there.In the meantime, I'll start with the chassis.