Friday, April 30, 2021

Mamod Minor 2

Mamod Minor 2 

In preparation for tomorrows #twittersteamrally I dug out a tiny steam engine that's several years older then I am. 

I've no idea why my dad bought the Mamod Minor 2 steam plant years ago. I only recall it being steamed once, and that was in the kitchen where it slid itself around the worktop on a thin slick of water. Plans were mentioned of turning it into a steam tram, but obviously nothing came of this. 

Anyway, out of curiosity, I pulled it out of storage, filled the burner with lovely smelling meths, topped the boiler up with hot water and gave it a go. 

And off it ran! I guess that the Mamod is so simple, there is very little to go wrong with it and so at at least 55 years old, it is still happy to chunter away. 

After the run, my little engine looked a bit of a state, so it was time to dig out the Brasso and some elbow grease. 


The brass appears to be lacquered, but there was quite a lot of corrosion around the water outlet on the end and under the silver retaining strap and this took some action from the fibreglass pencil to burnish away. The best solution was to polish away the coating and accept that cleaning will be a bit tougher in future. To be honest, I prefer the high shine look anyway and quite enjoy metal polishing on a small scale, so I can live with this. 

And there we are - all ready for the #twittersteamrally.

Thursday, April 29, 2021

Fettling Felix

Felix 

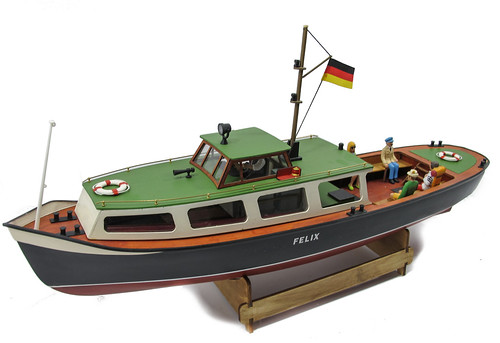
Felix is an odd boat.Built from a Krick kit by my father, neither of us can actually remember any of this happening. We certainly couldn't tell you when the model was built other than "years ago". 

To make it worse, this is a really nice boat. He has detailed the interior with a captain sitting at a control desk, and cabin interior to hide the radio control gear. A few LGB people, and it really looks the part. 

Finding the boat tucked away in the corner of the space room behind some other stuff, we though it time for the boat to spend some time on the water. At 63 cm long, it's a nice size for our lake, and fits the role of boat sailed after chip buttie perfectly. 

Of course it wouldn't be plug and play. A freshly charged, or so I thought 6V jelly cell was connected up and the controls didn't seem to work. After a bit of poking the rudder moved, but the motor seemed to be trying, but not turning. I could spin the prop with my fingers, but not under power. 

A faulty speed control I concluded and swapped it for a new one. It didn't help. 

Checking the battery charger, one of the croc clips on the lead fell off. I soldered it back on, decided the dodgy joint had stopped it charging properly, plugged it all back in and gave it another charge. At the same time, we added some new batteries to an order from Howes, just to be sure.  

The results weren't great, so I tried another charger. Then when the new batteries arrived, I gave one a boost the same way. 

Back at the boat, something odd happened. Touching the speed control connections on the battery produced a spark. Plugging them in properly the battery started to get warm. Something was shorting out. 

The old battery didn't seem to give the same problem. The motor span over but only forward. Checking the programming, I reset everything (it is possible to set the control for forward only) and even tried a different transmitter. Still, forward only. 

With nothing to lose, I swapped back to the old speed control - suddenly everything was fine. Even with the new battery. 

So, it looks like the initial problems were due to a battery that had lost most of it's charge over the winter. I then put in a speed control that was either faulty, or quickly became so (Viper controls have a lifetime guarantee fortunately). Along the way, I cleaned and oiled the motor bearings and top of the propshaft which had a hint of rust. This quietened down the drive a bit.

On the water, the boat isn't fast, but it tootles silently around nicely on about 3/4 stick. With a bit more charge in the battery, I suspect we can get a bit more go out of it. Some extra weight in the stern won't hurt either. 

Most importantly, this mystery boat is now working. And it looks good doing it. 


Wednesday, April 28, 2021

The ubiquitous steam tram


A few weeks ago, I mused about the possibilities for motorising an Atlas steam tram model. Within minutes, there were comments pointing me in the direction of write-ups showing how to achieve this. 

To cap it all, through the door comes 009 News, and there is a tram on the front cover! 

 It seems that I'm far from alone in seeing the possibilities. In fact I wonder if there is a single 009 layout not running one! 

This all goes to show that no matter how long you spend around model railways, it's simply not possible to know everything there is about this great hobby. 

Thanks very much to all those who provided suggestions. One day, I will give them a go - or should I try to be different? Clockwork anyone?


Tuesday, April 27, 2021

The trendy glass pot


Thanks to an offer at Sainsbury's, I've enjoyed a few Gu puddings. The cold ones are delicious, and not too large. Big enough to satisfy, but one is plenty. The hot ones are horrible, but we aren't concerned with those right now. 

Anyway, each pudding comes in a little glass dish 8cm wide and 4cm deep. It's a nice quality item that bugs me because you chuck them in the recycling after one use. OK, glass recycles well, but it seems so wasteful. 

It occured to me that a couple of these would be useful on the modelling board as somewhere to put little bits while working. A safe haven for screws and small components. 

I'm not alone in this - now I know what I'm looking for, I've seen at least two on the TV show The Repair Shop. And another on the jewellery making competition All That Glitters. At first I wasn't sure, but have now taken to peering closely at the screen every time a glass pot appears. Yes, I am weird.

Monday, April 26, 2021

Free to a good home - Melbridge Town

Old Goods Shed 

A few days ago, I received an unexpected message.Many years ago, my father and I build an 18ft by 6ft roundy-roundy OO gauge layout called "Melbridge Town". It was based on a trackplan in MRJ by Barry Norman for (I think) Nottingham Thorneywood Station.

We liked the look of it because it offered an urban location, most of the station building could be off-scene and there were transfer loops for freight that we though would head off to the docks in our world. 

At the time, we fancied a step up from small shunting layouts to something where we could watch the trains go by, but still shunt wagons around. 

The scenic boards were built and PCB track  made and laid. I made well over 20ft of retaining wall, a soul-destroying task. Wiring took ages and I tried to incorporate the panel along the entire back of the layout to reduce plugs and sockets - an idea that didn't work very well. 

Lack of space meant that we had to build the end curves and fiddle yards in a weekend at the railway clubrooms. The 6ft traverser fiddle yard was rubbish but we didn't have time to develop it. 

Anyway, we took the layout to Banbury and Derby shows. Basically, the fiddle yard was nailed down so the non-sliding table didn't. Trains ran around the model and looked OK, but we weren't happy and by Derby, the model was up for sale. 

Anyway, it went to new home where some developments were carried out, including binning the fiddle yard. I saw it at a show and was really pleased it enjoyed a new life. The thing worked OK and could take large-ish locomotives and long trains. 

Had we enjoyed somewhere to erect the layout and leave it up, it would probably have finished it, but the lesson learned was never to build more model than you can put up at home. To do so means you can't debug it properly. 

We don't even have any photos of the model. The few we did, were lost when some water got into the drawer they were stored in years ago. The shot at the top is all that is left. 

Anyway, it turns out the layout changed hands again. The new owner stripped some of the wiring off as part of a move to DCC, but hasn't done any work on it for five years. The model sits packed up in his garage and needs a new home again. 

So, if you want a moderate size continuous run layout - for free - and don't mind getting in a van and collecting it from Barrow-in-Furness, then drop me an e-mail and I'll put you in touch with the current owner. You'll need to be ready for some work, but less than starting from scratch. If I had the space, I'd take it back for old times sake, but I don't, so I won't.

Sunday, April 25, 2021

First chip buttie'n'sail of 2021. Now pay attention Parker!


With Covid restrictions lifted for a while, my dad and I have been able to resume our weekly trip to the model boat club for a chip buttie and sailing session. 

A sunny evening in the countryside is just the ticket. It gets me away from the screen for a while, and there is something relaxing about pootling around the lake lazily with a model boat. I think it's a form of mindfulness - you need to pay attention but not too much and so you can't help but relax. 

The buttie? Well, it's teatime and while I'm sure some sun-dried tomatoes and humus would be healthier, they wouldn't taste as nice. As a bonus, the table gets a good spray of anti-bacterial cleaner so it keeps the club hygienic. 

What did I say about paying attention? It seems I'm a bit rusty when it comes to sailing...

Still, no harm done. Once I'd pulled the weed out of the propeller anyway!


Saturday, April 24, 2021

Saturday Film Club: Hornby Railways R.345 Side Tipping Wagon with Pipe Load


I love an operating accessory for my model railway, and have a couple of Hornby side tipping wagons - but not the pipe tipper version as shown here. One to look out for. 

I also think that bright red with white boiler bands is the best livery ever for a GWR loco, and putting a super-chuff system in the tender only makes things better.

Friday, April 23, 2021

Lima operating accessories

Through the post with the Taylor & McKenna plastic bags, was a 1978/9 Lima catalogue. Inside was temptation: 

Lima 1978 catalogue

Lima 1978 catalogue

Now, I'm sure the Automatic Car Unloader has been in the Hornby range recently, although I can't find a listing for it at the moment. The Drive Through Coach wash looks familiar too, but what about the rest? 

I really fancy the Rolling Stock Transporter - and I'm sure it has masses of play value as well as being realistic since very little rolling stock travels by rail nowadays, at least when it's going to works or on holiday to preserved railway line. 

The Engine Shed with a traverser looks a bit nifty too, but I'm not sure about the engine shed with swinging thing in front of it, what's that all about? 

Anyway, this has provided a whole new range I need to add to my operating accessories collection. In the meantime, I've already started lobbying the Big H to get these back in the range!


Thursday, April 22, 2021

Signal boxes, mud and measuring tools in May's BRM


"Of course I can do two signal boxes for this issue", I said when talking in a meeting about the May issue of BRM. I'd already booked the Dexter's Cove model in for a build, but we had an Oxford Rail ready-to-plonk model in, and putting an interiors inside both seemed like a good idea. 

So it is, I've completed a couple of models - both of which took a bit longer than expected, but provide a variety of coverage for the topic in a single issue. The regular reader will know that the interior build didn't entirely go to plan either

On the review pages, I take a look at Volume 3 of the Building a Model Railway series of DVD's - complete with a lovely mugshot of Ten Commandments Dave that I'm sure I'll get stick for next time we meet at a show...

There's also a look at the new Mr Hobby Weathering Paste range - or pots of mud for modellers (one of my colleagues suggested a different substance, but this is a family magazine) which I've used on the tractor weathered he a few weeks ago

Finally, over on BRM TV, I grab all the measuring tools near my workbench and talk people through using them. 

All this, and more in the May 2021 issue of BRM.


Wednesday, April 21, 2021

Garden Rail May 2021


Old steam locomotives never die - on the Vale of Evermore light railway, they go on and on while pulling scale length trains. A garden railway doesn't need to be complex to look stunning, this line will be many enthusiasts dream come true.

We've plenty of practical inspiration this month:
  • Building a delightful Smallbrook Studio "Sprite" battery-electric steam locomotive
  • An Irish railcar built by an etched-brass kit newbie
  • Restoring an old kitbuild loco found at the back of the cupboard
  • Scratchbuilding a GVT van in 7/8th scale
  • Building a signal box complete with a detailed interior
  • Adding lights to your models

Buy the May issue of Garden Rail. 

Tuesday, April 20, 2021

Paint clips


I'm a sucker for interesting tools, and so while ordering the Jimney kit, I also picked up some of these "Useful Paint Clips". 

What I have, is a bag of crocodile clips mounted on 13cm long sticks. 20 of them.

I gather from the packing, that there is another part to the tool - a base that the sticks are poked into for support. I have no idea where that is in the massive website, but don't really care. Those sticks can be poked into some polystyrene just as easily, or into a piece of wood with holes drilled into it. 

At 18p each, these seem like a bit of a bargain. I'll keep some on the modelling bench to use while soldering and the rest in the garage next to the airbrush.

Monday, April 19, 2021

Wanted: BR Lampshade


In my cupboard of projects, I have the wall mounting unit for a BR Mk1 coach lamp. I've always fancied rigging it up with a battery as a reading light - but the glass shade is missing. No surprise there, the things must have broken regularly.

Original shades are rare - or at least I've looked in the wrong places. There might be a modern replacement that fits I'm unaware of too. 

So, as you lot constantly surprise me - can anyone suggest a source for something suitable? I'm not going to fret about perfection, a shade that looks about right will do the job.

Sunday, April 18, 2021

Brain fog

I've made no secret that I've found the last year challenging - my modelling mojo seems to have left the building and despite trying various things, it's not come back. 

Then I read this interesting article: 

Brain fog: how trauma, uncertainty and isolation have affected our minds and memory

As I read it, the problem is that our brains demand stimulation, a survival mechanism from the days we were dodging dinosaurs. 

The problem at the moment is lack of stimulus. I'm not going anywhere, other than the same old walking routes. A year without shows means a year without much inspiration. I know there are magazines and YouTube, but it's not the same as seeing stuff for real. That's where I get my rush of enthusiasm from. 

Knowing all this isn't much help of course as there is nothing much I can do about it at the moment. Still, at least there is a reason.

Saturday, April 17, 2021

Saturday Film Club: Adding rivets


An interesting technique - bit super fiddly! I might have to invest in some balls though. And one of those rivet maker things.

Friday, April 16, 2021

Steam tram


A few weeks ago, I mentioned some Atlas Editions trams that we'd bought far too cheaply for the quality of the models. 

All have potential for a diorama, but as I learned to my cost building Hellingly, overhead wiring is a pain in the backside to do properly. That limits the electric trams use as moving models, but there is another in the range - this attractive steam tram. 

Tram number 12 is 70mm long and 25mm wide. The small boiler, only 25mm above rail level, doesn't provide a lot of space to fit a motor, but this is narrow gauge, and I suspect an N gauge Tomytec mechanism could be squeezed in. 


Possibly, the biggest problem is the trailer car. The bogies are moulded integral to the underframe trussing, and obviously they don't rotate. Probably the easiest option would be to scrape the whole lot off and replace with new bogies and scratchbuilt truss-rods. 

My suspicion is that someone has already carried out this conversion already - can anyone point me in the direction if it's been written up?

Thursday, April 15, 2021

Class 13

Class 13 

BR's Class 13 shunter is one of those fascinating prototypes that modellers love, but have no real use for. Designed to powerful shunters for Tinsley Marshalling Yard, the chances of anyone building a suitable layout are slim to non-existent. You'd need a massive space for a start, and the best part of a years supply of rolling stock from Bachmann. 

This model was built for my bookazine Modelling British Railways Diesel Locomotives. We needed some practical projects and this is both simple and eye-catching.

 Class 13 

Just like the prototype, I took a couple of Hornby 08 shunters and pulled the cab off one. This was replaced with RT Models conversion parts. No soldering is really required, you can do the whole job with glue making it one for relative newbies to the hobby. 

One thing to be careful with is your selection of base models. Try to get some with wasp stripes on the end, making painting easier. And check the selection of cabinets on the side. I had to cast a set of grilles to fit in place of some originally hidden by a cabinet. I'm not telling you which ones, but it was a job that I'd have been happier not to have to do. 

The locos aren't linked electrically, but then the model hasn't really been used in anger so I've not idea how much of a problem this might be.

Wednesday, April 14, 2021

Waterborne Wednesday: Canal workboats


A quick trip to Hatton Locks for some research allowed me to grab photos of a couple of the Canal & Waterways Trusts workboats. I know they aren't as glamorous as the pretty canal cruisers, but I like them. Definitely on the "one day" list for a model or two.

The wide-beam boat is new to me. I didn't know they were in use around here, although I have seen a wide liveaboard in the middle of Leamington. 


Tuesday, April 13, 2021

A question of scale


Pay attention when shopping on eBay. These resin plants were sold to me as 16mm scale models. The tallest is 33mm to the bottom of its pot, a bit bonsai. 

I should have spotted the Oxo cube included in the corner of the photo. If I had, I'd have realised the diminutive size of the models, which I'd assumed would be the sort of thing you see in planters on  you see on a station platform. No size was quoted in the description, and there was that cube, so I need to shut up about it. 

I'm not too worried, each plant cost me just over 60p, so the bank isn't broken. I also enjoyed an evening painting them up, so cheaper than the same amount of time in a pub, and I still have some pretty plants for a 16mm scale windowsill at the end of it. 

Next time though, I'll pay attention properly!


Monday, April 12, 2021

Black 5 repair


On the workbench recently was this Black 5 which, I was told, didn't work. 

It is an interesting loco - a Hornby model that appears to have been tickled by an enthusiast. I think it's a collection of different parts brought together into one model, with a bit of added detail. 


The chassis was cast metal and designed to be motorised. I'd say early Hornby or Tri-ang, with home-brewed pickups that didn't touch the backs of the wheels. A bit of work with the soldering iron fixed that. It helps if the pickup wire isn't floating around. 

Poking around for electricity, I dropped the tender drive out, and the middle wheels fell off. They didn't seem to be very well attached and wobbled like crazy, but I suspect work after a fashion. The sideframes would hold them on the stub axle, and I don't have the means to bush them properly. 

This all improved things a little, but the model was still sticky. Eventually, I worked out that the valve gear "weathering" consisted of painting the metal with a mix of varnish and treacle. Stripping it down as far as I could, then polishing the muck away with a fibrepen, combined with unbending a few links, cured the problem.

Eventually, the model ran reasonably well, proving that nearly anything can be rescued. A couple of hours work and the loco will live to chuff another day.


Sunday, April 11, 2021

The Duke of Edinburgh on my layout


The Duke of Edinburgh's recent passing reminded me that he, and the Queen, once visited my layout, Flockburgh. 

At least, they visited it in the form of miniatures based on their 1950s selves by the German model manufacturer Preiser.

Of course I tried to find a photo of the event, and the only one I located is above. Phillip is in the blue suit on the far left of the photo. Not sure who he is chatting to, because the Queen is further along the platform talking to Teddy Roosevelt if I remember right. 

I hope he enjoys the Class 20, although I expect he'd prefer a steam loco. Or more likely, a wander down tot he quayside for something seaworthy.

Saturday, April 10, 2021

Saturday Film Club: Supeglue and accelerators


I use a lot of superglue, so when Mythbusters Adam Savage recorded a video on the glue, it was going to be worth a look. There's a lot of good advice in here, especially the baking soda trick, that also turns the glue into a filler. 

He's a bit wooly on the origins of the glue and what makes it set though - but reading the comments clarifies matters a lot. Very entertaining though.

Friday, April 09, 2021

Dermic oiler


From a very long time ago, the "Dermic" oiler for all your model railway lubrication needs. 

It's a nice bit of kit. The plunger slides incredibly smoothly with the glass tube. I've not yet tried it with oil, I need to find a pot of light machine stuff rather than 3 in 1. 

The instructions in the little box show this is an official GEM (George E Mellor) product and dates from the era when you'll squirt a bit of oil in your Tri-ang chassis to quieten it down.

The needle isn't in the box, so if I feel the need to volunteer my services to the vaccination programme, the NHS will have to provide me with one. It might be that owning your own syringe isn't the only qualification required though...

Does anyone remember these things? I'm guessing this is a 1960s device, possibly even earlier, as a little Internet research tells me that S&B were a pre-war company operating from what became Norwood Junction Models premises. A letter in the May 2019 issue of Railway Modeller tells me that the company was set up by Frank Stedman and George Birmingham. Frank had worked for the Leeds Model company.

Thursday, April 08, 2021

Taylor & McKenna bags


Some great post arrives - a package containing a load of old model railway catalogues which we'll look at another day, and the prize - two Taylor & McKenna bags. 

Old readers might look at these and recognise the family resemblance to the yellow carried bags of the wonderful chain of model shops - Beatties.  

I didn't know that there were specific T&M bags, when they were absorbed by the rest of the chain, surely they should have been re-branded? Obviously not. 

I remember the Banbury shop, but an sure it had become Beatties by the time I knew it. 

Still, two more prize exhibits for my collection. One day, I'll find the time to put it online, but for the moment you'll just have to put up with me going on about it here. Does anyone else collect old modelshop memorabilia, or just me?


Wednesday, April 07, 2021

Beginners Barclay

Barclay 

This little Barclay is built from a DJH Beginners whitemetal kit. It was a Hornby magazine project that was nearly a complete disaster. 

Not the build - that went very well. The reason this isn't the cheapest kit in the world is because a lot of R&D has gone into making it easy. Some cheaper kits achieve their price point by dumping lots of fettling on the modeller. Fine for me, bad for a beginner who hasn't earned their bodger stripes. 

The problem cam when I painted it. As I recall, the deadline was looming (they always are) and I weathered the model in the spray booth. In my enthusiasm, I overdid it massively. 

Tentatively, I attacked it with turps soaked cotton buds to see if I could remove the filth and try again. The result amazed me. As the paint cam off, it left what I considered one of my best weathering jobs. Dirty, but with the paint showing though.

Barclay 

At the time I was just relieved, but since then, the "dirt then cleaning" method has become standard for me. I usually add a bit more dirt afterwards to good effect. 

Would I have developed the technique without things going wrong? Maybe. Martyn Welch covers it in The Art of Weathering, but there's nothing to beat actually trying something to prove to yourself that it works. 

And I bet some people think mag writers get things right all the time!

Tuesday, April 06, 2021

Hood update


I've been asked for a HMS Hood update - my dad's boat hasn't appeared on the blog for a while. 

The photo (click for a bigger version) shows the current state of play. Progress has been slow as he's found other things to do, and also suffers from the same lockdown lack of motivation that I've endured. 

Anyway, the hull in in high-build primer and ready to be fitted with the mechanical bits. As the person most skilled with the electric sander, I'm due to give it a final smoothing and more primer when the weather warms up. It probably needs a couple more goes and then we'll be happy. The sanding sealer will make it watertight, so no worries there. 

After that, there is a growing collection of sub-assemblies, not all of which are in the photo. One change is to replace the gun turret supports with plastic tube rather than the slices of MDF provided for a smoother look. 

I like the flotilla of little boats that are part of the bigger model. You are probably seeing them larger than life size on your screen. There are also guns and loads of details waiting to go on. 

Maybe this year we'll get cracking. Putting the hull on the water will help, and with a bit of luck I'll get a handle on my workload and enthusiasm and help out. We would love to sail this at our boat club navy day. But then we said that last year!


Monday, April 05, 2021

Chocolate egg time


Easter provides a great excuse for me to buy a couple of Kinder Eggs to scoff and then build the toys found inside. I've done it before, so why mess with tradition? 

You don't want to know about the chocolate (too sweet), so let's look at the inards. 

Egg One contains loads of playing cards, a floppy piece of plasticy card and the centre to turn it into a spinner. At first I wondered if I'd found a junior tarot set, but it turns out this is a pairs matching game - spin to pick your animal and find the two cards they appear on. 

Egg Two reveals a 37mm tall toy. Pull the hair off, with great difficulty, and inside the the world's most useless pen. 

Neither takes any real assembly, which is a shame. Making up the toys has always been the highlight of Kinder Eggs, but it seems that is denied to us nowadays in favour of instant gratification. 

The TV advertising makes a great deal of noise about the augmented reality available with the toys, so I gave it a go. Download the app and you can scan in a picture from the instructions and add the character (even the spinner is a character) to a brightly coloured childs game. I'm not sure this is really augmented reality as everything happens within the game world, and if you do see the computer generated character within the real world, it doesn't interact with it at all. Still, the game will entertain little ones for a while. 

So, chocolate eaten and I'm bored with mu new toys. Happy Easter!


Sunday, April 04, 2021

Not at York

York Sign

It's Easter Sunday, and that can only mean one thing - getting up late and scoffing chocolate eggs. 

Well, this year and last anyway. In days gone by, I'd have been in the car bright and early, heading to York for the model railway exhibition. Sometimes as a visitor, sometimes as an exhibitor. 

Back in February, I posted that the show I missed most from the calendar was Stafford, as it was such a fun day out. This is closely followed by York, and only because thanks to the price of train tickets, it involves at least 5 hours on the motorway. 

Those hours of tedium are always amply rewarded with a show I've been to for at least 3 decades on and off. I remember my first visit, when the event took place in the city centre. My pick of the layouts was a model of the Wisbeach Tramway. Ironically, it lived around the corner from me, built by modellers I came to know a few years later!

I miss those city centre days, especially as an exhibitor. Nipping out while on a break and being able to wander the streets to watch the buskers was such a special experience. I understand the reasons the show moved to the racecourse, and it has proved to be an excellent venue, but I do have a soft-spot for "in town" shows. 

York has a special atmosphere. Those attending have, in the main, been doing so for years. As a punter, I can probably guess where each trader will be. What I know is that it's old-fashioned enough not to be filled with box-shifters. York is a modellers show with plenty of kit and bits stands. 

Part of the atmosphere comes from it being a 3-day event. Exhibitors get to know each other more than shorter events and you get into a routine. This was even more the case in the days of the 3.5 or even 4 day show when the last day was Tuesday, for reasons I never understood. Losing that day was a shame, but the crowds never justified it for the trade. 

As an exhibitor, it is my favourite event. My dad and I always felt privileged to be invited to a show with so much heritage, in such a lovely place. We did our best, and in return, they look after us. Years ago, there were several apres-show events and although the infamous barn dance never appealed, I used to enjoy the Saturday night sing-song at the Brown Cow. Ian Futers on the piano, and Timmy Taylors Landlord on draught. Brilliant. That ha dried up as the show evolved, but those three days in the racecourse were always enjoyable.

Anyway, York 2021 is another victim of Covid. 2022 is planned for the return. I hope to be there. 

Photos from 2009

Photos from 2011 

Photos from 2012 (50th show)

Photos from 2014 

Photos from 2015 

Photos from 2017 

Photos from 2018 

Photos from 2019

Saturday, April 03, 2021

Saturday Film Club: A look around an IC125

My mate Anthony wanders around an Intercity 125 with a camera - and makes a really good job of it.

Friday, April 02, 2021

R475 - Platform with operating crane


With my collector hat on, I've had a watch on eBay for some time looking for a nice example of the R517 good yard crane. It's basically the crane part of R127 operating crane truck mounted on a small platform.

The crane is a very nice model and would benefit from a detailing kit (there was one, but it's no longer available) for use on more finescale railways. 

Anyway, the R517 is popular and usually sells for around £20, but then on the MRC Second-hand sales web page, there was the Tri-ang version for a tenner! 

When the model arrived, it was mint. Even the original yellow tissue paper was in the box. It's too good to use on a model railway, so will head to the Tri-ang collection once I've finished playing with it.

Thursday, April 01, 2021

Rescuing brass parts superglued together


Look at this photo. What have I done wrong? 

Yes. Yet again, I've but the signal levers in their frames back to front. The hand grabs should be facing away from the signalman, and if the majority of the levers are off, as they should be, then I have them on the wrong side. You can tell that it's taken me a long while to spot this as they are at the painting stage. 

Now, I could ignore this, but since it's for a mag feature where I need to take close-up photos, the error had to be fixed. 

 
Assembly was with superglue, and it had set hard. With nothing to lose, I stuck them in a small jam jar with Zap superglue debonder on all the joins. These were left overnight to let the chemicals do thier job. 
 
 
In the morning, a little waggling released all the parts. Next, they parts had a batch in cellulose thinners to remove paint and glue. The remaining adhesive had turned to a rubbery substance a bit like a stiff Prit-stick. I picked this off using tweezers, and the result was a kit, ready for me to build all over again. 
 

This time, I paid attention and put them together properly. I'm pleased the debonder worked as well as it did. My fall-back was to take the levers outside and heat them up with a gas torch. However, doing that releases some rather nasty chemicals, so it's not an appealing choice.