Showing posts with label WD Barclay. Show all posts

Friday, June 06, 2014

D-Day Shunter

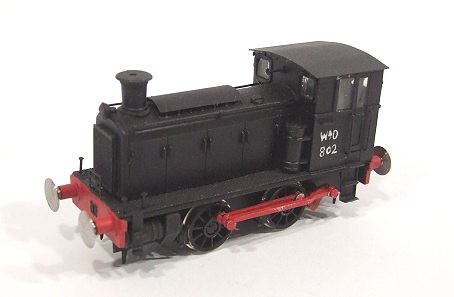
HO Barclay

Today is the 70th Anniversary of D-Day, the battle that began the end of World War 2.

When the Allies invaded, they didn't just take weaponry. They needed infrastructure too. Thus, one of the first things hauled up the beach was a 4-wheel Barclay diesel locomotive.
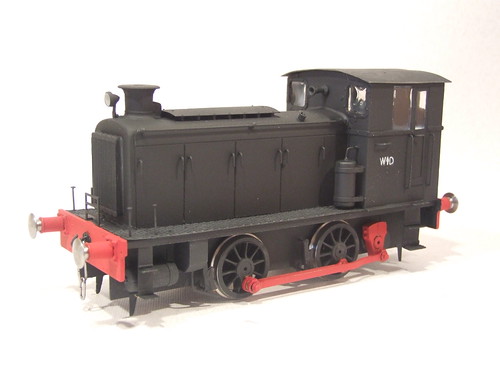
7mm Barclay DieselIt travelled on the back of a tank transporter for this as the famous Mulbery harbour was still in pieces out at sea. The Germans had stolen or destroyed all the locos and it was important to get the French railways working again.

I've built several of the Mercian kits for this little loco in 3.5, 4 and 7mm scales.

More recently, George Dent has done the same and made a transporter for the loco to sit on. I haven't seen the magazine yet but look forward to this as it's lovely little kit and this is a iconic moment that appears in a famous photo of the day.

More recently, on a trip to the Foxfield Railway, I found a 12 inch to the foot version in WD livery. OK, it is a bit over-weathered but nice to see in the metal.
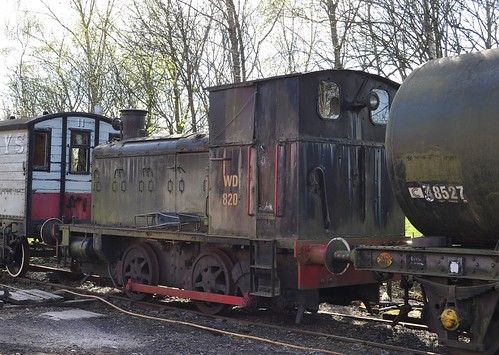
Foxfield WD

Friday, February 01, 2013

WD Barclay - Now in green

Green WD Barclay

I must admit that the finished WD Barclay looks very pretty in green with it's red buffer beams. On the Mercian Models stand, it will show up better to any potential customers, which hopefully will result in a rush of new sales for the OO model.

I mention the OO version because the fret originally contained 3 OO and 1 HO version. Trouble is, thanks to the devaluation of the pound and desirability of the prototype, the HO model has been selling well. This means a small glut of 4mm kits to sell. The etch has been sorted out to stop all this silliness but OO modellers - get your wallets out!

The cab side sports a WD logo applied by map pen and ink as I can't find any suitable transfers. Doubtless, someone will point some out to me now, but by the time you read this, I'll have the model packed up to go home. It will help future builder though, so comment away!

Thursday, January 31, 2013

Army Green

Army Green

One of the requests for the WD Barclay refurb was that the loco should emerge in green.

Which green wasn't specified but I assume that Army green. As it happens, I had a couple of the excellent new Airfix QL lorries to hand also in need of paint. According to Airfix, the green is No. 159.

Using a fresh tinlet, I sprayed the lorries and then the loco. Colourwise, I think the shade on the lid is lighter than that on the model but not by much.

On the loco, I feel that the results look a bit dead so a coat of satin varnish will be required. Maybe a dead matt finish may be technically right, but it looks wrong. My suspicion is that it won't survive handling as well without varnish either.

The lorries - they can stay matt.

Wednesday, January 30, 2013

Barclay repairs

Repaired Body on bench

The WD Barclay body wasn't in deed of much attention. The air cylinder on the front of the cab had come off and most of the bonnet handles were wonky. One cab corner, presumably the first part to encounter the floor, needed straightening and that was that.

Re-blobbing the solder inside the bonnet sorted out the handles. All now point downward and don't move when you push them. At the front of the cab, I tinned with 100 degree solder, then held the whitemetal part in place, heated the solder and once it had cooled - the thing was fixed.

Repaired Frames

The chassis needed more work. First, a couple of leftover strips of etch were fixed where the unwanted bends had been. These needed some filing to allow the motor to fit but this should have braced the frames to keep them straight.

Using the same technique as for the air cylinder, the vacuum cylinders and sand boxes went back into place.

Tuesday, January 29, 2013

Paint stripping without paint stripper

Barclay minus paintRemoving the paint from the WD Barlcay should be easy - it's an etched brass kit so I could dunk it in paint stripper and return the model to bare metal.

The right stripper choice was imperative as I couldn't remember which bits were glued on and which were soldered. Nitromoors is fine but it eats glue. My preferred option was Precision Paints Modelstrip. When I looked  at my bottles, one was empty (where had it gone?) and the other contained about 2 egg cup fulls of well-used liquid. Not enough to do the job.

Not a problem, I think, my local modelship has had a pot of modelstrip on the shelf for years. I'll go and get it. Except it had been sold and there wasn't any in the stock room. The owner suggested that I could try "Mr Muscle" oven cleaner from the 99p shop as that often worked.

Good thinking. It's not actually "Mr Muscle, the packaging might be orange and look at lot like the real thing but it's called "Dr Magic". Still only 99p though.

The model was popped in a jar and sprayed with the cleaner. I put the lid back on and left it for a couple of hours.

At the sink, things looked promising. A scrub with a toothbrush, poke with scalpel and general prod saw some paint peel off in sheets. I reckoned that if I gave it another dip, I'd get the rest. So, the jar was re-filled with loads of the foam and left overnight.

In the morning, prodding and brushing resulted in what you see. Apart from the "chimney", the model is paint free. I don't know how it has discoloured the nickel silver but that will soon vanish under some paint.

There's plenty left in the can too. I could clean an oven with it.

Monday, January 28, 2013

Barclay Diesel refurbishment

Poorly Barclay

Long time readers of this blog will know that I've built several War Department Barclay diesel locomotives. I've done then in 3.4, 4 and 7mm but always from a Mercian Models kit. It's a nice looking loco that has a claim to fame as being the first railway engine dragged up the beaches on D-Day.

If you visit the Mercian stand at an exhibition, you'll see the test builds I've carried out. Well, at least you'll see the 7mm test build. The 4mm version has had a hard life including at least one free-fall sans parachute to the floor. Trevor has returned it to me for restoration. Oh, and while I'm at it, could I repaint it green for a change.

Looking at the model once I'd stripped it down, it really was in a sorry state. While I have been supplied with all the bits that fell off. It's not all bad - the buffer springing still works !Before I re-attach everything, I should sort out the frames which now are more parallelogram than rectangle. But before that, I better remove the old paint.


Barclay in bits

Sunday, September 07, 2008

7mm Barclay Diesel


7mm Barclay Diesel
Originally uploaded by Phil_Parker.

It's finished. After a few little tweaks such as re-glazing a couple of windows and fitting the buffer-heads, the loco has been delivered.

It's a lovely kit and the result is a very handsome model. I think it looks better than the 3.5 and 4mm versions.

At Telford it attracted much favourable comment, although by the end of Saturday no-one had placed an order. Mind you this isn't uncommon with a new model that hasn't received any pre-publicity. Barclay on standThe first time anyone knows about it is when they see it on a stand. At 100 quid plus motor, wheels and gears it's cheap for a O gauge loco but still not an impulse buy !

The show itself was quieter than normal and those walking around didn't seem to be staggering under the weight of their boxes as normal. Of course we are suffering from a "credit crunch", the BBC reports that croissants are up 47% - a precursor to the end of the world if ever there was one, so that may have affected things. More likely the last few days of heavy rain and floods have dissuaded people from travelling too far. By close of play at 5pm the hall still had to be emptied of modellers with no homes to go to !

Friday, September 05, 2008

Nearly there


Nearly there
Originally uploaded by Phil_Parker.
The black paint is finished. The red has had a couple of coats. The windows are glazed, although I need to re-do a couple as the Krystal-Klear hasn't dried very well.

A few finishing touches today and then I'm off to Telford !

Thursday, September 04, 2008

Disasters

Melted castingDisaster 1
The casting on the right is what you get if you touch the casting on the left with too hot a soldering iron. In case you were wondering it's the Barclay locomotive's headlight. And you can attach it with 100 degree solder.

A frantic afternoon 'phone call meant that I received the replacement today. All I had to do was fit it, with low melt solder this time, to the spike on the bonnet front. It looks nice now...


Disaster 2
Things were going well. All the bits were on the model, a coat of primer hadn't shown up anything untoward so I mixed up a weathered black/black cup of paint to put the colour on.
Duff paint
Approaching the end of the job, all looked OK and I spotted that there was a corner behind an air cylinder still had a little primer showing through. I aimed the airbrush at it and a big drip of paint fell out of the cup - on to the model.

Trying to remove the blob, which had by then run down the side, just made things worse. I spraying more paint on the are but it just looked terrible. There was only one thing for it, the paint had to be stripped and done again. Quick work with paint stripper got the worst of it off. I just hope I can get in all the nooks and crannies so the new primer coat looks tidy.

If only people only looked at it via the pictures on the web, the problem doesn't show there !

Bonnet front with solder


Bonnet front with solder
Originally uploaded by Phil_Parker.
A few weeks ago I sent off the Barclay's bonnet front to be turned from a series of metal laminates into a whitemetal casting. This week I got the casting along with a few other bits in a jiffy bag.

The new version was interesting to compare with the one I sent off. The result is very clean and neat. Some shrinkage has occurred but not much - the width is the same but I think we lost a very tiny amount off the height and depth. Not enough to matter and once soldered in place and cleaned up the result looks good.

This allowed the radiator and funny metal thing in front to go on and make the face of the locomotive look finished.

Wednesday, September 03, 2008

Finished chassis


Finished chassis
Originally uploaded by Phil_Parker.
With a deadline on the Barclay locomotive of this weekend, I pulled my finger out and finished the chassis. To be honest there wasn't really very much to do.

The white metal sandboxes and reservoirs were soldered on with the magic C&L 100 degree solder. A coat of primer was followed by Precision "Weathered black" brushed on. I prefer the thicker coat this gives and anyway I couldn't be bothered to set the airbrush up at the time.

This was all left to harden overnight and the mechanical bits were put back on. That gearbox works a treat as this is one of my most free running chassis ever. Wheels and cranks whirl round with no sign of tight spots or binding. I suppose that I had to get one right eventually !

Great Gearbox


Gearbox
Originally uploaded by Phil_Parker.

This is a top 'box. I know it looks very simple but this is one of the best I have built in a loooong while. And that is a lot of model railway gearboxes.

Why is it so good ?

Well, first the etch folds up properly. The designer has worked out that at the corners you need to work out what overlaps what. A half etch rebate allows the construction of a square corner rather than the "fun" of trying to force two bits of metal into the same place.

The axles holes needed quite a bit of reaming to accept the bushes but far better that way than trying to etch holes the right size and ending up with something oversize.

Best of all though, the motor can go in with the worm gear fitted and the holes for the mounting screws can be used without alteration. A little allowance has been left to move the motor up and down to achieve the perfect mesh. In the last few boxes I've built these holes and the one of the motor shaft have had to be enlarged in all directions just to get the teeth together.

As this is for the 7mm Barclay, the whole arrangement is wide enough that the motor screws are either side of the worm so you can remove it while still in the frames.

Other gearbox designers take note !

Update: Apparently this 'box was designed on a napkin in a restaurant years ago when those concerned were slightly drunk. Other gearbox designers please note !

Saturday, August 09, 2008

Bonnet front


Bonnet front
Originally uploaded by Phil_Parker.
The Barclay model locomotive now has a front to its bonnet - or at least it will do once the laminated version I made up from the etches has been turned into a whitemetal casting.

This is all part of the process of doing the test build and comes under the title "Pattern making". The part I've assembled will have a mould taken from it and then be reproduced in all the future kits. A similar process occurred with the radiator that fits on the front of this and I have the casting to hand. Pity I didn't do both of them at the same time !

Monday, August 04, 2008

Cranked rods


Cranked rods
Originally uploaded by Phil_Parker.
In theory building a 7mm scale Barclay should be the same as building a 3.5mm scale one - just a bit bigger.

On the HO model locomotive I had to bend the connecting rods between the jackshaft and front wheels to bring them into the crank. This wasn't a problem on the OO model as we could use a wider (EM) axle of the crank, not an option in O gauge.

So I did the same on this model. And it worked.

OK, the holes in the rod have to be elongated a bit for smooth running but then I tend toward masses of slop in this area anyway. It's only decorative and so the most important thing is not to impede the rotation of the wheels.

So now I have a free running chassis that can be pushed back and forth on the workbench with everything rotating as it should. All that whirling metal looks pretty good too.

Saturday, August 02, 2008

Barclay Body


Barclay Body
Originally uploaded by Phil_Parker.
Practise pays off eventually. Thanks to several goes at this loco in 3.5 and 4mm scales the 7mm scale version took an afternoon to assemble. OK, it's not finished by a long way but apart from fun and games bending the bonnet - it's thicker than the OO & HO versions and needed more force than them to form - all was OK. The techniques used, including the bonnet bending are exactly the same.

I'll admit to a little cheating. Some of the overlays are attached with the Resistance Soldering Unit to same time cleaning up but apart from this a combination of 45w iron and small gas torch (for speed) were more than up to the job.

7mm scale railway modellers have one advantage - those handrails and bonnet handles are a whole lot easier to fit. A coffee stirrer provided a handy spacer behind them. That's much easier than bits of card used before as it doesn't get soggy from flux as quickly.

Sunday, July 20, 2008

Barclay Crank


Barclay Crank
Originally uploaded by Phil_Parker.
The 7mm scale crank axle owes a lot to the design of the same part in the 4mm locomotive. Rather than try to get a casting that is accurate enough to do the job, it's made up of a series of laminated etched bits and fitted to a Romford axle.

In the smaller scale this works very well. In 7mm it is nigh on perfect. Lots of parts are provided on the etch to allow for different wheels. I'm using Slaters so 4 of the common etches plus the three detail parts for the face are enough. The result is amazing, and I've build several OO & HO versions. The grub screw ends up flush with the face of the crank and there is no wobble.

Assembly is easy, just fit the first four lamination's to the axle to keep them in line. Run solder around the edge. Then add the three detail layers and run more solder. A quick clean up does the job. Holes are marked for the crank pin which have to be drilled out. The bolt is then screwed in from the back in the same way as it is on the wheels.

Saturday, July 19, 2008

7mm WD Barclay


7mm scale chassis
Originally uploaded by Phil_Parker.
Ever since the Barclay diesel locomotive came out in 4mm scale, people have said that it would make an excellent O gauge model. Well, Trevor is bowing to customer demand and I'm now hard at work test building the 7mm scale version.

So far, so good. The chassis, which is etched in thickish nickel silver, has been assembled. Bearings needed a touch of the reamer in the holes to allow them to slot in - exactly as they should. I fitted the crank axle bearing inside out as I've done on the OO and HO versions. Not sure if this will be necessary here but this IS a test build, so that's what I need to find out.

Sunday, July 08, 2007

HO Barclay - done


HO Barclay
Originally uploaded by Phil_Parker.
Another completed project – this is turning out to be a good weekend !

The Barclay is ready to go – everything works and looks fine. I don’t normally finish models in ex-works livery but this one certainly looks very smart like this.

The buffers are particularly nice, previous models have had whitemetal ones whereas these are Gibson. The steel heads are just the right colour, hardly suprising as they are just the right material, and with the clean paintwork look spot on.

This Barclay is a funny little loco. A diesel with a chimney like a steam engine (I know it’s for weight distribution but it still seems odd to me…). It’s cute though, a feeling lots of people share judging by the number of kits that have been sold. I just hope no-one spots this and brings out a RTR version !

Saturday, July 07, 2007

Cranky afternoon


rear cranks
Originally uploaded by Phil_Parker.
Lots of grumbling this afternoon.

The EM gauge axle arrived and so I was able to fit the cranks to the locomotive. This wasn’t too painful – clip the threaded portion off the ends of the axle then solder the cranks on. With a hot iron, whiff of flux and tiny amount of solder the job is soon done. It’s something that’s a lot easier if you are confident. Trying to hold the heat on for too long is a route to disaster as the laminations that make up the cranks separate.

The trouble starts when the rods are attached and you want the wheels to go round.

First, the cranks don’t stick out beyond the wheels so the rods have to be bent in to meet the pins. This effectively makes them shorter so the holes have to be elongated to compensate.

Having got the wheels rotating with the body off, this is fitted and the cab steps get in the way. Only a little, but enough to jam everything up solid. So a “happy” hour of filing the crank pins down as small as they can go and chamfering the edge of the steps ensues. You can see the result in the photo. The cranks and steps miss by less than a millimetre but it’s enough.

With the clearances restored I then discover that the rear holding nut has come off inside the cab. Since I don’t want to remove the roof I tapped the hole out to 8BA (Originally it was 10BA) and use the bigger bolt. It’s not got much to bit on but the result seems to work.

Oh, and tightening up either retaining bolt hard twists the chassis so don’t do that either.

But it’s done. A little touching up of the paintwork where I filed metal away for clearances, a dash of red on the waggly bits and we are finished I think.

Wednesday, July 04, 2007

Waggly bits working


chassis running in
Originally uploaded by Phil_Parker.

Still no axle for the cranks – a reminder ‘phone call will be made tonight.

In the meantime I have fitted some pickups and wired the loco up. It’s now sitting on the rolling road running in. Apart from a light reaming out of the holes in the rods everything seems OK.

There was a slight bind when the model was first started but a touch of oil on the gears and bearings cured this. The running in process wears the tiny bits of paint that are left in the bearings and weren’t removed by the post spraying reaming process. No matter how hard I try I never quite get everything out. Part of the problem is that I won’t loosen up the axles in the bearings too much preferring to let the running in do this. Obviously everything needs to work but I prefer to get all the mechanical bits bedding in at the same time.

Looking at the picture I'm struck by the similarity between my chassis and the cheapo Hornby 0-4-0 one that turns up under things like thier Caledonian Pug. Those aren't cylinders at the front, they are air tanks and sand boxes.