Monday, April 30, 2012

SS Canberra

Canberra kit


SS Canberra from the P&O fleet from 1961 to 1997. She was built at the Harland and Wolff shipyard in Belfast, Northern Ireland and launched in 1958. Perhaps her most famous time was a troop ship serving in the Falklands, earning the nickname "Great White Whale". After the conflict, she returned to civilian service before being broken up in 1997.

The Airfix kit was first introduced in 1961 and stayed in the catalogue until 10 years ago. It's 86 parts produce a 1:600 scale vessel 16.5 inches long.

I've been asked to build this kit to represent the ship as launched. Rather than just stick the bits together, I'll be trying to build it in the style of a "Builders Model". To that end you won't be seeing any weathering and I'll try to do better than the supplied Airfix moulded stand. Something in wood with brass supports would seem more in order.

This should be an interesting project as it's a long while since I build a plastic kit boat. Even then it was a probably a battleship, not a type of craft that have ever interested me much. At first glance, the mouldings look OK. Most of the parts appear to be lifeboats, a couple of which have been fitted to the wall that supports them.

The great age of the model is shown by the different approaches taken than and now. Panel lines for example, are raised when I suspect they should be recessed. It's almost impossible to do anything about that without degrading the model, but it's not out of keeping with the Builders Model vibe. These were often slightly simplified miniatures anyway so this should turn out better !


Sunday, April 29, 2012

Gauge 1 at Swindon

G1 DieselYesterday I made a quick visit to sunny (I'm kidding) Swindon to drop some projects off at the Gauge 1 event. While there I had a quick look around, bought some books and wished that I could have come away with some heavier packages.

It still amazes me the variety of products available in this scale. The range of RTR is good enough that you wouldn't need to get your hands dirty with any construction if you didn't want to. That's quite a change from a few years ago when it was the preserve of men in sheds operating lathes. Walk around with a pocket full of cash and you can buy high quality live steam locos and lots of rolling stock to tow behind them.

The test track was home to some trains thrashing around and smelling of meths. At one time there were a couple of decent sized express locos (scratchbuilt), one GWR pannier (Aster) and a Class 66 (Accucraft RTR). All made noises but only one was synthesised - a a lot louder than the others.

Big WhistlesWalking back to the car, I wondered what the place was like 50 years ago. The show took place at "Steam" the museum of the GWR which is built in one hall of what used to be the famous works. The rest of the site has become a designer outlet shopping experience. Out of curiosity I stuck my head in.

There was a GWR Hall stuffed and mounted behind the cafe seating. Once upon a time this engine charged up and down the country hauling passengers on holidays. Now it's an ornament. A bit like the rest of the site. It used to reverberate to the sound of heavy industry. Metal was bashed and cast. We don't do that anymore in this country. Now we buy stuff. The only thing being bashed is plastic.

What a shame the happy shoppers didn't know, or care, that not far from where they pondered the delights of big bags of Cadbury's mis-shapes or discount footwear, there were people who carried on the traditions started in the buildings they were standing in.

Saturday, April 28, 2012

Barriers

BarriersWe don't supply barriers. I think that is common with many exhibitions now", was the response I received when enquiring of an exhibition manager recently.

Is this really the case ?

I can't think of many shows I've been to over the last 5 years where barriers haven't been provided. Certainly all the big shows make the effort and most of the medium sized ones too. Having built quite a few myself and had the "joy" of shipping them to and from the exhibition, I know what a pain they can be but still feel they are integral to the organising of a model railway show.

This isn't just me being a prima donna. Obviously I want some protect from the hordes but it's more than that.

First, I want to protect the layout. Sans barriers, there are plenty of people who think that' it's OK to use the front edge of the model to support themselves. It isn't, you'll tear up the ground cover and damage the detail, but that won't stop them. I was very glad at one show for the barriers as I watched one elderly gent hobble around - he lent on one stick but every time an suitable handhold came within reach, a large, fleshy hand grabbed it. I hate to think what damage it would have done to a model...

"Put perspex along the front if you are so worried", I hear someone cry. "No", I reply. I hate the stuff along the front of a model. It's not that clear, especially after a few trips out, so it obscures the all-important eye-level view. Then you have to consider how tall it has to be. 6 inches seems popular, putting a nice edge line in everyones way if they do bend down.

It doesn't solve the problem either - I've seem people grab to the top of it to lean. Unless you've bought seriously thick stuff, eventually it will snap leaving a punter gripping sharp shards of plastic and you with a bill for replacement.

More than that, it just looks (IMHO) wrong. I don't want to operate in a goldfish bowl, models look better if the viewer feels they are in the same room without any obstructions.

From a punters point of view, a barrier is a good thing. Properly made, it provides a handy resting place for serious contemplation of the marvels in front of their nose. Obviously it mustn't be too low or the aisle file with railway modellers backsides, nor too high where the view of the layout can be blocked.

Small children can be sat on the barrier too, providing a welcome respite for parents. The Leamington barriers shown above were tested with what was at the time, our heaviest member, and survived to tell the tale.

So, if YOU are organising show, beg, borrow or build some crowd barriers. If you can't do that, at least let your exhibitors know so they can chuck a couple in the car with the layout.

Friday, April 27, 2012

Ejay Easykits Lamp Hut

EB3 Lamp Hut

Another kit from the dawn of modelling time - well, the 1970s anyway. An EJAY Easykits lamp hut.

According to the header card, the kit is from "printed polystyrene" but to me it looks a lot more like styrene with printed paper stuck to it. If it isn't then I assume that a paint layer is applied and this is printed.

Three colours are supplied. grey, cream and orange. All the builder has to do is cut the parts out and glue them together. Hopefully by next week, I'll let you know how easy this was to do.

In the meantime, can anyone fill in more history ?

Thursday, April 26, 2012

The Type 25 BR should have bought

Many months ago, David Brown sent me a picture that he'd acquired in the Internet. No, not one of those pictures, this one was a Photoshoped VW Type 25 van - known colloquially as "The Wedge". It's been electronically painted into British Rail colours are though it was a Class 25 diesel.

It looks good to me and I decided as soon as I saw it that I wanted to recreate this in miniature.

Actually, I wanted to recreate it in full size but have neither the time, space or cash for a real Wedge, so a model will have to do.

The problem was, finding a base model to work on. In the larger scales you can buy  a plastic kit of the camper version as anyone who read about my abortive DamperVan project will know. It's nice but the hassle of converting the camper to a panel van was more than I could be bothered with. This was to be fun, not a major project.

Diecast Type 25s are non-existent, although Oxford diecast are threatening one later in the year. A chance find at York of a Wiking model solved the problem for me. OK, so it's HO scale but I'm not planning to use it on a layout.

Basically, all I had to do was re-paint the van. The fun I had with the acrylic paints has already been documented. In the end though, I managed to get some colour on it and then finished off with waterslide transfers from an old sheet. A finishing coat of satin varnish (yes, the model had all shades under the sun) ties everything together nicely. You can't see any transfer film around the logo or letters and it looks very nice.

Type 25


Wednesday, April 25, 2012

Acrylic paint, round 2

Matt PaintLast week, I had a go with some acrylic paint, and it didn't go well. Not to be deterred, I stripped it all off using Precision Paints stripper, and had another go.

This time I was going to spray the stuff. This isn't so much because it avoids those nasty brush marks, not because it's what "proper" modellers to. Nope, it's 'cos sprayed paint dries faster so you can build up a decent depth of colour very quickly with lots of thin coats.

Three evenings of spraying, waiting, masking and spraying again and the bodyshell was in the colours I wanted. The ones I could be bothered to spray anyway. Using Tamiya masking tape (so much cheaper if you just buy the refills rather than the plastic cased stuff) the lines were OK and unusually for me, in about the right place. The paint was very, very matt though.

It also had the texture of fine sandpaper. Those paint droplets probably needed a bit more thinner so they didn't dry as soon as they hit the plastic. It wasn't a warm evening, quite the opposite in fact so that can't have been the problem. Enamel wouldn't have behaved like this...

Gloss PaintAnyway, the project involved transfers and even I know these don't like sticking to rough paint jobs. In that nice Mr Dent's book he says you should spray matt things with gloss varnish to provide a smooth surface - that way air bubbles don't collect under the transfer film and look 'orrible. So that's what I did. A coat of Humbrol enamel varnish. Nice and thin. Result, slightly finer sandpaper. Never mind, I'm sure it will all be OK.

(Actually, the photos is deceptive. It looked a lot smoother than that, but you get the idea)

Tuesday, April 24, 2012

Behind the scenes at a review

Review pictureLast month, in Hornby Magazine (Issue 58, April 2012), I had published a short review of some model fencing manufactured by Faller. The design is modern post and rail and the miniature version, once seperated from it's massive sprue, is pretty spindly.

Thinking that this on it's own would make a rubbish photo, I decided that some background was required. I couldn't be bothered to build a diaorama for this - let's face it, we are talking a tiny chunk of page here - so I had to improvise.

Necessity (or laziness) being the mother of invention, my solution was as you see below. A slab of medium density foam with some Flexifield grass fixed to it using big purple map pins looked like landscape. The legs of the fenceposts could then be pushed through this with a bit of a struggle, but through they went. With the photo taken at a suitable angle, the result didn't look too bad.

Reviewing a fence


Monday, April 23, 2012

Research for boat modellers

Or: Isn't the Internet clever ?

Laconically browsing the Isle of Man webcams at http://www.dotet.co.uk/index.php?type=webcam&id=54, I spotted an interesting looking ship in the Queen Victoria Pier at Douglas.


"That's odd", I think, "You normally see ferries berthed in that dock but that looks like a cargo vessel"

Intrigued, and a bit more awake, I want to know more. A quick look at the ship tracker http://www.marinetraffic.com/ais/ , zooming in on the Isle of Man, gets me this map:


Hovering my mouse over the green square, I get the name Helliar which looks like the same name painted on the side of the hull. One click later and I'm looking at full details of the ship at http://www.marinetraffic.com/ais/showallphotos.aspx?imo=9119397#top_photo

Including this very nice picture showing exactly why it's parked in a spot for roll on roll off ferries:


How clever is that ?


Sunday, April 22, 2012

National Model Boat Show 2012

Bourbon OrcaI've always felt the model boat world needed another exhibition, unlike the model railway calendar it's not stuffed to bursting with events. Something in the spring, or start of the proper sailing season would be good. Then at the end of last year, adverts appeared in the press for "The National Model Boat Show" taking place in Coalville, Leicestershire (a place name I can't hear without thinking of the Albion Band's excellent song "Coalville), about 40 miles away.

Off we trotted to the Hermitage Leisure centre - a building that was surely built without the benefit of an architect - and joined the opening day queue.

Once in, a process that would have been faster if they'd charged £4 rather £3.95 and saved all those 5p changes, we found ourselves in a decent sized sports hall. Along the main walls were trade stands and on the middle, boat displays. There was a sailing pool, but it was outside.

Gunboat


First stop was the excellent bring and buy stand. If you had some very modest amounts of cash handy, you could pick up a very nice boat. Top of the range seemed to be a vintage warship with a big cannon or 1/12th Waveney Lifeboat, both massively under priced in my opinion. I reckon that on the Saturday morning, around 20 boats changed hands and would expect Sunday to be similar. Once word gets out I could see this being a very popular stand in years to come, hopefully with an increase in prices for decent, finished models.

The trade mix was good and I couldn't see many that didn't appear in the November International show. Hopefully, this will also grow in future events.

Of course if this does happen, the hit will be taken by the model boat displays. The hall was full and plenty of clubs had taken the risk of getting involved with a new event. The mix was good with a huge variety of models on display.

Excellent event - looking forward to next year.

As ever, photos on Flickr for you to enjoy.

Saturday, April 21, 2012

Amersham & Chorley Wood exhibtion 2012

Chocolate CakeAn old exhibition manager for the Leamington show used to say that to find the best layouts for your show, you had to visit the local events because that is where you would discover the gems that most people overlooked. That way you’d get new layouts before anyone else and build the reputation of your event.

Amersham & Chorelywood’s event last Saturday was just the sort of thing he meant. Only lasting for one day and taking place in a community centre (actually a community centre and two old barns) somewhere that to me is darn sarf, it’s not one Id ever visited before or a show that features in most peoples calendar unless they are local.

But if you made the effort, there were gems to be found.

First, the cake. Homemade chocolate cake. Big slices. Very tasty indeed. Top marks.

Then the layouts. We had taken Flockburgh and set up in the main hall. I was glad we were there as once it got busy, the barns were difficult to move around in. Forcing your way through the crowds was worth it though. Four models stuck in my mind:

Khan troopsKhan – A slice of Namibia showing the gorge where a fictitious new alignment has bypassed the real 1 in 25 gradients. Set in 1908, the model was on the end of the best bit of layout criticism ever according to the owner. He has a vulture perched in a steel tower eating. Vultures (apparently) don’t carry food away to eat, the gobble on the ground. The bird is staying but it gives an idea of the sort of detail to be found.


CromerCromer 2008 – The modern railway writ small. Cromer station is a tiny terminus around the back of Morrisons supermarket. A lovely bit of modelling with surprisingly interesting operation albeit multiple unit based. While not as exciting as the station would have been in steam days, it showed the realities of modern railways perfectly.


FultonFulton Terminal – Most of this layout was water ! Situated on the East River and operated by the New York Railway, wagons were shunted on and off floats which would in real life have then been shunted by tugboat around the docks. The owner explained the system to me and it is fascinating. I particularly like the idea of box cars on floats being moved up to the side of ships and loaded directly, then floated back to the rail connection for onward transit.


Penrhos Engine shedPenros – It might be ex-GWR and set in Wales but I just loved this layout. The modelling was superb and the colouration. I would love to be able to produce something that looked this good. A beautiful model.

That’s not to say that there was anything wrong with the rest of the layouts, it’s just that these ones stuck in my mind. You can really tell the exhibition manager travels to book exhibits.

Flockburgh ran OK. We had lots of interest and quite a bit of chat. Unusually the first serious chat was with a woman who had just taken up the hobby at the prompting of her boyfriend. Being new to it, she still erroneously pronounced OO as “double zero” gauge BUT had hit upon the excellent method of making the layout from insulting foam. This shows what happens when you approach a subject with an open mind – doing this sort of thing is normally the preserves of super finescale experts and discussed in hushed tones by others as revolutionary. If you are reading this, good luck with the project. I think you’ll make it successful and prove that many of us are too hidebound by the “conventional” methods.

So, a good show and well worth the visit if you are in the area. The venue is easy to access, being a few minutes’ walk from an underground station. We parked at the centre and were reminded about the parking wardens four times in half an hour while setting up. I had had a chat with the bloke who was actually quite nice. 7 quid bought us a spot right outside the door which was very welcome as packing up time.

There are some photos on Flickr. Sadly I'd left my camera in East Anglia, so they were taken with my 'phone. See them here.

Friday, April 20, 2012

Slaters CARDBOARD station kit

Slaters Station


We all know Stalters for their plasticard and plastic-based range of models. They are also producers of very high quality multi-media locomotive and wagon kits in many scales. A firm not scared of developing markets most mainstream manufacturers shy away from with wheels on sale for garden and model engineering scales, it seems that in the dim and distant past, they started with humble cardboard models.

I don't recall ever seeing one of these before so picked up kit reference number 46M9 from a second hand stall recently for a couple of quid. Maybe the packet could have been opened to satisfy my curiosity but for such a small price, it didn't seem fair. Anyway, I might not have got it back in the packed again. Been caught with that one recently as I'll relate in a future post.

The kit is for a 4mm scale wooden LNWR station building. According the notes, these were mainly built before WW1 using a modular construction system. For the modeller, this means you can build a fictitious station using standard components and it should still look real. Parkside Dundas supplies the panels as plastic mouldings if you fancy this.

The Slaters kit is a bit more basic. There are some nicely printed, although not photo realistic, parts that have to be cut from the card sheets. Glazing is ready printed on acetate. It includes roof glazing that has to be folded up first. Finally, doors and brackets are injection moulded and on sprues. I have a feeling these might still be part of the range.

It's a nice kit that will probably sit in the pile of other card kits for the moment. If built, it would site nicely amongst Superquick or Metcalf kits. I'm not sure why they gave up on card, perhaps the size doesn't help. The main sheets are an unwieldy 46cm long. Most manufacturers stick to A4 size packaging for easy display and storage.

The one thing I can't find anywhere is a date of manufacturer. I'm guessing 1980's but can anyone do better ?

Slaters Website

Thursday, April 19, 2012

Acrylic paint and me just don't get on

VansideThe future of model making paint is acrylic I'm told. No longer will you have to endure the smell of oil based colourants. There won't be a pot of grubby turpentine substitute on the corner of your workbench, instead a glass of the clearest spring water will suffice for brush cleaning.

OK, so every so often I give them a go. My first expose to the stuff in the 1980's didn't impress me - Tamiya paint that lifted as soon as I tried to weather it - but things have improved since then. I've even used them on some magazine projects because you can get a perfect match for Hornby colours.

Anyway, I am noodling around with a repaint of a Wiking van. Since it is to go into railway colour. Simple enough job. Because I can't be bothered with cleaning up the airbrush after each shade, I think it will be fun to use a brush. After all this isn't a perfect project, just a bit of a laugh. Maybe it might make me change plans for an immanent kit build but probably not.

So I start by painting the yellow plastic body yellow. I'm using a good brush, fresh(ish) paint and a clean surface. It's plastic so I don't bother priming it. Big mistake.

The paint sticks to the surface like trouble to a politician. I don't so much paint it on as smear it in place. 4 coats are required to build up sufficient colour depth.

The grey roof is even worse. Then the blue sides. By the end of the job it looks like the van has been painted by someone with a decorating brush full of tar. This might be a fun project but I've obviously made a mistake. Since the photo was taken, the model has been dunked in stripper and will be re-painted using an airbrush this time. Maybe if I'd started the job with a spray of primer, things would have been different. I bet if I'd used enamel I wouldn't have had a problem.

The future can get stuffed. I'm stockpiling real paint.

Wednesday, April 18, 2012

Corner

Corner sceneThis is why I like building little layouts. You can spend time on the details. This little corner on the layout in a boxfile is a case in point. I've always thought it worked very well but would be lost in the context of a typical "dream" giant tail-chasing layout.

The elements are simple enough. An Airfix figure from the civilians set is engrossed in the letter he is reading. It's a nicely posed figure and because of this, one seen on many layouts. Used carefully though, he's as good as a whitemetal man costing as much as a bag of plastic people on a second hand stall.

The chair comes from Cooper Craft - part of their grounded van body kit. It's got 5 tiny parts to assemble but is delightfully airy and chair-like. Lent against the wall by someone who had snuck out of the office to enjoy the sunshine, we've all seen something similar in real life.

Tuesday, April 17, 2012

Easingwold East

Easingwold East

My post on York Show 2012 drew a question from Eric:

I have recently been kicking around the idea of a small 6' x ? layout of a typical small branchline terminus and then you posted the picture of Easingwold East, and I thought that is what I am looking for.

Something to build in OO that I can use out of the box points and build up towards making it by building the station buildings etc.

Any chance of a track plan and a few more details please.
Always happy to oblige. I should start by saying that the model railway layout Easingwold East is the creation of Dr. Peter Fletcher. He says the following in the York Programme:

The Easingwold Railway opened in July 1891, connecting the market town of its name to the main line of the North Eastern Railway at Alne only 2 1/4 miles away, and it remained an independent company until closure in 1957. In 1905, the North Eastern agreed to connect its steam lorry service from the surrounding villages with the Eastingwold terminus and so the layout assumes that a short extension of the line was built around the back of the town to connect with this traffic.


Basically, it's a short fictitious model intended to give a flavour of the railway in a small space. I liked the simple, clean look of the design and could well imagine producing a similar model with some Peco track (OK, probably SMP copper-clad stuff 'cos I'm a cheapskate) and kit buildings. The station especially looks like a Wills product could be used. If you are using the model at home. the Peco points don't even need motors as nothing is out of reach.

As far as rolling stock goes, if you aren't too fussy about the Northern roots, perhaps a Terrier as the main engine ? It needs to be a small tank of some kind and not a J69 or Pug please. Those are industrial engines unless you are modelling a preserved line. Kitbuilders have a much wider choice. Wills P Class springs to mind but there are plenty of options.

Easingwold EastMind you, with this plan, why not go preserved ? Done properly, not just pretending it's a preserved line to allow you to run anything, this would be a nice model. Perhaps some bunting for a gala day. That way you get to put some vintage vehicles in the car park for added fun.

Baseboards from plywood or even a ply top and softwood side combo shouldn't take up much space. On this layout the fiddle yard was a turntable affair but I reckon a 3-way point would be easier if a bit longer.

Basically, this IS what Eric is looking for. A small project that wouldn't take too much time to show results. With a bit of care and attention, the finished model could find a place on the show circuit if that's what you want, or provide a pleasant model for use at home with a small selection of stock pottering around.

Would I really build such a model ? Yes I would if I didn't have loads of other projects on the go. That's not to say I won't fancy a go in the future. In 3mm it would big quite tiny, or in Gauge 1, a bit bigger...

Monday, April 16, 2012

Townstreet Signal box in Hornby Magazine

I've been very busy at work recently, which has limited my contribution to the May issue of Hornby Magazine a little. In the reviews section I take a look at a very nice Hold'n'Fold tool from Eileens Emporium. It's a tool you only buy once, and if you can afford it, or persuade someone it would make an excellent present, then for the kitbuilder it is a good investment.

Parker's Guide covers a project that I thought would be quick and easy and turned out to be time consuming and easy, but really good fun. At Warley I fell for a Townstreet stone signal box. It's possibly one of the best looking models I've seen for years. The plaster casting really capture the stone texture better than plastic can do.

What sealed it for me though, was the detailed interior. This looks homely, in a way that a box in the middle of nowhere would look. There is a comfy armchair and coats hung on hooks by the door. You can imagine the signalmen spending a long time in here with a roaring fire to keep them warm - well those aren't double glazed windows you know !

Assembly is quick. Painting takes time but the effort is repaid with excellent results that aren't difficult to reproduce. Now all I need is to build a scene for it to sit in.

Townscene Signal Box

Sunday, April 15, 2012

York 2012

York Show 50th PlaqueThe 50th York Model Railway Exhibition. We wanted to visit this so much. For once we actually dropped hints in several quarters last year that we'd really like an invite. After all, we'd done the 40th and several others before that so we weren't exactly newbies. When the exhibition manager, Mike Cook, rang up and said "I understand you'd like to come to the 50th", we were well chuffed.

Sadly, Mike didn't make it to his 50th show - but we did and were determined to do him proud.

Flockburgh
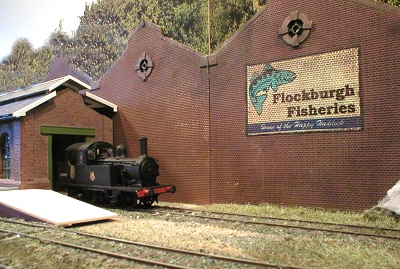
Flockburgh was titivated with several new details. I finally finished a number of jobs that I'd been meaning to do for some time ! We pitched up at the Racecourse and set out our stand. It turned out to be just below the exhibitors tea bar which meant much abuse from people hailing from Hull who refused to lower us refreshment on a string all weekend. Not to worry, all went OK after the hasty repairs and we departed for the B&B.

Now I know that most bloggers will write about the train sets on display, or bemoan the trade support. Not me. I know what you want, the behind the scenes stuff. Well, here it is. The food was a bit rubbish.

You  might look at me and think "There's a man who has a spoonful of All-Bran for breakfast and then goes out for a jog" but you'd be wrong. I like a plate of bacon, sausage, egg and beans occasionally. Mainly, when I'm staying somewhere where they will cook the stuff for me. I'm far too lazy to do it myself and anyway it's not special then is it ?

It certainly was this time. Delivered on a tea plate, which should have been a warning, one bite of the sausage restricted me to cereal and toast for the weekend. A discussion about the "Harvest Mom" cereal with another exhibitor revealed that although they are decorated to look Kellogs, they in fact hail from Aldi. The bacon tasted cheap and like the egg, was undercooked.

You might reasonably suggest I should shut up. After all, the other guests ate the stuff happily enough but then maybe I was still getting over the sandpaper towels after my shower...

Not to worry, we thought. We thought we'd eat at lunchtime, the restaurant has always been pretty good.

It is. So good it had run out of food at half two on Saturday and an hour earlier on Sunday. We ate at twelve on the Monday...

Rhubarb and Ginger SylabubOn the other hand there was a shining light in the comestibles. Sunday evening saw a celebratory buffet at the National Railway Museum. It was the 50th anniversary show, not something that many (any ?) other model railway exhibition can boast. Sadly, it was also a memorial to Mike who had booked the thing with the intention of attending himself. Glasses were raised to his memory. And before you moan, we had to pay for the beer ourselves. Nice pint too, if a bit lively but at least we could discuss the roof detail of LSWR coaches while we waited for it to settle.

The light but delicious buffet was followed by a truly delicious ginger and rhubarb syllabub. Not exactly the sort of food you associate with the railway museum ! Wandering around the hall with the place to ourselves was great, but City of Truro in light steam outside was magical. A nice meal, excellent company and the smell of steam engine, what better way to spend an evening ?

Enough of the eating, what about the show ?

Excellent. Mike had booked layouts he enjoyed for the most part and his choices were pretty good. Opposite us was the Gresley Beat and through gaps in the crowd (number were up this year) we could see the delights of a well modelled 82 wagon long train.

Easingwold East

Behind us was the "Layout I want to build" from the show. Easingwold East is a tiny (6ft long) EM gauge minor station. Not exciting to watch, or to operate I suspect, but lovely to build. The plan was simple with only 4 points but I could see myself producing it. In OO, you could kit-build the structures simply enough and it wouldn't take up much space. Pottering around with some small engines looked fun too.

Trade wise we had a good choice. I'm on the lookout for projects and picked up a couple. York isn't a show full of box-shifers, much to the chagrin on some on forums, you get some decent independents instead. I have a definite hankering for O gauge after looking at some of the models on display. My soldering iron trembles at the possibilities...

Our efforts seemed appreciated. All day, every day, there were interesting questions to be answered. The photographic backscene seemed to be the subject on peoples minds, closely followed by the couplings. And if I had a pound for everyone who said "What a lovely scale" I could have bought the Garratt off Baz that I resisted.

Not everyone was a happy bunny. If you insist on telling me everything that has gone wrong as it's going wrong then don't be surprised if I suggest you might like to go and look at another layout. And when I say that, I mean it. If you don't take the hint, be prepared for some of the dullest operation you will ever see. Not that doing this works, people like that seem to stick to the barrier like chewing gum to a good pair of jeans...

We drove back very tired but with the feeling that this was a show Mike would have been proud of. The racecourse floor is hard, even with a square of carpet to stand on, and three days is surprisingly long to play trains (I'm getting old) but all of this was worth it to be the owner of the plaque you see at the top of this post. York is a special show. It's old-fashioned in many ways but I would never turn down the opportunity to attend. I'll even have rubbish breakfasts and exfoliating towels and not moan. Well, not much anyway.

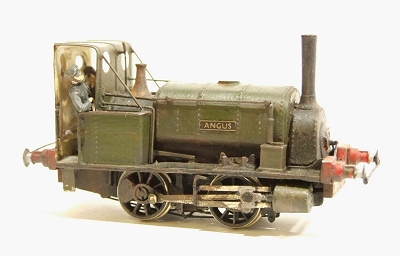
You want to look at some models, well here are the photos.

Saturday, April 14, 2012

Amersham Today

All being well, we'll be spending today at the Amersham Model Railway Exhibition showing off Flockburgh again. We don't do many one day shows, but this one is just down the M40 so it should be too long a day.

To be honest, we didn't bother putting the layout away after York. That can be done on the way home tonight.

Of course there was a little work - the rolling stock has been tweaked a bit as there are a few repairs required after the 3-day extravaganza. Mostly this is coupling bars pulling off or links vanishing. Neither are jobs I like to do at shows, spare wagons are a much more sensible option. At least, that's my excuse for building so many of them !

More details of Amersham show on UK Modelshops Website

Friday, April 13, 2012

K's J72

Ks J72

K's model locomotive kits have always had a mixed reputation within the railway modelling community. Many dismiss them as rubbish but in my opinion (and it's my blog so there) they are idiots.

What K's tried to do was supply a complete locomotive kit that was suitable for beginners to assemble. Everything you needed apart from glue and solder was in the box which saved the tiresome, and difficult if you are a newbie, task of sourcing wheels, motor and gears for yourself. Even today, this is off-putting to anyone contemplating their first kit, when you had to write enclosing an SAE to a shop, it was much more work.

Anyway, the other problem with K's stuff is that railway modellers are stingy and so the models were built down to a price. This usually showed up in the chassis which was basic in the extreme. A pair of drilled thick brass rectangles were the best you got. These would be held apart with screwed in spacers. Not state of the art even in the 1960's but as you didn't have to solder anything, who could complain too much ?

My model (a part built kit I was presented with to give it a good home) is fitted with (I think) Hamblings wheels. These pushed on the axle using a Hamblings wheel quartering jig - which I happen to have in my collection. As it is, the revolve a bit stiffly even after lubrication. Not motor is fitted and this was another area K's came unstuck as the ones they supplied weren't great and tended to die if you rant them too much. Mind you, the RTR versions weren't that great either although a nice X04 would be good in this model.

The bodies on the other hand, were usually pretty good. This looks like a J72 to me - prototype pedants please comment in the comments bit below as I'd like to know more. I've built the Taff Vale Tank and sitting on a scrachbuilt chassis, I think it looks rather good. As I said, it's my blog so I get to be nice about my models.

What to do with the J72 ?

Well, the world is full of nice RTR versions from Mainline onwards. I'm pretty sure I even have a box somewhere containing a body with replacement brass chassis that will give all the finescale goodness I could want. Perhaps this should be finished as it stands with parts of the same age as the kit, which is an old one since it's in a cardboard box rather than the later vac-packed card sheets. Mind you, for the moment it's off to the darkest recesses of the kit cupboard to mature a little more !

Thursday, April 12, 2012

Waiting times

Waiting passengersAnother question for you - How long should a passenger train stay in the station on a model railway ?

On Flockburgh, the passenger service alternates between the goods trains. It's purpose is to give the operator time to sort out the freight service in the fiddle yard. Thus, a 1:100 scale passenger has about a minute or so to get on board and find a seat.

This short delay seems to perturb some of our viewers who go into "nothingismovingonthislayoutwhydoesnothingevermoveonrailwaysatthisstupidshow" mode. You can feel the disaproval of the crowd. Presumably this is because they have never travelled by train so don't realise that the things actually stop at stations. Or that they would rather be watching a model running like a hampster in a wheel.

I like to think that a short wait in the platform gives the layout a bit of rythm to its operation. Sometimes there is frnetic shunting, sometimes a pause to listen to the birds and look at the scenery.

What do you think ?

Wednesday, April 11, 2012

The glue, or not to glue ?

3mm lorry

Here's a question - Is it better to glue road vehicles down to a model railway, or to leave them loose ?

If they are glued down, you can't lose them, unless the glue lets go, and they are always in the right place. It's one less job at the end of the show to go around and remove them from the display. Light fingered punters can't help themselves during the show either.

On the other hand, loose vehicles can be moved around the layout so it looks different every time it's exhibited. But they can be left behind, or more entertainingly, left on the layout when it's being packed up so you get the fun of finding a battered whitemetal kit on the floor after hearing the clunk.

What do you think ?

Tuesday, April 10, 2012

Last minute repairs to the locking bolt

Broken Lock BoltAs I type, we've just returned from York and after nearly three hours behind the wheel, and three days of the show, I'm too knackered to blog it properly, so that will have to wait for later in the week.

However, the trip nearly had to be cancelled at the last minute. Unpacking the layout to load it in the car, we discovered that somehow, the bolt that locks the fiddle yard in position was broken and in the process, lifted several inches of track. Quite how this happened, I don't know but without that bolt, the electrical connection and more importantly, the alignment of the tracks doesn't happen.

To make matters more interesting, we found this at 9:30 in the morning on Friday. The show closes for setting up at 5:30pm the same day and we were 3 hours away and had other plans for the morning.

The bolt is square section K&S brass tube running in more of the same. It is soldered to some PCB sleeper strip on the basis that this should allow the two halves of the outer tube to align and let the inner one slide. The resulting arrangement obviously isn't very strong.

Repaired Lock BoltMy repair involved replacing the sleeper trips with a slab of PCB. This is stronger but slightly thicker so first it had to be thinned from the back with the power sander. Not easy or precise but it seemed to work. The bolt outer tube is attached with solder and heated with my gas torch - the only way of getting enough heat into the joint to make the metal run. The brass was still warm nearly 5 minutes later !

All the emergency bodging worked. The bolt was stiffer than before but at least slid and aligned the tracks properly. After 3 days of use, it was becoming easier to slide too. Phew !

Monday, April 09, 2012

Peco point repair

Some time ago, Paul Godwin asked if anyone knew how to repair Peco points where the switch rails had come away from the tiebar. I didn't, and it seems neither did anyone reading this blog. Undeterred, he had a go and this is the result:


The switch rails had come adrift from the plastic tie bars. To repair them, I have used some Dewey Lace pins (These are brass, you can't solder to normal dressmaking pins, the silver coloured ones) inserted through the tie bar from the bottom and soldered them to the switch rail. Everything is cleaned and tinned first - away from the plastic - then soldered together with a small hot iron. You need to get in and out fast!
Carrs 145 solder and flux were used in the repair.

I noted that the more modern point had a hole in the tie bar through which to insert the pin. This gave the positioning of the switch on the tie bar straight away. The older one had to be drilled and I had to set the position.


This picture shows the initial problem
The pin is inserted and first cut to length, then removed and trimmed back a little further.
The tie bar being held parallel to the sleepers before soldering
A pin vice is used to hold the drill for the pin hole. This needs to be very, very slightly larger than the pin. Since these are different sizes, you'll need to measure and pick your own bit. Once this is done, a needle file cleans up the solder and ensures the flangeway is not obstructed.

The finished products. A newer large radius on the left, older short point on the right. The later was used for the first practise. It's a good idea to experiment on something you can afford to damage !

I have no idea how robust these will turn out to be. The use of the pin enables the joint to pivot as the blades move which should ensure there is no strain on the solder joint.
This isn't a repair for the faint-hearted but if you have a broken point, it might well be worth a try. Paul's note about getting in an out fast with the hot iron is well made. It's easy to melt the plastic, but if you succeed, I can't see why the point shouldn't last for many more throws. Thanks to Paul for his notes and photos.

Sunday, April 08, 2012

1970s shunting

B&W Shot

Down at the Melbridge Box Company, 0-4-0 shunter 25550 drags a single plank wagon towards the machine shop where yet another once expensive bit of heavy engineering equipment is due to be loaded. From there, it will be shipped abroad to make boxes in Hong Kong or somewhere else where the locals will work for a pittance in conditions that would make a British worker cry.

Despite this, the gentlemen in the UK who will buy the products, usually model trains, that are encased in these boxes will complain that the price is too high and it really would be better if they weren't being made by johnny foreigner. At the same time the owners of the factory will peer at the ledgers and comment that it's a good job they are manufacturing abroad or the recommended retail price would need to be three times what it is now.

The 1970s are in full swing as you can see from the car park. The Ford Cortina could do with a wash but the Beetle owner seems prouder of his brand new bug. It replaces the 1965 model that he felt was still all right but his wife knew belied its age to anyone who knew that sloping headlights had disappeared 3 years after it was made, and didn't want the neighbours to think they weren't doing well.

On the tracks, the shunter is very well looked after by it's crew who have nicknamed it "Polly" but it too will soon be sold for scrap as the march of the lorry moves ever onwards. Luckily, it will be saved from the torch and find employment on a preserved line where it will be allowed to pull carriages to the delight of children who prefer red paint and chrome domes to the dull green GWR tank engines.

(With apologies to Chris Nevard, who does these made up histories better, or at least can make his camera to depth of field)

Saturday, April 07, 2012

York Show

By the time you read this, hopefully we will be all set up and ready to play trains at the York Model Railway show. If you want to look us up. Flockburgh will be on the ground floor of the racecourse. Stand number 5 if you are looking through the programme.

If you are visiting, please drop in and say hello. As usual, it's always nice to meet readers of this blog, excellent fellows that you all are.

York Show Website

Friday, April 06, 2012

Juneero Tool

Juneero ToolMore vintage model making stuff for a Friday - this time a Juneero Tool.

"Juneero ?" I hear you cry, "What the heck is that and can you run it on DCC ?"

Sit tight readers because thanks to the interweb, I can tell you that Juneero was a kind of do-it-yourself Meccano. In the box were strips of aluminium and this tool. You then used it to cut them to length, punch holes and bolt together. Because it was sold as an engineering training aid rather than a toy, it was even produced during WWII. According to this website, production started in the 1930's and finished 20 years later. By that time kids had become too lazy to punch thier own metal and preferred the RTR Meccano version.

The tool was picked up at a car boot sale for 50p because neither I or the vendor knew anything about it. Back on the bench, the cutting works well on scrap nickel silver from an old kit. The right angled bend bit isn't bad either although the corners aren't that sharp. Mind you my metal of choice is harder and the device is 50 years old or more.

Holes of 3mm diameter are neatly punched. Here the harder metal and a bluntish punch are exposed as the leftover has to be pulled away. It's not a bad effort though.

Anyway, I think this might be useful. I can't see anyone wanting to buy it and after all this time it would be a shame to chuck it in the bin, so it's into the cupboard for the moment and I'll see if I can find a use for it.

Thursday, April 05, 2012

3mm Post Office van

Painted vanI can't resist posting a picture of the finished PO van. A little bit of digging on the interweb provided me with the correct colour scheme, or at least what I think is the correct one.

All this surfing revealed that people who preseve these things don't all paint them in the same colours. Maybe the local depots had a different take on the correct livery but I doubt it. The Post Office was always a pretty strict organisation.

Every example displayed a black bonnet and chrome grille but elsewhere there were some other bits in black around the windscreen. I pondered putting these in, my new Trumpeter brush was holding its fine point very well, but in such a tiny scale they could look a bit heavy.

Worse, the script "Royal Mail" over the crown on the side is either gold or black depending on whose version you are looking at. I went gold but can't be sure I'm right, the photo on the left would tend to suggest I am wrong. This is an area where I am sure the Postmaster General would have laid down the law.

Not to worry, the model looks nice enough. A little weathering courtesy of a thin wash of dark brown is all the dirt I needed. Some post washing lackey would doubtless have removed all the filth each day so there's no need to serious deposits.A little light much just highlights the detail.