Showing posts with label Lindberg Tugboat. Show all posts

Friday, October 02, 2020

Lindberg Tugboat in Model Boats magazine


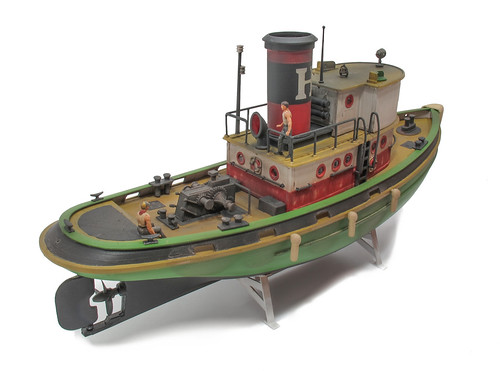
OK, it's not a proper write up, if you want to know how I built a tugboat from a Lindberg Kit, you can read all about it on this blog, but I couldn't resist sending a couple of photos to the new editor of Model Boats magazine. 

Opening up the October issue, there it is in the "Readers Models" section in all it's glory.

If you are into boat modelling and not subscribing to the last magazine on the newsagent's shelves then you really need to support it as the last few issues have been terrific reads. Maybe they just chimed with my interests, and some of those are a bit off-beat, but I enjoyed them a lot. 

Head over to the Model Boats website.

Tuesday, August 25, 2020

Lindberg Tugboat - all done

 Lindberg Tugboat on the canal. 

 For the final shots of the tugboat, I wanted to sit it on some brown water. The obvious choice would be the model boat club, but we're having to book in there to keep numbers down and I hadn't had the chance to do this when a sunny day appeared.

With a trip to pick up some wood required, I decided to try sailing on the canal. This was easier said than done as I wanted a nice, quiet spot. The first places I looked at were full of moored boats, or I could park anywhere near. Without a proper box for the model I didn't want to risk lugging it very far.
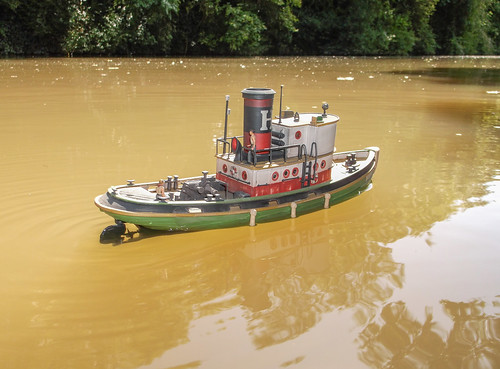
Lindberg Tugboat on the canal. 

Eventually, I found a spot on the edge of Warwick and set up. The water wasn't too far from the bank, another issue with the boat club at the moment, and the boat behaved itself when afloat. I was holding the camera and randomly aiming, but this worked OK. In a shady, spot, the flash made shots look better, the same as when I'm in the more controlled environment of the lake. 

The slight current kept the model on the move, but it easily overcame this and pootled around happily enough. Even a passing boat didn't seem to bother it. 
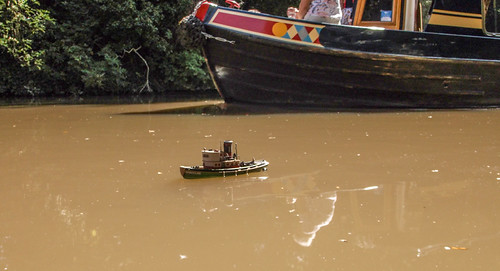
 Lindberg Tugboat on the canal.

I've enjoyed building this kit. Everything seems to go together well and the modifications required to fit radio control didn't cause any big problems. Now finished and weathered, I think it looks great. Maybe all those plastic handrails make it a bit fragile, I can live with this was it's a fair-weather model that demands calm water. Perhaps not a "Thursday Boat" I can take out at a moments notice, it will stand up to a big of use. There's not much point in fitting radio if you can't sail after all.

There are several other kits in this range. While they are probably very rare, I'll certainly be looking out for them.

Monday, August 24, 2020

Finishing touches to the tugboat


After testing on the water, I found a couple of little tweaks I wanted to make to the tugboat .

First, every time the superstructure wobbled, I was nervous it would fall into the water and sink. The retaining pieces provided aren't generous, so a 1cm tall wall is fixed inside the deck hole. Not only will this reduce the chances of the wheelhouse falling off, it will keep any water that makes its way on to the deck from getting it to the working gubbins. 

While I'm at it, the superstructure is tied to the hull with a length of very thin wire. If it falls off, hopefully this will allow me to retrieve it. I've done the same for other boats and at least once been very glad I did. 

Talking of the wheelhouse, the caption was rattling around having come unglued. Easing a knife blade under the edges and breaking the glue joint gave me access and I fixed him down again. 

Once happy the glue had dried, I put the wheelhouse top on, and it wouldn't sit properly. A few minutes prodding and wobbling the part lead me to realise the problem is he's too tall! Somehow, Lindberg made a mistake and if you want a man at the wheel, you have to file down his cap or chop off his feet. 

Since it's hard to see inside, I have gone for option 3, have him standing outside and hope no-one notices the ghost steered ship. The figures are too nicely made to hide away in the gloom anyway. 

I see I need to get some dirt under the lip of the funnel too...

Tuesday, August 18, 2020

Back on the water


On a nice, sunny, calm day,  I took the tugboat to our pool (don't get excited, you've probably got inflatable paddling pools that are bigger. And a lot easier to set up) for final fitting out. 

Getting the weighting right took a little while. The battery pack is on one side so a matching lump of lead was required on the other. Then a bit more up front to make the model sit level. this foot-long model now weighs in at 366g - a bit heavier than I expected, but it sits well on the water and that's what matters. 

Under power it sails well. You only have to crack the speed lever open a tiny amount for a scale speed. I need to look in to programming the transmitter to change the rate there for more control. Turning is OK, about 3 feet for a full circle. Reversing involved lots of splashing and less steering control than I expected. My guess is that and even smaller prop would have worked perfectly well. 


To be fair, a garden swimming pool isn't the most realistic of places to sail, I', sure dodging batching polar bears wasn't something the prototype did. (The bear supports a thermometer in case you were wondering) so I need to get it on brown water for the final shots some time. However, sailing has made me realise there are a couple of finishing touches required.

Monday, August 17, 2020

All the bits are finally painted


Updates on the tugboat have been thin because I've been painting all the detail parts, and that's not very exciting, even for this blog.

However, it's all done. Everything is attached, even if the superstructure is just plonked together for the moment. I want to spray some dirt over the whole thing before the glazing goes in.

Many of the parts took a fair bit of cleaning up to remove lines from misaligned moulds. The result looks pretty good though and I'm looking forward to the final steps.

The Peco loco cradle is very handy for holding the kit too. Far easier than the supplied plastic stand. Do you think they will mind I'm not using it for trains?

Lindberg tugboat 

 Weathering is nothing more than a quick blow-over using the airbrush to add some general grime to the model. We're seeing this boat from a distance (Imagine the Father Ted, small and further away skit) so I'm not worrying about very detailed dirt. Not right now anyway. This is just to tie all the colours together. 

 Glazing makes use of the clear plastic bits in the kit - except for two round windows where I'd lost the bits and had to use Glue'n'Glaze. I'm not sure this is better than the Lindberg version as those plastic bits have odd marks in each centre. 


Tuesday, August 11, 2020

The perils of a 2nd hand kit


"Bollards", I said as I scrabbled in the bottom of the box looking for the the final parts to complete the model. The trouble with a second-hand kit is that you can't be sure all the parts are present.

One missing piece was the front bollard - but that was easily replaced with a bit of plastic tube and a 4mm diameter disk made using the handy leather punch.


At the back, the winch was missing one end, easily replaced with a bit of Plastikard even if it doesn't have the rivet heads that should be there.

Tricker were a pair of capstans. If I had a lathe to hand, I'm sure replacements could be turned up. As it was I improvised with a couple of brass bushes supplied with the servo. I've never really understood why these are included, probably an aeromodeller thing, so it's nice to find a use for them. More plastic disks from the punch (I must buy a proper set) and once they are painted, no-one will notice.

Monday, August 10, 2020

Boat crew


I don't like putting photos of model figures on the blog - they never look as good as in real life. However, they are part of the build, so here we go.

Three nicely moulded 3cm tall figures are included in the kit. A nice touch, so many other kits leave you to find some from the aftermarket and I'm not sure there is much choice in 5mm:1ft scale. There certainly wasn't when this kit was produced!

All were painted with Humbrol flesh and then dry-brushed with the lighter Revell shade. I suppose I could have left this since they should all be ruddy-face sailors. Or maybe they should be more orange for that American Presidents-style tan...

After that, some muted colours for the clothes and a wash of Citadel ink to put some shadow in. I wish this was sold in a slightly less dark shade as it's a bit stark, but that's the fashion for fantasy and military modellers, and as I say, it looks better in real life.

The lolly sticks as handles to hold the figures by the way. The superglue joints should break easily, but I found I needed to slide a knife blade under them after breaking the captain's toes off.

Monday, August 03, 2020

Red lines


Lindberg's box art suggests the lower portion of the superstructure should be painted red. If I was any good at masking things, this would be fairly easy to apply - tape over the white to stay and blast with red paint.

If I try that, there will be all sorts of paint creep thanks (partly) to the those raised plank lines.

Plan B - Using tape to give me a guide, draw along the top edge of the red with a bow pen and then paint the rest with a brush. The lined line gives me a guide to work to. At least it follows the gentle curve upwards towards the front of the superstructure. Can't do that with a ruler.

And that's sort of what happened. The line wasn't perfect, the Tamiya tape is very thin so not was easy to follow as I'd hoped. A Bob Moore pen would probably have been a better choice in this respect.

Still, a couple of coats of red, a bit of fiddling and the result looked OK.


Since this is to be a weathered model, I burnished the red with a fibre pen to give it some wear. The pale grey base colour shows through in a few places and I quite like the effect. It's something I've done on PO railway wagons, but this is a new slant and I'm sure I'll do it again one day.

Monday, July 20, 2020

Hull painting


Look at that moulding line!

Time for proper traditional plastic kit modelling with a sanding session lasting an hour turning the top rail from a moulding to flat. It might only be half a millimetre to sand away with various grades of abrasive stick, but it didn't half make a mess!

After a clean up, I could move on to painting.


I'm following the box colours because I really like them. This might be a working boat, but that's no reason for it to look dowdy, quite the opposite.

Proper modellers would mask everything up and spray. I couldn't be bothered and did everything by hand. Three thin coats of the Humbrol satin green and brown. The black mostly only too one.

Everything was left to dry properly, so the job took several days, and the result is pretty nice. Spraying might have been a little better, but with my hopelessness with masking tape, I suspect I'd have been chasing around with a brush anyway.

Transfers name it after the horse in Steptoe and Son and I finish off with the light spray (from an aerosol) of satin varnish.

Not many words for a long job, but at least I'm well into the fun bits now.

Tuesday, July 14, 2020

Superstructure part 1


Working on the tugboat superstructure is a proper old-skool plastic kit building experience. 

Part fit isn't bad, but modern kits are so much better. I'm assembling all the big lumps first. These will be tidied up and painted before final assembly. 

One thing that does confuse me - why are the panel lines or gaps between planks raised lines? I'm assuming this was ease of mould making, you can make a grove easier than a thin raised line. Part of me wants to etch these with a scriber and the more sensible bit says to leave well alone as the subterfuge looks fine on a model. 


Putting all the bits together, I'm getting an idea how the finished model will look. Am I alone in dry assembling kits like this, just to see how the model is progressing? 

Monday, July 13, 2020

Sailing, not sinking


Back on the pool and this time the boat keeps the wet stuff on the correct side of the hull. 

I forgot to take some lead with me to balance the model properly, but a handy pebble worked well enough for this test. 

The smaller prop worked well too. Top speed is still a bit high, but I like that as it should let the model overcome winds and currents as well as getting out of the way of other models on the pond. 

Manoeuvrability is important. I well remember the day one of our club members was sailing his powerful model and because has was sitting down, couldn't see the boat in one corner of the pond. He decided to open the throttle and sailed straight through another model. Some people are idiots. 

Anyway, the other big check was battery capacity and again, I'm happy. Half an hours sailing with no slowing down. That's more than enough for this sort of boat. 

Now I can get on with the fun bits. 

Tuesday, July 07, 2020

Stopping the water


Working out how the water was getting in to the hull didn't take a lot of thought. As I examined the join line between the two halves, I spotted that there were some tiny gaps at the back around the prop tube.

It might be that when I inserted the new tube, I didn't open out the hole as much as I should have. Whatever, I decided to go for a belt'n'braces approach to the fix.

A think piece of microstrip was laid over the entire join. Fixed in place with cement and then solvent, I pushed it hard into any gaps - even imaginary ones.

Them some cheap epoxy was mixed and forced down the back of the boat to really fill the problem area.

Hopefully this will sort things. By the way, apologies for the static grass on the hull - the stuff gets everywhere!


While fiddling, I've taken the opportunity to fit a smaller prop to the model. The large version was OK, but was going to provide too much thrust making scale speed sailing difficult. Hopefully the smaller version will be entirely submerged yet give enough go to the finished model. Once the glue dries and it stops raining, I'll find out.

Tuesday, June 30, 2020

On a bed of Milliput


A gutted servo isn't the easiest thing to mount in a model boat hull. Admittedly, I could have removed the motor from the control board, but it wouldn't help that much.

Inspiration struck when I pondered sitting it on a carved balsa wood mount - then realised that a big blob of something would do. A bit more thinking and I remembered Milliput.

I've never been a fan of the stuff. It frequently doesn't seem to go off when I use it, but needs must. I sliced off a couple of portions and mixed them for 15 minutes while watching telly. Most of my mix was shoved in the hull and the motor pushed in to it.

Some rubber tube is acting as a coupling and since the gear on the motor isn't very big, I've tried to keep it under compression from the end of the shaft.

The blob was cleaned up a little with a damp spatula. It looks ugly, but seems to work remarkably well. The Milliput has hardened and when I give it juice, the prop rotates. Now I need to get the model on the water.

Fun Fact: I you are visited by Royal Protection Officers, and they spot two sticks on Milliput wrapped in their greasy paper but not in the cardboard carton in the top of your toolbox, their faces go a funny colour.

Monday, June 29, 2020

Waggle that rudder


Not confident my servo setup would work, I put the motor in a blob of Blu-Tack, bent up the connecting wire and tested the set-up. And it worked!


The final box holding the servo in isn't pretty - I just stuck plastic rectangles around the Blu-Tack and servo servo with solvent and cement followed by 2-part epoxy - but it works. The servo isn't jumping around and it swings the rudder with gusto.

The rudder swings far enough to work, nothing seems to be catching on anything inside the model and all the working parts are under the removable cabin. I'm happy with that.

Monday, June 22, 2020

Fiddly steering linkage


Lindberg didn't design their kit to have working steering.

The rudder clips into place, you set it at an angle to bring the boat back to you and that's it. Plonk the model in the water and off it goes. Get it wrong and you've lost it in the thick reed bed 10 feet from your launching point.

Modern RC means I can have more control, but only if I work out how to link servo and rudder.

My solution required an evening of fiddling with brass wire. A length goes down a brass tube full of grease into the top of the rudder. The end is bend over and bashed flat. A nut is soldered on the bottom. Trust me, that was a real pain to do and took two nuts, both of which filled with solder. Eventually I cleaned one out, a job that would be been quicker if I could have found my small taps...

The servo linkage is another bit of the same wire also bashed flat and drilled. At the moment it just waggles around at the servo end, but the important thing is that I can make the rudder move from the middle of the boat.

All this took a lot longer than it sounds, but quite satisfying to do.

Tuesday, June 16, 2020

Will the prop fit?


Digging around the box of boat spares, I've found a nice stainless steel prop setup to which I can fit a nice plastic prop. Placing it on the boat side, it looks like a good fit so I join the hull halves and deck together.


The kit is old and the part fit not perfect. I'm guessing that the hull has distorted a little over time joining the halves was a little bit of a fight. Plenty of liquid glue and much holding along with a couple of bulldog clips worked for most of the length, but the stern didn't want to play ball with a good millimetre of gap - if I could have got a clamp on it this wouldn't have been an issue, but there wasn't much chance of this.

Instead, I warmed up a soldering iron and melted the plastic over the join inside, letting it cool and do the holding for me. Amazingly, this seemed to work, allowing the glue to do it's job overnight.


The chosen propeller turns out t be a little bigger than it needs to be, but a small amount of carving gives me enough clearance to let it dodge the rudder support. OK, it's not prototypical, but no-one will notice.

Monday, June 15, 2020

Lindberg Line Tug Boat kit


I'm still keen to build a model boat and so it's back to the kit stash to find something I bought a couple of years ago at the IPMS show.

There used to be a fashion for motorised plastic kits, but mostly cars. There were a few boats including this one from the American Lindberg range. When I saw it on the stand, the idea of taking a model designed to said and adding radio control imediatly grabbed me.

Costing £20, the kit has been opened and the prop shaft and prop removed. A couple of tiny glue marks inside suggest someone has had a go, but they didn't get far.


The parts had been rebagged in thin plastic and as far as I can tell at this point everything is in the box. Even the motor is in there, but I fancy replacing this with a gutted servo with a second micro version for steering. Hopefully, the extra wight won't be an issue, but we'll find out later.


I love the instructions. No CAD drawings, instead we have illustration by an artist.


Anyway, I'll dig out the plastic glue and give this a go. With a bit of luck I'll end up with a model suitable for the pool - at a foot long, it might even see a calm day at the lake!