Showing posts with label Dotti. Show all posts

Tuesday, February 13, 2018

Dotti Done

Dotti

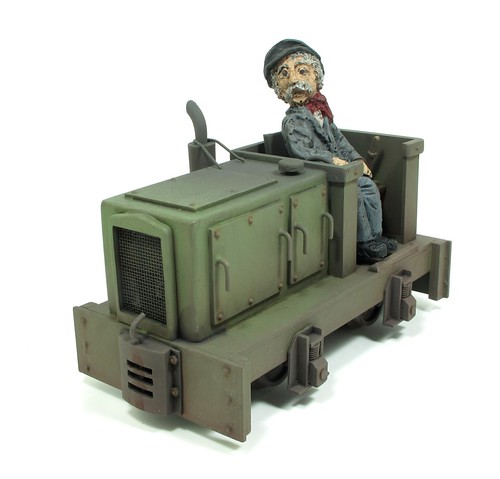
And with a few washes of Lifecolor dirt followed by a blast of same (thinned with windscreen wash) from my airbrush, Dotti is ready for service. 

On the track, she's a bit light. Attempting to haul a Brandbright coach around our local track, she struggled several times. Single axle drive and only one of those means she's best suited to short trains of wagons. Perhaps I need to unearth those weathered "Big Big" tippers!

Maybe a few chunks of lead hidden underneath will help, but in truth some derelin chain and more cogs are required. Not today though. Other projects beckon.

Monday, February 12, 2018

Let's try some acrylic paint


Dotti is a bit of a test bed and this continues as the paint goes on. I'm pondering if I need more acrylic paint and less enamel in my life. Water-based paint seems like a better thing, it certainly smells less.

Anyway, after priming with Halfords best red oxide colour, I've sprayed the model using Vallejo for no other reason than it seemed like a good idea. I'm told this paint outsells Humbrol in Europe so there must be something good about it. I'll admit I've used some of the earth shades for weathering in the past, but this is the first time I've used it as the main colour.

Thinned with car windscreen was, a tip picked up from plastic kit modellers, it flowed well and has given a nice finish. Some of the red oxide shows through in places as planned and I highlighted with a mix of base colour let down with beige.

I'm happy with the results this time so I'll be trying it again. Sadly, supply isn't easy (I got mine from Ian Allan in Birmingham) which precludes its use in magazine projects. 

Friday, February 02, 2018

Mr Starboard


Since this is an IP Engineering kit, I thought I ought to use one of their figures.

Obviously, Mr Starboard is perfect since he's looking the right way, I have a Mr Port for another project. Slightly cartoony in the manner of most garden scale people, I don't think the camera has been kind. Painted up, he looks rather nice and the eyes don't look so weird.

Paint is mostly Humbrol with Lifecolor flesh tones. All the colours were applied and then dry-brushed with a lighter shade. Once dry, a quick and thin coat of Games Workshop inks (black and brown) took care of the shadows.

Tuesday, January 30, 2018

Whitemetal castings on


Finally, the good bit. Half an hour spent with superglue sticking the whitemetal castings in place. Suddenly the loco takes a great, big step forward.

Apart from a tiny bit of cleaning up, the castings went on as supplied. I've drilled the centre of the air vent so I can pin it down with a length of plastic rod that goes through the top of the bonnet.Either that, or I'm sure I'd have knocked it off in the future.

The exhaust looked a bit unsupported but a length of wire added another support.

The radiator is filled with Albion Alloys mesh cut to size with scissors. Since the bonnet is off-centre, it looks a bit odd, but in a properly narrow gauge way.

Next up, a quick wash and then primer.


Thursday, January 25, 2018

Cab detail

The very open cab of "Dotti" caused me much head scratching. As supplied, you get a bench seat and a big wheel. It looks like a steering wheel, but when I posted a question on Facebook asking what should be in the cab, I got this very helpful reply:

Try looking up some of the German manufacturers like O&K and Jung, they tended to have a wheel controlling both clutch and direction and a single lever for the brake. There was usually a small lever for the throttle somewhere on the bulkhead

I was also sent a link to this website where I spent far too much modelling time looking at little diesels.

Anyway, a lever appears to hang on the back of the gearbox on a lot of locos. Nothing to be seen here, so something carved from plastic appearing to poke through from under the seat. 

Talking of seats, I felt my driver needed something more than a bench to sit on so fabricated something very basic from more plastic.  Finally, I spotted that locos driven sidesaddle sometimes had a strip under the drivers feet, presumably to give him something to brace against to avoid sliding out of the seat on curves.

Tuesday, January 16, 2018

Bonnet detailing

Fun time - the body goes together well enough so I get to move on to the detailing stage. Plastic rivets are supplied - these being Cambrian Models. Spotted in place using Revell Contacta glue, followed by a generous wash of liquid solvent, they work very well. I decided that the long panels deserved 6 rather than 4 lumps, it looks better even if the maintenance crews need to do more spannering.

No handles are supplied but a length of 2mm diameter brass wire was pulled out, bent and cut to length. Forced into pre-drilled holes, I had to use more solvent to fix as I was working at the model railway club and forgot to take any superglue. It seems to have worked.

The "cab" is more generous than I expected for the driver. I need to do some research to see what controls are required.

Monday, January 15, 2018

Getting the right angles


I've probably mentioned these before, but some of the most useful tools I own are these cast iron angles bought from Squires tools.

Assembling the Dotti kit body parts, it's important to keep them at right angles and using these lumps of metal as supports holds things in place as well as keeping in the right place. An added refinement would be to use some magnets to hold the plastic against the angle, but the speed the glue dries, this isn't really necessary.

Incidentally, for joining these parts, I'm using Precision Paints Superweld, partly because it was handy on the shelf but also 'cos it works really well. I like the sped at which a model can go together this way.

Tuesday, January 09, 2018

Dotti chassis

Nothing much changes. Many years ago, I'd look at Saltford Models kits with chassis made of a simple U-shaped channel fitted with a cheapo motor and gears. The biggest change now is that the wheels are turned steel rather than whitemetal, and the modeller has to stick 3 pre-cut bits of plastic together to make the channel.

The point is, it works.

Although the model can be built to 32mm or 45mm gauges, I've gone for the former as I'd like to run this at the 16mm Assoc. steaming sessions. It also seems more like a 32mm loco than the wider 45. Building it in both gauges would be interesting...

Brass bearings are pressed into the pre-made holes using a vice first and then parts are glued together with an ABS solvent. A spray of Halfords matt black was left to dry overnight before all the parts were fitted.

I deveated from the instructions in a couple of places.

First, there are very think plastic spacers behind the wheels to stop them rubbing in the chassis sides and wearing the paint away. B to B is 1mm wider then it should be but only half of that is down to the spacers. I can't see this being a big problem, this isn't P4!

Second, the switches are bolted in place rather than glued. Since holes are provided for this, I assume it's to avoid the cost (money and time) of providing the tiny bolts. I feel this is a more engineering solution and anyway, I'd probably get glue in the switches.

Up and running in a couple of hours, there really isn't anything to worry about with this sort of wonderfully crude engineering. That's what I love about this end of the hobby, anyone can have a go. 

First, some very thin plasticard washers
Monday, January 08, 2018

Dotti kit


Time to build something new for the garden. This IP Engineering "Dotti" 0-4-0 kit has been kicking around for months in my "pending" pile. It's a discontinued model that I bought for bargain price so I can't really do a magazine build on it, but that's good news for blog readers.


Unlike most of the IP range, the kit parts are cut from plastic sheet rather than wood. Whitemetal details are included plus bolt heads from Cambrian. Motor, wheels and gears are also in the pack. The model will be battery powered using a couple of AAA cells. Control isn't sophisticated - on/off and forward/reverse initially but in the future I'd like to have a look at this.

At present, this kit is still available from the Vale of Rheidol eBay shop.