Monday, October 31, 2016

Bachmann Wickham Railcar (32-992)


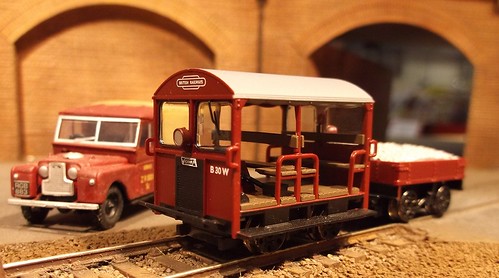
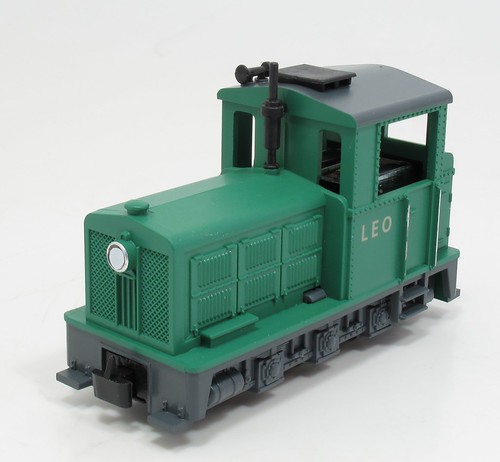
Bachmann's 4mm scale model of a Wickham Railcar is something I've been looking forward to since it was announced years ago. I once built a Springside whitemetal static version which combined being tiny with being full of nothing much. How anyone was going to produce a motorised version, without resorting to the canvas sides used in poor weather to hide the model's interior, was a mystery to me.


A clue to the solution could be found in an old model railway magazine, Railway Modeller I think. There, someone with more ingenuity than I produced a powered model using the same kit as my static version, but with a addition of a trailer providing a home to a motor filched from something N gauge.

Bachmann have been forced down the same route. In the pack is a railcar and behind a trolley full of "ballast". The trolley is home to what appears to be a coreless motor driving the front axle.

Pickup is from the rear trolley wheels and all four on the railcar. Under the commendably empty crew space is the circuitry required for any RTR model to suppress electrical interference. The power runs from the pickups into this and then back to the motor - hence 4 wires between the two vehicles. No provision is made for DCC, but I have a feeling that if you are handy with a soldering iron, hard-wiring a tiny chip into the railcar and hiding it on the back seat under some "stuff" might be possible.

 
A pair of traction tyres are fitted to the driven axle. Commenters on the web have suggested that these are evil and should be discarded. That's their choice but when they do this, the model will thrash around with wheels spinning uselessly. It seems that Bachmann didn't just make a set of grooved wheels for the fun of it, but because that's how you make this thing work. It reminds me of suggestions on VW aircooled forums that the entire thermostat system could be removed from the engine because some bloke in a garage knew better than a German car maker with some of the best trained engineers in the world. 

Anyway, assuming you leave things alone, and if you don't there are a spare pair of tyres in the packing, the model runs very nicely indeed. As mentioned a few days ago, we gave one a good thrash on Ruston Quays and it was perfectly happy running back and forth over the Tillig point. Smoothness improved after about half an hour, and we could turn the speed down a bit too. 

I'm really impressed with this. Bearing in mind the model has to be capable of running on anyones OO layout, the design is impressive. Yes, there are people who talk about micro motors driving special gearboxes hidden in the railcar end, but those who have tried this know it to be incredibly difficult and unlikely to be reliable for very long. 

For under £70, this is quite a model. Yes, it's tiny and if I'm honest, a bit of a gimmick. These things didn't run very fast so mixing it up with your main line traffic won't be very realistic - which won't stop loads of modellers enjoying them. I look forward to seeing Wickham's being chased along layouts by APT-E's (a equally useless but appealing model for most of us) on layouts.  

Currently available in BR maroon and more modern yellow. Repainting would be easy and it really could do with a crew (Apparently there will be some Scencraft figures available). I'll do something about this and add a bit of dirt at some point. 

Great fun and much more rhobust than the whitemetal version.

Sunday, October 30, 2016

Meet Holly the seahound

 
Browsing the Real Model Pilots stand, I couldn't resist this character - a dog wearing a flying helmet and lifejacket holding a steering wheel. 

I've no idea what she's going to be driving but I'm thinking some sort of speedboat. 

3D printed, despite being 11cm tall, she only weighs 33g. This is because the range is designed for model aircraft where weight is a vital consideration. As it happens, this is a good thing for my project as a tall and heavy figure would be unstable on the water. 


The printing is fairly coarse but from a distance this won't matter. The fly-boys will be even less worried most of the time.

For the moment, Holly sits on the shelf, but one day I'll pick up a hull ideal for her. One to add to the Model Boat Show shopping list in a few weeks time I think...


Saturday, October 29, 2016

Large Scale Model Aircraft, Gaydon, 2016

Pucara

This show doesn't disapoint. Organised by the Large Model Association, as the escalator delivers you to the upper floor, the first model on show is a quarter scale Argentinian Pucara. THAT is a large scale model.

Rather like last weeks model engineering show, this was a hall full of amazing models that I can admire but not copy. Well, I suppose I could but not without a lot of practise and hard work.

One interesting sight, not actually on display, was a 3D printed fuselage being carried around by one of the traders.

3D printed plane

The model is (paid for) downloadable and designed to be printed in several parts on a home printer. Problems have been encountered getting flat surfaces properly flat, hence the lack of wings. The owner went to to explain the economics of printing for large scale models - basically it costs a fortune.

Spooky pilots

Talking of 3D printing, there is a nice range of pilots from Real Model Pilots. I couldn't resist a photos of these as haloween approaches.They make "proper" ones too, all amazingly light. 

And I did make a purchase, but I'll show you that tomorrow...
Most of the modesl were far more traditionally made. Loads of blasa wood and lite ply, all covered with fibreglass and vinyl for the most superb "paint" finishes. 

Cake was lemon, and just sligthly too tall for easy eating, but I managed anyway. 


ead over to Flickr for my photos, including some bonus motor cars at no extra cost. 


Friday, October 28, 2016

Litho sheet


At the weekend, I had the chance to purchase some Litho sheet. 

Quite a lot of readers will be wondering what I'm talking about. It's only wierdos like me who still enjoy old model making magazines who will have read articles extolling the virtues of the stuff. 

The sheets I have are 0.2mm thick aluminium. Each has been used as part of the printing process, hence the drawings, text or music on them. I assume they would be fitted in some sort of drum in a machine and used to transfer ink to paper. This will (I'm told) wash off with meths.

Anyway, the idea is that this metal can be used for covering models. It can be emossed with the rivet press, or a nail and should make excllent ironcladding for a boat. Not that I have one in mind, but you don't find this stuff every day so I snapped it up when I could. 

Suggestions for other uses welcomed in the comments. 

Thursday, October 27, 2016

Farewell MREmag


On behalf of the DRM ePublishing Board: 

As many of you are aware the MREMag site crashed on Monday and despite the ongoing best efforts of our technical director the problem has proved unable to be fixed. On analysis our expert discovered that there is a major error in the program used to host MREMag and although the problem has not been created by MRE we have been advised that fixing the problem would incur a nonspecific fee for the situation to be rectified.

Our future plans had taken into account the creation of a new website and the fact that we are now having a problem with the existing site has forced us to bring forward our plans and introduce the new site as quickly as possible. This may take a few weeks, possibly four or five but we believe that to bring forward the launch of the new site, which will contain a moderated forum in place of ‘Having Your Say’ is the most effective solution to the current situation.

With this in mind do please keep sending in your contributions and. and if they are still relevant by the time the new site goes live they will be posted.

Sometimes situations can force changes to plans sooner than expected and the problem we are experiencing with the current site is just one of those occasions. We do apologise to all those who enjoy a cup of tea while reading ‘Having Your Say’ but we are convinced that our decision is the most practical.

Please keep checking back to the website though as we will also be monitoring incoming emails and will continue to provide updates on progress. We will also provide a link to the new eMagazine from there in November.

Once again, our apologies for the untimely changes and please bear with us. We really are doing our best to get something in place.

----

As you will gather from the above, MREmag.com, in the form I ran it is no more. There have been plans for a couple of months to evolve it into an e-magazine, possibly with an attached forum. This change would have taken place over the rest of the year, at which point I'd have bowed out. 

Sadly, the site broke down before the Tuesday edition appeared and it looks like it can't be fixed. Not really how I'd hoped to go out, but that's life. 

My first issue of the magazine appeared on the 15th October 2012. Since then I've put out an edition 3 times a week, apart from the last month when it wound down to twice a week. Total number of editions - 627.

I'm proud to say that I never missed one, even when I was out and about. Editing has taken place in Leamington Spa, The Isle of Man, Hong Kong and Australia.

Sydney View - Daytime
Not a bad view from the editors desk.

Along the way I've been to some interesting events. Press days with manufacturers, London Toy Fair, 3D print shows and a few others. I'll miss these a bit.

More importantly, I've met, sometimes only by e-mail, some wonderful people. And a few aresholes, but I forget about them.

Firmly in the wonderful camp is Brian Macdermott - Wishlist poll supremo, constant contributor and ardent supporter of the magazine. He'll be embarrassed that I mention this, but he is well known within the hobby as an incredibly helpful bloke. I'm not the only person to have benefited with his assistance along the way and he doesn't get nearly enough credit.

I should also thank Pat Hammond, creator of MREmag. He's always been on the end of an e-mail to help out, answer questions (especially those on the history of railway models) and write most of the reviews for the magazine. It was always great to find a stack of Pat's ready-to-use words sitting on a sever waiting for me.

Compiling a comprehensive list of others is impossible, but here's a start: John Cherry, Steve Mann, Simon AC Martin, Steve Grantham, Graham Hobbs, Dennis Lovett, Simon Kohler, Tim Mulhall, Andrew Emmett, Andrew Carter and many, many more. Sorry to all I've forgotten, problems accessing the e-mail and writing this after a long day so my mind is not at it's sharpest. Your help and contributions are appreciated all the same. I hope we can stay in touch in the future.

So, now I find myself with big chunk of free time. No longer do Sunday, Tuesday and Thursday afternoons herald editing sessions and I won't have to plan around being near a computer for the next day's issue. I'll miss the morning check to see all is fine however as I was always proud of each one. Maybe I'll get the sequel to my novel finished at last, or perhaps a bit more modelling.

If you were a regular MREmag reader, I hope you've enjoyed the ride with me. MREmag will continue in a different form but without my assistance. Keep an eye on the website for updates.

Thank you again.


Wednesday, October 26, 2016

Warehouse Wednesday: Special cinema


I had planned a sensible post for today but as I stood on Birmingham Moor Street station, I spotted this building. 

First, it's a very basic brick and concrete structure with a flat roof. As a modelling project, you couldn't find much easier. Tucked beside a station, it's ideal for an industrial landscape. 

However, whatever the building was originally home to is a mystery. Now, it's a cinema for "adult" films. 

I'd have thought that including one of these on a layout would date it to no later than the 1980s. After that, surely the arrival of VHS cassettes would have killed the demand to watch grumble films in a room with other Macintosh wearing people? (Note: It's often said that VHS won the format war with Betamax because Sony refused to let those sort of films be sold on their format).  

There used to be a "Private Cine Club" opposite Gee Dee Models in Nottingham. It was there the first time I visited (the model shop) in around 84 or 85. Long gone as I recall, or at least the sign is. 

Now with the Internet and special films only a click away, how come this survives? Their website is pretty coy about the programme showing on the "2 main cinemas showing a wide variety of adult films". Perhaps the "seated area for you to relax and make new friends" is more important?

Tuesday, October 25, 2016

Adding doors


As far as body detail goes on the Cravens, MTK pretty much leave it up to the modeller. What you find in the box is a nicely pre-formed aluminium shell with the windows punched out.

Doors have to be scribed onto the surface following the plan. My CD marker pen is running out of ink but pencil works fine. First I marked a line for the top of the doors. This happens to be the width of a steel rule held against the rainstrip, or at least that is near enough and easy to do neatly.

Next, I marked 1mm either side of the windows for the verticals using a square. It's a bit fiddly around the tumblehome but with practise a straight line can be achieve. Better to get the hang of it with the pencil. Non-window doors are 7mm wide, possibly should be 1/4mm wider but I this is easy to measure and looks right.

A scriber ought to be the ideal tool but I found the line too narrow. The Olfa cutter makes a much better and wider line as well as being easier to direct down the side of the square. Any slips, and there were some, will be sorted with a smear of filler after priming.

Monday, October 24, 2016

Cravens chassis


Clipping a quickly assembled chassis into the body reveals an interesting problem - it's too high at one end. 

This is no surprise, the training bogie is supported by a casting but the instructions provide no clue which way up it should be fitted. I actually flipped it over half a dozen times trying to guess the orientation and in the end gave up, screwed it in place and then filed around 3mm off the support until the model sat flat. 


One "issue" with the kit design is that according to the instructions, the body is painted inside and then glazed and THEN you fit the chassis and build the rest. That's lovely, but how do you spray the outside?

My plan is to glaze after painting which means I need more finger holes, hence the large holes sawn out around the trailing bogie. The nut and bolt fixing of this and the driven end will also help as I will need to be able to remove these.

All nuts are fixed in place with Pound Shop epoxy resin. The whitemetal pivot for the bogie is replaced with a big, fat, bolt. I had to bush the hole in the stretcher with some plastic tube for this to work but I found some in my stocks that was about right - a little reaming in the middle opened it up enough for a slightly sloppy fit so the model handles less than perfect track.


Sunday, October 23, 2016

National Festival of Railway Modelling 2016

Wickham Railcar

With my shiny new DCC controller, I was looking forward to setting up Ruston Quays at Peterborough this year. For the first time ever at a show, I would be able to shunt the lower yard. With the station shuttle working, we'd have two trains moving realistically on the 6ft long layout.

As it turned out, the DCC device attracted a huge amount of favourable attention. The guys from the MERG stand wanted to see it, as did quite a lot of the visitors. I understand that several headed off to sign up with MERG afterward which makes me feel very pleased.

The other star of the show though, had to be Bachmanns Wickham Railcar. The BRM review samples had arrived a couple of days earlier and we gave them a workout on the shuttle service. While this might not be realistic for the layout, it IS entertaining and precisely the reason we have both DCC and DC on board.

Walking around time was limited, but I did manage to track down some excellent chocolate cake on the Saturday lunchtime. I certainly needed the sugar hit as by the end of day one, I was tired out.

HD Garrett box

Sunday saw me refreshed and with time to wander around a bit before the show opened. My star layout was the Faller Hit Train display for no better reason then it's utter barking mad. The fake Hornby Dublo Garratt was brilliant too, especially as they'd made both the loco and it's box.

Day 2 went well with more and more chat with visitors. The controller was fondled by many, one group even recognised the Inglenook yard design and successfully shunted a train for me - something I'd always wanted to see happen. Perhaps that means I've achieved everything with the layout and don't need to take it out again? 

Saturday, October 22, 2016

Midlands Model Engineering Exhibition 2016

Men of steam

Before my trip to Peterboriugh for showing off, it was time to look at some other peoples work at the MMEE. As usual, there was many, many tons of wonderful things to look at. 


Friday, October 21, 2016

MTK motor bogie

MTK Motor bogie

This is a first for me - a motor bogie from a kit fitted with traction tyres. Admittedly, they look a bit like rubber bands, but then that's what traction tyres are so fair enough. 

The motor is a heafty beast. I'm sure it's a known make but can't place it for the moment. I'm sure someone out in blog land will be able to help as a nice Friday puzzle. 

It turns over well enough with a bit of 12v DC. While not the most sophisticated unit out there, I plan to retain it. The wheels are another matter though. I'm not great fan of traction tyres, although not as madly against them as some on a popular web forum, but for a single car unit? I don't think they are required. 

The wheels look a bit aluminium so I decided to replace them with Romfords. The axles are 2mm diameter and the gears firmly fitted. Waggling the wheels didn't budge them so more effort was required.
Wheel removal

My GW Models gear puller was the perfect tool for the job. Screwing the plunger down eased the axle from the wheel . The replacements slid into place easily enough, although a dot of superglue has made them perfectly secure. I didn't remember to check them with a back-to-back gauge first!

The re-assembled bogie still works so I haven't broken anything. Time to look at the body.

Thursday, October 20, 2016

MTK Cravens parcels DMU

MTK Cravens Kit

I love a good model shop. One where the levels of old stock have built up a big and rummaging around unearths nuggets of gold. 

Hereford Model Centre is just such a shop. Many cabinets contain all sorts of good things. Careful studying of the contents is worth taking time over. Far more worthwhile than visiting the Mappa Mundi down the road which I thought very over rated and not nearly as useful as anything by Ordinance Survey. I'm amazed the 3 Wise Men found the stable is that's what they were using. As it was they probably nipped out to Tesco and got lost...

Anyway, at the back of a cabinet, I spotted a small cardboard box labelled:

Modern Traction Kits
Cravens Motor Parcel Van

No.M55997-9 (Class 129)

Kit No. MUI

And priced at a very reasonable £19.50

Once the cabinet was unlocked, I had a poke in the box and quickly left a happy shopper. 

Those who know MTK kits will be wondering if I have gone mad. They have a definite reputation as challenging builds. However, I understand that the trick is to get a first production batch. The owner added models he wanted into the range and the first lot were usually OK. After this he was happy and I'm told quality control could slip. 

I had sneakily plugged the ends into the pre-formed aluminium shell and they fitted perfectly. That says first batch to me. 

My quick check had also confirmed that all the major bits were in the box and there was even a motor bogie (more on this tomorrow). All for under 20 quid. Bargain!

The plan was to build the model to run on the Ruston Quays shuttle in time for Peterborough. Spoiler - I didn't manage that, but the build is fun anyway.

Wednesday, October 19, 2016

Warehouse Wednesday: Aussie navy buildings

Cockatoo Island buildings - brick

Two years ago, I was enjoying a trip to Australia. Being a bit odd, I skipped the beaches and traditional stuff, finding my way to Cockatoo Island.

Despite the name, the island isn't a rural paradise, it's an ex-Navy dockyard. Found in Sydney Harbour, it's easily reached by ferry and once there, makes a fascinating days exploration for those who like industrial architecture. 

Most of the buildings are still intact, some in limited use. There are numerous large cranes dotted around and lots of rust. It's fantastic. 

Looking back at my photos, I really must put together a proper album, for the minute, you'll have to make do with these two and a trip to the website.

Cockatoo Island buildings - metal

Tuesday, October 18, 2016

The grass REALLY IS greener


As we struggle out of the EU, perhaps a word to those keen to leave. It seems that the grass really is greener in Europe. At least it is if this stuff from Germany is in any way accurate. I found it in a pile of bits and have since thrown it in the bin.

Why is it that the continentals seem to favour shades of green best described as "nuclear"? 

Do they think that layouts should be visible from space?  


Monday, October 17, 2016

Another reason to hate DCC...


Needing to chip a locomotive, I stuck a note on a forum asking for recommendations. Since I know little of the world of in-chuffer electronics, it seemed the sensible thing to do. 

A suitable device was suggested and I place an order. £13 still hurts when you are a skinflint, but this is the future I am told so I better get used to it. 

Which makes it super anoying that the thing won't plug in. Wrong pins it seems. So I'll have to go and buy another. I'm sure many of you will be smugly laughing at me. I'll learn to check more closely in future but at the moment I'm much more a gods own DC fan!

Sunday, October 16, 2016

Collecting rubbish


Jam and stirrers

Let a modeller loose in a cafe and what happens? 

He doesn't leave the tiny jam pots or used coffee stirrers to be thrown away like any normal person. They go in his rucksack for washing out to be filled with nuts and screws and stuff. 

The stirrers will probably be an aid to holding things being soldered, releasing a nice aroma of hot chocolate when they are.  

I like to think I'm being "green" rather than hoarding...

Saturday, October 15, 2016

GETS 2016

Last Sunday, I trundled 8 miles down the road towards Banbury, to visit the Great Electric Train Show (GETS) at the Heritage Motor Museum, Gaydon.

Always an excellent show, this year there was a special reason to visit, LWMRS exhibition layout Walford Town's final public appearance.

Walford Town DMU

I remember Walford first being built back in the 1980s. At the time the club lived in a damp basement at the top end of Leamington Spa. The front room was home to the magazine collection and the back less salubrious (no carpet) room was for layout building. After finishing a members layout (Macduff) the group decided to have a go at a club EM project.

As I recall, Ian Futers made most of the PCB track but after this the group was fairly fluid. Eventually the model was completed by a team who had no interest in diesels or the current scene.

Walford 03

Despite this, the model was completed to a high standard. So high that it still stands perfectly happily with models a quarter of a century younger. This was despite, or perhaps because, there wasn't today's high quality RTR. Everything you see on the layout is well detailed using etched and cast parts, most of which are still available.

My favourite detail has always been right on the front of the model, a couple of broken fence posts.

Broken fence posts

Most people won't spot them, but I love the way the concrete has broken away exposing the steel bars in the centre. A well modelled detail based on careful observation.

Moving on, while the other layouts were really good, the one that caught my eye was Gweek North Quay.

Gweek North Quay

This O16.5 model is full of atmosphere. Everything is modelled to a consistent high standard, but it's not squeaky clean as many finescale layouts can be. That is, there is life in the modelling.

Motorbike

Judging by the numbers in front of the model, I wasn't the only one to appreciate it.

While the museum conference centre is a little bit of a maze, the cafe is excellent. Lunch was some very fresh sandwiches accompanied by delicious cherry and coconut sponge cake.

Coconut cherry cake

Had I now planned to eat in the evening,£7.50s worth of boeuf bourguignon might have been the way I'd gone as it also looked rather good. Not badly priced either compared to pub meals.

Trade was good although I confess to not spending much. There was a lot of chatting though and I did pick up some goodies for future projects, so a worthwhile visit.

Only one complaint. I bought advanced tickets (actually wristbands) and it seems that these don't entitle you to take away one of the old cars found underneath the exhibition. I'm sure I'd have been doing them a favour as a nice new one could surely have been put in the space. That Jaguar XK120 would look lovely on my drive...

More photos on Flickr.


Friday, October 14, 2016

Peterborough bound this weekend


This week, I've had Ruston Quays on the workbench for a little fettling in time for our trip to Peterborough. 

Over the weekend, I plan to finally have exhibition visitors operating the layout so please drop in for chat and a play. 


If you are in Warwickshire over the weekend, you might also like to visit the Midlands Model Engineering Exhibition, where my Fantail launch, "Sooty" is on display.

Sooty and Puffin

Thursday, October 13, 2016

Loco fiddling, DCC making and a new layout in BRM

Layout in a box

Just in time for the weekend at Peterbotough, the latest issue of BRM appears in the shops. My main feature is the first part of my N gauge layout in a box build.

Much of the work was carried out at TINGS a few weeks ago, and this time I'm covering those two heady days of excitement and mess behind the stand. There's lots of polystyrene and plaster action followed by the heady wiff of hair spray.

1F

Next we have a little locomotive personalisation. For a change I'm not starting with some knackered second hand thing, instead I thought it would be more fun to work over a modern model to show that it is still possible to improve the current batch of RTR. That and I had a Bachmann 1F sitting on the shelf that I'd bought because I liked it so much.

Keeping things simple, there is nothing cut off the loco and no repainting required, just a few simple techniques that make a dramatic difference, which I consider an improvement although I've probably ruined the value to a collector.

DCC unit

Finally, I need some of the evil DCC in my life and since I can't find a controller I really like, I've built one myself. 

OK, I have constructed an MERG controller kit but I still did all the soldering and stuff so I feel that I have rather more investment than if I'd just handed over cash. As it was, I didn't have to fork out as much of that as I would if I'd gone RTR. Despite this, if you concentrate, doing this job is well within the capabilities of anyone who has done a little bit of soldering. 

On the DVD, I'm showing off a rather nice new airbush/compressor/spray booth package we've put together. If I hadn't got sufficient spraying kit already, I'd have made more effort to hang on to it as the equipment really good. As it is, the Editor will be earning his spraying spurs at some time soon.

Wednesday, October 12, 2016

Warehouse Wednesday: Charlestown garage

CharlesTown garage

Down by the docks in Charlestown, Cornwall, you find this garage/tiny warehouse. 

I like the rubble stone side wall combined with the pale brick front and weathered wooden doors. While not a big building, it's full of character. 

Not sure how I'd tackle the side wall. It's probably a job for scribed plaster as embossed Plasticard will look too uniform. I can't remember if Wills have anything suitable in their range as this might work for 4mm scale modellers. 

In 7mm though, this would be a fine model and could easily find a home on any quayside layout.

Tuesday, October 11, 2016

Wooly ideas for abrasive


As my dad continues his Bismark build, he's reached the stage where wooden decks need to be treated. 

The instructions say to spray them with matt varnish and then smooth with fine wire wool. 

It works a treat. The varnish raises the grain very slightly but a rub with wire wool renders it smooth as a the proverbial babies backside. I suppose a mild abrasive would work just as well but this is certainly effective and so simple. Best of all, wire wool is cheap and readily available from the decorating sections of DIY outlets. 

Monday, October 10, 2016

No flies on me


Spotted at the railway club last week - a clever clamp for holding small circuit boards. 

Attached to a desk, it provides provides a steady board for soldering, but the PCB can be flipped over while still in the clamp? 

Where can you purchase one of these? Apparently you look for fisherman's fly tying clamps

Sunday, October 09, 2016

Is video really a good thing?

A few weeks ago, I spotted a tutorial on YouTube covering making model roads. It was well filmed and the end results looks impressive, but I was struck by the duration - 17 minutes.

As a well known writer of how-to articles in the model railway press, I pondered how I would have covered it on the page, and concluded that there were 6 or 7 steps. In other words, I've have had to do the job is just over half a page. Even with a little generous stretching and a big final photo, I'd not have extracted more than a double page spread out of the job.

More recently, I've been pondering how to reduce the wind noise when recording video on my G12 camera. The solution seems to be a furry muff (stop sniggering at the back) fitted over the microphones.

Price for the ready to stick version is around £14, which seems a lot for a bit of teddy bear fur and some Velcro. It's not like it's even a custom job, you have to crop the Velcro to fit the camera.

I was right. There is an Instructables that covers making a wind muff. They do it in one step and on a pretty short web page. Reading time 2 minutes.

If I prefer, I can watch a video for the same job. Duration of the films is anything from 4.5 to nearly 8 minutes. Most of this is watching someone use scissors to cut Velcro or showing off teddy bear fur fabric. Some show the results of fitting the muff, but mostly it's handycraft.

My feeling is that if you want to follow the process, static works best. Video is for those who just want to be entertained, or at least sit slack-jawed while pictures move on a screen in front of them.

Now you might cry "hypocrisy" as I also film material for magazine DVDs and you might have a point. I often wonder what the point is myself.

With every film I'm trying to use the medium to give something that the printed page can't. There are times when watching a live demonstration can make a difference. Some things are easier to understand when you watch, but my feeling is that there are less of these than people think.

You can also say that it doesn't matter. The job is to entertain people. Nothing wrong with that - it's the business we are in after all. When the viewer is happy then nothing else matters.

Maybe it does, but I do worry when people tell me that they only watch videos and refuse to read or even look at the pictures. Perhaps I'm just being grumpy and old fashioned. Perhaps I just need to get over the idea that anyone does things for themselves now and that for most people vicarious modelling is the future. As one who can be on the screen, I ought to be glad that there is a small demand for my services.

What do you think? Should I ditch words for moving pictures? 


Saturday, October 08, 2016

Hut ready for the garden


Ready for the garden. I sprayed the hut with primer followed by car aerosol black.

This looked very clean and lovely, but not the look I was after. These things probably never looked new!

Out with the acrylic paint and my first shock was - no black. Don't know where it's gone as I know I used to have some, but there was grey and dark blue so I mixed these up, painted the "metal" and then wiped it down. The results weren't quite as dark as I might have liked, but they aren't bad, espcially in daylight. 

Some grey and brown mix applied in the same way on the woodwork looked OK. Finally the red wheels with gunmetal treads. 

It might not be finescale, but placed outside amoung all the wrong scale real plants, I looks great. I just can't decided whether to keep it in over winter or put it in place now.

Friday, October 07, 2016

Massage the resin


The curved roof for the shepherds van was a very different profile to the top of the ends. Fortunately, resin can be softened by hot water, so it took a bath in the sink. 

After a few minutes, the material had softened and could be flattened by massaging it with my fingers. This took out most of the curve. 

After this, some nice thick blobs of epoxy and a few clamps made it fit. I suppose I could have gone straight for the clamps but making at least a token effort to re-shape the part does seem the proper way to work. And I always like to do things properly!

Thursday, October 06, 2016

Steradent stove


To furnish the inside of my shepherds hut, the manufacturer provides a bench. I suppose this gives somewhere to sit and possibly even kip, but it's going to be cold in the winter. 

There is a hole in the roof for a chimney but nothing for it to connect to inside. That seems odd as the box shows the door open so the interior will be visible. 

Anyway, I spotted a steradent denture cleaning tube in my parents shopping and thought it looked about the right size for a stove. Once the empty vessel was acquired, it turned out to be better than I thought. 

With a little imagination, the plastic top looks good for the stove top and a few bits of plastic sheet give me a little added detail. While it might be visible, it's not that obvious so I'm not going to go to great lengths. Just the suggestion will do the job. At least the chimney will have something to be connected to. 

Wednesday, October 05, 2016

Warehouse Wednesday: Back to the 80s with Cornwall House


Cornwall House 2

Right Move describe this building as "a detached modern office building arranged over 3 floors with 2 suites per floor. A central entrance at the front of the building leads on to a staircase that serves all floors together with a passenger lift. The vacant suites have all been refurbished and generally have suspended ceilings with recessed lighting and perimeter trunking. Toilet facilities are centrally provided within the building core."

They have an interesting take on modern as Cornwall House was built in 1987 - not exactly modern image - and it looks like it.

Cornwall House entrance

This is pure 1980s, the 1980s of Capital City, Filofaxes, red braces, Margaret Thatcher and mobile telephones the size and weight of bricks. Green windows, faux copper roofing and the overall design come straight from that decade.

Cornwall House 1

Personally, I love it. The lines are clean with little extraneous detail. 

For modellers, it's modestly sized building a minutes walk from Princess Risborough railway station. I know we tend of obsess over buildings from the early part of the last century but if you are modelling the 80s, this sort of structure is worth examining as it's incredibly hard to freelance anything as convincing. 

Tuesday, October 04, 2016

Shepherds Hut


One of the projects I've had kicking around for months is a Trenarren Models shepherds hut kit for the garden railway. Much of the basic construction was carried out in the gardens of a stately home for a BRM shoot earlier this year. I promised to finish the job and let them have stills for the end of the film, but haven't got around to it. Until now. 

The basic model is made from resin and goes together passably with plenty of pound shop epoxy resin. The castings are all pretty clean so there's not any real challenges although the body does seem s bit big for the chassis. 

Anyway, I want to model the hut with the door open, so there's a bit of work to do. More of this on Thursday. 

Monday, October 03, 2016

Find the Fieldbahn

Leo the loco

Warley is approaching and I need a reliable locomotive to run on Owen's Bridge. The"proper" Simplex is pretty worn out and I'm not sure it can be revived for a couple of days worth continuous running. 

As a backup, I have a Roco 33209 "Leo" to tickle up with a bit of dirt'n'detail.


Roco_chassis

Under the basic body, the mechanicals are very nice indeed. OK, it's only a 3 pole motor but this drives quite a gear chain via a spring coupling. 

What I can't find is any photos of the real loco. I'm assuming this is because Roco have freelanced the model to fit a chassis, but if not I'd like to find a photo of a prototype. Can anyone suggest anything?