Showing posts with label Barclay 0-4-0T. Show all posts

Thursday, June 01, 2017

Build a Barclay and look under the sink

Time for a little bit of a magazine catch-up. If you wonder why I write these posts, it's partly ego (look at me, I'm in print), but mostly so I can use the search feature on Blogger to remind myself when a particular article has appeared.

Yes, I have the original mags, but a lot of them are in storage and flicking through those on the shelf isn't as quick as banging some keywords into that box on the top left of the screen.

Anyway, a couple of pieces to mention. First, in the June 2017 issue of Narrow Gauge World, I've written up building the O16.5 Barclay loco constructed some time ago. In many ways this is the series of blog posts edited and with a bit more useful information. And a lot less typos. That's the difference between what goes on here and a properly edited and curated magazine.

Over in the Railway Magazine Guide to Railway Modelling, I've been digging around under the sink and around the house to find some non-railway modelling materials that we can use for constructing layouts.

This article has been kicking around for years and finally found a home. Admittedly, not much of the original was left by the time I submitted it but then ideas, materials and my skills have changed a lot in that time!

All this magazine variety is going to be one of the casualties of my new roles with EIM and GR. It's time to concentrate on the new (to me) publications and stop messing around elsewhere.

Tuesday, September 06, 2016

The Barclay goes for a spin


Last year I bought a little turntable for displaying models. Until now it's sat in the box, but I thought I'd give the Barclay a quick spin on it and see how the result looked.

Interesting. I did take several angles, but the editing program decided it didn't like the formats (it has off days) so you get one angle pretty much straight from the camera.

Monday, September 05, 2016

0-4-0T Barclay

Barclay

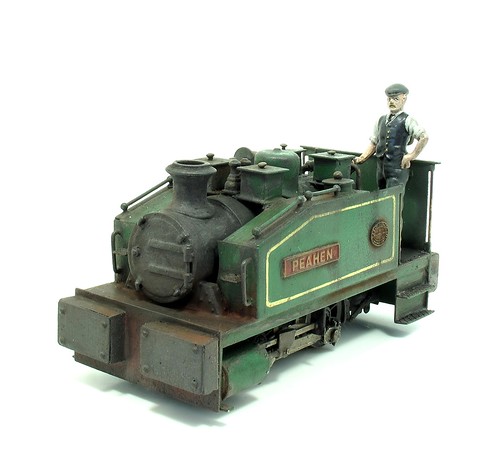
Let's start the week with a finished project. The Barclay has been heavily weathered and is now ready for service - or at least standing in the display cabinet until I work out what to do with it. 

Most of the muck is earth/track colour/black Humbrol enamels sprayed over the model and then cleaned away with cotton buds and kitchen roll. Finishing touches from weathering powders, mainly rust around the front end. 

It's certainly a funny looking locomotive, but then that's why the kit appealed to me when I bought it. I can imagine the real thing (it's sort of freelance but stick with me) wuffeling around a grotty industrial site nosing its way between down-at-heal buildings covered in a layer of soot.

Until preservation, it will never pull any coaches and even that might be a dream as lorries take over the day-to-day work leaving the railway with less to do. Daily steamings become twice a week and then once in a blue moon. With a bit of luck the driver greases up the motion as he sticks his faithful steed away in the back of a shed for what might be the last time, hoping that the bean counters forget she is there so they can't send for the scrap man.

Friday, September 02, 2016

Hero of the footplate

Painted driver


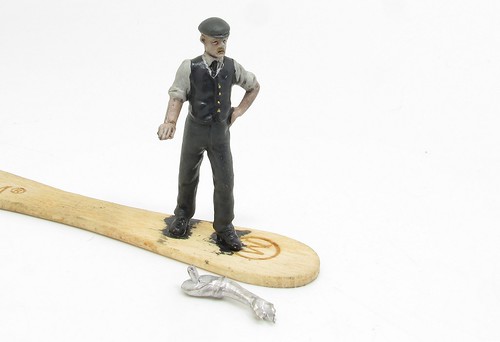
Driving the Barclay is this slightly camp figure from the Border Miniatures "Heroes of the Footplate" range. I'm not sure if these are still available, the website seems to have vanished.

FC6 - loco driver suitable for a 1920 industrial engine is a whitmetal casting with alternative arms. Drilling a hole in his shoulder allowed me to superglue the arm so his hand is just touching the regulator. The pose is natural and relaxed, just right for a driver to chugs around on his loco all day and has long since stopped getting excited about it. 

Flesh tones are from Lifecolor, everything else Humbrol. Final wash of black, Citadel Miniatures.

Thursday, September 01, 2016

Not matt


Model railway frustrations No.65 - paint that should dry matt and doesn't.

I'm looking at you Humbrol 33 and Railmatch Weathered black. 

Fortunately, a quick coat of Testors varnish solved the problem but it's a pain to have to do it. 

I'm guessing that the Humbrol (usually well behaved) wasn't mixed enough but the Railmatch? Surely someone there should have worked out that weathered back ought to have a bucket of matting agent mixed in? 

Tuesday, August 30, 2016

Lined out


The Barclay would probably look fine in plain green, but I need the practise at lining models out so I've loaded up the bow pen with paint and had a go.  

To help me, I made a little ruler from plastic that could be hooked over the tank edges - it's easier than measuring and as long as I don't lose it, it will be around for future efforts. The edge the pen will run along was chamfered to stop the paint creeping under it, something that happens if you have a plain edge. 

I'm quite pleased with the results. The paint was a bit thick so I thinned it, a little too much as it turns out. Corners were painted in with a brush and then cut back on the outside edge with another brush loaded with turps. Maybe I'm a long way from a Rathbone but once weathered, it will look OK.

Monday, August 29, 2016

Molten metals paint


Metal is tricky in model form. Ideally you'd make whatever it is in the right material and just polish it, but that's not always possible. 

At the IPMS last year, I came across Darkstar "Molten Metal" paints and was very impressed. Unlike enamels, the pigment doesn't drop out of suspension all the time so there's no need to stir constantly.

Airbrushes.com now stock the paint, which makes it easier to get your paws on. After arranging for a  review for MREmag, I've had a go on the Barclay where I needed to paint the copper pipes and brass valves. While the pipes really are copper, and the brass bit are cast brass, cleaning either up was more trouble than it was worth. 

The paint initially didn't want to stick to the smooth, sprayed enamel base but constantly working it solved this and after a few minutes it had coated perfectly. Ideally I should have used a primer base which would have solved the problem. 

The results look pretty good to me. For copper, I used copper colour. Brass is "Regency Gold". Both will have a wash of black come weathering time which should make them look even better. 


Friday, August 26, 2016

Dumb buffers made of wood


Narrow gauge locos don't often have buffers outside of Talylln land. Mostly there is some sort of chunky centre coupling. The Barclay kit comes with some brass fold-up buffers and these look suitably industrial, so I decided to use them. 

Except that in real life I suspect they would be made of wood rather than solid metal.

Not a problem, in the material stash there is some strips of hardwood. I removed the buffer sides and stuck the faces to the wood. Once dry, this was sawn and sanded to match. 

For extra industrial appearance, I added bolt heads using fine brass pins. These are fitted into holes drilled in the face and wooden bloc but not through the buffer beam. Doing what I did cost me 3 drill bits which is plenty thank you. 

To be honest, I'm not sure about the bolts. Surely they would stop the buffer faces sliding? However, I found real locos fitted with them and the metal faces would have to be held in place some how. It's not likely that they'd have used a big pot of epoxy glue!

Thursday, August 25, 2016

Plumbing the cab


Cab plumbing is simple enough - some (supplied) 0.8mm copper wire is fitted into  0.85mm holes drilled in the lost wax castings fitted in the cab. A few dots of superglue hold everything in place. 

Drilling cast brass requires a nice sharp bit. The first one I tried wasn't man enough for the job but a change to a fresher tool allowed me to carry on even though I was using a pin vice rather than a power tool. Am I the only one who can't be bothered to plug something in for jobs like this?

Tuesday, August 23, 2016

Sandbox handles


Normally once I start sticking castings on a locomotive, the model begins to come to life, but not this time. The odd proportions of this beast mean the chimney and dome don't add nearly as much as they would on a "normal" loco. 

Still, I'm quite pleased with the sandbox handles. Each is the top of a brass pin superglued in the hole. 

To ensure each is the same height, I gripped them in a pair of tweezers and shot the glue with kicker. This seemed to fix them but give me enough time to extract the tweezers. 

Monday, August 22, 2016

Time to turn the soldering iron off


Happy days. The soldering on the Barclay body is complete. Everything else can be glued on. 

Last job was the cabside handrails. These are brass pins supplied in the kit.

Each was tacked in place, fluxed up and then blasted with a gas torch to melt the solder faster than the surrounding brass could draw the heat away. 

After a quick wash, I couldn't resist and bit of polishing with fibreglass pencils, just to get rid of the worst of the kettle descaler experiment. Well, it's nice to have a shiny model...

Tuesday, August 16, 2016

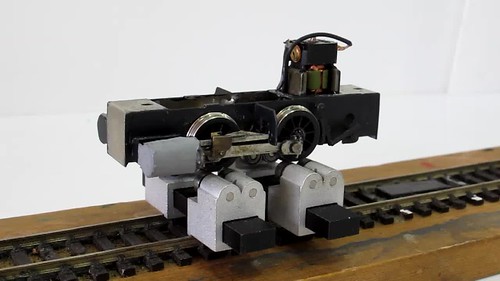
Barclay chassis testing


Barclay chassis test

A quick coat of Railmatch "Weathered Black" followed by a bit of cleaning up the next day and the chassis is ready for a test. 

Powered an half-century old H&M Clipper, it thrashes away on the rolling road nicely enough. Control will be more subtle on a better controller. I like the rolling road though as it gives all the Romford bits the chance to unscrew themselves. Two crankpins did - fixed with a dot of superglue on the threads - and one wheel nut - re-tightened with a bit more force.

Only one chip has appeared in the paint, possibly because the metal wasn't perfectly clean before priming, apart form the the hand painting has worked OK. 

Back to the body now. 

Monday, August 15, 2016

Painted primer


Stripping this chassis down will be a faff so I've treated it to a brush coat of lovely Humbrol primer. I did buy a new pot, but only because I can't find the old one. 

The sticking power of this stuff amazes me. OK, I've kept the metal clean but it does seem to work well. An etching primer would be better but I find the brushable versions too thick, and you can never clean the brush out afterwards. This stuff comes out with water - how it works so well is witchcraft. 

Friday, August 12, 2016

Pickups


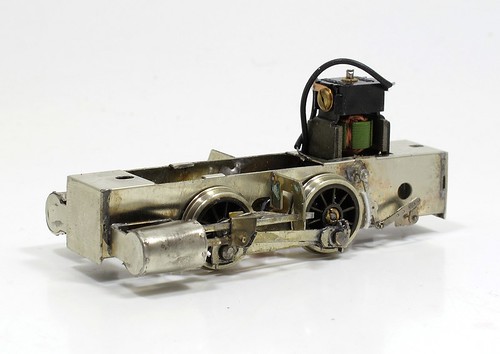
No problem fiddling the electricity in this loco. Once side is uninsulated, so the chassis is live. The other needs some phosphor bronze (supplied) pickups. 

These are fitted to a plate bolted underneath the frames.  I filed the bolt head down a bit bit you're going to have to be no higher than track level to see it anyway. Using a bolt allows adjustment off the loco, although I just bent the wire with it in place. Where the pickups are close to the chassis at the back, superglue painted over the wire should avoid short circuits. 

Barclay Chassis

Now I have a sweetly running chassis. A bit more clean up and it's ready for paint. Where did I put my tin of brushable primer?


Thursday, August 11, 2016

Brakes


Braking on the Barclay is a bit limited. We get some rear shoes and nothing in the middle. Is this prototypical? 

Anyway, the whole lot hangs together OK with everything attached to wires poking from the chassis. I did wonder if the operating gear would look better if the oval cam thingy pointed down rather than up as the instructions show. There's little in it, so I followed the manufacturer. Most of this is hidden behind the back steps anyway. 

The brake shoes are plain so I bent some square plastic strip and superglued it in place. Then I filed it back a bit to reduce the thickness. I could have used thinner plastic but it's easier to bend a square cross section without it buckling. 

Tuesday, August 09, 2016

Wrap the cylinders


Hard nickel-silver cylinder covers aren't ideal. Much as I love this metal, it's a pig to bend. 

A few moments with the gas torch warming it up helped a bit. Maybe if I'd been less lazy and used the gas hob it would have helped even more. Anyway, I bent them around a screwdriver and tried them in place. 

Handy hint, burnish them clean before bending, it's a lot easier that way.  

Clipped in place, I would have liked them a millimetre longer as the grip on the ends is tenuous. Mind you, I'd have preferred them in brass so perhaps I should have made new ones. Running solder around the ends and finishing this with a file and fibre pen looks OK though. 

I'm ignoring the cylinder ends as I've fitted front footsteps on the body which hide the detail and mean the chassis won't fit if you fit it. Not sure if this is the right move yet, but if I take the steps off, the end plates can be glued in place at a later date.

Monday, August 08, 2016

Boiler won't sit down


I always hope that these posts will help people. If you are building a kit, it's useful to read about potential problems before you encounter them. 

Which is why I mention that all did not go well when I first mated the Barclay body to the chassis. It wouldn't sit down properly. 

At first I though this was due to the motor hitting the inside of the firebox. Que lots of squinting down the boiler and worrying how I was going to grind the shaft even shorter. 

Then I spotted the real problem. The boiler bottom sticks below the footplate and hits a couple of chassis spacers - the ones I've coloured red in the photo. 

A few moments with a mini-drill and cutting disk removed the front spacer, and cut a chunk out of the boiler to clear the one by the motor. I had wondered if the front one should sit in the slot in the boiler, but to do that would move the later forward exposing a hole in the footplate and clashing with the motor. 

Anyway, all the work is invisible and not the body sits where it should. 

Friday, August 05, 2016

Boiler fitted


As suspected, a great big hole had to be opened out in the bottom of the smokebox to enable the boiler unit to sit down properly. 

Being whitemetal, my getting it in slightly the wrong place at first didn't matter, a sharp knife was enough to carve the hole in the direction required. It's underneath, so no-one will spot it. 

Lashings of C&L 100 degree solder hold everything in place. This includes the pair of triangular supports at the front. The curves are a hopeless match for the boiler and even solder wouldn't bridge them, so there will be filler action later on. 

I am disappointed by just how tarnished the brass is looking. It's being cleaned after every session with Shiny Sinks and has even been doused in Cilit Bank. Can anyone suggest anything else? I'm not going down the Brasso route, I'd like a dip of some sort. 

Thursday, August 04, 2016

The Barclay's back

6 months in a box while I was too busy on other projects hasn't done the Barclay too much damage. 

With a little more time to finish personal projects, I've hauled it out, hoping to finish the model off. I don't remember there being huge amounts to do. The chassis works, although it needs finishing. The main bits of the body are built. Can't take long can it? 

First up, one of the more important jobs - fitting the chassis retaining nut. I've forgotten this before and had to bodge a solution. Not this time, with the bolt covered in permanent marker and doused in oil, the nut was held in place and then tacked in place. The bolt didn't stick so was removed and the nut finally fitted.

Next, I'll fit the boiler although this looks like it needs a little modification to fit at the front. And I'll sort out the wonky sandbox by knocking it off with my clumsiness.

Thursday, January 21, 2016

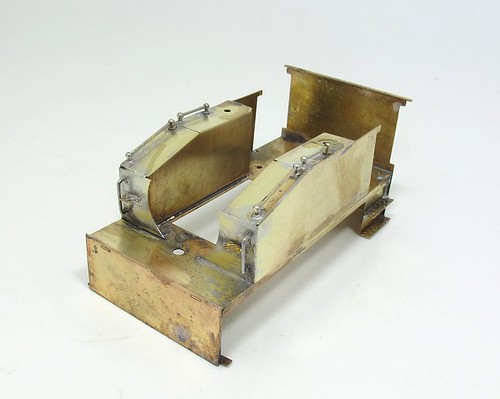
Hot handrails

Handrails fitted

Planning is important. The correct time to attach the handrails to the Barclay tanks was when I could solder the knobs from inside. Instead, I left them thinking I could use a bit more heat and work from outside.

I could, but it needed a lot more heat. In the end I tinned anything that went through the brass body then smothered the lot with solder paint and Powerflow flux. With each handrail held in place with a screwdriver and the gas torch fired up to provide some quick heat.

The results are OK, if a little messy. Before cleaning the model up, it looked a real state with burnt and blackened flux over everything. A scrub with Shiny Sinks and then a bit of burnishing brought everything up to a shine again but it takes confidence, and experience, to know that's how things will turn out.