Showing posts with label TR Coach No7. Show all posts

Tuesday, June 21, 2022

The new Garden Rail sales stand is open for business

16mm scale Garden Rail sales stand

And with that, the job was done and our sales stand is open for business. 

The posters, shrunk GR covers, bring the front to life a bit more. I should be able to peel them off for replacement in the future. Figures, who look nothing like anyone who will be around the stand (must do something about that) are from the Karas Kharicters range. Not the best, but with plenty of character which I prefer for a job like this. Caracature people work (IMHO) better for my sort of modelling. 

All being well, the next time you see this model will be on Saturday at the National Garden Railway show as part of our "Layout in a day".

Monday, June 20, 2022

Wiggly tin roof


Roof sticking
IP Engineering supply a nice laser-etched roof for the coach kit, but I'm not sure which way up it should be fitted. 

Etched lines up, and it will need covering with tissue, but would represent the planks found on real vans and carriages. I'm not convinced you can actually see these in real life, but modellers like to represent them sometimes. 

Etched lines down and the roof is slightly harder to bend, but the top surface is smooth amd ready for paint. 

I've gone for etched up, as I fancied covering the roof with some "corrugated iron". The sort of thing that might have happened to static vans in the early days of preserved railways. Well, it's my model and I think it looks fun.

Wiggly tin on

The wiggly tin comes from Bole Laser Craft, and is vac-formed plastic. I wound it around an aerosol to put too much bend in it first, then fixed to the roof with some gel superglue that promises and super-strong bond. 

Setting time was short enough I could hold the plastic in place, saving messing around with elastic bands. I know I'll knock the shades off if I do too much of that!


Tuesday, June 14, 2022

Wheels on


Closeup of wheels

With the bodywork nearing completion, it's time to add the wheels. 

Solebars are made up of two plywood laminations to produce a nice chunky piece of wood. Onto these, the whitemetal axleboxes are fitted, once their brass bearings have been instered. A fraction fit (put them in with  hammer) seems sufficient for these, especially on a model that isn't actually going to run. 

I wanted more then glue to hold the axleboxes, but was running low on really tiny screws, so each 'box gets a load of superglue and single screw, which seems pretty strong so I've be happy with this on an operating model. 

The steel wheels aren't the ones supplied with the kit, I can't find them at the moment, but some random wheels given to me months ago (thanks Earl) of unknown manufacture. It all comes in useful in the end!

Monday, June 13, 2022

Striking lucky with transfers


Coach body with Garden Rail logos
Here's a bit of luck, or perhaps my penchant for not throwing things away finally paid off. 

The coach needs Garden Rail logos. In the past, I've printed them on one of the special sheets that can go through an inkjet printer. It's a reaonably easy process, but I work on the basis I'm probably going to muck things up, and so make more then I need.


Looking in the transfer (not decal) store, I found the ones leftover from my last job and they turn out to be the perfect size for the new carriage. A dip in some water, bit of Microsol and Set then a spray with Halfords satin laquer.

Adding the branding starts to bring the model alive too and keeps my interest up if it were flagging.

Thursday, June 09, 2022

Paint and green lines


Coach parts

Stuffed with newspaper and masking tape, the coach body was treated to a couple of coats of Halfords white primer, followed by some satin clear laquer from the same source. This went well, and showed no significant sign of yellowing. 

The results might have been neat, but looked a bit insipid. Something else was needed, so I took a deep breath and dug out my bow pen. I'm not a confident user of the tool, but reasoned that if I didn't like the results, the laquer would allow me to wipe them away. 

As it was, a couple of lines down each side of the raised beading, carefully joined up so they looked like a fat one, went on pretty well. The thing with large scales is the lines are wide, and I'm not sure I could do them in one hit with the pen. Two passes seemed to work OK. 

This still wasn't quite right, but rounding the inside of the corners with a brush, even if a long way less than perfect, makes a massive difference. At that point, I decided to quit while I was ahead. A bit of skill aquired, and results I can live with. That will do me!

Tuesday, June 07, 2022

Power sanding in the odd corners


Proxxon 28594 power sander
The trouble with sanding sealing wood, is that it raises the grain, which then has to be sanded back for a smooth finish. No complaints, that's how the stuff is supposed to work, but sometimes it's a fiddly job to get in all the nooks and crannies. 

Under the shelves on the back wall of this coach are just such a problem area. Pondering this, I remembered that some time ago, I'd aquired a Proxxon 28594 power sander and perhaps this might be just the tool for the job. 

To be honest, I'm not that good at resorting to power tools - something more profesional modellers do at the slightest opportunity, for speed, and often accuracy. I'll carry on hand working something, partly because the tool isn't set up and doing so takes effort, but mostly because I'm not in the habbit, although I probably should be. 

Using the sanding tool

The first snag is that while I'm sure I once had proper self-adhesive sanding pads, these are long gone. No worry, some normal 240 grit sandpaper attached to the sanding head with double-sided tape worked perfectly well - I was soon smoothing away under the shelves and in all the hard to reach areas. 

A technique is required - when using the tool, put your finger in the indented area, a bit further forward than you see in the photo. I kept my pinkie back for clarity, and also because I hadn't worked out what to do at that point. 

Another thought - use coarser sandpaper. 240 grit is fine, literally, but I could have gone for 120 and been fine. 

I've not worried about a second coat of sanding sealer, but the resulting bare wood look works well inside the coachs, so I'm happy, and will try to keep this useful tool closer for future jobs.


Monday, June 06, 2022

Raised panel detail


All the raised panel details are supplied as laser-cut card frets which need to be carefully removed and stuck into place. The instructions suggest using spraymount, but that pongs, and I've only got the repositionable stuff anyway, so they would peel off again. 

Instead, I used runny superglue placed in the wood/card join and allowed to run into it by capillary action. My Zap thin glue is passed it's best, but with some kicker sprayed on it, did the job. Mind you, the kicker stinks too, and probably isn't good for me to inhale. 

Although the position of the raised detail is etched into the wood, at the ends, the top horizontal is either too high on the card, or too low on the end. I just used a bit of spare fret to double the depth of the moulding, but on balance, I should have cut and lowered the horizontal part. It would have been easy to do, but only before the glue had dried. 

Another coat of sanding sealer will hopefully provide extra hold, and I'm still not convinced about superglue and wood...

Spare fret is handy by the way. No hinges are provided, but a bit of leftover fret does the job nicely. Waste not want not!


Thursday, June 02, 2022

Basic body construction


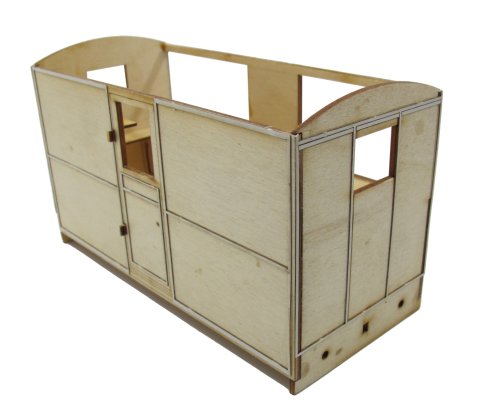
This is one of those projects that starts fast, but will slow down as I reach the detail stages. Some models are built as a series of sub-assemblies that come together in a wonderful crescendo, but this is the other way around. 

Sticking the main bits together should be easy, but for some reason, all the glues decided to misbehave (does this happen to anyone else?). PVA that normally grabs in 20 minutes dried without grasping anything. Super-phatic was better but still not working as fast as normal. 

Eventually I resorted to UHU superglue. I've never been a fan of superglue on wood - in my head it's not suppose to work on porus surfaces, even though loads of modellers use it very succefully. This time it did the job, so I really need to get over it.

Ultimatly, with a combination of adhesives, and the assistance of some clamps, the basic box was made up and doesn't seem to be inclinded to fall apart again. 

Inside, the counter is made up of five flat pieces supported by legs. The position of these is marked and to my surprise, a bit of Super-phatic on the top and they stayed where I put them without further support. 

All fitted inside perfectly, and while I was at it, I added the shelves for the back wall. No measurements or markings are provided for these so I worked by eye, using a gauge to ensure the shelf tops were parallel to the top of the wall - and hopefully flat enough that things won't roll off them. 

The finishing touch was a coat of sanding sealer to give me a nice smooth surface for painting later. Do this in a well-ventilated area, it's a bit smelly.

Tuesday, May 31, 2022

A mobile kiosk for Garden Rail


IP Engineering kit for coach No 7
Some time ago, I was looking at the IP Engineering stand and especially Tallyllyn No7, and thought it would be fun to build it as a mobile kiosk for selling Garden Rail. My plan is that it would sit at the end of the siding on my "Layout in a day" at the National Garden Railway Show, providing some more branded goodness for people to enjoy, and hopefully, photograph. 

I suspect that the pandemic then got in the way, but with the show hoving into view next month, I've pulled the kit of the shelf for, what I hope, is a speedy build. 


As with all IP kits, the parts are mainly laser-cut plywood. There's also some other stuff that's a sort of high-quality card, also cut, a sheet of acrylic and whitemetal axleboxes and buffers. Some 32mm gauge wheels will also be part of the package, but they are packed seperatly and I can't find them right now. Not that it matters, I'm sure I have others and it's not like this thing needs to roll anyway as I'll be modelling it with the canopy sides open. 

As with the other Garden Rail branded models I've built, livery will be white with home made transfer decoration. I'll need to make some miniature magazines too - but that's easy 'cos I have the files for all the covers!