Showing posts with label Porter. Show all posts

Thursday, March 18, 2021

Modified Porter

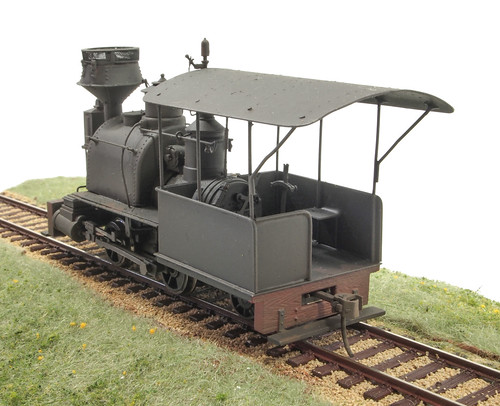
On30 Porter

Finally this week, an On30 Porter locomotive. 

Based on a Bachmann model, the version you see here has been improved with the aid of a Backwoods Miniatures dress-up kit that is sadly, no longer available. 

You can read all the details in this blog thread.

On30 Porter

One of a batch I built for a customer (before you ask, I don't do this any more), it got a little bit broken, but I fixed the body up and kept it for myself. 

One day, I will build an On30 layout. Something for small, and somewhat worn steam and diesel engines to run on. I keep photographing minimum space models and ogling them in magazines. It's nice to dream...

On30 Porter

Tuesday, December 30, 2008

Porter 6


Porter 6
Originally uploaded by Phil_Parker.
You should never throw anything away you know...

Porter 6, or the first engine for my On30 layout, has been weathered and is ready for service once I find a suitable crew. Wanting a really dirty engine once I had finished fixing all the bits the post office had carefully removed back on, I blobbed a bit of rust coloured paint in a few place before giving it a blast from the airbrush.

The main dirt colour is the stuff from a jar I tipped the remains of paint into while I was weathering the clyde puffer a few days ago. It's a dirt brown mix pretty close to the dark brown I'd normally use. And free 'cos I didn't have another use for it !

Earth colour under the footplate and weathered black along the top finished the job as usual and the result is a really filthy loco. A quick wheel clean and this model can go back in the box until we get around to building a layout for it.

Monday, December 29, 2008

Broken bits


Broken bits
Originally uploaded by Phil_Parker.
When I delivered the recent batch of Porters to their new owner I picked up the original model locomotive I built. After a trip through the postal system, it needed a bit of repair.

Somehow the model had taken a serious shunt which has removed the front plank, bell, whistle and destroyed the coupling. Apparently the cab was bent back as well but by the time I collected the model this had been bent back.

I'm going to restore these parts and weather the loco so it can join my fleet for the On30 layout. Once this is done I'll have cleared the test track for something new.

Friday, December 19, 2008

Boxed Porter


Boxed Porter
Originally uploaded by Phil_Parker.
These locos have to travel to sunny Leicester (The San Tropez of the East Midlands) tomorrow so they need to be packed up. To me, the obvious plan was to put them back in the nice padded Bachmann boxes the locomotives originally arrived in.

Snag is, thanks to the longer can, and in some cases, fatter chimneys they wouldn't fit. I needed to alter the foam packing. Fortunately this comes as three layers like a sandwich. The "bread" is flat foam and the "filling" is a nutritious fat lump with shaped holes in it.

I carefully marked out the new shape with a felt tipped pen and then tired hacking away with scissor. This was rubbish and untidy so I tried a X-acto saw. This worked better with some neat lines but even the finest blade snagged. Finally I used a cheap snap-off blade knife with the blade fully extended and used in a sawing motion. This worked a treat producing nice neat and straight lines. OK, straightish but they do the job and this model now travels reasonably securely.

Thursday, December 18, 2008

Finished Porter Lineup


Finished Lineup
Originally uploaded by Phil_Parker.
Job done - 5 detailed, painted and weathered On30 Porter locomotives.

Each one is a little different from its brothers yet they all look similar, as though a line had bought them all at the same time yet each had been used slightly differently. Perhaps some were better steamers than others and saw more action. Maybe the shed was a single line and drivers simply took the nearest loco out so on quiet days some didn't get exposed to the elements.

I like them a lot. Bother the stove pipe and spark arresters chimneys looks nice. The later look a lot better than the ones supplied by Bachmann though.

To take a closer look at these models, I have grouped the portraits together here for your enjoyment.

Wednesday, December 17, 2008

Wood pile


Wood pile
Originally uploaded by Phil_Parker.
Tradition has it that American steam locomotives burn wood. As the early white settlers built their way across the country, digging coal out of the ground wasn't a priority and there were plenty of trees to burn so that's what they did. Of course the trees were supplemented by arrows donated by a population who thought they had colonised the country quite effectively and didn't see why anyone else should have a go.

You may notice my entire grasp of US history has been learned from cowboy films, but as these are certain to be accurate this will do.

Anyway, the Porter locomotives needed fuel and that means I can't use my stocks of Welsh Steam Coal. Instead I spent an hour chopping up artists matchsticks to get enough for 5 locomotives. As well as cutting to length I carved and split corners so nothing looked to regular. Mind you, if you've ever split wood with an axe (ax for US readers who apparently have an aversion to vowels) it's amazing how square cornered the results are.

I did wonder about weathering the resulting wood but the colour is pretty good and the fuel wouldn't stick around long before ending up on the fire so it surely wouldn't get that dirty ?

Tuesday, December 16, 2008

Weathering Porters


Weathered Porter
Originally uploaded by Phil_Parker.
At last, a job that is quicker when working on a batch of models - weathering.

Only a light coat of dirt is required so I've been drifting this on from the airbrush. With 4 models to work on I was able to use most of a paint cup of "dirt" each time instead of abandoning most of it.

Today's problem involved temperature, or the lack of it. Our garage isn't heated and when the mercury drops, cellulose thinners cause enamel to go lumpy rather than watery. Switching to white spirit solved the problem and I sprayed away with the airbrush in one hand and a hair drier in the other.

Monday, December 15, 2008

Painted Porters

Painted PortersAfter a quick coat of primer the Porter locomotives received a blast of Precision black paint. This was left to harden overnight and then all the brown wooden bits and brassy metal bits were picked out by brush in the appropriate colours.

Thanks to my own stupidity the lenses on the headlamps had to be cleaned up 'cos I forgot to mask them when priming. Some watch glass cleaner applied using a cotton bud did this and I only had to scrabble on the floor looking for a couple of them when they flicked off the workbench. I'll try and remember to cover them up during the last stage - weathering.

Another touch is that various oil cans have been added to the locos. This, and the numbers, differentiates between some otherwise very similar engines and provide odd highlights of colour amongst the black.

Sunday, December 14, 2008

Filler strip


Plasticard filler strip
Originally uploaded by Phil_Parker.
Taking the steam dome off a Bachmann Porter exposes the worm gear of the mechanism. In the Backwoods kit a bit of brass is provided to fill the hole. I think that the design has changed slightly and pulling the dome off now takes a curved part away as well which runs down the side.

This part could be separated and glued back in place followed by the brass filler bit BUT that way results in a patchwork effect unless hours are spent with filler and files.

Far easier is to cut a bit of the thinnest plasticard 6.5mm wide and fit this over the area. Glued down and painted this looks right. I even contemplated riveting the edge but decided that that wouldn't fit in with the rest of the model.

The photos shows the wheels and waggly bits masked for painting. Since they can't be removed fully I like to get some protection on them from the primer - it's a pig to remove when it gets where you don't want it.

Friday, December 12, 2008

Bell rope


Bell rope
Originally uploaded by Phil_Parker.
Attaching a rope to the bell on these model locomotives is harder than it looks. Sure you can superglue a bit of black thread to the operating arm and inside the cab but because the thread is slightly stiff it tends to twist rather than hang in mid air.

The solution I use, which may not be the best and I'd appreciate others, is to brush superglue along it and then tug the "rope" into position with tweezers. Loctite do a nice superglue in a plastic pot with a brush in the cap that's very handy for this. A second advantage is that the hairiness of the tread is reduced.

The other operating control is a handle for the sanding gear. This is bent up from wire and hooked into the sand dome. A support is required at the steam dome and I use another bit of wire for this. Once painted the effect is very nice and these spindly bits add a lot of character to the finished model.

Thursday, December 11, 2008

Bringing things together

Cabs on the PortersHooray ! - I'm bringing the parts together now.

The cabs are back on the locomotives now. To do this the screws in the side of the firebox have to be removed. Then the cab goes back on and the screws put back in. Which would be fine if it wasn't that the screw holes are hidden behind the cab sides. Loads of fiddling and poking followed to try and do these up. Leaving them off occurred to me but this leaves the cab flopping up and down.

Next the footboards are made up and attached. Each of these are laminated from two parts. On the earlier models I used superglue for this but while it work fine, getting accurate alignment is difficult as the glue sets too quickly. This time I ran solder around the edges. At least I can heat it up and re-do the join. A final touch is to drill holes for the sand pipes - 18mm from the back end and 5mm from the side. More pin-vice inflicted blisters for me !

Wednesday, December 10, 2008

White metal bits on


White metal bits on
Originally uploaded by Phil_Parker.

So far building the Porters has been all about making up sub-assemblies. This one is at least attached to the loco.

The steam dome is a whitemetal casting needing only a little cleaning up and a hole drilling in the top for a whistle. A tap is fitted and the pressure gauge rescued from the spare bits pot.

The casting fits pretty tightly on the spigot so you can't really get it out of square which is a relief 'cos I hate doing these sort of jobs as it's too easy to get things looking fine while you build, only to show up wonky once the paint is on !

The water gauge and regulator come next. The gauge looks suspiciously generic to me and is fitted to the backhead in place of the vestigial moulded effort from Bachmann. I filled the spigot flat and superglued it in place which seems more than strong enough. Drilling a hole in close proximity to the gear didn't appeal and anyway, that metal is pretty hard. The regulator arm is etched and has to be bent and glued in place. I've never been convinced that I've ever got these right but they fit, look OK and anyway you can hardly see them on the photos of the made up models.

Tuesday, December 09, 2008

Chimneys


Chimneys
Originally uploaded by Phil_Parker.
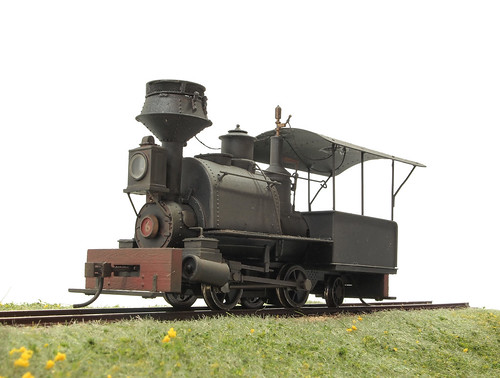
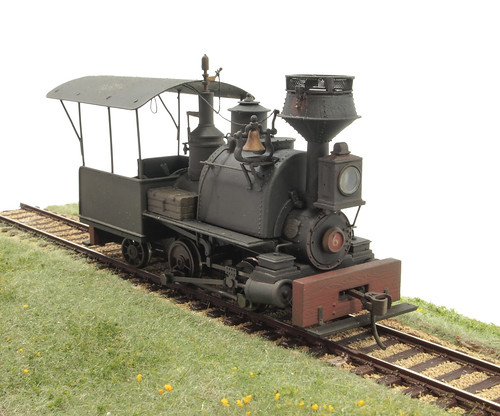
These are so much nicer then the original supplied by Bachmann. While their stovepipe funnel is nice, the spark arrestor version looks distinctly Disney rather than prototype to me.

As far as I'm concerned, a spark arrestor is a big fat thing atop the pipe. Backwoods supply a nice whitemetal casting and the builder is left with several options for topping this off. Last time I built up the etched cage but it was a fiddly awkward job and so it was deep joy to be asked to make the model as per the Backwoods web site. This loco has the basic arrestor topped with mesh.

I tried this out but the initial results looked untidy. Then I hit on the idea of using the top ring from the full cage, soldering the mesh to this and glueing it in place over the funnel top. Then the hinges and catch are extended around the lip using microstrip and the whole lot looks very neat and tidy - and more importantly like something that would work in real life.

The bottom is more fun. A hole has to be drilled up the centre to fit the locating spigot. I used a centre finding square to get the first pilot hole in the correct place and then progressively drilled out to 3.2mm. 3 chimneys is about as much as I could do in a single sitting with a pin vice - the palm of my hand was blistering nicely thanks to the back of the tool rotating against it.
Monday, December 08, 2008

Saddle tanks


Saddle tanks
Originally uploaded by Phil_Parker.
Converting Porter saddle tanks is more complicated than it looks. First the handrail is removed to be replaced with a finer one using knobs supplied in the kit. At the same time holes have to be marked and drilled on the other side, the new look locomotive will have double the hand holds of the RTR model. To get a nice level handrail the same height as the original I dug out the odd-leg calipers and scribed lines in the paint with them - so much easier than trying to measure anything.

Three of the locos have spark arrester chimneys which require the bell to be relocated to the side of the tank. Working out where the new bracket is to be fitted I went for a position up against the rails which allows me to brace the joint by sticking it to the handrail knob. The bell bracket needs a little fettling to fit to its new support. Finally a dash of filler sorts out the hole left from the original mounting.

Sunday, December 07, 2008

Bits of Porter


Bits of Porter
Originally uploaded by Phil_Parker.
What a lovely pile of model locomotive bits !

All the Porters have been tested and found working, their reward being reduced to a pile of parts ready for the transformation into beautiful finescale models. To keep track of the parts I used one of the Backwoods boxes as a tray and then some McDonalds wax paper condiment cups for the smaller bits.

Couplings and pony trucks have obviously been saved as they will go straight back on. Another pot holds saddle tank retaining screws, the fourth takes all those details that I'll re-use such as bells, whistles, plates and badges.

Apart from this I now have a selection of Porter cab and bunker parts which are, to me, pretty useless. Does anyone have a Porter with a damaged cab ? I may be able to help you out.

Saturday, December 06, 2008

4 Porter cabs


4 Porter cabs
Originally uploaded by Phil_Parker.
No, it's not a model railway version of the 12 days of Christmas, this is yesterday's model making output. 4 cabs for the batch of 0N30 Porter locomotives I'm currently working on.

I thought building these as a batch might speed matters up. It did but not by much. The gains come from having the tools to hand and knowing what to do rather than anything else. Perhaps 1 cabs worth of construction time might have been saved but certainly no more.

Some tasks certainly don't gain anything from repetition - that cab beading was a chore. Worth it though in the end though.

Sunday, November 30, 2008

Lightly weathered Porter


Porter 1
Originally uploaded by Phil_Parker.
Black locos always look odd as I've said many times before. You really do have to get them a bit dirty so the details shows up.

This model is requested with a light weathering job. To this end I wafted some dark grey over everything. Then the lower half of the locomotive had some dark brown and earth mixes blown on. Across the top some weathered black simulated the smoke dirt.

This really looks nice. Subtle but effective.

Painted Porter


Painted Porter
Originally uploaded by Phil_Parker.
Precision Black (not matt or weathered, just black) paint is an excellent match for the original Bachmann finish. A coat pulls the model together.

The buffer beams are picked out in dark brown and requested and the whistle and bell in brass. Strange how the noisy bits are shiny isn't it ?

Built Porter


Built Porter
Originally uploaded by Phil_Parker.
The etched cab attaches to the Bachmann floor once this has seen the attention of Mr Razersaw. First I had to add a sunscreen and reversing lever that I had forgotten in the last post. Putting the floor back in is fiddly and requires a bit more force than you'd expect.

Lots of other parts need to find their way onto the model. The running boards are the worst as they glue to the bottom of the saddle tank, which isn't all that good a fit. A touch of filler sorted out the gap on one side - it's important to get these level.

Cylinder covers are provided, nice but a bit oversize. They do give that "backwoods" look to the model and impart a bit of character.

Saturday, November 29, 2008

Etched cab


Etched cab
Originally uploaded by Phil_Parker.
The biggest job on the porter is building the cab. It's not difficult per se, just fiddly.

Since I'm doing an 0-4-2 the floor has to be shortened as it's supplied long for an 0-4-4 with rear bogie. Then the sides go on, beading is added using 0.7mm brass wire and then the uprights from the same stuff. The back is made up from part of the back intended for the longer model.

The roof is supplied pre-formed and riveted. Care soldering it in place and you end up with it nice and level - get that wrong and it will ruin the model locomotive.