For more years than either of cares to remember, my Dad has had a Clyde Puffer under construction. It's a Caldercraft kit which has proved to have many shortcomings a problems for the unwary model maker. For much of the time the boat has sat on the shelf while he's worked on other things but every so often the plan was blu-tacked up and another burst of activity occurred. The project has advanced in fits and starts but finally has been completed.
My role has been to offer encouragement and a bit of helpfull (sometimes) advice. Buying a completed Puffer from the same kit was also very useful as we could see where another modeller had made adjustments to get the thing built. I've also been in charge of painting and just before Christmas I had to set up the airbrush to perform the final weathering.
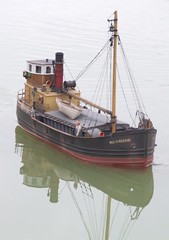
My brief was to make a mucky model. The guide was to be a set of photos taken of the "Vital Spark" from the 1990's BBC TV series. On a trip to Scotland years ago he'd taken some photos of the vessel tied up in Crinan harbour. For TV purposes the boat had been weathered heavily and looked good in this guise. The only change we wanted was a different name - everyone has built a "Vital Spark" so we picked "Auld Reekie" which was the boat's previous name and much more redolent of Puffers.
While this isn't a big model in boat terms, for me it's larger than anything I've ever weathered before. I knew that there was no point in trying to do much with dry-brushing techniques as this would take forever. My best option appeared to be to drift dirt on with the airbrush. That way I could build up the effect gradually and hopefully stop work before reaching the point where a repaint would be required to sort things out !
Normally I mix up a weak paint in a paint cup and use this. For the puffer I half filled a paint jar with white spirit and poured in some Humbrol 170 (Dark brown). After testing the result on newspaper more spirit went in to bring the level up to 3/4 of a jar. This was sprayed from a distance of at least 12 inches and often 18. That was to allow drying time from brush to boat which hopefully would impart a little texture to the results. The entire model was treated to this but unevenly. The photos showed that dirt seemed to work up from the waterline and anyway I liked the effect it had on the nicely detailed hull.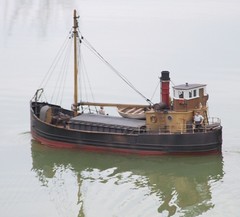 Any leftover paint was poured into an old jar and a new mix made up with rust colour. The paint jar wasn't cleaned out so some of the old paint contaminated the new, helping the blending process and avoiding sharp changes of colour. Extra attention was paid to hatches and holes in the hull with rust running down from these a feature very obvious on the real thing.
Finally some Precision "Weathered Black" was made up and smoke residues blown on across the wheelhouse roof and mast where you'd expect the smoke to stick. The areas around the coaling hatches took a shot too as I don't suppose the crew were too careful or cleaned up after fueling !
I think this job only took about an hour - shockingly quick for such a large task. A little finishing up on some detail work, the cap steps were dry-brushed with metalcote steel to represent wear of example, did the job. Close up the weathering look OK but on the water and at a slight distance I've really pleased with it.
Friday, December 26, 2008
Dirty Puffer
Subscribe to:
Post Comments (Atom)
No comments:
Post a Comment