Wednesday, November 30, 2011

Soldering handrails

Handrails

The biggest problem with this model locomotive were the missing bonnet side handrails. On the real loco they are pretty prominent so I couldn't just pretend their removal wasn't an in service modification.

Worse, the things are exposed and vulnerable, which is probably why they were missing. As bought they are moulded in plastic. Without access to an injection moulding machine, I knew it was time for some wirework.

Normally I make handrails for 4mm scale models from 0.45mm brass wire. 3mm scale models get 0.33mm so I guess I wanted something half way between these for 3.5mm. No chance, a quick measure of the existing ones showed that the 7mm scale wire - a whopping 0.7mm - was required.

Bending the top rail was complicated because the rails curve in towards the front steps. The verticals are complicated because the holes in the footplate and holes in the cab side aren't in line. As it turns out this worked to my benefit. I fitted the verticals leaning out and then the lower horizontal on the faces of these. The results looks pretty good as the outside edge of the horizontal rails are the same(ish) distance out from the bonnet sides.

All soldering was done with the wire in-situ thanks to the diecast body. Quick work, good flux (tried the non-acid stuff which was as usual, rubbish) and I didn't damage the paintwork. The handrails were flexible enough to be removed for cleaning in the sink followed by a blast of primer and thin coat of weathered black paint.

Tuesday, November 29, 2011

Cab work

Cab stuffThere's not a lot of space inside this cab - it's mostly full of diecast lump covering the motor and circuit board.

I'd been sent a figure to fit in there but the trip through the post had decapitated him so I had to find a replacement in my stock of little people. Luckily I had a HO builder who, once chopped off at the waist, "sat" at the controls with his hands on the desk. The yellow hard hat and blue boiler suit symbolises the model industrial locomotive driver for me. An older prototype would see the mans bonce protected by a cloth flat cap.

Anticipating the future weathering activities, I masked the cab windows by pushing in some tape and then running a knife blade around the inside edge to trim it exactly to shape. Of course this meant I couldn't be certain the driver was looking through the windscreen properly so I should have left this for a little later.

Monday, November 28, 2011

Y51100

Y51100My next project is a bit of a departure - a French model shunting locomotive, Y51100.

The basic model is produced by NPE Modellbau but this one appears to be second hand, or at least has been in a wars a little. Along the sides, the prominent handrails are missing. Holes are included in the buffer beam for pipes but there aren't any in the box too.

A bit of digging around on the web threw up plenty of photo galleries such as this one which shows that shunters around the world are very similar. Boxes on wheels that get dirty. There's nothing special about French grime it appears.

This is a popular prototype for models. DJH produce a whitmetale kit and Joueffused to make a ridiculously cheap version.

My job is to detail and weather this model. The first step is to take it to pieces, as one of the "musts" is a driver in the cab. Access to the insides involves undoing a mixed bag of screws until the thing comes apart. The main body is entirely diecast but comes apart easily enough. Inside is a can motor with two worms driving both axles. A circuit board handles the directional lights and presumably facilitates DCC installation.

Dismantled loco

Sunday, November 27, 2011

Flockburgh video

At Warley, BRM took some photos and video which have now appeared on the website.

The pictures are here

and Watch the video here (Flockburgh is 8 minutes in)

Making your own sand blaster

Sand BlasterWhile reading English Mechanics, I couldn't help photographing this delight - instructions for making your own sandblasting set-up using a grinder fitted with a wire wheel.

Basically, you drop the blasting medium down a funnel onto to the wheel which flings it at the item to be blasted. Health & Safety isn't forgotten with a see-through panel to protect the operator. I bet he needed it too - the media will get suck in the bristles and be flung out everywhere that the wheel isn't guarded.

The thing that strikes me about this is how incredibly messy the process would be. Did anyone every try this ?

Nowadays we do the whole thing in a sealed cabinet using compressed air. The mess is contained and the media can be reused until it wears smooth. Still, it shows ingenuity which is what made this nation great !

Saturday, November 26, 2011

English Mechanics - June 1938

English Mechanics QueriesQuerist requires a formula for working the pressure to eject a cylindrical pot stamping out of its die, in terms of the pressure required to stamp it out.

I'm glad I don't get that sort of question when people hit the Ask Phil button at the side of this page !

Browsing through English Mechanics magazine, June 1938 issue - I'm a bit behind with my reading, it's just the sort of thing you could write in and ask. Another questioner asks about making a xylophone and the third about wiring up an earth indicator. Flicking though the other issues that year, the questions all seem to be in the same vein.

This was the era of men in sheds. Inventors beavering away in the workshop at the bottom of the garden, every so often taking a pause to re-fill the obligatory pipe and take stock of progress. Electricity was still relatively news, refrigerators a luxury and bicycles or motorbikes the personal transport of choice for most people.

Can you image such a magazine in WH Smith today ? Even those that do science don't get into the nuts and bolts in the same way. Now we have people who are scared to build a plastic kit, then they were considering how to set up a production line for metal pots. Mind you, if you had to ask the question then I wonder how much chance there really was that you could use the answer. As it is, the reply involves pointing out that there are too many variables to be accurate. After all, are you stamping out thimbles or batch tubs ?

Still, at least there is an answer. One that even makes sense to me and describes a basic machine to do the job. I could probably head down to the shed and after a bit of hammering and drilling, have my own production line up and running in a couple of days.

I wonder what happened to the questioner ? In a couple of years time he would probably be involved in fighting from a muddy trench wishing he had stamped out a few more metal pots to wear on his head. It's quite poignant really.

(US readers might point out that they had "Popular Mechanics" magazine but I'd suggest that it was more colourful and quite a lot less hardcore shed man than the English version. A lot more readable though.)

More on English Mechanics here.

Friday, November 25, 2011

A foreigner teaches me a bit about compensated chassis

Western loco

"A Great Western loco on your layout ?" I hear you cry, "How could such a thing happen ?"

Well, I'll admit that something Great Wobbly turning up on one of my train sets is unusual. It's not that there is anything wrong with GWR stuff, it's just that all the other companies were better and GW fans are a but too fundamentalist for my liking.

Anyway, at Warley (yes, I'll stop mentioning it now) Peter Stratford was manning the 3MM Society stand behind our layout. On it he was merrily building rolling stock, assisted by his young daughter. At 12 she shows many a grown-up how to assemble a Parkside kit. Among his collection was this 94xx Pannier Tank and coach which he was keen to see visit our bit of Scotland.

Late on Saturday, when I hoped no-one was watching, we gave it a go. And it worked. The loco ran happily around the layout. Peter was pleased as he doesn't have anywhere to try it at the moment so the fact it could handle our sharpest curve was good news.

As someone who struggles with flexi-chassis construction, I was interested to note a few differences from my own methods. First, he doesn't use hornblocks for the wobbly axles, just bearings that have been opened out top and bottom. Movement is minimal, nothing more than a couple of mm, my models have twice this which makes fitting pickups awkward but I can't see a disadvantage with making use of the full treavel of the 4mm scale hornblocks - or is there ? Also the engine, being whitemetal, is very heavy. Twice my engines weight at least.

Some lessons to be learned there perhaps. Not enough to convince me to got GW though !

Thursday, November 24, 2011

Flockburgh Fisheries Chimney

Flockburgh ChimneyAfter all my messing around with cardboard to produce a chimney for Flockbrugh Fisheries, I solved the problem with a simple action - I handed the job to my Dad. After all, I had enough to do on the train set and it would be a good way to keep his aged brain ticking over.

Of course, pretty much the first version he made was right. All I had to do was cover the card shell with plasticard and paint it. I did take the opportunity to build the top of the stack (is there a technical name for this ?) with multiple layers to make it look a bit fancy. My study of photos showed that factory owners liked to show off up there - presumably because everyone could see where the money had been spent.

Anyway, after a little ground clearance and a touch of trimming at the back, it's in place hiding the gap in the sky where the baseboards meet. I didn't do a great job of matching the brick colours but that can be sorted eventually. In the meantime it's just a more modern addition to the factory to replace the one that nice Mr Dibnah modified.

Wednesday, November 23, 2011

Matchbox shunters

Matchbox Shunters

A little eye-searing colour for a Wednesday morning ! Bet that woke you up...

One of the cleverest conversions I've seen for some time was sat next to us at Warley on the British HO 1:87 scale stand (the stand was full size, it was the models that were 1:87 obviously)

A diescast shunter from Matchbox (MB 24) had been motorised with the guts of an Underground Ernie inspection vehicle. Plastic bufferbeams made this into quite a presentable freelance industrial shunter. A similar modification has been performed on the front model but as this came from a set, it's a plastic rather than die cast metal locomotive . I'm intrigued that Matchbox bothered to produce the model in two materials since this would double the investment in tooling.

Anyway, I had one of these loco as a kid but only the metal one. Had the Steam engine and GWR saddle tank too. Having always wondered if it would be possible to motorise the models and build a little railway, I'm now wondering about a project to make them into something better. Sadly the plastic models are like hens teeth and you can't easily detail the metal ones.

Needless to say, having seen these models, it turns out that conversions of this model are quite popular with the 009 community. Maybe the Handyman Hall railway needs another bit of motive power ?

More information on the Matchbox shunters here

Tuesday, November 22, 2011

Flockburgh Souveniers

Flockburgh souveniers

Flockburgh is a seaside town so it stands to reason that visitors would be able to buy some delightful tat as souvenirs. To provide some atmosphere, we've accumulated a collection of these which are displayed along the top of the fiddle yard display box.

Of course, Flockburgh is a fictional place so all of these goodies have been converted from souvenirs from other towns. Luckily for us, these things are made in huge quantities very cheaply. Then they are handed to poorly paid people who paint the appropriate place name on.  As these aren't under the glazing on pottery items, a quick rub with a fibre pen and some Brasso gives me what is described in modern parlance as a "white label" item. Being made by the ton means they turn up for no money at car boot sales and other outlets for junk, for no money, so we've amassed quite a selection. Those in the photo are just the new items for Warley.

A few moments work with a small paintbrush gives a reasonable piece that could very well have been bought from a shop in the town to commemorate a visit. The fact that the painting can be a bit shoddy doesn't matter - in many ways it makes them more convincing.

The pile is enough to convince many visitors that we have modelled a real place. Finescale anoraks on the other hand are completely unimpressed. At a recent show someone who had spent the previous half hour bending my ear about how great he was building 009 chassis was especially scathing. He wandered off convinced that I didn't take things seriously enough to warrant further enlightening about his achievements. If I'd realised they would have that effect, he'd have had his attention drawn to them 29 1/2 minutes earlier !

In addition to the little items above, we also have a couple of "Flockburgh, Home of the Happy Haddock" sweatshirts that occasionally make an appearance at shows. Sadly I'd don't have a photo of myself wearing one, but if any blog reader happened to take one at Warley, then let me have it and I'll post it up here if it's not to embarrassing.

Monday, November 21, 2011

Warley 2011 roundup

Warley MuffinCake: Excellent. Chocolate muffin with white choccy bits and gooey choc in the middle. Offered as the second course at lunch. You could have had yogurt but why would you ? Made excellent afternoon tea.

Best bits: Meeting lots of people who read this blog (Hello everyone, thanks for dropping by). Hearing lots of people say nice things about the layout. Getting away at the end of the show by twenty to six thanks to some fine organising of the traffic.

Worst bits: Opening at 9am thanks to the motorcycle show. Apparently biker are scared of railway modellers so we have to go in first in case we rough them up. Being clobbered by a falling 3mm Society stand. The steam locos on the layout gradually giving up due to various mysterious ailments.

Favorite Layout: Mannin Middle. Top pun for a name (the operator, a man, is in the middle of the layout, gedditt ?) but most importantly, a cracking little Isle of Man layout. Looked good. Ran well.

Favorite Moment: Watching Chris Nevard apparently setting up a photo of; nothing. Just an empty test track. I'm sure there was a reason.

Basically, it was a good weekend, although I was shattered by the end of Saturday. The attendances were as good as previous years which would seem to be a good thing. Lots of people were carrying lots of goodies.

The layout was a bit problematic. Diesels ran well, steam a lot less so. I really can't build reliable compensated chassis and when you want to rely on them this is A Bad Thing. We have thought about this and with a bit of reworking, the layout could accommodate more early oil burners. Extend the head shunt, move the church a couple of inches and we can get a loco and two wagons in and we have a plan.

Thanks again to everyone who said hello. Special thanks to Mike for being our third operator and doing a heck of a lot of playing trains over the weekend. He seemed to be enjoying it though. Perhaps it was something in the muffins.

More photos on Flickr

Anyway, I picked up a few other ideas so stay tuned for the rest of the week.

Sunday, November 20, 2011

Weathered Teak

Teak and Smoke

Not being familiar with real LNER teak coaches, I was interested to get a proper look at some during my trip on the Severn Valley Railway. Varnished teak is an interesting material and very popular with modeller. The trouble is, it's a pig to get right and this isn't helped by people not understanding what is right.

As you can see, the wood changes colour from the nice uniform shade seen on most model railway coaches to a patchwork of different browns. I can't work out if the wood lightens or darkens with age - it looks like the former on some vehicles but some of the descriptions I've read suggest the opposite. There's certainly a darkening where muck has got into splits in the wood and seeped along the grain.

Of course, there is an extra factor at play here. Restoration. These coaches have been restored and maintained in an era when the wood is harder to get hold of and we are more sensitive to keep things original. Thus, panels will have been removed and replaced rather than just thrown away. I suspect this accounts for some of the patchwork effect you see in the top picture.

How would I model all this ?

Dunno. I saw Pete Waterman perform a demo using his brand of teak undercoat topped with brushed on coloured varnish. This looked pretty effective but wouldn't replicate the variations in tone I saw. Maybe these didn't happen in real life, or maybe we just prefer to remember things looking rather nicer than they really did.

Teak Doors

Saturday, November 19, 2011

To cover the layout or not ?

Flockburgh coveredFlockburgh is situated quite near a huge NEC door this year at Warley. Worried that muck, dust and rain might blow in and damage things, we bought a 5 by 4 metre thin polythene sheet to cover the model up. In the erie sodium lighting, it looks quite spooky as the gossamer thin plastic billows around.

Is this a good idea though ? Normally we don't bother covering the model overnight at shows yet others go to great pains to do this. I can understand traders being keen - it's a security measure more then a hygiene one, but I've always felt that with layouts you stand more chance of damaging detail hauling sheets on and off the model.

The other thing is that there is likely to be more dirt around when the public are in than when the hall is empty. Therefore you'd be better off covering it when the filthy people are wandering around. At least that way they won't be able to see anything to complain about !

So, do you cover or not ? And why ?

Friday, November 18, 2011

Nearly Warley

Yes, this another post about the Warley Model Railway Exhibition taking place at the NEC this weekend. I know you've read the same sort of thing on other train blogs and if you aren't going or even don't live in the same country, it's probably not that interesting. Sorry about that.

Flockburgh Brake Van

Anyway, I will be exhibiting Flockburgh at the show. Stand E54, about 2/3rd's of the way across the hall from the main door. Later today we'll load it into the car and trundle through some of the back-roads of Warwickshire to the big tin shed in Solihull, next to the airport.

The wheels are cleaned, some of the jobs are done and hopefully everything will be working as you burst through the doors at 9am (yes, 9am !) on Saturday morning. Please come and say hello, it's nice to meet people who read the blog. At least that way I can believe that there are some real humans out there !

Builders Yard

Over on the Hornby Magazine stand (A12) I'll have the Skaledale conversion builders yard on display. We reckon it will fit in one of the glass cases so you can have a proper look and say "It's smaller than it looked in the magazine".

Loco crossing viaduct

Making it's exhibition debut is the Handyman Hall railway. You've seen it in print and on this blog, now have a look at the real thing. I've had to sort out some light as the NEC illumination is a bit rubbish for this sort of thing. In my case, this is a desk lamp rather than anything more sophisticated. I'm not anticipating taking the layout out on the circuit so no great efforts are going to be made in that direction. The model might even be operating, such as it is, if you ask someone on the stand nicely. Well, ask them to turn the controller on anyway.

Warley Show Website

Thursday, November 17, 2011

Jinxed cardboard

ChineyWhat you see before you is my first attempt at the Flockburgh chimney. You'll probably notice that it looks bit too tapered. I thought so too. I can't find a plan for a tall chimney so I'm having to make it up as I go along.

It wasn't easy to get this far either. Every single part I cut out went wrong. Either it was badly measured or I simply didn't cut it right. Absolutely nothing worked. There's not a single part that wasn't done twice.

Anyway, I had another go. This time I wanted the same thing except with less taper. My latest attempt went right first time.

Except that when I compare it against MK1, the taper is the same. How does that happen ?

Jinxed cardboard. That can be the only answer.

Wednesday, November 16, 2011

Thunder Tiger people

FishermanPaul asks:  Great website.......I am new to the model boat world and I have acquired a good example of the Thunder Tiger Catherine which I plan to light, rename and add a few extra’s Including a crew.
I need to acquire some rigging eyelets because the rigging was damaged in transit, can you help?
Finally for now in your view what is the approx. scale of the Thunder Tiger Fishing boats?
 
The first part is easy - I'm pretty certain the eyelets are available from DIY stores, or at least something very similar is. If you only need a couple though, I'd be inclined to bend them out of wire rather than buy. Form the main look around a drill bit and then twist the tail with pliers.
 
People are harder. Looking at my model I've used some 1/24th scale sailors from George Turner, set 2422 but repainted. However, George is giving up figure production apparently to concentrate on slot car production. You might get lucky and he will have some left in stock. If not then it's going to be more of a challenge. You might like to try Prieser as they do some good stuff and not too expensive for what you get. The slightly cartoonish President Obama might be fun to use somewhere or you can do your own thing with some nudes.
 
One handy hint with figures - to work out the scale, measure a door. This is probably 7ft tall, possibly 6 1/2ft on a boat. Using these numbers you can quickly divide one into the other to get a scale no matter what the model. If you know the door height, take a ruler to a toy shop and measure the little people (the ones on the shelves, not the customers) and you might be surprised what will fit in.

Tuesday, November 15, 2011

Handyman Hall and oil tanker in Hornby Magazine

December already for the magazine world and issue 54 of Hornby Magazine sees me building a Peco Wonderful tank wagon. It's an old kit but still available. Despite its age, this is a very advanced model with working leaf springs, something I don't think is available anywhere else. Even the finescale boys who do spring their rolling stock use a wire behind the W-irons rather than proper, working springs. Maybe we've stolen a march on the MRJ crowd with this !

Down at the clinic I've explaining how to avoid burning your delicate fingers while soldering, stopping your paint from drying out, measuring rail and making baseboards. This last answer sees the first appearance of our late lamented cat Tiger in print. When I was snapping a picture of the part-built boards, he decided to wander up and sit on the corner. Two and a half decades later, he is seen posing in the sunshine.

Finally, this issue is the start of the Handyman Hall Railway series. We move from plywood bits to some rough scenery and a big pile of mess. Unlike the slightly random ramblings here, in print you get nicer pictures and properly edited text. Next month, more scenery, water and buildings.

The Handyman Hall Estate Railway

Monday, November 14, 2011

The Warley job list

A few weeks ago at Taunton, I started a list. A bit like the one that German starts in the Dad's Army film but without Pike's name on it.

Under the miss-spelt title, I noted the following tasks:

  • Clean the display box glass
  • New display box sign to replace the one that got wet
  • Build a chimney to cover the baseboard joint
  • Reverse the Jinty polarity
  • Put an extra magnet in the headshunt
  • Rewire the Class 20
  • Re-mark all the uncoupling magnets

Oh, and finish off the detail on the scenic extension.

Still, I have all week to do this don't I ?

Sunday, November 13, 2011

International Model Boat Show 2011

Pigeon PieAs the winter arrives, it's time for the model boat show. Just as we are all thinking "It's a bit cold so I'll give a trip to the lake a miss today.", we are gathering in a big shed in Warwickshire to stock up on goodies to build the craft we plan to sail when the temperature picks up in a few months.

The format was the usual mix of trade stands and boats on display. A modest poll is provided and unlike previous years, it's seen a lot of use. My attempts at booking a sailing slot on the Saturday afternoon we fruitless as all the frequencies had been bagged. The same story applied on Sunday. I think this is Neptune telling me to get a 2.4ghz radio set !

One of the high points was visitor trying to persuade me to sell him Pigeon Pie. He and his wife  liked my model a lot and the kit has been discontinued, although not for ever it appears, so there wasn't an opportunity to replicate my efforts. Needless to say, there was no deal. This is the pride of my fleet and not up for grabs. It's really nice to be asked though and certainly good for the ego.

Elsewhere, the highpoint was to see the ex-HFM Pilot Boat is being re-released in much improved form. I've ordered one as I really love pilot boats. Long term readers will know that my last attempt was a bit of a disaster but I'm confident that this time I'll get something on the water. Looking at the prototype racing around the pool, it really looks the business.

I've been taking time to look at other projects in my personal boat yard. Three Brede lifeboats and a Tyne that happens to be the same model I have plans for for a start. I might not make immediate progress but at least my photo collection is growing and one day, I will get started.

Talking of photos: Have a look at my collection on Flickr.

Saturday, November 12, 2011

Station and Railcar in Hornby Magazine Yearbook

Christmas time is here again and that means the arrival of Hornby Magazines yearbook.

This year the publication differs in having a central theme - the building of a layout based in ex-GWR territory. Both the "How to Guides" and prototype information revolve around the project and give reader an idea of the scope of such a project both from the research and building ends of the job.

My contributions are assembling a Ratio Station and detailing a "Flying Banana" railcar. The photos have come out very well and I'm very pleased with the look of my work.

The railcar is a little unusual for a magazine project because although I tried flush-glazing it, this didn't work so I reverted to the supplied plastic item. I make it rule to improve a model when modifying it and if something isn't going well, then stop it. In this case, the glazing kit didn't fit well so I decided that non-flush glazing was better than badly fitted windows.

Maybe this means there is a gap in the market for a better set (some of those nice laser cut ones perhaps) or maybe just a new model. Railcars are lovely but not often seen on layouts. Apart from Flockburgh of course. And I have a GWR steam one in my kit stash. And a couple of G1 Bananas to look at some time. And a 3mm scale one I can't remember why I bought. Oh, and that 7mm kit for an early banana.

Hmmmm. Perhaps it would be better if no-one produced a new RTR model please. Until I've finished mine at least !

Amazon has a really good deal on the yearbook.

Friday, November 11, 2011

A tiny little book

Preparing Pigeon Pie for it's appearance at the International Model Boat show this weekend, I realised that whilst I'd painted a resin figure bought from a dolls house shop to lounge around on the desk, she was reading but I didn't have anything for her too read. I couldn't put the model on show without sorting this out. If I did the appearance would be of a bored teenager grumpily lying on the deck rather than someone enjoying their trip down the river.

Someone said every problem is an opportunity and this gave me an idea. I've written a novel, so how about giving my miniature reader a copy to enjoy ?

The cover art was dragged into a DTP package and reduced to 1/12th scale. At the same time I did a copy of the first title page in the book. Both were printed on photo quality paper to make sure that the resolution was high enough for them to be read. As an added bonus, the shiny paper gives the correct sheen to the paper.

After cutting out the cover, I stuck a slip of plain paper inside it but only to the back. The real book has an inner cover and so it's nice to be able to fan the pages a little. Having said that, being able to flick through the entire volume would be a step too far so the rest of the pages are represented by a rectangle of Daler board which is solid enough to fold the spine around. On to this is stuck the printed inner cover and the job is complete.

With this my scene is complete - our reader is about to embark on a new novel as the vessel she is travelling on potters down the river on a lovely summers day.

Thursday, November 10, 2011

ex-LNER Class C15 locomotive

Model C15 locomotive

Finally, after rather longer than it should have taken, the C15 locomotive is finished and has been passed on to its new owner. After final assembly and a little light weathering, it looks rather nice. It's ABC gearbox makes it move like a Rolls-Royce too.

I didn't go to town on the dirt. This is a well-cared for locomotive which is doesn't gleam but at the front there is dirt and a bit of rust. The underframes are grey and brown with a bit of earth colour blown on with the airbrush. This creeps up the bodysides a bit as would happen in the real world. Along the top is two shades of black and a touch of gunmetal for sparkle.

On delivery, I found the bogie spring needed quite a bit of adjustment to keep the driving wheels in proper contact with the track. It might be that the spring needs to be shortened, but it can't be left out altogether as the bogie will leap around if some of the weight of the loco isn't transfered to it. I put some lead in the body but as a DCC chip was to be fitted, I left plenty of space for this since I had no idea how big it was ! With the chip in, John is filling the boiler with lead and this should provide loads of tractive effort.

Hopefully the model should be running on the L&WMRS layout Kimble at Warley. With 4 or 5 coaches on the back it should look lovely.

The kit is still available from Connoisseur Models.

Wednesday, November 09, 2011

Coaling up

Coal FoamAt the back of a tank loco is space for coal. On the C15, it's a gaping hole that could swallow a couple of full-sized lumps of the stuff.

I'm not depleting my supplies of real Welsh Steam Coal (honestly, it's what I use, get in touch if you'd be interested in buying some) that much, so I filled the hole with foam rubber filched from some packing suitably chopped about to look like the coal is sloping toward the bunker whole. Somewhere I have some dense dark grey but couldn't find it so this time it was a medium density powder blue. Never mind, a coat of Humbrol black acrylic sorted this out although it looks a lot like "liquid lead" in the photo, the filling weighs nothing.

Coal coalThis was topped with broken up coal stuck in place with lashings of watered down PVA. A 50/50 mix of water and glue plus a drop of washing up liquid to reduce the surface tension. The water came from the pot I cleaned the acrylic brush in so it was nicely black. I'm hoping this adds extra shadows or something. Well, it seemed like a good idea at the time.

As well as saving coal, this has the added advantage of not adding a load of unwanted weight at the back of the engine. I'm nearly done and don't want to be re-balancing a model see-sawing on it's drivers.

Tuesday, November 08, 2011

Electric pony

Electric PonyWill 4 wheels on a model locomotive provide enough pickups ? I don't think so and with another 6 to choose from on the C15, I ought to be able to do better.

At the front, the bogie is attached to the body rather than the chassis. If I try and wire that up there will need to be provision for the chassis to come out and disconnect. Maybe something involving micro plugs and sockets or very long wires might work but both seems a lot of trouble. Fitting invisible pickups on the thing would be a challenge too.

The pony truck at the back looked a better option. It's bolted to the chassis and flops around so will stay on the rails nicely. I added a load of lead to the nickel silver - not that easy as you have to put the cutouts in to access the chassis retaining bolts - to improve road-holding.

Electric collection comes from a couple of PCB off-cuts with phosphor-bronze wires. These have the added advantage of providing some side-springing to the keep the axle centred in the narrow truck.

So now 6 of the 10 wheels are doing something useful. Let's hope this is enough.

Monday, November 07, 2011

Inside the cab

Loco cabCab interiors on preserved engines are lovely shiny places. Because the footplate crew are volunteers, a bit of elbow grease and Brasso isn't a problem. Indeed, they are so chuffed to be there and allowed to be in charge of a real life locomotive, that they want to show their steed off to the public and make sure it looks it's best.

The cab of 828 is a good case in point. You can see your face, or any other part of your body you care to examine, in the pipework. The cab sides are clean and you can easily see that they are painted with a woodgrain effect. Even the backhead has had attention.

In real life, things weren't so tidy. Crews might have been a little house-proud when they were assigned to a single engine but once you were rota'd on to anything that moved, the impetus to spruce it up wasn't really there. The next guy on the footplate might benefit but you could spend your life polishing and by the time you saw your engine again, the work would have been undone.

On the C15, I wanted to show a working engine. It's not decrepit but the cab is a dirty, dusty place. The sort of effect you'd get by shovelling a few tons of coal from one end of your living room to the other.

After a little discussion on a forum, it was decided the the cab sides would probably be painted beige/cream above waist height. Left on it's own, this would be too bright but a wash or two of dirty black toned it down and gave a pleasantly uneven finish. Once the paint had dried but not hardened, I brushed several colours of weathering powders and some black powder paint around to make things even dirtier and properly gritty. It's not clean but not horribly dirty either. Hopefully more real engine than museum piece.

Cab interior

Sunday, November 06, 2011

Caledonian 828

Caledonian Smoke

Last week I went on my first railtour. It was a bit of an accident as I'd been asked along to chat to someone who wanted a loco built. Since he was running the tour, it seemed like a good idea. Initially I thought it was just a quick chat on Bewdly Station on the Severn Valley Railway while we looked at a real engine. So it was that I arrived at 8am to find a nice blue loco standing under the water crane. Gradually, people turned up and suddenly the chat included a train ride and I was also fitted up with an ornage hi-viz tabard.

We boarded the 4 coach train and headed up the line. In the middle of nowhere, the train stopped and we clambered down to the lineside. The train drew back and then went forward so the crowd, who had assembledinto a neat line so as not to block each others shots, took photos. It then went back and we repeated this. 3 times. Then we moved along the line a few metres and repeated the exercise.

After half an hour we climbed aboard again and headed to the Kidderminster. The loco was turned while we watched. Most of us filled up with hot drinks as well. Then we returned to Bewdley.

At this point most of the party left to take up vantage points on the platform or lineside. I stayed on board with Trevor and looked through Geoff Silcox amazing collection of industrial railway photos. He managed to spend a great chunk of time in the Wlesh coalfields during the last days of steam and captured images that won't be seen ever again. As well as taking f ine railway enthusiast snap, he also managed to get some atmosphere into the pictures. This might not make them helpful for modellers fascinated by the number of rivets, but to those who will never experience such lines, they are invaluable. To be honest, most of them should be hanging in galleries in place of some of the thing that pass for "art". In fact if there were of a gritty inner city rather than gritty coalfield.

While we enjoyed the photos, our train had travelled back and forth through the station about half a dozen times (I lost count if I'm honest). At this point the party got back on board and decided to break for lunch. Sadly, I had to attend a meeting in the late afternoon so had to leave to get back to it so left them to fill thier camera cards. Next time though, I'll make sure the day is clear.

I did manage to bag a few photos I'm proud off, 2 of which are shown here. Click for bigger versions and let me know what you think. There are some useful detail shots to come later in the week too, so watch this space.

Caledonian Autumn

Saturday, November 05, 2011

Book Review: Weathering Locomotives by Tim Shackleton

The latest in the "Aspects of Modelling" series from Ian Allan publishing is the well publicised  Weathering Locomotives by ex-MRJ editor, Tim Shackleton.

Any book on model railway weathering is always going to be compared with "The Art of Weathering" by Martyn Welch. The later is seen by many as a bible of weathering techniques. Most fine scale articles include the phrase "Weathering techniques from The Art of Weathering blah blah blah". Now it is an excellent book and my copy is well thumbed, but the methods described are IMHO more suited to 7mm scale models and larger. Trying to apply them to 4mm and below risks over-cooking the model. The detail needed in the smaller scales simply isn't as great as you are effectively viewing the trains from further away, which softens what you see. It's not for the time-starved modeller either.

This is where Mr S's book scores. He takes a more practical approach for the 4mm workers. For a start, his palette has only 4 colours on it: Matt White, Matt Black, Matt Leather and Metalcote Gunmetal. All are obtainable from a reasonable model shop. You will need an airbrush though, and apparently a pretty good one. My trusty Badger 150 gets a mention but really I need something double-acting. The spray isn't the only tool mentioned, lots of scraping and brushing to move paint around enters in to the task so prepare for a trip to the makeup counter if you want a full set of tools - although doubtless a trader or two will have been to Boots and then re-sell the results on their stand at a show for a decent markup.

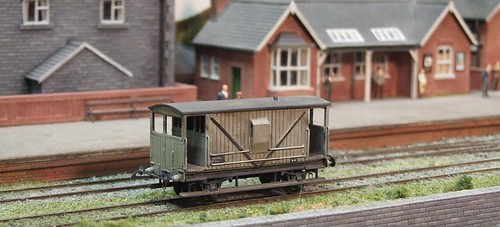
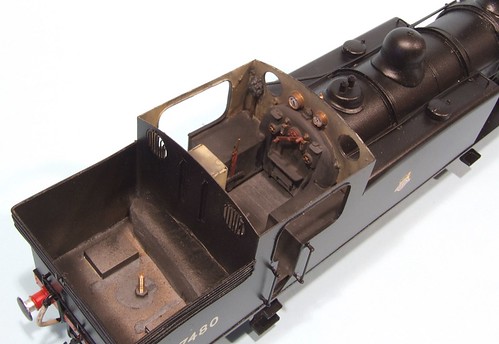
Much of the book is spent explaining how weathering and dirt affect locomotives at various stages of their life. Whilst using photos as a reference is mentioned, this is an excellent way of explaining what you are seeing in a photo. Most of the time people tell you to model what you see. I remember my art teacher doing this for drawing and while I got the idea, turning a 3D item into a 2D sketch of any quality always defeated me. I quite enjoyed this part of the book as it's well written and a good read.

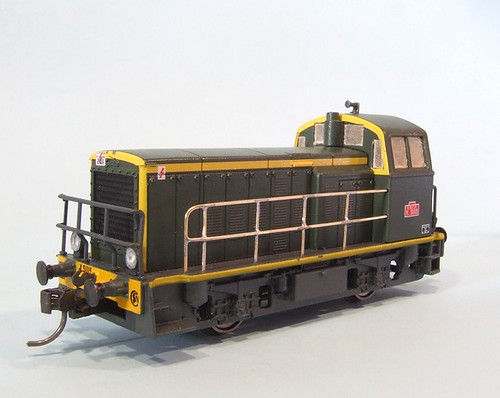
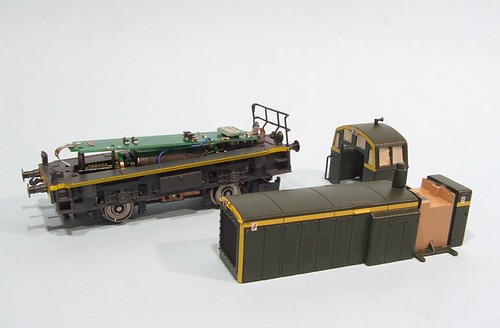
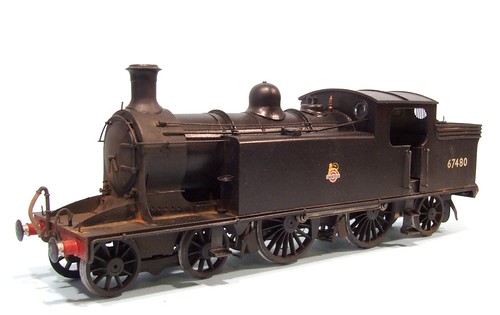
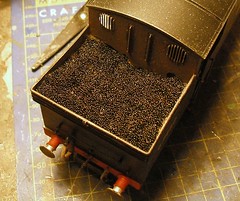
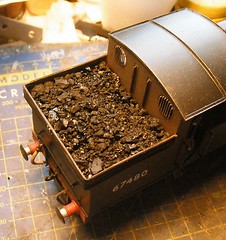
There are a number of worked examples showing dirt being applied to various locomotives. Mostly this involves airbrushing paint but American "Filter" paints are also tried. To be honest, I didn't think the results were that great on this one. The 08 model didn't look much like the photo at the start of the piece - but I can see the idea and even if I don't want to copy the technique, I know I'm not interested so have probably saved the cost of the book in materials.

Photographic quality is excellent throughout, not something to be said for The Art of Weathering which Wild Swan produced largely in black & white, not that helpful bearing in mind the subject !

One point I would disagree with the author on is not wearing a face mask while spraying. I know he normally works outside and suggests that this allows the vapour to dissipate, but I'd argue that you suck air in from a reasonable distance, certainly the same sort of place that the airbrush is laying paint. Maybe I'm just over-cautious, but I don't see a spray mask as an optional extra.

Overall, I'm happy to recommend the book. I paid good money for it and feel it was well worth it. If nothing else, it is an enjoyable read which provides plenty of food for thought even for someone who has been weathering stuff for years.

Buy Weathering Locomotives from Amazon

Friday, November 04, 2011

Fantastic Mr Fox

Fox Transfers BR crests and numbersSometimes I am to forward planning, what Archimedes was to ventriloquism. That's why a few days ago I was looking through my folder of transfers (decals to US readers) and realised with surprise that there were no BR numbers suitable for an O gauge model steam locomotive. Some of the largest BR crest from a OO sheet would be fine, but no digits.

A quick telephone call to Fox Transfers found me talking to a very well-informed lady. She could supply me with a sheet full of a specific size crest, or a mixed sheet. I went for the later as I recon there might be some G1 projects that could use the larger sizes. And I didn't know exactly how big I wanted so this kept my options open.

Numbers can also be sent in mixed or single sizes. I knew, thanks to the instructions, I wanted 8 inch and so opted for a one size sheet. I was then promised that they would be sent out as quickly as possible.

As quickly as possible turned out to mean a long envelope arriving in the post the next day. My transfers were packed with a sheet of black plasticard to stop the GPO folding them in transit. Everything arrived in perfect condition.

The crests are interesting. The loco was requested to be supplied with early BR versions. This means the "Lion on a unicycle" version. More importantly, for really early crests, I'll be using the version where on both sides of the loco, the ferret faces the smokebox. Originally this was the plan but when the Royal Heraldry people told BR that this counted as two different designs, presumably requiring two different registration fees, the railway company decided on a single version which faced the front or back of the loco depending on the side it was applied. I quite like the anomaly though and it's a conversation point for those looking at the model.

Thursday, November 03, 2011

Westinghouse pumps

Westinghouse ModelAttached to the C15 smokebox side is a Westinghouse pump, a common feature amoungst Highland engines.

The kit makes provides a couple of whitemetal castings and some rough instruction for fitting. Not being familiar with this fitting I looked at photos and concluded that they were bracketed to the appropriate bit of engine and most importantly, held vertically in all directions. If you just fit the bits then the pump will lean as the smokebox at this point isn't vertical.

Westinghouse PumpMaking up a spacer from spare etch wasn't too difficult but I still didn't have much guidance on the plumbing. In the instructions there is a side view but it doesn't make it clear where the top pipe goes in. I took it around the back of the disk on the top of the pump which is probably correct, although having seen a real Westinghouse, I'm not so sure now !

Wednesday, November 02, 2011

Pipes and wire

SidePipeworkBack at the C15 locomotive, I've been fitting the pipework that runs along the side of the boiler. There's quite a lot of it and working out where it should go has been a problem. Put simply, the pipes emerge from the cab front and end up in the smokebox. The route they take is the issue.

Looking at the prototype photos it appears that no two locos are the same. It's possible that they even changed during the live of the engine. The basic route is the same but fitting seems to have been a pretty ad-hoc thing with many variations on the bends in the pipe. Some look suspiciously like the pipe hasn't seen a proper pipe bender. Most don't do anything for the clean lines of the engine, especially the larger pipe which runs at all sorts of funny angles when it leaves the cab.

On the model, all this is produced using various thicknesses of wire. I always use stuff supplied straight rather than rolled - this job is hard enough as it is without acting like a brass snake charmer !

Another issue is fixing the pipes/wire to the boiler. If there are clips, and I assume there are, then these are tiny and not visible in pictures. I just soldered the wire wherever I could secure it and hope no one notices.

Tuesday, November 01, 2011

How big is a tank driver ?


Don asks: I know this is probably a silly question but could you tell me what size figure you would use with the hachette tiger 1 ? Height in mm please. Thank you for your help.

Not a daft question at all Don. The Hachette tank partwork is aimed at beginners and it's perfectly possible to built it without any model making experience whatsoever. The only daft thing is not to ask when you are unsure.

The tank is 1:16 in scale so to work out how tall your driver needs to be, just take his height and divide it by 16. So, if you require a 6ft 3in driver, then convert this to centimetres (190.5), multiply by 10 and then divide the result by 16. Result: 119mm

Or if you fancy loading your tank with a British Prime Minister, 103mm.

My suggestion would be to do a quick search for Tamya 1/16th military figures. The range and quality is excellent and it's easier than measuring !