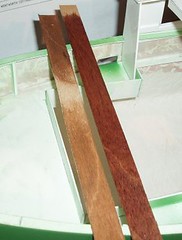
I want to make the top rail on my boat out of wood. In my Dad's spares box I snaffled some thin planks from the USA which will be ideal. They are a pale pine colour and I fancy something a bit darker.
Rosewood ought to be good but since I was doing a test I also used some walnut and oak colours. Suprisingly the oak looks best (nearest on the left) with the green of the hull. It's not a colour I normally like but here with a coat of varnish it's going to look smashing.
Tuesday, January 31, 2006
Monday, January 30, 2006
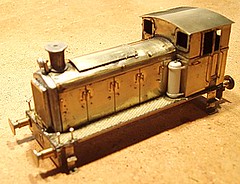
Brass Barclay
Back to the Barclay production line. Just the thing for anyone's model railway. This is the first locomotive produced. It sat on Trevors stand for a few shows while I built the second one properly.
Because I didn't have any instructions I made a couple of mistakes with my first go. Nothing that anyone will notice when I have finished it.
Based on the photo I've been working to, the air tank by the cab isn't the same as the one in the kit, not that I got one as I had the etches long before all the castings were ready. A bit of plastic tube sorted this out quickly though.
My dilema is the colour. The prototype photo shows wasp stripes on the end and buffer beam. For my layout I think black with red buffers would be more appropriate, but would the "correct" version be more interesting to look at ?
Since I hate painting stripes I tend toward the simpler livery but I'll decide once I've primed it.
Sunday, January 29, 2006
Looking rubbish
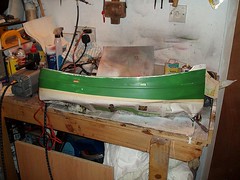
Well, I’ve done it. The hull has been rubbed down to remove the rough paint that resulted from the runs. I decided to the finish the bow as well with its little extensions. As this has to be painted in the main colour, it seemed sensible.
This time the paint went well. Admittedly I was working with an airbrush (set to as wide a spray pattern as it manages) and a hair dryer in the other. That paint wasn’t going anywhere as once it hit the hull, I hit it with some heat !
Result – A nice job. The green is now smooth and has good depth of colour. I’m chuffed.
One thing I had forgotten was how to hold a big item like this. It kept hitting this as I moved around. Fortunately only the masked sections touched anything else so I got away with it. In future a bit more planning would be a good idea.
Saturday, January 28, 2006
I hate paint
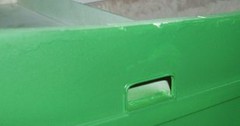
Most of my boat hull has been painted with car aerosols but I fancied that the green should be done with the airbrush. I wanted to use a mid green and knew that Humbrol produced something suitable in a semi-gloss.
As the whole hull is to be semi-gloss (bought the varnish), this should allow me to brush paint windows etc and retain the common look that's important to the appearance of the model.
My airbrush as mentioned before, doesn't chuck out enough paint for a large model and my over-enthusiasm gets the better of me. Too much paint in small areas results in runs which ruins the finish.
Strangely, one side of the model is perfect, the other has runs. Pity really as the masking went pretty well and if I didn't need to rub back the paint and touch it up I would be moving on to the next stage of the build.
Does anyone have any advice for dealing with runs as they happen. I know I shouldn't get any (two thin coats is better than one thick one etc.) but I do and wiping the excess away isn't the solution.
Wednesday, January 25, 2006
Pidgeon Pie
Time to introduce a new project to you.
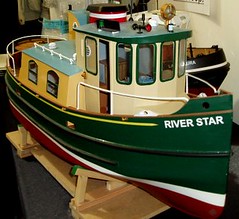
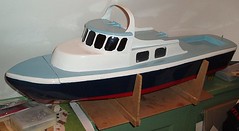
Last year at the model boat show, I bought myself a kit. I hadn't planned to, or at least not this kit. Trouble was, I had to be there all day and towards the end I'm chatting to the guy running the Metcalf Mouldings stand. I had been admiring the River Star model all day but at 170 quid it was much more than I wanted to spend.
Anyway, he was about to sail the model on the stand (the one in the picture) in the pool. He sailed it and then handed the controller to me. It was a fantastic sail. Controllable, tight turning circle, stable. Eveything I wanted in a boat. I handed over the plastic before I handed back the transmitter.
The prototype is interesting, it's a tug yacht. Apparently this was a boat built for hauling pontoons in the USA while providing luxurious accomodation for the captain and his wife. A quick search on the web shows lots of different designs so it must be succesful. The end result is very attractive.
For some reason this kit has excited me more than anything I've built in a while. It's not the value - although it's my most expensive kit to date. There is plenty of boat for the money though !
Anyway, check back for updates. I've got much of the work on the hull completed and will fill in the details.
Monday, January 23, 2006
Happy running
That's another show over with. Another layout badge added to the pile that will go on the badge board once it gets made.
Apart from a point motor that played up, everything went well. The point motor was first diagnosed as a faulty switch. Needless to say I had forgotten spares so I nipped off to see Squires and was met with the comment, "Are your operators adding to my profits ?". Mr Squires has obviously seen a few layout owners turn up slightly flustered and purchasing a small item, before !
The switch was replaced but it made little difference. So I squirted the motor with WD40 and everything was fine. No idea why it stopped working properly as it had been fine all day.
It's strange that despite the layout having been out before we still found little niggles. One of the points is a little tight. Not bad enough to warrant tweaking with a soldering iron at the show, but it needs attention. Perhaps we are getting used to the model and more picky and spotting the smaller issues. If we keep at it like this everything will be perfect !
Saturday, January 21, 2006
Leamington Show
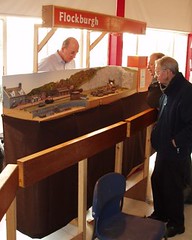
Another weekend, another show. This time we've taken Flockburgh to Leamington Spa. Not too far away this time - only a couple of miles !
Flockburgh had a somewhat pained birth. Many times it was on the verge of scrapping because we couldn't get the locos to stay in contact with the track. Now it works fine. OK, some can only run one way around but we can live with that.
Reaction has been very positive. Most of the club members haven't seen the model as it's only its fourth show. Since I'm not one for building stuff at a club - why load up all your tools and take them to a workbench in a cold(ish) room a few miles away when you can work in comfort ? - the layout has appeared full formed as far as they are concerned.
Another group who are enjoying it as 3mm Society members who are pleased to visit a general show and find something in thier own scale. We can talk about the wonderful CD catalogue that came with the last "Mixed Traffic" or bemoan the lack of interest shown in us by the committee. It's suprising how many people know me but I don't know them. Probably something to do with not being good at remembering names. Of course a lot of time you never get a name, just a face in a crowd. As long as it's a freindly face, that's all that matters !
Thursday, January 19, 2006
Unpainted figures
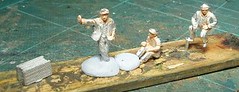
The problem with going to shows is that you see all sorts of goodies. Of course this is also one of the benefits !
These are new editions to the Montys Models range sold by . Some nicly modeled workmen drinking tea.
Since Hellingly is modelled under construction they will be a good finishing touch for the centre of the layout. Not cheap at £1.30 each but then I don't need many. Besides, on a small layout they don't get lost. Each can be painted carefully and people will notice it !
At present they are stuck to my general purpose painting stick which also doubles as a "holder" when soldering. The flesh colour is from Revell, the only paint they make that I find superior to the Humbrol version. The later is a bit "pink" although a few ruddy faced individuals to vary the mix don't hurt.
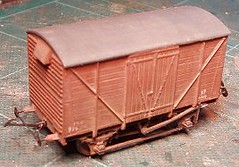
Dirty picture
This is a 3mm scale van. It's built from a Parkside kit in the same way as you would build the more common (& slightly cheaper) 4mm version.
The only difference comes at the painting stage. Whereas a 4mm model gets careful dry-brushing with lots of different colours, I've found that in the smaller scale this looks a bit heavy.
A simple wash of track colour is enough to give a nice finish. Nothing more needed. Pity really as I like weathering. Perhaps I should build some 7mm stock where I can really go to town !
Monday, January 16, 2006
St Albans
Time to take a layout on it's travels again. It was the turn of The Hellingly Hospital Railway to go to St Albans. We should have gone last year but illness prevented it. Embarassing but there's not a lot you can do sometimes.
Anyway, this is a show with a really good reputation - something that it lived up to this year. There was also a good attendance. At most shows there is a lull at lunchtime but not here. At the end of the day on Sunday we even wondered if they were going to go home ! Prize goes to the man taking his grandson around five minutes before the death saying "We've still go to see upstairs". With 3 floors he was really going to have to go some !
The layout ran nicely with only minor niggles. Considering the heat in our basement location this was good news. We even managed to run the electirc locos without the trolley poles flicking off any more than normal.
Operation wasn't heleped by a doggy steak & ale pie on Saturday night (only one pint so it wasn't that) laying me low for Sunday. My Dad did most of the work, a real trial since the Hospital isn't the most interesting layout in the world to run.
Friday, January 13, 2006
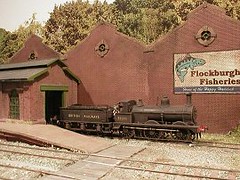
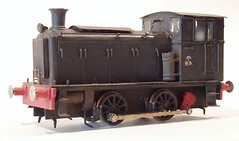
Finished Barclay !
At last - it's finished. A quick burst of grey, track colour (dark brown) and rust from the airbrush tones the black paint down. Now it can go off and meet it's maker !
See the model at a show near you as long as Trevor remembers it for the stand.
See the model at a show near you as long as Trevor remembers it for the stand.
Wednesday, January 11, 2006
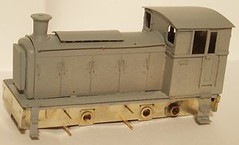
Barclay Chassis
Building the chassis is my least favourtie part of any loco kit. Everything about the body can be bodged. As long as it looks OK, it is. The working parts are different - get them wrong and the loco will be an embarrasment.
This is the second Barclay kit I've built. My methods for building the jackshaft have changed slightly. on the first I thought the rods would bind on the rear wheels so I put extra washers inside the rod to hold it away from the chassis. This time I left these off and everything is fine. I think the rear wheels crank pins are smooth enough and large enough to keep things in place.
The chassis runs well. With the cranks flying round is very attractive - at least for anyone with an interest in industrial locomotives !
Sunday, January 08, 2006
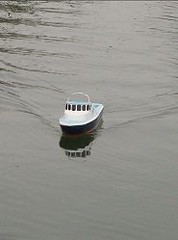
After 40 years, it sails !
The 40 year old boat makes it to the water. And it was great. No nasty sinking and good performance. Worth the wait. Considering the history of this model it was magic to see it buzzing around and creating a wake.
The only problem was that initially the motor worked intermitantly. Sometimes fine, sometimes it just sat an buzzed. I noticed that the sterring servo was kicking when the motor should be running and re-routed the aerial wire toward the front of the boat.
This helped but when I fed the wire out of the side and wrapped it around the "handle" on top performace was perfect. There are a number of aerials on the prototype and it looks like these are going to have to be more than deceorative.
Time to fit the details.
Friday, January 06, 2006
I love spray cans
On a project yet to be introduced to you dear reader, I have been spray painting. Since the model is a largish boat I have been using a red oxide car spray paint.
Wonderful.
When I sprayed the hull of the 40-year old boat, I used my airbrush - a Badger 200. This takes forever as the airbrush, while a fine tool for most of the work I do, simply doesn't chuck out enough paint for anything a metre long.
It's always been a rule that airbrushes are the "proper" tool with aerosol cans from Halfords being a poor second only used by amateurs. Wrong. Airbrushes are great but they aren't a panacea. Pick the right tool for the job regardless of what the "experts" tell you.
Tuesday, January 03, 2006
Barclay Loco
Ahh the end of Christmas holidays. A day off with nothing much to do except suffer from a cold and a kit that needs building.
A relaxed day later and the Mercian Models kit is partly in primer. The kit assembles well, the only tricky section being the bonnet bending.
Like all models, the detailing is the slow bit of the job. Putting those bonet handles on was a bind until I cleaned the iside of the bonnet (dirty from anealing) annd used a card template to hold all the hadles to the correct distance from the sides. Soldering from the iside is quick and easy then.
My camera isn't doing the model any favours, that handrail isn't as wobbly as it looks and the wide angle lens has distorted the verticals. Still, at least you can see it.
Sunday, January 01, 2006
The 40 year old boat project
Let me introduce possibly the oldest model boat never to have sailed in anger.
40 years ago this month a plan appear in Model Maker magazine for a Vosper boat. My Dad liked the look of it and started to build himself a model.
The boat was 2/3rds complete and then work stopped. For years it lived in various unsuitable places including a shed drawer. Amazingly it survived reasonably intact.
A couple of years ago the model found an indoor home and has since been restored and nearly finished. One of the jobs I have carried out over the Christmas period is to spray the main colours. This is a bigger job than it should be as my Badger 200 airbrush doesn't really push out enough paint for a job this size. The results are OK though.
The motor and radio gear are now fitted, something that couldn't have been contemplated in the 1960's with radio control costing many weeks wages for a single channel !
All that's left to do is for the finishing touches to be applied and the ice to melt on the local boating lake. Once we have the maiden voyage I'll post some more pics.
A quickie project
I'd not normally buy or build a continetal HO scale kit. However I was at a show and saw a cheap kit which looked like it would be a bit of fun...
So I had a couple of spare hours while watching a film on TV - I can't sit and watch the telly without fidgeting so much of my model making has background visuals.
The kit is Kibri BNo. 51108 and went together very easily. There were even some left over bits. I have a nice water tank thingy which I'm sure will be useful somewhere.
The only trouble is I'm stuck with a model I don't have a use for. So as an experiment I'm going to try and sell it on eBay. Wonder if it will find a new home ?
Subscribe to:
Posts (Atom)