Showing posts with label 16mm Hunslet. Show all posts

Tuesday, October 23, 2018

The (nearly) cheapest loco kit in the world, finished.

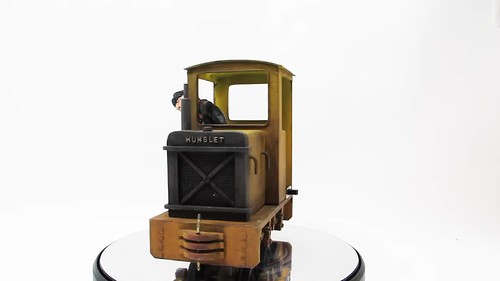
Finished loco


Finally finished, the Phil Sharples loco is looking pretty good. Most importantly, I enjoyed mucking around with this kit quite a lot.

Nothing earth-shattering took place, but I tried a few new things and I've some ideas for future project.

The most important thing is the model is done. I speak to a lot of people who start a project, get stuck, or simply decide that it's not going quite as they hoped, and stop. Even if a model isn't the perfection you hope for, pushing on and getting the thing done is still a good exercise. An average or even poor finished model is better than another project dumped in the back of a cupboard.

And yes, this model did languish for a loooong while as work took over. The first pictures were taken a year ago and dribs and drabs of work were carried out with a final sprint towards the end when I decided I was going to get this done!

Monday, October 22, 2018

Wiring a battery electric loco

Plan A for the Hunslet involved fitting a cheapo infra-red control system that I picked up at a show. That didn't work, so I've decided to wire it up with a switch for the moment. The bits are in the box with the rest of the kit anyway, so I might as well use them.

Wiring this stuff isn't rocket science. Essentially the batteries are wired to the motor and these make it go.

For stop and reverse, add a double-pole-double-throw switch. Batteries to the middle terminals. Motor attached to the end pair. Then the top left terminal is wired to the bottom right and bottom left to top right. The wires should cross on the middle (make them a bit longer to loop out of the way of the connections to the middle pair.

Hopefully, my crude diagram will help. If not, ignore it.

One fault with the set-up is that the switch provided doesn't have a centre off. Had I spotted this before wiring, I'd have replaced it with one that does. As it is, the slider needs to be carefully positioned in the middle to switch the motor off.

Long term, I want a cheap remote controller - suggestions in the comments please - I am NOT spending Deltang money on this model! As the body is not fixed down, retro fitting shouldn't be a problem.

Tuesday, October 16, 2018

Weathering an MDF loco is harder than it looks

Adding a bit of dirt to the Hunslet, pretty much essential as the faded yellow was still VERY bright, was supposed to be simple. Blow earth colour around the bottom, blackish over the top and track colour pretty much everywhere.Just like I do for everything else I build for the railway world.

The end result looked a bit flat. Maybe I should have given the yellow a coat of satin varnish to make it pop a bit more, maybe I didn't clean out the paint cup properly and the earth colour took the edge of the others, but I wasn't really happy.

Wanting a bit of dirty hanging around the detail, I tried a wash of Agrax Earthshade shading ink. On the sideframes it looked good so I went for it over the rest of the body. Normally, it's paint on, wipe off. Here, it soaked into the surface a bit so I had to wipe quickly. Another reason I should have varnished the yellow.

After that, a bit of dry-brushing and I'm reasonably happy.

The figure by the way is a Kara's character. I do like his stance, leaning out of the cab. A bit more lively than most.

Monday, October 15, 2018

Getting the paint on

Prime some MDF and the amount it soaks in varies more than I'd expected. This isn't a problem for what will be a heavily weathered loco, but if I'd been aiming at shiny, there would have been some sanding between coats. Maybe even some sanding sealer first.

Anyway, I'm quite pleased with look of the model in grey. It's a little cartoony, but in an appropriately garden railway way. The scratchbuilt exhaust, made from several bits of plastic tube, looks fine, even if I have had to cheat on the way it exists the bonnet doors.

I fancies painting this loco yellow and found a pot of Precision faded signal yellow to do the job through my airbrush.

The radiator was harder. First attempts at masking were scuppered by the bonnet handles so I decided to hand paint. Fine until it comes to the mesh where you can't get paint far enough back. In desperation, I cut a square hole in some card, slightly smaller than the central core. This acted as enough of a mask to let me spray with an aerosol, the overspray being limited to the other black bits around the edge which I handled with a brush.

After that, a quick-dry brush with some gunmetal and it's looking good. On to proper dirt!

Tuesday, October 09, 2018

Plastic noodling a radiator

At the front of the Hunslet, I need a radiator, and prototype pictures show that this sticks out of the sides and top, so I needed to concoct something from bits of plastic.

Wrapping a couple of layers of 0.5mm thick sheet around the edges and then sanding the corners away was a quick enough job. The raised flanges are made from 2mm square strip. I don't buy much of specific sizes preferring to keep big stocks of random sizes, but these seemed about right for the job and I can't remember what I bought them for originally.

The mesh is from an Albion Alloys sheet. Easy to cut with scissors and held in place by a few dots of superglue. The cross in front is more microstrip superglued in place.

Over the top is the word "Hunslet" from Slater's letters. It should be "Hudson Hunslet" but I couldn't fit that on, nor be bothered fiddling around with plastic letters. If this were a proper scale model I would, but it isn't.

It still looks nice though. 

Thursday, October 04, 2018

Detail manufacture with a leather punch

An understandable niggle with many laser-cut kits is that bolt heads and rivets are represented with etched circles rather than anything raised. I'm sure round bits could be supplied but this would be fiddly and add to the cost. Surely modellers can do these themselves if they are bothered?

I am and I can.

The solution is simplicity itself. A leather punch with varying sizes of hole makers.

Leatherworkers want to make holes, but I'm more interested in the circles themselves. Punching some 0.5mm plastic quickly fills the punch and with a small screwdriver, I can poke them into the reservoir under the orange plastic cover.

A bit of superglue and there I have it, simple bolt and rivets for the kit.

Note: I know you can buy really nice bolt heads from both Tamya and Cambrian. I have both sets but felt they would be overkill for this kit. It's not that accurate a model, so these will do. 

Tuesday, October 02, 2018

Body mods for the 16mm Hunslet

A dry run with the loco parts produces a not-unattractive little model. It's very much a relative of the low-cost Saltford Models that I loved years ago. Simple and slightly cartoony, the only difference is that the modeller doesn't have to cut the parts out.

In truth, you could stick this model together in about half an hour. There's some soldering to do for wiring, but nothing too challenging.

One feature I understand, but don't like, is the bonnet to radiator proportions. I know radiators are larger than bonnets on these things, but not this much.


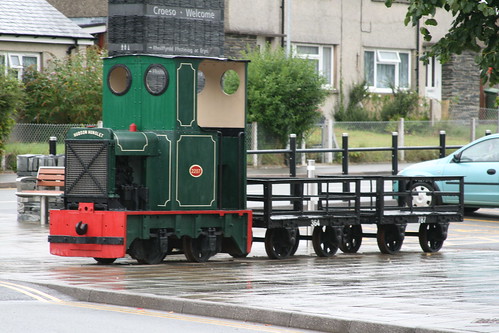
Hudson Hunslet 2207 @ Blaneau Ffestiniog

You can see what I mean from this photo, along with the open-sided engine bay.  Well, we can fix one, but not the other. After all, that bay is home to the motor and batteries. 

Building up the bonnet sides with thick plastic and then wrapping it in a couple of layers of thin stuff at least gives me a set of flat sides to work with. 


 Doing the wrap in two layers means you can use 0.5mm tick material which bends easily and if limonene solvent is used (buy it from Wizard Models at shows) it sticks well. The less vicious solvent takes a bit longer to dry but won't warp the plastic as normal MEK can in this sort of application.

Monday, October 01, 2018

The world's cheapest model locomotive kit


Railway modelling is expensive, cripplingly so according to people on popular forums. Basically, if you want toy trains, you and your family will have to go without food for a year.

Of course, this is rubbish. If you must buy every new locomotive when it comes out then yes, it's a pricey hobby. If your ambitions are a bit more modest though, there are bargains to be had.

Easily the cheapest loco kit I am aware of is a laser cut 16mm scale model from Phil Sharples (search vwmonkeyblue on eBay, and there is a useful set of photos here). For £35, you get all the bits required to build a loco including motor, wheels, battery box and switch.

The basic laser-cut MDF parts slot together easily enough and the chassis even has plastic bearings which will be more than adequate for the light work it's designed for.

Needless to say, I won't be building the model exactly as intended. That would be no fun. You see the other way to make railway modelling cheap is to do some, erm, railway modelling...