If you are going to sail a cardboard hulled boat, you better make sure it is waterproof.
The instructions say everything should be painted with urethane. Fine, except that I don't know where you buy it. On the other hand many varnishes are marketed as polyurethane so I assume this will do.
First step was to spray the hull with Plasticote varnish. It went on well and seemed to make the hull slightly glossy which I think ought to keep the water out. Unfortunatly it didn't cover the areas where the surface of the card had been damaged when I peeled off the tape used to hold it together for the first fixing.
Filler is the cure for this and on the garage shelf was some high-build primer. This is a primer with filler in and it's in a spray can, Just the job. I think I bought it for working on my camper because I couldn't get any normal stuff at the time.
Anyway, I spray away. Remembering previous tangles with this, I dried each coat with a hair dryer. It all looked OK except for a couple of areas where the paint went on too thick. These were a bit rough but I decided to let it all harden and sand the problems away.
To my suprise when it had dried some areas were cracked. Sanding took the worst of this away but another think coat and some more drying brought the cracks back. Presumably the filler is too think and shrinks on drying.
I'm going to sand again and if it looks OK shoot another coat of varnish over the hull to finish the job. Before doing this I've attached the deck so the hull has reached its final shape just in case flexing it makes things worse. At least the tape marks have gone...
Wednesday, January 31, 2007

Monday, January 29, 2007
Sanding sealer
Ahhhh, the joys of tradition modelling. Who amongst you whipper snappers with your X-Boxacto knives and your Resistance Soldering Units, has ever used sanding sealer ?
Not many I suspect. Well sit at Grandpa Phil’s knee and let me explain.
Imagine you have some wood. Yes real wood from trees, not some plastic imitation. You would like to paint this wood. Now you might think that all you do is open the tin, stir the liquid and slap it on in the approved manner. What you will end up with is a hairy mess.
Wood has grain and is made up of fibres. So, before paint you need to seal the surface or the liquid colour will make the grain and fibres rise – giving the impression of a model that’s been too close to the cat.
The trick, if it can be described as such, is to paint the wood with sanding sealer. You’ll have to search a bit for this, as most model shops don’t carry it. Model aircraft shops are the best bet, or Squires. Sanding sealer is made from the blood of frogs harvested at midnight or something (I might have made that bit up) but the trick it performs is magic. Balsa wood is converted to a smooth substance that feels like soft, warm plastic. Paint now forms a beautiful smooth surface. The brush you used is probably dead though unless you wash it out in cellulose thinners. A small price to pay I feel.
Of course you could just use plastic in the first place. It would save a lot of mucking around.
Sunday, January 28, 2007
Nose job
Sunday is sailing day so “Little Miss Minty” needed her nose job.
In other words I stuck one of the spare winches back on the front of the boat.
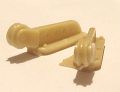
The resin casting was cleaned up by gentle application of a big file. Not much work was required, as the casting was pretty good to start with - just a little flash needed attention on the base, the rest was perfect. I then painted it with matt aluminium from the Humbrol range. All the other fittings are painted the same although they have been varnished so look a little different. I’ll notice this and so will you now I’ve told you, but no one else will.
Once dry a dab of superglue and Minty’s nose is restored. If I can avoid the buoys she’ll not need attention again.
In other words I stuck one of the spare winches back on the front of the boat.
The resin casting was cleaned up by gentle application of a big file. Not much work was required, as the casting was pretty good to start with - just a little flash needed attention on the base, the rest was perfect. I then painted it with matt aluminium from the Humbrol range. All the other fittings are painted the same although they have been varnished so look a little different. I’ll notice this and so will you now I’ve told you, but no one else will.
Once dry a dab of superglue and Minty’s nose is restored. If I can avoid the buoys she’ll not need attention again.
Saturday, January 27, 2007
Metric rules
I’ve always been a metric sort of person. Not for everything you understand, if asked how far away something is I’ll estimate in feet or miles but when you want precision only metric will do. This especially important when modelling so I measure everything in millimetres.
So it is great to discover that the cardboard model boat kit has all the measurements in imperial. Wood sizes are described at 1/16 rather than 1.5mm. I’ve had to rely on Google to do all the conversions for me – type in “Convert 1/16 inch to mm” and the search engine does all the work.
It doesn’t help that one of the measurements is wrong – the main cross support is not 6/34 from the stern – it’s about 6.75 inches. Roughly. Sort of. I’m going to work it out by pushing the bit of wood back and forth until the edge of the hull appears to fit the deck.
This is all the fault of the Americans. They simply aren’t clever enough to realise that you need millimetres for precision work and probably explains why everything important ever was invented in Great Britain. We Brits worked this out many years ago which is why we lost the war of independence just get rid of them. Imperial units instead of metric, coffee instead of tea, it explains soooo much…
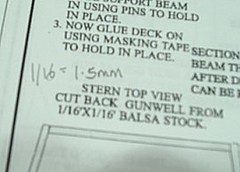
Friday, January 26, 2007
A cardboard boat
Cardboard and water don’t mix. Or if they do you get papier machie. So I was fascinated to see a cardboard boat kit on eBay which intended to be a working model fitted with radio control.
Since I managed to win the auction at a price that was very right, I wondered what I would get.
A few days later in the post a Osbourne Micro Boat kit for a Chris Craft Cruiser arrived. It’s brilliant. Laser cut card and wood along with a few fittings. Excellent instructions. A real quality item.
I couldn’t resist starting it. It’s one of those models you can build while working on something else. Every step involves glueing or varnishing and then leaving the piece to dry. Normally I get impatient and ruin things but not this time I have promised myself. Besides, I need to get a move on with the Armstrong, hopefully I’ll be distracted enough to do a proper job.
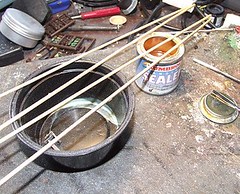
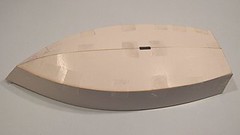
So far I have taped the hull together and then run white glue into the inside of the joints. The tape was peeled off as carefully as I could and I’m left with a suprisingly good hull. It’s a testament to the makers art that the parts fitted perfectly and I look forward to carrying on with it.
Since I managed to win the auction at a price that was very right, I wondered what I would get.
A few days later in the post a Osbourne Micro Boat kit for a Chris Craft Cruiser arrived. It’s brilliant. Laser cut card and wood along with a few fittings. Excellent instructions. A real quality item.
I couldn’t resist starting it. It’s one of those models you can build while working on something else. Every step involves glueing or varnishing and then leaving the piece to dry. Normally I get impatient and ruin things but not this time I have promised myself. Besides, I need to get a move on with the Armstrong, hopefully I’ll be distracted enough to do a proper job.
So far I have taped the hull together and then run white glue into the inside of the joints. The tape was peeled off as carefully as I could and I’m left with a suprisingly good hull. It’s a testament to the makers art that the parts fitted perfectly and I look forward to carrying on with it.
Tuesday, January 23, 2007
Amazing Service
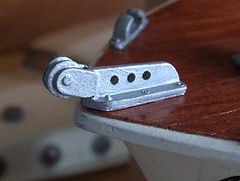
Sailing Little Miss Minty a few days ago I managed to break the pulley from her nose. It was a clever manoeuvre involving hitting a buoy forwards and sideways at the same time. The part pulled off and sank.
So I e-mailed George Turner Models and asked for the cost for the replacement part. A few days later in the post I received not one, but two parts free of charge !
What fantastic service. You simply can’t get better than this. I think I know who will be getting more of my money in the near future…
So I e-mailed George Turner Models and asked for the cost for the replacement part. A few days later in the post I received not one, but two parts free of charge !
What fantastic service. You simply can’t get better than this. I think I know who will be getting more of my money in the near future…
Sunday, January 21, 2007
Leamington Show
Yet again I go to a show and see examples of a hobby about to turn over and die. The Leamington Show had only a large increase in attendance with over 2000 coming in over the two days. The traders seemed happy with their takings and I know several large and expensive items went in the back of visitors cars.
The layouts were notable for their excellent quality – or at least I assume they were as I couldn’t get near them during peak periods.
Yes, the hobby is definitely on it’s last legs and I confidently predict were are doomed.
The layouts were notable for their excellent quality – or at least I assume they were as I couldn’t get near them during peak periods.
Yes, the hobby is definitely on it’s last legs and I confidently predict were are doomed.
Saturday, January 20, 2007
In praise of the odd-ball
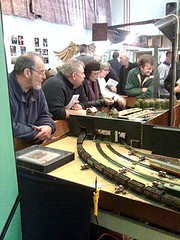
At our show I find myself chatting to the operator of a 16mm layout.
The larger narrow gauges aren’t often represented at indoor shows. Most people consider that they are suitable for the garden only. I think this photo shows that properly done, you can use the size to make an attractive model.
The layout itself is pretty basic. On a 4ft square board there is a single circuit that forma figure of eight looping over itself. The train trundles around, disappears from view in a tunnel and re-appears at a higher level, spiralling down to start again. A loop and single siding allow a little bit of operation but not much. Basically this is a watch the trains go by model. The builder obviously enjoys making mine locomotives as he has a couple of spares over the bare minimum required.
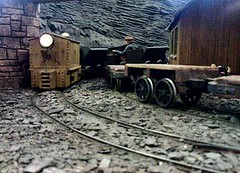
Scenery is slate, either in cliff of rubble form. There is a hut and a basic bridge but not a lot else. Despite this I liked the model. It’s a good example of something created by a modeller who likes modelling. He likes the process of putting things together and pitching his skill against a dream.
I wonder what other people think of it. Many will be happy to walk away from the show with some new Hornby or Bachmann product that they will place in a cupboard to be used “one day”. Some will go home enthused clutching purchases and planning to “do” the train set. Many won’t see anything in this little model. It’s too remote from what they want to make. The idea of building absolutely everything is alien. Surely they will argue, you have to buy something.
Worse are those who think it is stupid to build a model you want when you could just buy a new “thing”. They will complain that this isn’t what they want to see at an exhibition, why can’t there be a layout made entirely of bought items ? The argument runs, “We must show the beginners what they can do without any skill”. Skill in this instance being considered a mysterious power that only the high priests of the hobby possess.
To this last group I say, “What about me ?”. I posses the magical power of “skill”. Not nearly as much as I would like but some. I want to see models that inspire me. I want to go to a show and see a model and think, “I would like to make that.” With the emphasis on “make” and not “own”.
As a hobby we need odd-ball layouts that take us away from the main line and into interesting byways. It’s like a diet – if all you ate was McBurgers you wouldn’t die but like would be terribly bland. This might not be a hobby marked by heady excitement but at least we deserve some variety.
The larger narrow gauges aren’t often represented at indoor shows. Most people consider that they are suitable for the garden only. I think this photo shows that properly done, you can use the size to make an attractive model.
The layout itself is pretty basic. On a 4ft square board there is a single circuit that forma figure of eight looping over itself. The train trundles around, disappears from view in a tunnel and re-appears at a higher level, spiralling down to start again. A loop and single siding allow a little bit of operation but not much. Basically this is a watch the trains go by model. The builder obviously enjoys making mine locomotives as he has a couple of spares over the bare minimum required.
Scenery is slate, either in cliff of rubble form. There is a hut and a basic bridge but not a lot else. Despite this I liked the model. It’s a good example of something created by a modeller who likes modelling. He likes the process of putting things together and pitching his skill against a dream.
I wonder what other people think of it. Many will be happy to walk away from the show with some new Hornby or Bachmann product that they will place in a cupboard to be used “one day”. Some will go home enthused clutching purchases and planning to “do” the train set. Many won’t see anything in this little model. It’s too remote from what they want to make. The idea of building absolutely everything is alien. Surely they will argue, you have to buy something.
Worse are those who think it is stupid to build a model you want when you could just buy a new “thing”. They will complain that this isn’t what they want to see at an exhibition, why can’t there be a layout made entirely of bought items ? The argument runs, “We must show the beginners what they can do without any skill”. Skill in this instance being considered a mysterious power that only the high priests of the hobby possess.
To this last group I say, “What about me ?”. I posses the magical power of “skill”. Not nearly as much as I would like but some. I want to see models that inspire me. I want to go to a show and see a model and think, “I would like to make that.” With the emphasis on “make” and not “own”.
As a hobby we need odd-ball layouts that take us away from the main line and into interesting byways. It’s like a diet – if all you ate was McBurgers you wouldn’t die but like would be terribly bland. This might not be a hobby marked by heady excitement but at least we deserve some variety.
Thursday, January 18, 2007
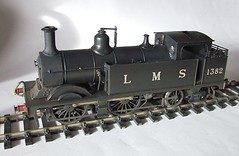
LMS 0-4-4
This locomotive is a testament to Just In Time delivery.
It’s scheduled to be on a stand at our show on Saturday, and I’ve just finished it.
The biggest job was weathering. My technique nowadays involves toning the model down with a weak spray of tank grey, followed by one of track colour and finishing up with some earth colour around the chassis. I’d already dry-brushed the chassis with dirt as mentioned earlier.
The weak sprays take the edge off the pure black paintwork. Not enough to turn the model into a collage of grey and brown sludge, just enough to make it look like a model. The human eye needs a bit of help with contrast and reducing it this way makes things easier to see.
Or something like that.
Using a weak paint mix has the advantage that you can use it, look at the effect after drying with the trusty hairdryer, and do some more if you want. I really should sort out the lights where I spray as a mix of fluorescent and incandescent doesn’t exactly give the best colour to decide how the painting is going
The separation of matt and satin blacks still shows through. My intention is to present a locomotive that is clean but has working dirt. Steam engines are filthy things so a gleaming example simply isn’t real. I know that legions of cleaners were employed but they weren’t that good.
After paint I just needed to glaze the windows with Krystal Klear and add some coal to the bunker. Then sit back and look at my efforts, which are in my eyes, full of errors. With a bit of luck no one will notice so please don’t tell them.
Wednesday, January 17, 2007
Black to basics
Once upon a time I painted model railway locomotives black. First I did this with a brush. Later I progressed to Humbrol mini-sprays as I liked the results they gave. Later still I used an airbrush.
The consistent theme was matt. The black was always matt.
Then I read a book on weathering which talked about colour. I realised the error of my ways. If you look at a steam locomotive, you will notice that the smokebox is matt black. The rest of the body is in gloss and the difference shows. Sometimes you only see things if they are pointed out.
Now I am a reformed character. Smokeboxes are still matt but the rest gets a coat of satin varnish. The contrast is marked. It’s amazing how different the finished make the same colour appear.
There is even a difference between methods of application. My favoured mini-spray actually gave a slightly satin finish. Use an airbrush with the same paint though and the result really is matt. There is absolutely no shine. Brush painting is fine as well. Not quite as matt as spraying but not bad. Of course Humbrol has always brushed very well and if you are careful not to re-work sections that have started to cure, will dry to a very fine finish. The smokebox in the picture is brushed as I’m too lazy to mask it and it looks good.
Real experts will tell me that in nature there is no such thing as pure black. It’s always influenced by other colours reflected in it or by the light around it. I don’t really understand that but cheat by weathering everything so my models don’t suffer from “pure” black. I do understand that until you take the edge off the black, the model looks wrong.
This is nothing that a quick dry brush or spray with “Tank Grey” (Humbrol 67) can’t sure though and that’s the next stage for this model.
Monday, January 15, 2007
Boiler out
Once you have rolled your boiler, you get to attach it to the rest of the locomotive. At this point if you are following the story I’m going to disappoint you a bit. I managed to get a big chunk of last weekend in on this kit – well most of the Saturday anyway. This means that the model is pretty much complete and so you won’t get a stream of postings explaining each step. Sorry.
The only interesting moment was when I discovered that the smokebox door wouldn’t fit. The only chance I had was to use something from a 4mm scale range and that would just look stupid. The boiler was too low.
The solution was pretty horrific and I didn’t embark on it lightly. Using a small gas powered torch I melted the solder in at each attachment point and jabbed a scalpel into the molten liquid. This allows it to cool without re-attaching the part. By using lots of heat and being luckier than I deserve, a major part of this model locomotive was separated from the rest. Even where the front was attached to a whitemetal saddle, separation was achieved without melting anything important. The trick, if there is one, is to use a lot of heat so the solder melts before anything else has the chance to heat up.
A little cleaning and a lot of measuring – something I should have done in the first place – and the boiler is back in place. The smokebox door is fitted and all is OK. Phew.
Sunday, January 14, 2007
Roll your own
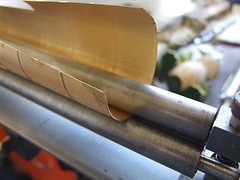
When you, the eager punter, buy this kit it should come with a boiler that resembles a tube. Lucky you.
For me the boiler arrived as a flat etching, which meant I needed to form it. This is a job I hate since my previous efforts haven’t always been as successful as I would have liked. With only one etch I had to get it right first time as well. No pressure then.
The method usually recommended is to work a heavy metal bar back and forth on the part with it sat on a pad of paper. This will gradually cause it to bend until you get a tube. Me, I get something with the profile of a twenty pence piece. Mr Kaizer tells me that I’m pushing down on the bar too hard, but if I don’t the metal stays flat.
Because of these failings, a couple of years ago I invested in some GW Models rolling bars. These are the proper engineering tool and therefore ought to allow me to roll the metal. Mind you I’m not that clever at using them – perhaps I should have taken metalwork at school instead of computer studies !
At least the metal didn’t need annealing. It’s half etched to give the boiler bands so making it more flexible isn’t a good idea. Since one of the other jobs I’m useless at is soldering metal strip to tubes for boiler bands, this is a good thing too.
I just wish it hadn’t come flat packed.
Thursday, January 11, 2007
Greyey browny dirt is the New Black
Painting the chassis.
Stage 1 – Hand paint with Humbrol Matt black. Spraying might have been a bit better but I couldn’t be bothered to set up the airbrush. The paint brushes nicely anyway to give a nice finish.
Stage 2 – Let the paint harden. This takes 24 hours and you can feel the difference. New paint may be dry but it feels soft to the touch. I don’t know why but it does.
Stage 3 – Dry brush everything with matt dark grey. Humbrol 66 because I didn’t have any 67 to hand.
Stage 4 – Repeat with rust colour.
Stage 5 – Repeat with gunmetal from the metalcote range.
Stage 6 – Dust with a rusty weathering powder for a bit of colour & texture.
Finally, clean out the bearings with the reamer and leave to dry.
Wednesday, January 10, 2007
Chassis in primer
With things running, the wheels come out and the chassis goes into primer.
Luckily I looked in the bag of castings and spotted that some springs are provided to go behind the wheels. This is one of the first, if not the the first that has featured these. I’ve certainly never used whitemetal ones before.
A bit of thinning down was required so they weren’t proud of the bearings but my coarse file sorted this. You wouldn’t want to be messing around with a needle file here ! If you don’t have a coarse inch wide file, use emery paper stuck to a board to keep the sanded surface flat.
I also soldered the sandboxes in place, taking the positions relative to the relevant bits on the body. I did remember to check that the wheels would still revolve after they were attached.
Finally, after a clean, the chassis is sprayed with etched primer.
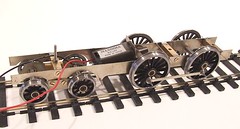
Monday, January 08, 2007
Stupid design
What idiot designed the 0-4-4 ?
When you want to test run the chassis you have to put the non-driving wheels in as well. Most locos will trundle up and down the test track with only the coupled wheels fitted. Not this time as the back drags along the track.
With the mechanical bits fitted I have to assemble the bogie and the screw it in with that fiendishly fiddly attachment comprising springs and washers. This is needed because even with the bogie in place you have to prop up the front. What is the point of this ?
Anyway, it works. With the rods reamed out the wheels rotate and all is fine. Watching a chassis you’ve built yourself perambulate back and forth along the track is one of the more satisfying things that happens in this fine hobby.
Sunday, January 07, 2007
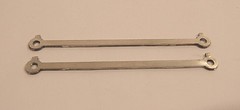
Coupling Rods
Con rods are usually a fairly pain free part of a build – right up until you try and fit them.
These were simply a case of laminating two etchings. I tinned both first. Then flux was smeared in between them as they were held together with wooden tongs. Soldering along the edges made the solder in the middle run nicely to hold the parts together.
The holes for the crank pins were then reamed out. I don’t worry too much about accuracy of alignment of the parts because as long as they look OK, this step sorts everything out.
The holes in the rods should be the same distance apart as the axle holes. If not, the loco won’t run. These were wrong by about a millimetre. Not huge but bad enough. Hopefully some elongation of the holes will sort things. If not I’ll have to separate the etches and look at shortening them.
This is why the loco has to be test built. This sort of thing can be correct – possibly with some milled rods – but you need to know about it first.
Saturday, January 06, 2007
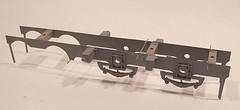
0-4-4
OK – This project has been sitting around part complete for several months and now I need to get it ready for handing over on the 20th. These things really creep up on you don’t they ?
The job – Test build an etched 7mm scale locomotive kit for a Midland 0-4-4 for Trevor. He’s bought it in and before it ends up in the range, someone has to see how good it is. That’s me then.
Starting with the chassis, this is a pretty simple beast. Ream out the holes for the bearings, which are correctly etched undersized as it’s easy to make holes bigger, a b@&**er to make them smaller. Once these are soldering in place the sides are brought together with the chassis spacers.
You can tell the age of the kit by the fact it’s designed around screw in spacers rather than etched versions. This isn’t a problem as long as the sides are identical. Once I was happy that all was square, I solder the spacers to the sides. Ideally you files the heads of the screws flush and cover them with solder so they can’t seen when the model is painted. I files but didn’t fill as it’s useful on the stand to be able to see what you are getting. Actually they will hardly show anyway but never mind.
The cross wires for the brakes make the whole thing permanent – which is good, we don’t want the chassis disassembling itself later do we ?
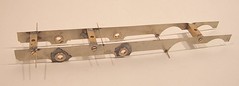
Thursday, January 04, 2007
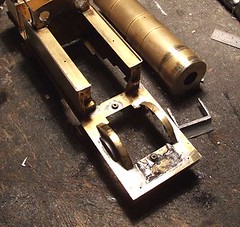
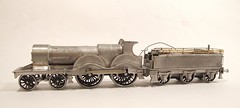
Armstrong locomotive
A proper picture of a model locomotive at last !
This is the current state of the Armstrong. It’s looking pretty good and even works.
One problem is that the loco sits 1mm too high. Avoiding this would mean scratchbuilding the footplate out of thin brass or using smaller than scale bogie wheels as they area a tight fit under there.
The model has reached a hiatus however. I have to put it back in the box for a few weeks. You see there is another loco I have promised to have finished for someone in time for the Leamington Spa show in a couple of weeks. This has also sat half completed in a box for too long.
Time is also needed for me to work out how to correct the shape of the outside frames on the Armstrong. They should curve down ahead of the front cranks and don’t. This alters the look to the detriment of the model. I’m thinking about making the extra bits from thick plastic card but this doesn’t seem like proper modelling as I should really use metal. That would be harder to cut to the complex curves and needs to be thick to match the frames so I have a delima
Tuesday, January 02, 2007
The information swamp
“Hold on”, I hear you cry, “Not the box files again, you’ve done them already.”
Well, sort of. I mentioned a few days ago that the Railway Modeller Magazines were getting the chop. That process is now finished and the remains are in the paper-recycling bin at Sainsburys. What I have kept is a modest pile of interesting bits.
Traditionally these would stay as a pile, or piles, for months. They would expand horizontally like a weed to cover every available surface until I tired of dog-eared paper lying around and binned the lot. This will not be the way in 2007 ! No, I am busy working for the future. Laying down the foundations for a fine library that will allow the inquisitive mind to lay his hands on the perfect piece of information at a moments notice.
Actually I have been watching quite a bit of Inspector Morse while doing this so I might be confusing myself with a great detective and owner of an incisive mind. I’ll just carry on muddling along while struggling with the Guardian (you can tell I read it coz of my speling) Quick Crossword.
Whatever, now I have my piles of torn out pages I do need to sort them somehow. There is much pleasure to be found casually browsing for an article when time isn’t precious but none at all when you know that it’s somewhere in the information swamp.
My salvation will be the box file. I already have some very tatty ones holding plans and papers. They were rescued from a past job each announces that it contains TB test results or other delightful forms from the Ministry of Agriculture. After twelve years it’s time to get rid of them and tidy up. With each file costing £1.79 I say, “Blow the expense” and have invested in enough to take and file everything neatly, or at least in a set of matching boxes.
Currently I have four files:
which are sat on the worktop as I throw paper in their directions. For any smartarse wondering about the last box, the is a file called “Uninteresting articles”, it’s large, blue and metal and as I said earlier, stands in Sainsburys car park. I’ve done that already thank you.
Categorisation is a bit weak. The Locomotives and Rolling Stock are basically plans so easy enough. Buildings can include other things nailed to the ground such as fences and buffer stops. Ideally there is a drawing in each of these but not always. Everything else goes in the Articles box.
The RM isn’t always helpful to people like me. Sometimes there are several interesting pieces in a single magazine. That means I have to staple together several articles in a bundle. Then I have to make a best guess at which the most interesting one will be in the future and throw the wad into the correct box. As I was pretty generous will removing articles, keeping things that might not be interesting now but could be in the future such as modern image (for today) grain wagon plans, this dilemma happens quite a lot. The information swamp won’t be totally drained.
If I were a librarian then an index would be written and nothing would ever be lost. I’m too lazy for this and doubt I’d get it right anyway so I guess it’s wellies on and splosh into the quagmire once in a while.
Well, sort of. I mentioned a few days ago that the Railway Modeller Magazines were getting the chop. That process is now finished and the remains are in the paper-recycling bin at Sainsburys. What I have kept is a modest pile of interesting bits.
Traditionally these would stay as a pile, or piles, for months. They would expand horizontally like a weed to cover every available surface until I tired of dog-eared paper lying around and binned the lot. This will not be the way in 2007 ! No, I am busy working for the future. Laying down the foundations for a fine library that will allow the inquisitive mind to lay his hands on the perfect piece of information at a moments notice.
Actually I have been watching quite a bit of Inspector Morse while doing this so I might be confusing myself with a great detective and owner of an incisive mind. I’ll just carry on muddling along while struggling with the Guardian (you can tell I read it coz of my speling) Quick Crossword.
Whatever, now I have my piles of torn out pages I do need to sort them somehow. There is much pleasure to be found casually browsing for an article when time isn’t precious but none at all when you know that it’s somewhere in the information swamp.
My salvation will be the box file. I already have some very tatty ones holding plans and papers. They were rescued from a past job each announces that it contains TB test results or other delightful forms from the Ministry of Agriculture. After twelve years it’s time to get rid of them and tidy up. With each file costing £1.79 I say, “Blow the expense” and have invested in enough to take and file everything neatly, or at least in a set of matching boxes.
Currently I have four files:
- Locomotives
- Rolling Stock
- Buildings
- Interesting articles
which are sat on the worktop as I throw paper in their directions. For any smartarse wondering about the last box, the is a file called “Uninteresting articles”, it’s large, blue and metal and as I said earlier, stands in Sainsburys car park. I’ve done that already thank you.
Categorisation is a bit weak. The Locomotives and Rolling Stock are basically plans so easy enough. Buildings can include other things nailed to the ground such as fences and buffer stops. Ideally there is a drawing in each of these but not always. Everything else goes in the Articles box.
The RM isn’t always helpful to people like me. Sometimes there are several interesting pieces in a single magazine. That means I have to staple together several articles in a bundle. Then I have to make a best guess at which the most interesting one will be in the future and throw the wad into the correct box. As I was pretty generous will removing articles, keeping things that might not be interesting now but could be in the future such as modern image (for today) grain wagon plans, this dilemma happens quite a lot. The information swamp won’t be totally drained.
If I were a librarian then an index would be written and nothing would ever be lost. I’m too lazy for this and doubt I’d get it right anyway so I guess it’s wellies on and splosh into the quagmire once in a while.
Monday, January 01, 2007
One year old
Today marks the first birthday for this blog. To celebrate the event I am going to allow myself a ramble. If you want any content about making things, come back another day or plunder the archives, otherwise, read on.
To date I’ve posted 238 times. A small but slowly growing band of readers view an average of 12 pages a day. You click through to the adverts enough to earn me 2 cents a day.
Occasionally someone sends me an e-mail or posts something in the comments section of an entry. I’d love more feedback but then so would everybody who writes a blog.
Today I have to decide if it’s worth carrying on. On balance I think it probably is.
Part of the reason for writing this stuff is simply the practise it gives me. Two or three times a week I have to try and string some words together in a meaningful order. Sometimes I do it well, sometimes it goes a bit pear shaped. It doesn’t matter, the practise is useful. Since I aspire to get into print occasionally, the easier I find the process of writing reasonable prose, the more I can concentrate on the message or story I’m telling. All the best writing course say you have to write a lot and so that’s what I do. Sorry if you feel this means you read material that should have been rejected but that’s the way it is. The essence of a blog is speed so typos can creep thorough. You are getting this for free remember…
I also have to take lots of pictures. More practise, which has spin-offs in both my modelling and Real Work life. I have made an effort to get some basic facilities allowing me to take reasonable photos. Perhaps if I didn’t have an outlet that would be a job I wouldn’t quite have got around to.
Mostly though, it’s forced me to keep finding little bits of time to do the things that go into the blog. Over the last year I have completed a couple of boats, several model railway locomotives and various jobs on my campervan. I like to write these up and so I get on and do them. Rather than slobbing out in front of the telly the blog is always nagging me to post and if I want to post I have to make things. I love making things so this is A Good Thing.
People ask how I find the time for this. Well I don’t have a family demanding attention. My job doesn’t need me to take work home (actually it does want me to, but I refuse) in the evening even if it doesn’t let me take holiday properly. Most of all though I want to find the time. OK so I can leave stuff part done on the bench which saves getting out and packing away after each session. But lots of jobs can be accomplished in a few minutes – even if I do then turn them into a War & Peace length post ! Should I get a couple of hours to spend on something then it’s turned into several posts. One thing I have learned is that writing a blog means writing about trees and not the wood. But then that’s why layout articles in magazines rarely interest me. There is no detail and that’s where the devil is once you start getting your hands dirty on the workbench.
Anyway, I hope you enjoy reading this stuff and will continue to come back. Why not bookmark the page and then tell all your friends about it. If you are a magazine editor, why not offer me a multi-million pound contract to write a monthly column ? If you are a modeller and hit a problem, let me know and I’ll see if I can come up with a suggestion. Sometimes I even get the answers right !
Happy New Year.
Subscribe to:
Posts (Atom)