This year marks 60 years since the Caribbean island of Jamaica achieved full independence form Great Britain. Therefore it seems appropriate to take a look at this excellent hardback book by Jim Horsford.
First of all, I was surprised that Jamaica actually had any railways. I'll admit that I've never considered a holiday there, and know pretty much nothing about the place other than all the terrible stereotypes inflicted on us by adverts. With a logical mind, if the Isle of Man can manage a railway system, an island many times it's length should surely support one.
This, it certainly did. Running from Montego Bay to Port Antonio via the capital, Kingston, the first lines were built in 1843. Public operation ceased in the 1990s but there are still bauxite trains to be found. Sadly, as the author acknowledges, much of the text has been written in the past tense. Despite many attempts, no one has managed to revive the system and much of it is lost forever.
The book itself is a sumptuous publication, profusely illustrated with colour and monochrome photographs. Any show the line in decay but there are those that give us a glimpse of happier days.
Starting with a quick look at the island, the text soon moves on to a detailed history of the line from the early days of the Jamaica Railway Company (JRC), through Government ownership and two world wars. Post war developments including dieselisation follow and take the story to 1992 and closure.
Next up are the individual lines making up the system with track plans and photos of the stations.
Finally we get the steam and diesel engines plus railcars - there were certainly plenty of the later!
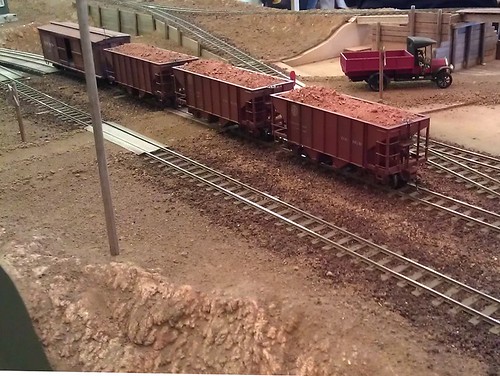
UK enthusiasts will be interested to see a lot of USA tanks so if you fancy a model then the soon to be released ModelRail production. Hornby Dublo did a suitable steam crane too - like many railways of the Empire, some of the stock originated on these shores.
Modelling in HO might be better bet for the later period as GE 44-ton switchers would be available off the shelf and much of the rest would probably be scratchbuilt anyway. I don't think there are kits for those Wickham railcars and even the English Electric diesels look very American to my eyes.
If you have any interest in Jamaica, or are fancy a holiday there, this is 168 pages of book well worth owning. Maybe it is time to agree to go on a nice holiday somewhere sunny after all?
The Railways of Jamaica from Mainline and Maritime
A daily updated blog typed by someone with painty hands, oil under his fingernails and the smell of solder in his nostrils who likes making all sort of models and miniatures. And fixing things.
Wednesday, October 31, 2012
Book Review: The Railways of Jamaica by Jim Horsford
Tuesday, October 30, 2012
American Narrow Gauge Magazines
For the aspiring writer, it can be difficult to know where to pitch your first pieces to get that first publishing credit. For us railway modellers, this isn't so much of a problem. Mostly it is because we are such nice and interesting people. Editors are queueing up for our exciting and stimulating words.
It's also because we have so many more targets to aim at. If your only interest is watching the telly then the market is limited. Radio Times and its downmarket ITV tribute act, TV Times, have staff to do this sort of thing. We love watching daytime TV while stuffing our face with doughnuts etc. probably run out of an office with a couple of people wearing shell suits and very thick glasses from too much screen time. You'd have to come up with a pretty good take on the latest Eastenders plot to outdo staff writers who know every twist, turn and intermarriage. Even then you will need to write it for an audience who find the menu at Greggs challenging.
No, model railways are where it's at. Look at these three US titles I picked up for 25p each. All old back numbers but just as relevant today as they were when new.
Light Iron Digest aims to provide "Pertinent information for the Narrow Gauge, Industrial & Shortline Enthusiast" and presumably eyed up Short and Narrow Rails (Railroad history for the short-sighted & narrow-minded enthusiast) with looks that could set fire to paper if not actually kill. At the very least, I can't find a website for the later so I assume it worked.
Both are A4 sized and offer prototype and modelmaking articles and plans. They also are happy to accept articles submitted by anyone who fancies having a go.
Sn3 Modeler covers much of the same ground but supports the more esoteric (to UK eyes) S scale models of 3 foot gauge railways (14.3mm track gauge since you ask).
The thing is, all of these are proper, professional magazines, not society journals. It just goes to show the breadth and diversity of our hobby.
Monday, October 29, 2012
Slim Gauge Circle, Rugby
 Sunday saw a quick trip over to Rugby for the half-yearly Slim Gauge Circle meeting. At the very least I know that NG Trains would be present so what I spent on diesel, I'd save on postage when I ordered a 3-can pack of Testors Dullcote.
(Note: Dullcote is a matt varnish, not unexciting outdoor wear.)
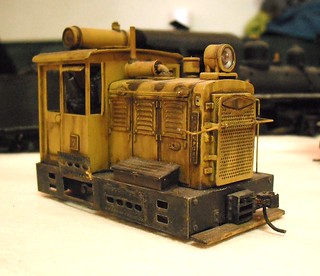
It's always worth the short trip as there is some inspirational modelling from the Pheonix Group. People who think that when you erect a model building, you should cast all the brick first. An Albion war lorry was the highlight of the stand this time and shows what you can do if you have patience and skill. A couple of 1/35th industrial locos under construction caught my eye too. Once finished, they look the business I expect.
Mind you, none of this stuff comes cheap. Seeing one modellers supply of Grandt Line nuts and bolts shows that scratch building isn't always the cheapest way to produce a model, at least it isn't if you work at this level.
The groups modular layout took up the centre of the hall. One side featured some most impressive stonework around a lagoon. Chatting to the creator of these, he explained that all(!) he did was stipple very dry Polyfiller in place and then work over it with brushed on water. Apparently this re-activates the mix and causes rivulets in the surface. This sounds simple but I'm keen to have a go and see how much practise is required as the results were very impressive.
A few photos from the Slim Guage Circle event.
Sunday, October 28, 2012
Wanted: English Mechanics, Amateur Mechanics & Mechanics
Almost a year ago, I mentioned English Mechanics Magazine and highlighted the amazing questions men in sheds were asking three-quarters of a century ago.
I like to the website of Eric Hutton who is scanning all the old English Mechanic issues from 1865 to 1926.
He is now working on the later issues from 1926 up to 1954 when the magazine went through various name changes before eventually becoming incorporated into Model Engineering. If discussions with Model Engineering go OK, these will be published digitally.
There are some missing edition in Eric's set. Mostly odd magazine plus the whole of volume 6
from April 1929 to October 1929. He's looking to find anyone who can locate these. A full list of those required can be found here.
Eric's website can be found here and is well worth a delve into.
Saturday, October 27, 2012
Replacing springs in a comfy chair
Boing!
Not the noise you want to hear when sitting down in a comfy chair. It will be accompanied by your bottom feeling a little less supported.
Looking under the chair, the first stage it to remove the hessian covering. You'll probably spot bits of zig-zaggy spring poking through this. Inside there will be several springs running parallel to each other.
Replacing a spring isn't difficult. First find an upholstery supplier in the local area. Re-upholstering furniture is a popular college course so if you are struggling, ring then and ask where they get stuff from. If all else fails, there is the Internet but your bum might prefer you don't have to wait for delivery.
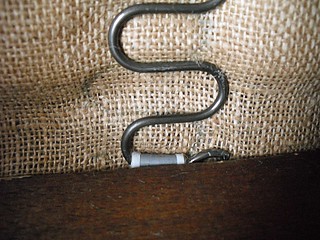 Taking out the old spring involves knocking it free from the retaining tube at each end. A small hammer will do this as they are only held by their own springiness. You might even be able to pull the thing out with your bare hands.
If this fails, try grasping the spring with some big pliers and tapping these with the hammer. Sometimes the problem isn't brute force but getting your whacker in to the target.
You may also need to remove a retaining clip in the middle of the spring.
 Next, compare the new spring with the old. The new version will be a standard length.
Cut the new spring carefully. I used bolt cutters as the metal is stiff but assuming you don't have any to hand, a junior hacksaw should do the job.
Clean up the ends of the metal.
Slide the new spring into the tubes at each ends of the seat.
Finally, in the chair I did, the spring was clipped to a wire running at 90 degrees across the base.
Replacement clips (Z-clips) can be bought but I found them difficult to use and just re-bent the old clip which I had removed earlier.

Finally, use a staple gun to re-fix the hessian to make a nice neat job.
All this took less than 15 minutes once the replacement parts had been bought. Total cost, including 3 spare Z-clips was £2.60.
That's a whole lot less than replacing the entire chair and far more satisfying than chucking an otherwise perfectly good piece of furniture away.
Not the noise you want to hear when sitting down in a comfy chair. It will be accompanied by your bottom feeling a little less supported.
Looking under the chair, the first stage it to remove the hessian covering. You'll probably spot bits of zig-zaggy spring poking through this. Inside there will be several springs running parallel to each other.
Replacing a spring isn't difficult. First find an upholstery supplier in the local area. Re-upholstering furniture is a popular college course so if you are struggling, ring then and ask where they get stuff from. If all else fails, there is the Internet but your bum might prefer you don't have to wait for delivery.
 Taking out the old spring involves knocking it free from the retaining tube at each end. A small hammer will do this as they are only held by their own springiness. You might even be able to pull the thing out with your bare hands.
If this fails, try grasping the spring with some big pliers and tapping these with the hammer. Sometimes the problem isn't brute force but getting your whacker in to the target.
You may also need to remove a retaining clip in the middle of the spring.
 Next, compare the new spring with the old. The new version will be a standard length.
 Cut the new spring carefully. I used bolt cutters as the metal is stiff but assuming you don't have any to hand, a junior hacksaw should do the job.
Clean up the ends of the metal.
Slide the new spring into the tubes at each ends of the seat.
Finally, in the chair I did, the spring was clipped to a wire running at 90 degrees across the base.
Replacement clips (Z-clips) can be bought but I found them difficult to use and just re-bent the old clip which I had removed earlier.

Finally, use a staple gun to re-fix the hessian to make a nice neat job.
All this took less than 15 minutes once the replacement parts had been bought. Total cost, including 3 spare Z-clips was £2.60.
That's a whole lot less than replacing the entire chair and far more satisfying than chucking an otherwise perfectly good piece of furniture away.
Friday, October 26, 2012
Fixing a gearset with bodgery
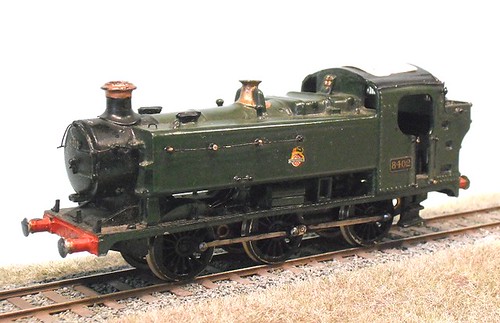
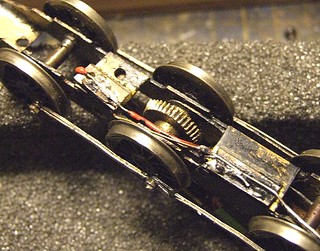 People give me stuff to repair sometimes. The latest "goodie" to pass across the workbench is a rather sad whitemetal kit for a GWR 9400 class tank engine.
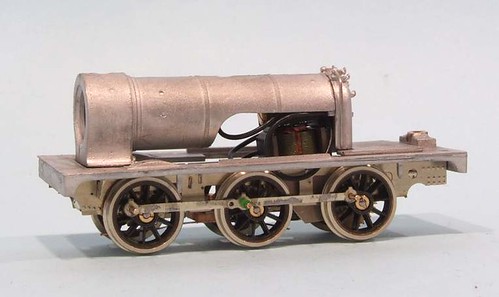
The problem I was asked to look at was the gearset which had come out of mesh.
"Could I just adjust it a little" was the request.
As you can see, it wasn't adjustment the thing required, but replacement. On the middle axle, that's not supposed to look like a bevel gear!
Now, I don't mind helping people but if you want a new set of gears then I'm not inclined to go shopping for some gears and donate them. That's not a hard and fast rule, but in this case if I couldn't do the job fast and for no money, this loco was going back with the suggestion that the price it was being sold for was reduced from preposterous to realistic.
Anyway, what I did was to take the Romford wheels off one side, drop the other out with axles still attached. The gear wheel was flipped over and the whole lot reassembled. Amazingly, this worked. Moving the unworn section to where the wear is happening brought the two gears into contact. The results run pretty sweetly.
Now, what this model really needs is new gears. Better pick-ups. A repaint. New handrails. Missing steps re-instated. A cab interior.
Basically, a good dose of TLC. Let's hope the new owner give it this. At least it will run for now.
Thursday, October 25, 2012
Parker's Guide Bookazine
It can now be revealed, I've been working on a special top secret project - a compilation of many of my Parker's Guide projects from Hornby Magazine into a single best-selling book.
It's out today!
As well as lots of old projects, there are half a dozen new ones in there to entertain and educate you. The full list is:
So much good stuff. Yours for only £7.99
Available from WH Smith, leading newsagents and Sainsbury's.
Buy on-line from: Key Publishing
A few early copies were sold last weekend so Graham Muz has already published review on-line for you to read.
It's out today!
As well as lots of old projects, there are half a dozen new ones in there to entertain and educate you. The full list is:
- Wills Viaduct
- Pocket Money Project - Display case
- Class 33 detailing
- Making holes
- Coal wagons
- Pocket Money Project - Goods loading dock
- Killin Pug (Body and chassis)
- A tale of two huts
- Repainting die-cast models
- GWR horsebox
- LNER signals
- Silver Fox Hunslet shunter
- Using plastic sheet
- Pocket Money Project - Old style TV aerials
- BR 21-ton hopper
- Telephone boxes
- Covered carriage truck
- Soldering metal
- Etched kit basics
- Tarpaulin wagons
- Long low
- Ransomes Rapier 6-ton mobile yard crane
- Pocket Money Project - Tunnel mouth
- Scratchbuilding a hut
- 7mm scale wagon
- 10203
- Pocket Money Project - Grounded van body
- Whitemetal open wagon
- Etched 02 diesel
- Skaledale builder's yard
- GWR V5 Mink van
- Class 13 diesel
- LNER bogie brick wagon
So much good stuff. Yours for only £7.99
Available from WH Smith, leading newsagents and Sainsbury's.
Buy on-line from: Key Publishing
A few early copies were sold last weekend so Graham Muz has already published review on-line for you to read.
Wednesday, October 24, 2012
Book Review: Tiffy's Workshop, Marine Models From Scratch
Graham "Tiffy" Castle has been scratchbuilding model boats for many years and writes regularly in Marine Modelling International magazine.
His articles revolve around scratchbuilding techniques for boat modellers. I've read a few but this book is like the normal fayre on steroids. 21 chapters covering the entire process of building model boats including several alternative methods of producing a hull.
There's lots of detail and simply reading it all will take quite some time. I prefer to think of the book as a reference work to be dipped in and out as required. At the moment, I'm reading the chapter on deck planking as there is a model floating around here that would benefit from some work in this area.
Aside from the traditional modelling methods, computer use gets a chapter to itself. Tiffy covers CAD, craft-cutters and producing dials. This is all a little sketchy but there is enough to start the keen modeller off looking further into the subject.
Some of the pictures show interesting dioramas which beg to be copied or at least used as inspiration for my own models.
164 pages fully illustrated with colour photos. Two pages of index. Perfect bound paperback cover.
Tiffy's Workshop at Amazon
Tuesday, October 23, 2012
P Class cab
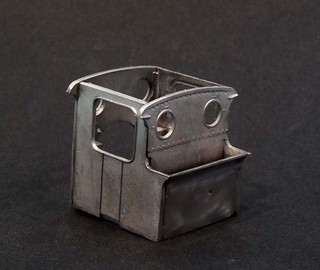 Wills have endowed the P Class with more than the usual number of location aids. Despite this, when I started assembling the locomotive body, I still managed to get the tanks slightly out of line with each other.
The great thing about whitemetal kits is you can usually put the bigger bits together dry to see if they fit. Then a little tack soldering will make sure you are right. Finally, the joints can be made properly with a seam if you feel the need.
From all this I concluded that it made sense to make the cab up as a sub-assembly. A couple of pegs were nipped off the bottom and the whole thing built up on my soldering slab.
One of the problems with this material is that on emerging from the mould it shrinks. Skilled modelmakers allow for this when making the master. Someone didn't do it right with the bunker back and I found if I wanted everything square then this was just under 1mm too narrow.
Not to worry. With everything else in place. a good fillet of low melt solder filled the gap. There's more work to do but it's all together. Even if I were gluing this kit together, I could have filled the gap but solder just makes life quicker, if a bit more "entertaining" when working with thin and meltable materials !
Monday, October 22, 2012
Will the motor fit ?
That's the question that I always ask when building a small model locomotive. The P is tiny and yet the gearbox seems massive. Before progressing the chassis too far, I thought I ought find out.
Fitting the footplate ought to be easy but it seems that there has been a bit of design tweaking in the kit. That chassis is about 2mm too long. Not to worry, there are some half etched lines on the frames where it should be shortened.
This done, everything went together. Then I noticed that the drawing showed the front bufferbeam should be opened up to accept the underframe. A new beam is supplied to cover up the hole. I will never get to be a finescale modeller...
Anyway, the very detailed backhead fits nicely into the back of the boiler. Place the unit in position and one end is floating in mid air. Look at the drawing and realise that the cab floor has to go in to provide support. Fit this and all is well.
The extended shaft sticking out the back of the motor has to be shortened. Proper modellers use a cutting disk or needle file. I use a big pair of Zebra wire cutters. OK, so the cut shaft pings off around the room at Mach 2, but otherwise I can't see a problem. Indeed, the disk or file will heat up the motor shaft and right next to the plastic end of the motor too. Any comments on why I should do what I do would be appreciated.
After all this, the motor and gears will fit nicely. Once the firebox sides are in the chassis, I might trim the gearbox a little to hide it but otherwise there is loads of room. I don't know what I was worried about.
Sunday, October 21, 2012
Turn your hobby into your career
I was quite excited when I read the e-mail subject, "Philip, turn your hobby into your career"
After all, I've gone a bit of the way down this path but it's been more by accident than design. Maybe there would be advice on doing it properly so I actually make some money?
No. Apparently not. Reed recruitment show just how well they know me. When I open the advert, I get this:
After all, I've gone a bit of the way down this path but it's been more by accident than design. Maybe there would be advice on doing it properly so I actually make some money?
No. Apparently not. Reed recruitment show just how well they know me. When I open the advert, I get this:
So not my hobby then.
My hobby if I liked dressing up in Lycra and running around like like is a PE lesson.
Saturday, October 20, 2012
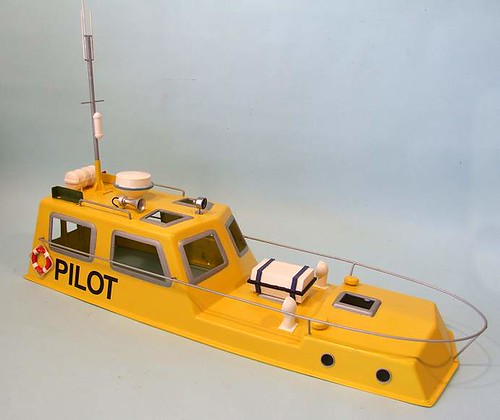
Pilot Boat launched
The Pilot Boat has launched!
On the water, it's absolutely fantastic. At just over 1/2 power the nose starts to rise. Got to 3/4 and it's fully on the plane. Full throttle sees the nose waggling in the air and looking a bit silly. I don't mind though, it's fun like that. Maybe one day I'll get sensible and pop some weight up in the pointy end to tame it - which should see an increase in top speed.
Maneuverability is also excellent. All in all, a really pleasant boat to sail.
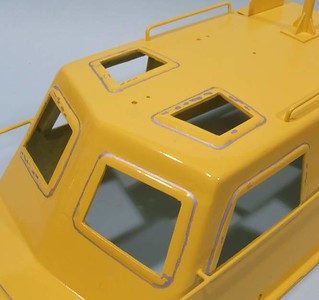
With that brightly painted top, it looks good on the water too. No change of losing sight of it on the other side of the lake!
Conclusion: It's not a perfect kit, but then if you want that you'll need to shell out a heck of a lot more than £99. For the money, it's fantastic and highly recommended.
Friday, October 19, 2012
Genius at the Midlands Model Engineering Exhibition 2012
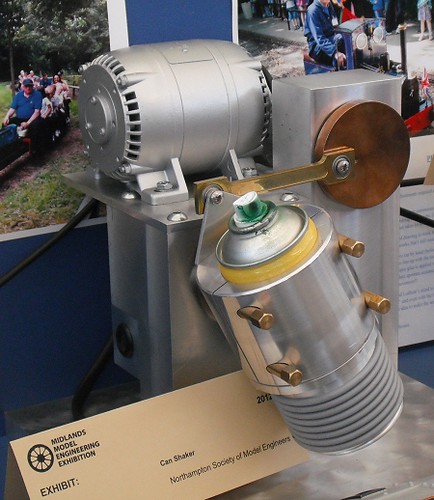 The Midlands Model Engineering exhibition is as good as ever. There are lots of beautifully made models. I look at the workmanship and wish I had a small percentage of the abilities of those metal craftsman.
And then I spot a flash of genius. Someone has made a tool anyone who has ever spray painted something wants. A motorised can shaker.
Who hasn't read the instruction on the side of the paint can which say something along the lines of "Shake the can vigorously for two minutes after you hear the sound of the ball bearing moving."
And who hasn't shaken the can for a bit, heard said ball bearing move, given it another half-dozen shakes and then decided that is enough.
If only I had one of these devices, my paint would always be properly mixed!
Incidentally, does anyone remember the ACME device that you used to be able to buy to shake Humbrol paint tinlets? I'd like one of those as well.
Elsewhere, there were a number of unusual designs. If you recall the famous photo of LMS diesel shunters lined up outside the works, you might know that one of them wasn't a diesel. It was a double Sentinal (Update: That should be Sentinel-Doble - see the comments). Look what I found on display:
For some reason it was on a turntable running at 78rpm (ask your parents, kids) which made photography difficult. I found some construction photos here though.
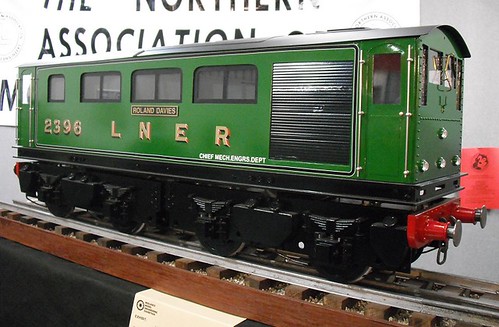
A few feet away, a proposed LNER design for a diesel that would be based on a surplus Newport Bo-Bo electric locos. Gresley was behind it apparently and the project only died when the engine supplier got cold feet over the output required from his equipment.
Finally, you find an experimental bevelled gear. I can't find anything about this one on the web but would be fascinated to know more:
Finally? Well, OK, then how about a real, working GT3:
Quite a selection. I know weird prototypes are pretty popular among the RTR model railway community, but it takes real commitment to build one of these. It's not like you can get your hands on any castings, you're building it from raw metal or nothing.
More pictures from the Midlands Model Engineering Exhibition 2012.
Thursday, October 18, 2012
A running P Class chassis
The Hobby Holidays jig shown a few days ago might seem like an extravagance. It's hardly cheap and you really can do without it. Railway modellers of yore happily soldered locomotives together with irons heated in the hearth with nothing more sophisticated to aid alignment than the Mk 1 eyeball and a try-square.
I don't care.
I have assembled chassis the same way and at the point you see me, I'm fiddling with things trying to make wheels rotate without tight spots. Not this time.
Maybe it's practise. There is still some skill required even when using the jig. Who cares, the chassis worked first time. I built up the gearbox, which required no adjustment (a rare thing to be honest) and dropped it into the chassis. Drive in in the rear axle because there is a chassis spacer in the way of the gearbox if I want to use the middle. That might change depending how well the motor fits into the locomotive body.
Anyway, I built it and it worked first time. If I sound smug then that's because I am. Don't care who knows it either, regular readers will know this doesn't happen often so I plan to enjoy it!
Wednesday, October 17, 2012
Not losing little bits (hopefully)
This is me being clever. Working in a plastic box lid while assembling a model railway gearbox.
This is fiddly work involving very losable screws and bearings. While I obviously can't solder in there, at least anything dropped should stay and not vanish into the deeper recess of the workbench. A gurbscrew, especially one from a gearwheel, is a real b****r to find even on a reasonably tidy bench. Well, I imagine it is, my work area can only dream of being tidy...
Did it work?
Sort of. I still managed to lose one of the motor grubscrews but that had performed it's usual trick of attaching itself to the motor thanks to the laters magnetism. It actually worked inside the thing which meant I couldn't find it for a while despite expecting this.
Never mind. As a plan, it worked. Perhaps perfection is a padded box. Or room maybe.
Labels:
hints'n'tips,
kitbuilding,
model railway,
P Class
Tuesday, October 16, 2012
What's that bracket doing?
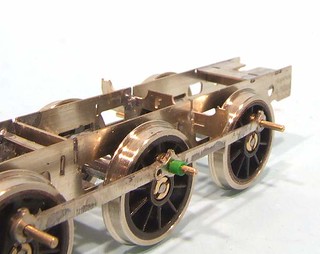 Just when I thought things were going well with the P Class, there is a snag.
 The instructions were followed. I was impressed with the chassis design. Then I put the wheels in and the rods on.
And when I spun them, the rods clonked a bracket.
After a bit of head scratching, I couldn't see where I'd gone wrong. Surely that nice Mr Rice, who has written much about kits being assembled before they are inflicted on the paying public, can't have messed up can he?
Whatever, the simple solution was the unsolder the offending bracket and chuck it back in the box of bits. If it's absence offends me later, I will modify it and put it back. For the moment, scale fidelity loses out to rotating wheels.
Now, why did they allow so much side-play?
Monday, October 15, 2012
Being a project butterfly
David asks: I follow your blog with great interest and note that you are starting another loco build. What happened to the TT gauge class 25 diesel that was on your blog ? The chassis and most of the bodywork were described but it would be nice to see it painted.
Good question.
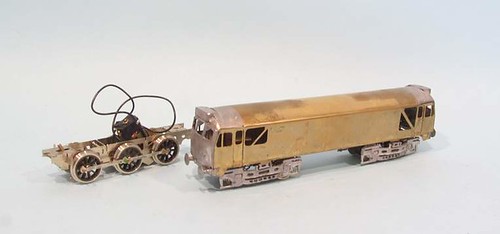
At the moment the loco is sat in a box with all the other bits of the kit. A box it's sat in since January. As you can see from the photo, the model isn't looking bad.
So why have I started something different ?
Because I am a project butterfly. I flit from model to model, alighting on each one for a few moments before fluttering off to have a go at something else. I've always been a bit like this - juggling projects both as hobbies and work. If I stay too long on one job I get bored and since this is (mostly) a hobby, I flit when I feel like it.
I know this isn't the way to get anything done and I apologise if you've been reading and wish I'd crack on with something. Mind you, if you feel like that, do drop me a line as David has bumped the 25 back up the list. Sometimes it's nice to know people are interested. Also, it makes me take another look. I'd forgotten just how good the 25 was looking and how close it might be to completion. A bit of underframe, some grilles and it could go into primer and then paint.
The P Class has been kicking around for a while and I think it will be a pretty quick job. At the moment I need something that gets done and gets done fast. There is pleasure top be had from doing a job like this fast. Hopefully I'll see some changes pretty quickly and that will spur me on to do more.
The other, duller reason, is that it will get me ahead with blog posts. I've had a few magazine projects floating around for a while and there are more to come. Some of these will pop up hear but most won't. Thus, if I want to keep posting daily (it's a good discipline for me) then a project that progresses fast will help me out.
So, sorry if you are waiting to see me finish something. I know that the right hand sidebar contains a few stalled builds. I will get around to doing them. Railway modellers should consider themselves lucky. There is a Brede lifeboat that I planned to complete over 3 years ago. And then the Beetle 7 years ago. And my campervan needs to get MOT'd...
Sunday, October 14, 2012
Talk-Talk TV Advert
Having moaned about Halfords adverts a few posts ago, I ought to mention one I really like at the moment. Talk Talk, the mobile telephone company, have a marvelous ad that features a model village and its inhabitants.
I watched it a few times and wondered which model village was featured. There is a lot of CGI and I pondered if it had all been done this way. Nope, all the scenes were filmed at Bekonscot model village in sunny Bekonsfield.
There is more on the Bekonscot website.
Saturday, October 13, 2012
Getting jiggy with the P Class chassis
First job on the P - make the mechanical bits work. If the wheels don't go round then anything else is a waste of time.
Setting up the Hobby Holidays jig requires the conrods to be made up. Interesting as there are several options for this. I've gone for the simplest, a fixed rod with no flex. You have to break a few bits off the etch for this but they are half-etched for ease of removal.
For a simple 6-wheel chassis, there is a lot to this beastie. I'd expected 2 or three spacer, I've got 7 including replicas of the inside cylinders. By the look of it I can even represent the slide bars and stuff is they don't interfere with the axles.
The bolt sticking out of the top is a clever addition, access for the screwdriver is via a hole in the bottom of the cylinder block. In fact the whole design, by Iain Rice I think, is pretty clever. There's some good thinking gone in to this and it's accompanied by a reasonable exploded diagram. I think I've got it right but time will tell.
Friday, October 12, 2012
P Class
It occurs to me that I've not featured a loco build on the blog for a while. It's also been a while since I've built a model for me and not with the intention of it appearing in print. Sometimes, it's easy for this not to be a hobby.
Anyway, my chosen subject is a Wills Finecast P Class tank. I bought the model years ago. While not something I'd normally consider, the P's were the only class of steam loco passed to work over the Hellingly Hospital Railway.
I think they were only passed at a time when BR was trying to explain how much work would be required to bring the line up to scratch if they wanted real engines rather than lines own electric one to handle services. As far as I know, a P never traversed the hospital tracks.
Anyway, the kit is whitemetal with a nickel silver chassis. Wheels are Romford and there is a motor and gearbox in the packing. At the time I bought the model, probably because it was cheap, I picked up all the bits to make it work. With a bit of luck, this will be a fairly quick build and a bit of fun. It's a lovely looking little loco anyway.
Thursday, October 11, 2012
Working Yard Crane in Hornby Magazine
Inspiration for this month's Parker's Guide came at the Midland Railex show. A visitor arrived and while chatting mentioned she's had problems building a Peco yard crane. I wondered how difficult it was and had a go.
Since I have the benefit of not being a beginner to this sort of thing just to make things more entertaining, I built it and made the mechanism work. In OO. I am truly brilliant and just a bit mad.
Elsewhere you find me reviewing a Metcalf station and some books. My staff project involves ruining a couple of Base Toys lorries. Well, when I say ruining, I mean ruining their collectible value while improving their modelness.
Buyers get a free scenic supplement too - In there I'm looking at a real scene and working out how it could be modelled. Then I don a donkey jacket (ask your Dad) and get to work on a small road full of potholes.
Hornby Magazine Website
Wednesday, October 10, 2012
Book Review: Railway Top Spots by Julian Holland
Once upon a time the hobby of train spotting wasn't reviled as it is now. It was an activity that most young boys took part in. Showing an interest in trains and recording the numbers of those that you had seen was perfectly acceptable and indeed, spawned an industry supplying materials and information and resulted in one of our best known transport publishers - Ian Allan.
Real trainspotting wasn't just a case of hanging around the end of a platform with a bottle of Tizer and pack of jam sandwiches. The keen enthusiast would travel around the country and even engage in a bit of sneaking onto engine sheds in the hope of quickly picking up a page full of "cops" before exiting propelled by the shed masters boot.
Julian Holland's book celebrates those halcyon days with a tour around the regions. In each one , some of the top spotting stations are covered with a few pictures and brief description. There are also sheds to look at. The location, or more usually the route from the nearest station, is given along with photos taken there. The authors hand written spotting list makes an appearance too. This last item might seem like a bit of a gimmick but if you want a representative selection of engines to be found in a single day, it could be useful.
Most of the images and descriptions relate to the popular steam/diesel changeover era although a few later pictures such as the scrapping of BR Blue Westerns pop up. Photos are a mix of black & white and colour. Reproduction is good and most of the time, the pictures are large enough to yield useful information.
I like the mix of motive power. It's not all express engines despite these being the most popular for the spotters in real life. A couple of Deely tanks make it in, prompting me to wonder where I put that kit for one bought many years ago.
Yeovil Town station also appears and looks like a real possibility for model making with a compact site with both station buildings and engine shed fitting in to a single image. Doubtless someone will tell me that it was a sprawling site that would take up a football field in 4mm scale, but I can dream.
The book even has a proper index although you need to get your head around how comprehensive it is. Looking up a Z Class 0-8-0 tank (another on the list of locos I'd love to make a model of) I spy an entry but arriving at the page, it turns out there is no photo. Pages with pictures are shown in bold, those with a mention in the text are normal. Most books would just leave the later out so it's a good thing once you get the hang of it.
At 191 pages, this would be a thoroughly enjoyable read for anyone of a certain age who remembers bunking sheds in their schoolboy shorts. The pages will stoke up many memories. For those of us born far too late for hat sort of thing, it's still good fun with lots of nice and surprisingly useful photos. The loco allocations are a lot less boring to read than in "proper" books too but just as informative.
Tuesday, October 09, 2012
Derelict Cornish mine pump house
 Stanton Abbey produce a range of pottery buildings of interest to those with garden railways. We spotted this fantastic derelict tin mine back in March at the 16mm Society AGM. The model was ordered and delivery awaited.
Due to problems with the kiln used to fire the pottery parts, there was a bit of a delay but a few days ago, there was a phone call from Robert Silkstone to say he would be in the area delivering other models and would someone be in to accept this one ?
Weighing in at over a stone and with a chimney 18 inches tall, it's not a small model. Placed in the prepared spot by the railway, it looks fantastic. Loads of character.
Being a stone building, I feel it could easily pass for a large O gauge or G1 model as well as G scale.
Cost, including delivery, and a demonstration of how to make the chimney smoke using some kitchen towel, a very reasonable £65.
Check out the Stanton Abbey Website.
Monday, October 08, 2012
Smokebox paint
 Visiting the Severn Valley Railway last week, I had the chance to examine Stanier Mogul 42968 as I waited to board the train.
I'm pleased to say that it was dirty. Not the thick filth of late BR days but a workaday grubbiness that seems appropriate.
The smokebox particularly appealed - look at the heat blisters going on with the paint. If I produced a model that looked like this, people would suggest I need a better airbrush or at least to learn how to use the one I have.
I suspect that the easiest way to reproduce this effect would be to brush some Mek Pak on the paint and watch it crinkle. Then spray another coat to seal the effect in.
What you really can see is that the boiler black and smokebox blacks are very different colours. There's some nice browniness going on by the footplate too - a bit of weathering powder there I think. The footplate is matt and dusty too so a bit more powder required.
Sunday, October 07, 2012
BusTubeTrain conversion ?
Spotted on the Transport of Delight Blog is this fantastic BusTubeTrain vehicle. Apparently it is a Daimler DMS owned by the Epping and Ongar Railway.
The rear(?) train wheels are add-ons, covering the busses rear wheels. Inside, it is possible to walk from one end to the other.
Ingredients for a model: Diecast bus. Diecast tube train. RTR DMU
Method: Take deep breath and grasp your saw handle firmly...
My mate Tim describes this as "Perfect integrated transport" !
Saturday, October 06, 2012
Class 22 in MLI Mag
The history of British Rail Class 21,22 and 29 is a real can of worms. Worms that were bought in haste and then consigned very quickly to places they couldn't be spotted and would cause as few problems as possible.
Colin Marsden has done his usual excellent job trying to untangle the history and the magazine is full of photos and plans.
In the modelling section at the back, Page 95 to be precise, you'll find a photo of my 3mm scale Class 22 built from a Worsley Works scratch-aid kit. It's not a great picture but I like to try and see the scale get a bit of coverage where I can. Who know, perhaps someone might look at it and think, "I could have a go at that."
Flockburgh deisels
Modern Locomotives Illustrated Magazine
Friday, October 05, 2012
Pilot Boat Painting Disasters - Part 4, Done and dusted
Filling in yesterdays lines with silver paint went well. Even a thin line is easy to paint up to and the slight ridge of dry paint tends to stop the new stuff spreading where you don't want it to go.
After this, I got to the fun stage - sticking the extra bits on. Navigation lights are painted. The searchlight and airhorn are glued in place. A little bit of wire into the back of the later added a little bit of detail.
Needless to say there still was a problem. That radar dome is made of some funny rubbery stuff. After over a week, the paint hadn't dreid on the surface. The same paint that worked so well on the two liferaft pods. What I had was a sticky surface. Maybe there was some mould release or perhaps the material just didn't like paint. The pale blue line worked OK and dried as fast as you would expect.
The word "Pilot" is made up from a BECC vinyl letter sheet. The 20mm tall one that costs a fortune. Better planning would have seen me buy a bespoke sheet at a show but of course, I didn't remember to do this. It took me two goes to put the letter in place too. Attempt one saw the word at different positions along the side. I nearly left it but relented in the end knowing I'd regret not peeling the letters off and moving them later.
Once happy, the whole top recived a spray of Humbrol satin varnish to bring all the tones into line. This seals the letter to the sides, not an essential step, but one I like to make.
If I'm picky, some of the silver window edges aren't pefect but on the water I don't think anyone will notice. I've got to finish this model and so I'll have to accept it won't be perfect in every way.
Thursday, October 04, 2012
Pilot Boat Painting Disasters - Part 3, Making it better
 If you learn more from making mistakes than getting things right, I've learned and learned good.
Once the Pilot Boat superstructure was dry from it's wipe down with white spirit, I needed to start the repaint. All the yellows was gone and so were the silver window frames. I could have repeated the painting process again but to be honest I couldn't face all the frame masking again.
I'd also got an empty pot of warning yellow so took a trip to Halfords and bought a can of Ford Signal Yellow car paint. For a moment I seriously considered florescent yellow but then thought better of it. I also noticed they do a luminous paint and wondered what I could use that for...
Anyway, painting with an aerosol is a lot easier than an airbrush. A few blasts with the paint, some hairdryer heat and another waft gave me a nice yellow boat top.
Windows would be harder. The moulding doesn't provide any sharp edges to work with. Proper painters would probably mask the edges and spray but I decided it would be easier to draw these in with a bow pen and then fill in with a brush.
The results weren't bad. Silver paint is a paint to use - it varies in runniness no matter how much I mix it - but generally I think I got away with following the edges of the windows by hand. The blobs you see in the middle of the window are areas where I was checking how the paint flowed from the pen on the smooth yellow paint. I eshewed the ruler because all those handrails would get in the way but with a little practise and confidence the lines ended up OK. Confidence is the key to using a bow pen. Go for it and you end up with a much better result than you get if you are "careful". Anyway, I could always wipe the mistakes away with a dry kitchen towel before they became permanent.
Labels:
model boat,
painting,
Pilot Boat - Speedline Kit
Wednesday, October 03, 2012
Book Review: Model Trains, Railroads in the Making
This is a very important book. It's the first model railway book I read. Not through choice, it was just that Young Phil was a regular at Whitnash Library and this was the only volume they had on the subject. I was working my way through the Famous Five series and pretty much anything else on the shelves of the children's section but this book caught my eye and I'm sure I borrowed it numerous times.
As a book on the subject, it's not great. The text began life in Italian in 1969, being translated to English 3 years later by Gerald Pollinger and published by Plateway Press, part of WH Smith. There was obviously some demand as the copy I now own was published in 1981.
The photos though are the things that caught my young eye. Once you get past the half dozen technical pages at the front printed on the roughest paper imaginable, it's full colour glossy all the way. Photos 1 and 2 show the Trix model of Der Adler.
I'd never seen a model train like this. My train set was a Triang 3F and some Graham Farish wagons. This was a tiny little model, crude to our eyes now but colourful and fascinating back then. I still aspire to owning one today.
The book continues with more and more photos of contemporary (for 1969) ready to run rolling stock. The first UK prototype is Photo 12 and shows a Hornby Dublo 2-6-4T. I didn't take much notice of this as opposite it was an American steam loco with inclined cylinders and fly cranks produced by Altini. It's weird. So weird I can't even find a photo on-line. The text mentions the most modern BR steam engine is the Leader class - an anachronism in 1969, never mind 1981 !
To modern eyes, the 112 photos show some very crude RTR models. There's a Dublo Deltic at 59 and while it looks primitive compared to the foreign stuff, not THAT primitive. Despite this, I'm sure I enjoyed leafing through. We didn't go abroad for holidays and so this was one of the few ways I saw continental trains. Of course I didn't know at that point that if you were interested in British trains, admitting there were any in other countries is tantamount to admitting that you are a devil worshiper.
Towards the back of the book rolling stock and scenic items get a look in. I do remember being fascinated by a train of Italian wagons loaded with road building equipment. Maybe the yellow plant caught my eye or maybe it was just different enough for me to remember. There is a hint of incongruity with a steam traction engine loaded along with diesel ground levelers.
I also remember liking a close-up view (Photo 105) showing a Marklin van being loaded by Merit staff with English labeled oil drums and milk churns. Perhaps this influenced my love of detail and cameo scenes on model railway layouts.
Maybe if the library had stocked Guy R Williams scratchbuilding book then I'd be making stuff for Pendon by now. That probably wouldn't have been in the children's section though !
Tuesday, October 02, 2012
Pilot Boat painting disasters - Part 2. Taking it off again
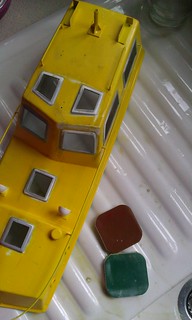 So, there I am with a Pilot Boat superstructure covered in paint. Bad paint.
 Plan A - Sand the duff areas and re-paint them. I'm sure that's what the experts would do.
A pack of Micromesh sanding things in various grittiness were to hand so I started work.
The effect was interesting. I managed to remove some paint. Dodgy areas were taken back to the bare plastic but looking critically at the result, after a calming tea break, I knew that this was just a patch job. Even if I bought a new pot of paint, the surface would be lumpy and unsatisfactory.
Plan B - Squirt Cillit Bang over the model. On many surfaces, this is a very effective paint stripper. Not here. All I got was a sticky surface with as much paint on as before. You might ask why I didn't use proper paint stripper designed for use on plastic. The answer is simple, I didn't have enough for a part over a foot long.
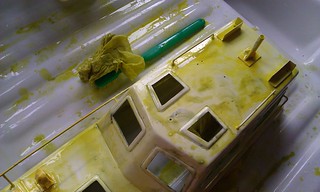 Plan C - This occurred by accident. Hoping to de-sticky the surface, I wiped it with white spirit. To my surprise, the paint literately washed away.
 A few minutes work with more spirit, clothes and old toothbrushes gave me a largely clean plastic superstructure. Not perfect, but good enough for a second attempt.
Labels:
model boat,
painting,
Pilot Boat - Speedline Kit
Monday, October 01, 2012
Pilot Boat painting disasters - Part 1
Listen to your own advice. That's what I should remember. It's good advice and I do know what I'm talking about sometimes. When I don't, it goes a bit; well, you judge...
The pilot boat top is yellow. Bright yellow with silver window frames. Pondering how to achieve a neat finish, I decided to paint the frames, let them dry, mask them and airbrush the top coat.
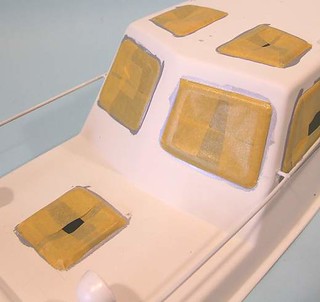 With brass handrails firmly attached to the superstructure, a quick spray of primer seemed in order and this went well using a can from Halfords (see, I do go in there, despite what I said yesterday). This was allowed to dry and Humbrol silver was applied with a brush. All very nice. Not too neat but that didn't matter.
Again, allowing for plenty of drying time, metallic paints are special in this respect, a hour of masking followed. I used the proper Tamya tape. The good stuff. Trimming the edges with a knife resulted in what I though was quite an impressive job. Well, I hate masking so it looked good to me.
Back at the spray booth, I started with half a bottle of Railmatch yellow. Wafting this on, I discovered it wasn't covering the excess silver poking out from the masking. I had forgotten how rubbish yellow is at covering anything.
Never mind, an extra dose of white primer and the silver vanished. Quite a healthy dose but at least I had a decent base to work on.
Spraying the yellow continued and I remembered my advice: Paint large models with an aerosol. The Badger 200 is an excellent airbrush but doesn't really put out enough paint for a big model. Although I got coverage, I could see that some areas were slightly yellower than others. Attempt to fix this with more paint didn't seem to go well. Eventually, I ran out.
 Never mind, I let the model dry and took it out to the daylight. It actually looked OK.
So, back to the workbench to peel off the masking. Clever people will work out what happened next.
The depth of paint and primer applied reared it's white and yellow head. Around the windows, the surface cracked and broke away. Think potholed tarmac breaking away in the road, but in bright yellow, and you'll see what I mean.
It was no good, the paint was going to have to come off.
The pilot boat top is yellow. Bright yellow with silver window frames. Pondering how to achieve a neat finish, I decided to paint the frames, let them dry, mask them and airbrush the top coat.
 With brass handrails firmly attached to the superstructure, a quick spray of primer seemed in order and this went well using a can from Halfords (see, I do go in there, despite what I said yesterday). This was allowed to dry and Humbrol silver was applied with a brush. All very nice. Not too neat but that didn't matter.
Again, allowing for plenty of drying time, metallic paints are special in this respect, a hour of masking followed. I used the proper Tamya tape. The good stuff. Trimming the edges with a knife resulted in what I though was quite an impressive job. Well, I hate masking so it looked good to me.
Back at the spray booth, I started with half a bottle of Railmatch yellow. Wafting this on, I discovered it wasn't covering the excess silver poking out from the masking. I had forgotten how rubbish yellow is at covering anything.
Never mind, an extra dose of white primer and the silver vanished. Quite a healthy dose but at least I had a decent base to work on.
Spraying the yellow continued and I remembered my advice: Paint large models with an aerosol. The Badger 200 is an excellent airbrush but doesn't really put out enough paint for a big model. Although I got coverage, I could see that some areas were slightly yellower than others. Attempt to fix this with more paint didn't seem to go well. Eventually, I ran out.
 Never mind, I let the model dry and took it out to the daylight. It actually looked OK.
 So, back to the workbench to peel off the masking. Clever people will work out what happened next.
The depth of paint and primer applied reared it's white and yellow head. Around the windows, the surface cracked and broke away. Think potholed tarmac breaking away in the road, but in bright yellow, and you'll see what I mean.
It was no good, the paint was going to have to come off.
Labels:
model boat,
painting,
Pilot Boat - Speedline Kit
Subscribe to:
Posts (Atom)


