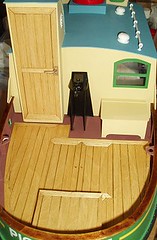
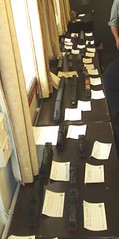
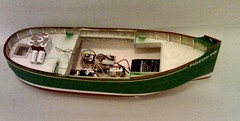
I’ve posted this picture just because I’m proud of it. The woodwork at the back of my boat looks really good – to me anyway.
It’s interesting how details make a model though. The handle on the door transformed a nice bit of planking into a model of something. For such a small casting, the effect it gave was startling.
This has started me thinking about extra detail for this area. Perhaps a deck chair (pun intended, they all are) but that might be too long. A directors chair perhaps. With a discarded newspaper and half drunk mug of tea. Just something to breath life into the scene.
Wednesday, May 31, 2006
Tuesday, May 30, 2006
A pet hate.
I hate printed plywood. Every model boat I’ve seen at a show with it has always looked terrible. Am I the only person who can see what it is and that it doesn’t look anything like what it is supposed to be ?
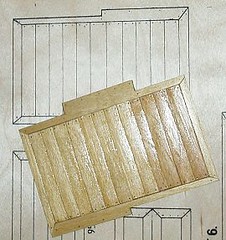
So, the boat box is nearly empty except for a piece of printed ply. The instructions tell me that I cut the parts out, stain them and then glue the result to the boat. No chance.
My version – trace the parts onto tracing paper. Tape this to a cutting board and replace every plank with a version cut from some bass wood I bought at a model railway show years ago. The sides of each plank are gently sanded to emphasis the gaps between each board. The wood is stuck to the paper with PVA of Bostick solvent free glue.
Once this is done the face is sanded and the piece cut out from the sheet leaving the tracing paper as a backing. A coat of Ronseal satin varnish, another sand and a final coat, finishes the job.
This looks sooooo much better than the ply. Proper grain going in the right direction on each piece. A nice 3D effect as well. Not too lumpy, just enough.
It’s not that time consuming – the largest part for the rear deck took about an hour and half to plank which I did while watching Sean Connery save the Earth from a meteor in a particularly duff film.
Two different colour of stain were employed. Light oak for outside wood. Mahogany in the bridge. The quick dry varnish worked a treat. Not oo glossy a finish and ready for recoating in ten minutes. Just the think for impatient modellers like me. I think the top rail will get a coat as well as the finish is better than that currently sported.
Monday, May 29, 2006
At last, we get to the water.
If you plan to try out a new boat, it makes sense to choose a day when you have the lake to yourself. That way if there are any problems you get to work them out without lots of “helpful” suggestions. This was the reason I drove down to the boat club this morning nice and early.
When I arrived, Mike was there fitting a new blind. A few minutes later a couple of guys turned up delivering paving slabs. Of course the landlord arrived as well. Quite a crowd.
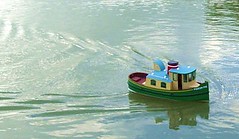
Fortunately the Pie was placed on the water and apart from a list to starboard, behaved itself. Off she sailed, happily traversing the full width of the water with no radio problems.
The weight distribution was sorted out – it’s lead shot in plastic bags so is easy to move around. I removed a bit from the front as the nose was a bit low. I need to take more out but this can wait until all the fittings are fixed on as this might alter the trim a little.
Despite not having a proper charge, I managed around half an hours sail. This ought to improve as the battery is run through a few charging cycles. Pretty good though. An unprototypically high speed is possible but it’s not too ridiculous. Turning is excellent. With a little practise I doubt anything will be able to outmanoeuvre me. No need for a bow thruster on this boat !
The light breeze didn’t worry it so I expect to sail in most weather conditions. However before this happens I am going to finish the model. Plenty of fitting still await painting and sticking on and there is a lot of woodwork to do. Nothing better than running a model to give impetus to this process though.
What I have is a boat the right size for the water available that is really pleasant to sail. After all the hours spent on construction, enjoyable as they were (mostly), this is good.
When I arrived, Mike was there fitting a new blind. A few minutes later a couple of guys turned up delivering paving slabs. Of course the landlord arrived as well. Quite a crowd.
Fortunately the Pie was placed on the water and apart from a list to starboard, behaved itself. Off she sailed, happily traversing the full width of the water with no radio problems.
The weight distribution was sorted out – it’s lead shot in plastic bags so is easy to move around. I removed a bit from the front as the nose was a bit low. I need to take more out but this can wait until all the fittings are fixed on as this might alter the trim a little.
Despite not having a proper charge, I managed around half an hours sail. This ought to improve as the battery is run through a few charging cycles. Pretty good though. An unprototypically high speed is possible but it’s not too ridiculous. Turning is excellent. With a little practise I doubt anything will be able to outmanoeuvre me. No need for a bow thruster on this boat !
The light breeze didn’t worry it so I expect to sail in most weather conditions. However before this happens I am going to finish the model. Plenty of fitting still await painting and sticking on and there is a lot of woodwork to do. Nothing better than running a model to give impetus to this process though.
What I have is a boat the right size for the water available that is really pleasant to sail. After all the hours spent on construction, enjoyable as they were (mostly), this is good.
Sunday, May 28, 2006
The evil accelerator pump
Bently says “7. Poor transition from idle to operating speed”
My symptoms, engine ticks over OK but if you press the accelerator it goes, “bobble bobble pluuuu” and either revs or stalls.
Sounds like the same thing then !
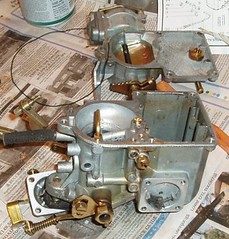
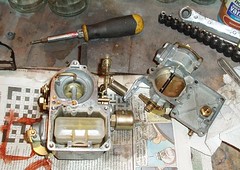
Out comes the carb, onto the bench where it is stripped down again. Carb cleaner is sprayed through all the passages as I try to work out where they run. The books tells me to investigate the accelerator pump so I do. A bent tube points down into the throat of the carb and after spraying and poking wires this appeared to be the problem. More spraying and poking with it out of the main body and I finally get it clear. A fair amount of crud was pulled out from behind the diaphragm too which can’t be a bad job done. I still don’t really understand what this bit does – best guess is it gives a shot of petrol when you accelerate, presumably to avoid a flat spot during the engine speeding up.
Reassembly is the reverse etc. etc. Everything was better but still not great. However it was good ebough to warrant a gentle test run where things improved. Not more rough transition from idle to acceleration. Presumably the crud left in the pipe (there was some as the van still hesitated on hard acceleration) had been blasted through the system.
Tomorrow we are going for a proper test run with hills and everything !
My symptoms, engine ticks over OK but if you press the accelerator it goes, “bobble bobble pluuuu” and either revs or stalls.
Sounds like the same thing then !
Out comes the carb, onto the bench where it is stripped down again. Carb cleaner is sprayed through all the passages as I try to work out where they run. The books tells me to investigate the accelerator pump so I do. A bent tube points down into the throat of the carb and after spraying and poking wires this appeared to be the problem. More spraying and poking with it out of the main body and I finally get it clear. A fair amount of crud was pulled out from behind the diaphragm too which can’t be a bad job done. I still don’t really understand what this bit does – best guess is it gives a shot of petrol when you accelerate, presumably to avoid a flat spot during the engine speeding up.
Reassembly is the reverse etc. etc. Everything was better but still not great. However it was good ebough to warrant a gentle test run where things improved. Not more rough transition from idle to acceleration. Presumably the crud left in the pipe (there was some as the van still hesitated on hard acceleration) had been blasted through the system.
Tomorrow we are going for a proper test run with hills and everything !
Saturday, May 27, 2006
Competition time !
No model making today – it was off to the Double O Gauge Association AGM where I get the “honour” of organising the annual competition.
It’s a salutary lesson every year when I have to work out what I plan to enter. This year I had only one candidate, the Barclay Shunter. Perhaps reviewing my blog will remind me what I’ve built over the last few months. Not a lot that still remains in my possession and meets the criteria for entry. Perhaps next year I’ll add a class for 1:12 scale model boats !
No prizes for me this year either. My scruffy little shunter couldn’t compete with some of the gorgeous models entered in the same class. I don’t mind, as I like it. Nice to have something to aim at though.
Friday, May 26, 2006
No rust in here now.
Charge the battery and the engine turns over – it just won’t fire. So I give it a shot of carb cleaner in the top which gets things moving. And he idles ! Really well !
OK, lets try some revs. Splutter, pop. Hmmm, Unscrew the plug from the bottom of the tank on the side of the carb. Petrol all over the engine. Spray carb cleaner in and do the plug up. He starts again.
Still not much in the way of revs though. I tweaked the mix, the idle speed (idle was still OK) and even the timing but nothing helped or even made any real difference.
Then he wouldn’t start again. Nothing. Must be dirt in there. So I take the carb off and move to the bench. I am getting worryingly quick at this.
Cleaner is shot though everywhere I can shoot cleaner. All seems to flow freely so I put it back together.
Result – a little better but it’s still not happy on the revs. Turning the richness up seems to help a bit but I still don’t fancy venturing off the drive on my own at present.
The fuel filter hasn’t filled with muck yet though. I suppose that must be some consolation.
Thursday, May 25, 2006
Out of line
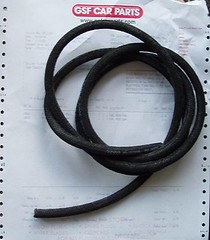
Or at least that’s what GSF have been for over a week. This means that I haven’t been able to complete the work on VW Type2. The tank was flushed out and all the fuel line replaced, except the bit between the tank and the engine.
Today, at last, they had the pipe. 20 minutes on a rare dry and bright evening saw the final connections made and clamped. I poured a couple of litres of petrol in and checked for leeks. None so far.
Then I discovered the battery was flat…
Today, at last, they had the pipe. 20 minutes on a rare dry and bright evening saw the final connections made and clamped. I poured a couple of litres of petrol in and checked for leeks. None so far.
Then I discovered the battery was flat…
Sunday, May 21, 2006
An unhappy day at the races
We didn’t have a chance to test the Tomkat after repairing the drive shaft. Of course as soon as we put it in the water and ran it around, the boat got slower and slower until it limped into the bank, all our racing dreams dashed.
Racing continued although it was more a war of attrition rather than a graceful sprint. Lots of battery problems, dodgy steering and general unhappiness. I suspect there will be a lot more testing before the next heats. There certainly will for us !
Racing continued although it was more a war of attrition rather than a graceful sprint. Lots of battery problems, dodgy steering and general unhappiness. I suspect there will be a lot more testing before the next heats. There certainly will for us !
We are sailing
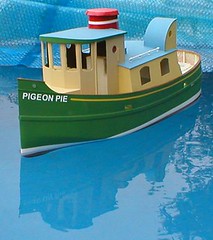
A bit of catch up here. Before I built the Armstrong Whitworth, I managed to get Pigeon Pie to a sailable state. Having had the maiden voyage in the bath, the next step was to move out to the pool in the garden.
With the cover half off I have sailed it around a little. Good thing really, while reversing the propeller unscrewed itself and had to be rescued from the bottom. This wouldn’t have been possible if it had happened on the lake ! I need to fix the retaining nut a bit more securely.
Steering needs checking. I had to have the trim set to full left in order that the boat was manoeuvrable. Not difficult but rain stopped tinkering on the day.
With the full weight inside this a heavy boat. It is very stable so I hope not to have to worry in cross winds or slightly choppy water.
Saturday, May 20, 2006
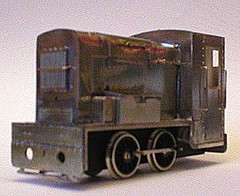
Finished...
…well, nearly. All the bits have been assembled and the model passed back to Trevor who was delighted to see it. So were a number of visitors to his stand so it looks like it will be a popular model.
Total build time so far is about 8 hours. I’ve been rushing things which is why some of the solder shows. Of course there is no motive power either. A more realistic time of 15 hours from kit to finished model should be attainable for the experienced modeller. It’s a hobby though so why worry about the time ?
I’ll sit back and wait for the castings and new cover plates for the wheels to replace the current under size ones. This is all part of the normal kit design, or at least it should be. Some manufacturers don’t bother putting a kit together before it hits the market but if you don’t you lumber all the purchasers with something that nearly works, but not quite. Not this time, we’ve already talked about a potential upgrade for the production models that will make a fairly easy kit to build even better.
Hopefully later in the year I’ll get to finish this model with mechanics and paint. I love the look of it and can’t wait to do this.
Thursday, May 18, 2006
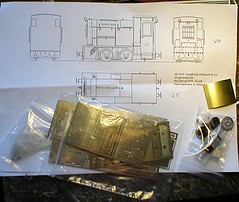
6 hours
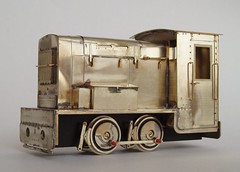
A quarter of a day in and I’ve nearly reached the end of the soldering. All the etched bits have been attached apart from the roof. Handrails are on, although the plan shows a couple more that there aren’t holes for. I just need to add handles on the bonnet doors. The wheel overlays need sorting to but I’ll put a motor in first.
The kit fairly flies together. I reckon that it should be possible to go from kit to finished in around ten hours. Of course this relies on having built lots of kits before and really going for it. If you allow 12-15 hours, a this will make a really nice model.
Ugly though.
The kit fairly flies together. I reckon that it should be possible to go from kit to finished in around ten hours. Of course this relies on having built lots of kits before and really going for it. If you allow 12-15 hours, a this will make a really nice model.
Ugly though.
Tuesday, May 16, 2006
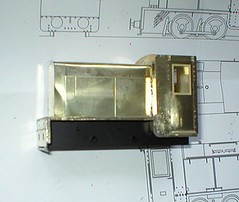
3.5 hours later...
Good job the kit goes together pretty well. I have a chassis that looks square – the wheels rotate freely with the rods on. I’ve sprayed it so the paint can dry before I start re-attaching moving bits.
Bending the bonnet was interesting, as was that footplate. I managed to put the top (flat) part in back to front despite checking several times. It won’t show so it stays as it is. The cab goes together really well once you’ve punched out all those rivets.
Now for detail.
Bending the bonnet was interesting, as was that footplate. I managed to put the top (flat) part in back to front despite checking several times. It won’t show so it stays as it is. The cab goes together really well once you’ve punched out all those rivets.
Now for detail.
Thanks Trevor !
Trevor rang me on Sunday. He was checking progress on a number of projects he’s supplied me with. One of these is a test etch for an Armstrong Whitworth 1935 diesel in 7mm scale. He is going to a show on Saturday and it would be great to take it with him to gauge interest. I had to admit that the kit was still a collection of parts and pointed out it would have been useful to be reminded a bit earlier.
Trevor is OK with this – I promised a finished loco by July when he attends his next narrow gauge show.
Still, I might as well have a look.
Trevor is OK with this – I promised a finished loco by July when he attends his next narrow gauge show.
Still, I might as well have a look.
Monday, May 15, 2006
My boat of many colours
Once upon a time, when you built an Airfix kit, the instructions end with a drawing showing which colours to paint your model.
When you are all grown up kits get more expensive but you don’t get the picture telling you how to paint it. If you are lucky there are some livery notes but after that you have to do your research before heading to the paint counter of the local model shop.
My boat has a whole page devoted to a list of the colours the manufacturer painted the prototype model in. He notes that you can paint your boat any colour you like – possibly more in hope than expectation as most of us will find the colour scheme an important part of the model’s appeal. I certainly did and although I’ve modified things a little I’ve pretty much stuck to the paint job on the model I saw last year.
One thing I didn’t spot until I read the paint page was that the saloon and bridge were different colours. Both versions of beige but one with more yellow in it. Once I had read this, the difference stood out a mile in the photographs. This wasn’t spotted in either of the two reviews I had acquired. One has gone for a very beige look, which is hopelessly washed out. The other had used the yellow, much nicer and sunnier, but it didn’t look as nice as the original to my eye.
Mind you, having painted the main sections of the boat, I know its true for boats as well as trains, the detail brings the model alive. When you decorate a room, it looks nothing without all the bits in it. I need to get the windows, vents, chimney (shiny red !) etc. applied now to offset that beige !
Sunday, May 14, 2006
Framed
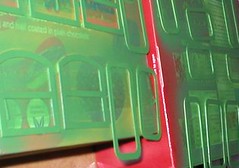
I’ve been putting off cutting the windows for ages. It’s always been a job that loomed over me. I knew I’m going to have to do it some time, just later please.
So with Dr Who on the telly at the end of the bench I put a new blade in the scalpel and started. By the time the cybermen had started chasing people around the big house (Trigger is going to take over the world ?!) I had a pile of windows. Fortunately they were in line on the printed sheet so I was able to chop long lengths, only the corners were a little fiddly but nothing a sharp blade couldn’t deal with. A bit of filing on the outside corners and all looked good. I even score lines on the side windows to show where they opened.
Brush painting was considered but I reckoned spraying would be quicker and neater. When I started they flew around the bench. However pulling a couple of boxes out of the recycling bin and using some double sided sticky tape I was able to spray and hair-dry with impunity. Best of all I could spray with the windows vertical so paint didn’t fall out of the cup on the airbrush. Removing the frames was a bit awkward as the tape was very sticky, the scalpel came in useful again to pick them off without damage.
Simple really – I don’t know why it took me so long to get around to it.
Saturday, May 13, 2006
Snapped drive
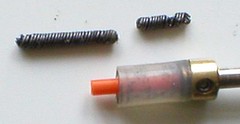
This is the snapped drive shaft from the Tomkat. It’s a bit of wire rope 2.6mm in diameter.
Since I didn’t have any of this handy (I suspect an old bike brake cable would yield some) I’ve had to improvise. The first attempt is in the photo – an inner from a model aircraft “snake”. This crushed when the grub screws were tightened.
My solution is to use a bit of metal drive band (it’s a tightly wound spring) with a bit of wire in the centre. This hasn’t been tested on the water yet but bench testing shows the drive to be stronger than my grip on the end of the shaft with my fingers.
Dirty camper
My VW Camper van has been giving me grief recently. I’ve had to change the fuel filter every 50 miles or it blocks and the van won’t run.
Last week things got so bad that when I reached the bottom of the road, the engine stopped and wouldn’t re-start. At first I thought the fuel pump had failed but two hours later and a visit from the excellent RAC man with carb cleaner, we diagnosed that dirt had reached and blocked the main jet.
Of course the van would then idle happily for ages. I tried it again yesterday and stalled before leaving the drive. No chance of re-starting either. At least I was n the drive and didn’t need the RAC. My membership doesn’t cover home start, they were very generous last time and didn’t make me upgrade.
I’ve been putting off emptying the tank for weeks. As long as we were running I had better things to do. Changing a fuel filter is a matter of two minutes thanks to all my practise so as long as I stayed out of town didn’t give me too many sleepless nights. However with a one ton sculpture on the drive, I had to get on with it.
The fuel line was pulled from the bottom and petrol decanted into a plastic can. Then through a filter made of old T-shirt (Lands End. Nice shirt but killed by an over enthusiastic washing powder tablet) into a jerry can. I had hoped to do this with less than 2/3rd of a tank.
The result was a lot of rust on the filter. Next job is to pull the outlet (22mm spanner or deep socket – just been out to get one)and change the in-tank filter. The petrol will make the same run though the tank and filter until I get clean fuel coming out. After 10 years of ownership this is the first dose of dirty fuel I’ve had. It started instantly so I hope a dirty fill up or a missing in tank filter caused it.
Friday, May 12, 2006
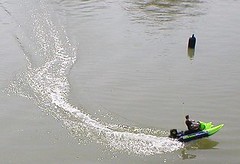
Too fast for the camera !
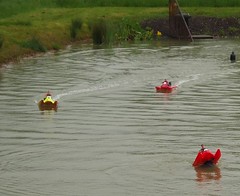
It works. The Tomkat has had it’s maiden voyage in finished form.
On the water it really stands out. After all the hassle that fluorescent paint works a treat. I don’t think the people who are counting how many laps we do during the race will have difficulty spotting this boat !
Of course every silver lining has a cloud and in this case it arrived in the form of a sheared drive shaft which put and end to the playing, sorry serious testing.
Tuesday, May 09, 2006
Maiden voyage - sort of.
Not much of a maiden voyage, sailing back and forth in the bath. It’s traditional though, all model boats get their first taste of water this way so who am I to go against tradition ?
Nothing leaked though and the radio control gubins behaved itself. A little weight from an old battery pack and we were floating pretty level. I suspect more will be needed to get to the waterline but you can’t tell when the only view is a plan one.
This weekend I’m going to pull my finger out and try to get the superstructure into some sort of shape so I can take it to the lake and sail it. Extra detail can come later – I need to get on the water.
(Sorry about the photo, I took it with my phone and the bathroom isn’t really bright enough for photography without flash.)
Monday, May 08, 2006
Stuff from the scrap box
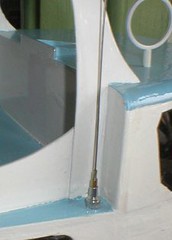
Still trying to improve the radio range on the 40- year old boat (It really needs a name) I’ve managed to use one of those bits that we all keep thinking it will come in useful one day.
I rescued the aerial from a cheap radio controlled toy. It’s been sitting in my pen pot for years. I’ve used it for clearing nozzles a few times. Now with the addition of a base (spare end of a transmitter control stick) and some K&S brass tube we have a whip aerial. The prototype had two of these but I’ve only got enough wire for one at present. If I source some more it will get the second.
The aerial has been wired in to the loop antenna already fitted. Hopefully this addition and some suppression on the motor will mean we can control the boat properly from the other side of the lake.
Sunday, May 07, 2006
Ready to launch
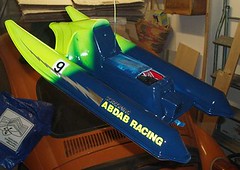
It’s been painted, stickered and varnished. The driver has been primed, filled, painted, adjusted to fit his seat properly and re-painted. Finally the Tomkat is finished.
And I think it looks pretty good. It’s certainly going to stand out on the water !
Next job is to make sure it still works. I’ve a habit on locomotive chassis of getting paint where paint shouldn’t be. This quickly wears away and all is well but I’m not sure the same thing applies on a boat. Mind you I don’t care about the slow running characteristics of this model – in fact I don’t want it to have any at all !
Before sailing I fancy a coat of car wax on the bottom to protect the paint from water and make it extra slippery on the lake. Not sure if it really makes a difference but I think this is what proper boat racers are supposed to do so I’ll see how it goes. As long as it doesn’t sink I’ll be happy.
Saturday, May 06, 2006
Flying Boat
Work out how to hold the model BEFORE you start painting. Wise advise that I’ve read several times.
So I need to spray the Tomkat with varnish and decide to hang it from a bit of wood hastily fixed up in the garage. A couple of cheap clamps hold it to the central heating pipework that runs round the edge of the room near the ceiling. The model dangles on some electrical cable I rescued from a trip to the skip. You can cut this when it’s time to take the model down, much easier than untying bits of string. Besides, I didn’t have any string handy.
It works - the model can be guided with one hand while the other works the airbrush or hairdryer. I had to push on the masked innards as they were the only bit not being painted but that wasn’t too bad. Except that the boat is in the way of the only door. So I hung it high to make it easy to duck under. This makes handling it a stretch, not bad for the few seconds that make you think, “That will be OK.” After a few minutes spraying I wish I’d hung it about 18 inches lower down and ducked lower !
The Beetle in the background ? Yes that is another project but one for a dry day ‘cos I don’t want to be welding in the wet…
Friday, May 05, 2006
Ready mixed paint
Needing to finish my boat with a gloss coat, I popped into a local model shop to buy a can of something suitable. I had to go for Revell instead of my preferred Humbrol as that’s what they had.
On the rack was something new, ready mixed airbrush paint. £1.99 a jar. Cheap enough to give it a go although I bought a couple of metal tins as well.
After a good shake (as per the instructions on the side of the bottle) I decanted some into the cup on the airbrush and started spraying. The verdict – too think. A squirt of thinners improved things no end.
One interesting side effect was the creation of “cobwebs” of varnish appearing in mid air. I think this was a combination of too thick a paint and too wide a spray pattern. Thinning the mix cured the problem although it confused me for several minutes.
Although the bottle is reasonably large I still had to use about half of a tinlet to get a decent gloss finish. Straight from the can it needs a lot of thinner though. Probably 3:1 thinner:varnish. This might explain why the ready mixed version is on the thick side.
And why is it called Email paint ? Not enough letters for enamel or can you download it from the web ?
Monday, May 01, 2006
Fixing a rechargeable drill
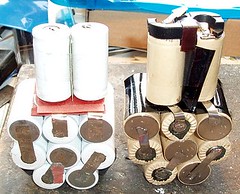
I hate throwing things away when they can be fixed. I also love tools. So when a well used rechargeable drill started to give less and less useful work for a charge it caused great frustration. The drill was replaced, but the old stager never made it to the bin – like all proper bodgers I kept it in the back of the garage “just in case it comes in handy for something”.
Well it has. At the Larger Scale Model Railway exhibition I found myself in front of the Multicell International stand. They had a pack for rejuvenating old rechargeable devices called “Build-a-pack”. It contains some cells, tags, heat shrink tubing etc. – for a fiver. The guys claimed I could use this to fix my drill.
First job is to extract the batteries which was easy and I pulled out the pack you see on the left of the photo. All I had to do was warm up a soldering iron and replicate this with the new batteries. Soldering the tags to join the cells together was a bit fiddly as the solder didn’t take too well to them. A bit of patience and flux cured this. I started by taping the cells together in the same shape as the old pack. Then I joined them electrically.
The instructions give vague guidance – all they can do as the parts can fix a number of different items. Lots of insulation material is provided so I used some to match the old pack.
Once the job was done I carefully checked the polarity was right before reassembling the battery cover and putting it on charge. Half an hour later the drill was better than normal. Well worth a fiver of anyone’s money.
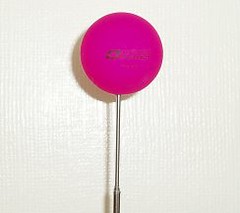
Not so super glue
Being someone who believes in health & safety, I have always used an antenna protector on top of the aerial of my transmitter.
While browsing the local sports shop I found some really bright ping pong balls that looked like they would be ideal for the job. I bought one, cut a slit in the bottom and put the aerial in. Since it was just going to wobble around on the top I dripped some superglue in to fix the top to the inside of the ball. This worked very well.
Unfortunately some of the glue ran back down the aerial and glued it up solid so it no longer telescopes. Cue a trip to the bin for the transmitter and a return to the drawing board for this idea.
Subscribe to:
Posts (Atom)