Sunday, April 30, 2017

Don't kids build plastic kits any more?

Corsair Kitbits

I like to keep an eye on Facebook model railway groups to get an idea what the "average" modeller is thinking about. My guess is that specialist forums tend to attract people who are more committed to the hobby and likely to have acquired model making skills. 

Facebook on the other hand is the modern first port of call for many people. There are loads of groups acting as virtual clubs and if you are on there, why wouldn't you join? 

Anyway, I'm fascinated by the number of people for whom assembling a plastic kit if a major step. I grew up sticking various airplanes together with varying degree of failure. I didn't care, I just enjoyed making things. They didn't need to work so simply putting two bits together without glue oozing out was good.

Now people approach a wagon kit and don't know what glue to use. Worse, they are trying to make something that has to work. Even worse, they don't usually buy magazines where they will find lovely, well written and photographed step-by-step articles on doing this sort of thing. That's not a fault of magazines, just that the internet has produced a generation who think they shouldn't have to pay for any information. 

Anyway, what they need is to build a plastic plastic Spitfire. Something that doesn't matter. But kids of today, will they listen? Will they heck.

Saturday, April 29, 2017

Saturday film club: Road train, Isle of Man style

How do you celebraite a steam festival? By loading a steam locomotive abord a low-loader and hauling it around with three traction engines, thats how!


Unsurprisingly, quite a few people pointed cameras at the sight.


Friday, April 28, 2017

Removing a Heljan AC railcar body


John asks: I need to get access to my Heljan O Gauge AC Cars Railbus chassis to service the electrical pickups that failed at a recent Show. Any thoughts?

I had to go away and look this one up. It didn't get mentioned in the August 2015 issue of BRM when I covered detailing the model and quite frankly, I'd forgotten.

Fortunately, Howard mentioned disassembly in his review a couple of months earlier.

First, remove the handrails either side of the door. I don't think they are glued in place. Put them somewhere safe as they are easy to lose.


Then slide something under the door. Inside there is a clip and if you pull both doors out slightly, they should release the top half of the body. Of course, this weighs a ton so a couple of slivers of plastic sheet stuffed behind each door might be a good idea unless you have 3 hands.

After that, you in uncharted territory for me. I guess there will be much work with small screwdrivers to take the chassis apart. Good luck!

Thursday, April 27, 2017

Bridges, shunters, baseboard builders and a photo shoot in BRM

May's BRM has been a busy one for me. A quick run down of my bits'n'pieces:


I've taken Heljan's 1361 tank and added a bit of personality to the RTR model. There are a few modifications, number plates, coal, pipes and quite a lot of new paint and dirt.  


In 7mm scale, how about a signal box? This kit from Polak isn't quick to build, but it goes together well, the result looks good and it is pretty sizeable. If you can glue a plastic kit together, this laser-cut model won't cause you too much of a problem.

 Rather faster, think an hour from opening the bag to finishing painting, is this laser-cut MDF bow girder bridge from ScaleModelScenery. Loads of bridge and so quick and easy to assemble.  


I had to brave a trip around part of the M25 to visit Modula Layouts in Billericay to collect some bespoke baseboards for a future project. No laser cutting here, just proper craftsmanship and some really useful ideas. As I say in the article, I meet at least two couples a year who would benefit from the services of someone able to give then a leg up towards building a layout.


My first layout photo shoot, the O9 model "Buttermere Mining Company" was carried out at the Small & Delightful show a few months ago. 7mm scale running on 9mm track is an unusual combination, but Bill Flude has made a lovely job of it. I'd really like to have a go myself... 

On the DVD, I'm demonstraiting hill-making skills with polystyrene. Having spent hours talking about this at various shows, it seemed sensible to put this on the disk so people can replay them at will. 
 

I'm also talking to Steve Purves from Bachmann about thier new 009 models as we watch the first Baldwin tank circle Owen's Bridge. 

And if all this isn't enough, here's Andy York and I standing on a level crossing talking about the contents:


Wednesday, April 26, 2017

Warehouse Wednesday: Terrys factory

Terrys Factory

As I sat eating my cake (morning) or tiramsu (afternoon, how decedant is that in Yorkshire), the view out of the racecourse window was of the old Terrys chcolate factory. 

Sadly no longer making choccy products (the future wasn't Orange. Sorry) as it was the first few years of the model railway exhibitions tenure at the site, the building stood vacant for a while and has now been converted into apartments. 


Looking at the balconies, I wondered how easy they would be to add to a Metcalfe warehouse building?

Tuesday, April 25, 2017

Wooden seats


If it's O gauge, wooden bits can be made of close-grained wood. In this case I've used (I think) basswood, or as we call it, lime.

At 1mm thick, it's easy to work with a sharp knife, being careful when cutting across the grain. A light sand and the bits are ready to superglue in place. The only tricky one was the backs for the middle seats. After much faffing, I glued one end in place and then pushed the other where it should be (the wood fits between the poles) before the glue fully set and still had a little flexibility. 

The lengths of balsa signify that the wooden bogie's guage has been reduced to 21mm for the 3ft track that I don't own. I've a few ideas about this but they can wait for a bit.

Monday, April 24, 2017

Brass roof soldered to whitemetal sides


Finally, some free time to carry on with the Wickham trolley.  

The obvious next job was to fit the roof. This involves soldering brass to whitmetal. When I fitted the handrails, I had to tin them with normal solder before attaching with low-melt. This time I've bought some more 100 degree, to replace the pack I've mislaid, from C&L. 

For a while, the roof has been kicking around but when I come to fit it, it's disappeared. Probably to the same place as the old solder. 

Not to worry, a new rectangle of thin brass was carefully cut out and then curved in the rollers. 

Then a few blobs of Powerflow flux and a bit of soldering iron work and it's in place. I use the normal iron for this although the low temp one will work. If you are quick, the brass acts as enough of a heat sink to avoid damaging the whitemetal bits, and these are big enough to survie a bit of heat. 

While I was at it, the front bumper bar (if this was a Volkswagem we'd call it a "nerf" bar) was made from some nickel silver strip and brass rod. It's done by eye but looks OK to me and is an essential feature of a Wickham.

Sunday, April 23, 2017

York 2017

Exhibitions always evolve and York more than most. Now in it's 55th year, there are certain stands that should be where you expect them to be, and when things change, it can be a bit of a shock.

This ought not to be a problem. After all, people, even model railway traders, get older and want to retire. Others come along and add freshness to an event. The hobby itself has changed a lot since I first visited the show back in the days it was in the centre of the city.

Needless to say, one constant is that York is always worth the trip.

Most of my time during the day seemed to be taken up with chatting. It's my job and an excellent chance to catch up with old friends.


One target for the day was to meet up with Bill Schneider from Rapido and examine the latest sample of their forthcoming Sterling Single locomotive along with the newly announced Dynamometer Car. 

Both look excellent as they progress toward the manufacturing stage. Bill is always great fun and didn't mind at all when I asked it he had just sprayed an old Kitmaster model and stuffed a tender drive in it. More to the point, he didn't mind when I moved everything around on the stand so I could take some nice photos with plain backgrounds. At least he said he didn't...

Before this, Paul Martin at EDM showed me a rather special Korean brass large scale diesel shunter. Powered by a battery and fitted with radio control, it would make a rather nice basis for finescale layout in the larger scales. 


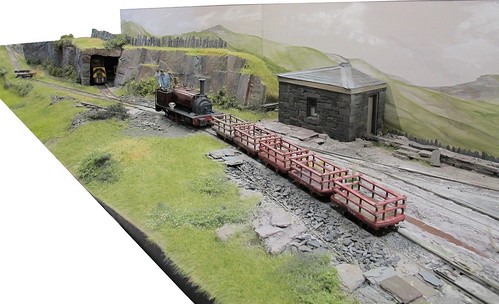
The idea of building something large and detailed has been taken up by Tony Hill with his lovely chunk of Wales in 16mm scale. 

Melin Llechi

It's rare to see this level of treatment given to a large scale model but of course Tony is a scenic expert so the Melin Llechi looks fantastic.

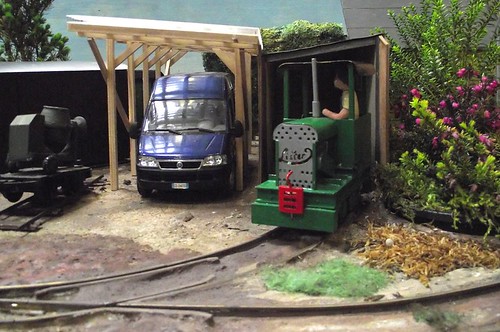
Moving down to O gauge (how often can you say that?) Thorne Hill Colliery is a fairly simple and compact (for 7mm scale) 10ft long shunting model.


Thorne Hill hoppers

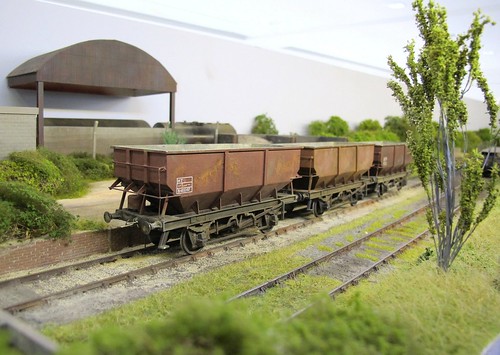
Displayed at a reasonably high level, the greenery provides some useful view blockers that mimic watching a real life railway. Rolling stock is large with a Class 37 shunting while I watched and several bogie wagons moving around.

I've never been able to get into the Tewrry Pratchet Discworld novels, but those who have will enjoy Angst-Lesspork which is based on his novels.

Angst-Lesspork

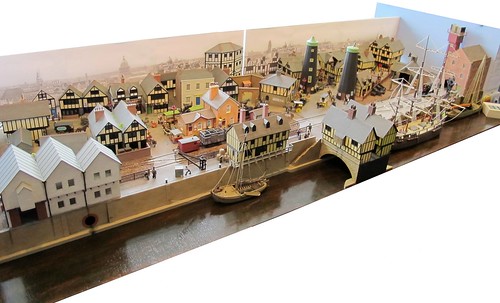
There was a wealth of detail for keen spotters but I liked the overall impression and most importantly, it was different. Mind you, York isn't generally home to dozens of RTR stuff tail chasers, so it's a very suitable place to see such a model.

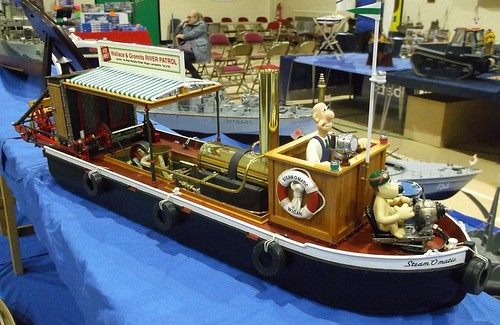
What it isn't, is somewhere you expect to find amazing quality model boat building.

Bismark superstructure

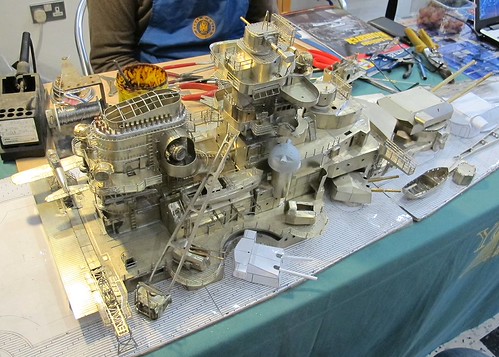
But on the ground floor, there was Mike Williams doing just that. He is constructing a 1:200 scale model of Bismark entirely in etched metal. The level of detail is incredible and it's a real testament to someone who really knows and understands his materials. And yes, it will float, that's why he's building it so large. And smaller and the displacement would be too small to allow this. 

You'll be pleased to know the catering was as good as ever. Reasonably prices and the queues weren't too long. On a damp day, having somewhere to sit and eat with a knife and fork is preferable to squatting in a corner with sandwiches. 

Sorry the layout report is a bit short. There were loads of superb models. Too many for me even to photograph, but what I did can be found on Flickr


Saturday, April 22, 2017

Saturday Film Club: Origami genius


Like most people, I've folded a bit of paper. Mainly for aeroplanes but proper origami is fascinating.

Some of the work in this film is just beautiful. Sheets of paper expanding from tiny boxes. Not sure how useful this if for modellers, but I watched it twice when I should have been doing something useful. 

Friday, April 21, 2017

Removing a Heljan Park Royal railbus body

Alan asks:

For several weeks I have be trying to find out how to remove the body shell from my new 00 Gauge Park Royal Railbus to insert a 21 Pin decoder and to plant a driver and some passengers.

Sadly, their website is in Danish and I only speak English and German.

It mentions 21pin DCC in a round circle but they forgot to say whether it is 21 pin DCC ready, or 21 pin DCC fitted; so I bought a 21 pin decoder just in case. I have located four body clips, two on each side, and inserted strips of an old bank card across them to enable me to slide the body off. That does not release the body. It seems to be very tight at the front and rear ends and I am loathe to use force.

I have visited YouTube Videos but the one they detail for body removal, has screws in the roof, accessed by removing plugs at the front and rear of the roof and, removing the side door handles. Mine is definitely not one of those.

I would appreciate your assistance to track down information leading to the removal the body shell.

Interesting problem. When looking at my 4mm scale Railbus, I realised that I've never actually removed the lid. 

There's certainly no screws in the roof, but looking underneath I could see some indentations which I guessed must hold clips. Sliding a blade down each eased the body away from the chassis but you need at least 2 pairs of hands to do all of them at the same time.


Cutting some 0.5mm thick plastic sheet with scissors, I made 4 strips that could be slid down behind each indentation. Then I carefully grabbed a diecast bit of the chassis and pulled gently. It took a little more force than expected but suddenly the body slid free. 


You can now see the little clips moulded inside the sides. Obviously the trick is to push these away from the chassis block - the job my plastic spacers do - and it slides clear. 

Once free, you can get at the DCC sockets and stuff which are up in the roof.


If you don't want to make plastic spacers, although they are a handy tool, Andy York did the same job with business cards

A word of warning, the railcar body is flexible but won't take levering with screwdrivers. You only need to move it a couple of millimetres or less. Be careful or you could break your model. Having said this, these are designed to come apart so hopefully these notes help.

Thursday, April 20, 2017

Mashima motor replacement


There has been a great deal of gloom and doom in the model railway kitbuilding community at the news that Mr Mashima has retired and no-one else is taking over the business. Some have been scrambling for Chinese alternative on eBay, others are just adding "can't get a motor" to the list of reasons never to consider building a kit. 

Aside from several gearbox manufacturers having stockpiled Mashima's for a while so they can continue supplying, here's the first complete alternative that I've seen on a stand at an exhibition. In this case, York last weekend. No doubt there are others, I've just not spotted them yet.

The motor and gearbox is in the Comet range, now sold by Wizard Models. I can't comment on the effectiveness other than to say Andrew know his stuff and doesn't sell rubbish. I've certainly use one. Hope this helps someone.

Wednesday, April 19, 2017

Warehouse Wednesday - Haarlam Mill Part 2

Demolished building

Last week we looked at Haarlam Mill proper, but beside it is another interesting building, or at least the remains of one. From what little is left, I'd say this was a 1950s structure but you are welcome to correct me on this.

Demolished building front


Demolished building front

Wandering around derelict buildings isn't normally advisable but this one seemed pretty safe. In fact I wondered quite why demolition had stopped at this point. The roof is gone and most of the walls but not all. Surely half a days work with a bulldozer would finished the job? Yet there was no sign of any machinery or ongoing work.

At the back of the building is a weighing machine that might be a useful detail for modellers.

Weighing machine

Too small for lorries, presumably it weighted goods barrowed in through the double doors next to it.

At one corner of the building was another surprise.

Air raid shelter

Best guess is this is an air raid shelter. Poking my head in the doorway, the corridor appears to go of under the earth bank. Not seen this design before but I'd guess (there is a lot of guessing this week) it's designed to be large enough to shelter the workforce, hence a bit bigger than domestic models. 

Tuesday, April 18, 2017

What's wrong with playing with toys?

This IS the book you are looking for.Interesting story on Toy News: Adult toy fans fuel market growth

No great surprise to me. I've worked in IT. You find me a room of developers without at least one person with Star Wars toys on their desk and I'll be amazed.

Ask the room who has built some Lego in the last year and the chances it's someone without kids and a really fantastic but pricey model.

Let's face it, what I do is classed by "normal" people as playing with toys.

So what?

Why should toys be restricted to children?

If you are fortunate enough to have spare time once the basic needs of your family have been catered for, you will look for ways to fill it. For many this involves watching TV or shouting at footballers.

Others prefer to do things that require a bit more thought and that includes playing with stuff. As the article suggests, playing with things is a great stress-reliever. Some find comfort in objects that link them back to their youth or just the familiarity that a non-changing companion can provide. Nothing wrong with that either, unless you subscribe to the idea that we should always do the proper and expect thing, even if this makes us miserable. Which is better, to be "right" or to be happy?


Children learn a huge amount through play. I don't see why the same can't be said of adults. I know lots of people who enjoy developing their skills at activities that might be considered pointless such as painting tiny figures or bashing a ball around a field with a stick. Is a golf club any less of a toy than a plastic kit?

Anyway, at what age are you supposed to "put away childish things"?

The quote is from the developed from one in the bible: When I was a child, I talked like a child, I thought like a child, I reasoned like a child. When I became a man, I put the ways of childhood behind me. I assume it refers to a time when growing up involved taking on responsibility for your family - but that was 2000 years ago, the world has changed. For the better generally.

And if that means we never have to grow up properly and leave fun behind us, that sounds fine to me.


Monday, April 17, 2017

Easter Egg Special!

In the second ever, the first was 2014 and I can't understand why I haven't repeated it, Easter Egg special, I've bought 3 random Kinder Eggs so I can review the kit contents.


Kinder toys are the sort of thing some of us used to find inside cereal packets. The ones now found only on eBay and costing quite a lot. Well, no-one kept them did they? I remember little plastic car kits that I coveted at the time. 

Anyway, nowadays you don't have to eat an entire box of cereal (did you open the toy when opening the box or did your parents make you wait until it was finished so that your sister would steal it even though she didn't like making plastic kits like you did) to get a toy. Now you eat some egg-shaped chocolate, open a plastic pack that looks like a Minion from the films, and there you have it. 


Anyway, 3 eggs, 3 toys. Traditionalists will be pleased to see that one of them is a spinning top, only a hoop and an stick would be preferable. The top is spin by pulling a toothed belt that rotates a cog on the top of the top. 4 parts plus a sticker. Fiddly and not that thrilling if you ask me. I think you are supposed to play with these things in groups so the tops "fight" each other

Far more interesting is the plastic tractor kit. This, according to the supplied leaflet, is part of a set. As such, it's a shame I got two of them then. 

5 parts, including a baseplate with the spinning sheels already assembled to it plus 5 stickers, this is a real prize. The bucket can be raised and lowered and the model "brummed" along the floor. Nose to tail, ignoring the bucket arms, the model is 36mm long. Perhaps with some rust paint it would be suitable for the background of an N gauge model? 

Anyway, when I ate the chocolate, I realised why it's taken 3 years to repeat this, it's still horrible.  Still, at 80p each, I can't see the target market moaning too much.


Sunday, April 16, 2017

16mm Society AGM 2017

Car port

Here's a first. Because I couldn't make it to the garden railway show at Peterborough this year (busy selling ice cream at a local performance of "Legally Blond") I've had to leave photo duties to my parents. 

They tell me it was a good show, although I don't have any cake reports for you. Sorry. 

Saturday, April 15, 2017

A milestone reached

This is post number:


since this blog started way back in 2005. I hate to think how many words that means I've typed!

Thanks to everyone for visiting. Now if only I could finish all those projects on the shelf before post 5000...

Friday, April 14, 2017

Looking at a model with fresh eyes


At Coalville, in an effort to promote the clubs lifeboat day, I took along the only orange boat that I own - my scratchbuilt Brede.

The model hasn't seen the light of day for about 2 years, and that was after at least 18 months storage. I'm shocked to realise I "finished" the model in 2013.

Except it's not finished. I got far enough to produce a magazine article to a deadline and then stopped.

Part of the problem was that my initial thoughts had been around a really perfect miniature and yet I know the hull isn't quite the right shape, not bulbous enough at the front. It wasn't as good as I hoped so I tucked it away.

Seeing the model afresh, you know I didn't do a bad job. I even got a few compliments at the show.

There's not a huge amount to do. Perhaps I can add a little missing detail before May's lifeboat day and then get it out on the water.

Has anyone else come back to an old model and revised their opinion positively?

Thursday, April 13, 2017

Fratton Model Centre - Portsmouth


 This find is down to my dad who visited in February and returned home with tales of  a fantastic shop. By coincidence, a thread on Model Boat Mayhem was also singing their praises. Thus, when I visited the town this week, a visit was on the agenda. 

About 25 minutes walk from the historic dockyard, it's not in the most fashionable part of town. A couple of streets away, every shop seems to be selling second hand, and rather tatty, furniture. This isn't a problem, most model shops are in cheaper areas, that's how they can afford to stay open. 

As you can see from the photo, it's a bigger shop than average. The windows are full of wonderful things including second hand RC boats, plastic kits and railways. They must have known I was coming as there was even a diecast Philip from the Thomas range in the window. 

Inside the shop has developed that happy range that only develops with maturity. Yes you can get paint and brushes and glue (including a range I didn't know about) and plastic kits and model railways and boat kits and second hand model boats and aircraft kits and second hand model aircraft (nice but huge Hercules) and diecast models (nice Dinky Eagle) and tools and bits and piece for all these plus magazines (50p for old Tamya ones). 

Little things impress - the second hand coaches, wagons and diecast are all individually bagged so they can be hung on racks. Simple but makes for a nice neat shop rather than piles of pre-owned stuff. 

There's lots of stock, enough that you really need to look around. Short people will struggle as there is stuff high up but I'm sure the helpful staff will be there for you.

I came away with a lighter wallet but many boat bits as well as some Coopercraft kits. That Eagle was tempting but no. The Hercules was too big for the car. I probably should have bought a Philip though. 

Wednesday, April 12, 2017

Warehouse Wednesday: Haarlem Mill - Part 1

Haarlem Mill 1

"That's an interesting building", I said as we passed by on the way to do some filming for BRM, "Can we stop off on the way back and take some photos?".

Haarlem Mill 3

We did as you can see and I'm very glad. The cotton mill dates from 1780 and was the first to use a steam engine. This supplemented the waterwheel rather than replaced it, but made up for a sometimes inadequate supply. By 1789, the mill employed 200 people - a major employer in such a rural area.

Haarlem Mill 2

The building has been altered quite considerably since it was built. Digging on-line tells me that while the plan hasn't changed, the upper floors have been rebuilt. There have been many more recent changes looking at the walls and one building has gained a hideous lean-to which would make a lovely modelling project.

Haarlem Mill 5

Talking of modelling, like most early mills, this is quite small. English Heritage suggests 17m by 8m. That's only 20cm long in OO, well within the space available to most modellers.

Haarlem Mill 4

Tuesday, April 11, 2017

L.Cornelissen & Son


Wander around our capital city and you'll be disappointed by the lack of model shops. It seems that shops selling buttons can thrive (there are 2 more), try and flog conventional model making stuff and you'll run out of money very quickly. (4D Models don't count, they are trading to designers and students).

That doesn't mean there is nothing interesting, we just have to be imaginative. A couple of weeks ago, I was wandering the streets and tripped over L.Cornelisson & Son. The shop proclaims them to be artists colourmen. I think that means they sell the ingredients for art paints. 

With time to spare, I had a look inside and what a delight. The basic fittings appear to date back to their founding in 1855 and could come of of the BBC cupboard marked "Victorian Shop". 

The stock is just as interesting. As expected, there are ingredients for colours, something I don't think I have ever seen before. Jars of powders which I assume are to be mixed up. If that's too much trouble, and I'm not sure why you'd bother, then pre-mixed paint is also on sale. I spent quite a long while considering the range of metal colours and wondering if they would be any better then the ones I already have in stock. 

In the window there is a press for printing etchings along with the tools and equipment for making them along with lino cutting. I also spent time looking at gravers since Odds seems to think they are invaluable and on that basis I want one. 

As it was, I enjoyed 20 minutes browsing and left with three more brown pencil crayons for my collection. Pathetic really, but I'll be back. This is one of those shops where you want to try some of the techniques just so you can buy the tools and materials in an informed way. The staff are ever so helpful, one was advising someone on calligraphy pens and materials which sounded fascinating, that being informed should be easy.

One thing that has moved with the times, the shop has an extensive website with on-line shop. Visiting in person is much more fun though.

Monday, April 10, 2017

Airfix QuickBuild Volkswagen Camper Van

Look what I bought at Nottingham model railway show:

First spotted at London Toy Fair 2016 in 3D print form, the final kit has just been released at a price of £14.99.

In the box, like all other QuickBuild kits, the contents are more Lego than traditional Airfix with 42 specially moulded parts, all made in the UK too!


Assembly is very like those plastic bricks from Denmark, I suspect that the two brands are compatible which opens up some interesting possibilities. 


Even allowing for photography, total build time was less than half an hour. If you don't hang around, you could do it in about ten minutes, but why rush the job? Enjoy it.

 Inside the bus are a couple of bench seats - pretty basic and hardly a "camper". This is where I suspect Lego fans can improve matters with a more appropriate fit-out. Studs are moulded into the seat squabs to hold drivers and passengers in place. Does this indicate that Airfix are going to produce QuickBuild people for the cars? The Beetle doesn't have these studs...

Clever design makes use of the prototype panel lines and traditional paint scheme to hide the joins between parts resulting in a very creditable model.  
At the back, the engine bay door opens to reveal a very basic representation of the 1500cc power plant. A sticker provides the only detail showing the fan belt. 

For a youngster, this is a pretty good toy. It's robust, a descent size and runs well when "brummed" along the carpet. Grown-ups might enjoy buying one for someone too young to handle the assembly so they can do this bit themselves...

Scale looks to be about 1:20 (Airfix claim it's "fit the box") so a touch large for G scale model railways, but as these vans are on the small side, I don't think it would look out of place and being plastic would survive well in the garden. 

Could it be the basis for a detailed model? I'm not sure the shape is as good as the Beetle from the same range, but this is very subjective. The prototypes varied both at the front, above the windscreen, and at the back where the rear door changed size. 

Classic blue split

The biggest issue is that the belt line is flat rather than raised as it should be. I'm not sure this fixable with some plastic stuck on the surface though.

Of course, this isn't the point of this kit. It's one to build and enjoy. VW owners will snap them up and if they own a splittie, doubtless will respray to match their van. In the meantime, I'm going to lobby the designers for a bay window version!


Sunday, April 09, 2017

Coalville Model Boat show 2017

Impy

A couple of years ago, Coalville show nearly died. Fortunately, it was saved by Iain from Component Shop and this years even was the best yet.

Held in a leisure centre not far off the M42 or M1, we'd agreed to bring a display for KMBC. Not a huge one, 6ft was plenty, but large enough to promote our upcoming lifeboat and warship events.

6ft is also enough when all the boats come from my father and myself and need to fit in the back of the car. This seemed a lot easier than trying to co-ordinate several members boats attending an event 50 miles away from home. The idea of someone announcing "Can you bring my boat back for me on Sunday, I can't come after all" didn't appeal much. Sometimes it's just easier to work with things under your control.

Many other clubs didn't worry about this and indeed it was noticeable that quite a few models only appeared on the first day. This seemed a bit rough on Sunday visitors who would have seen a slightly less impressive display than those on day one. Not a big difference, but I noticed several that I wished to re-photograph and couldn't.

Steam O Matic

Anyway, the event itself was great. The outside edges of the hall were full of trade stands. Had I been looking for a new model boat kit, my choice would have been impressive. As it was, I bagged several fittings for existing projects. I like to be able to browse the little bits and pieces rather than try to order over the web. Aside from being more fun, it's easier to get exactly what you need. Model boaters suffer from working in a large variety of scales and sometimes you need to make use of parts not exactly the size you need but close enough to do.

Catering should have been terrible but in fact was excellent. Each day started with a fresh sausage cob (we are in cob country) lunch being a delicious chicken wrap. If there was a problem, it was the fresh cooking that slowed delivery at peak times. That and customers who refused to pay attention when their order was called for collection.

Gingerbread crew

Sailing took place in an ingenious pool outside the hall. Fortunately the weather held to allow this.

On display were a huge number and variety of boats. For the fiver entry fee, even on Sunday I thought it excellent.It looks good for next year too - apparently the traders were happy and numbers, although still recovering - were good enough to make it worth it.