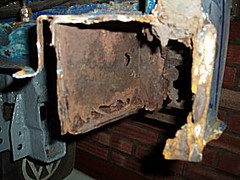
OK, I have been hacking away at the back of my Type 2 over the weekend. Most of the rusty rear valance has been removed and despite my best efforts with the grinder I didn’t set fire to anything with the shower of sparks.
This job has beaten me though. As I dig I find some solid metal and some rusty stuff. I think most of the rust is out but can see some at the ends of a box section.
Trouble is I can’t get the stuff out. The grinder is too big to cut away without removing loads of good metal to create access. I’m really feeling out of my depth here.
So, much as it pains me to do it, I have accept defeat and hand the job over to a professional with a plasma cutter and the experience to do a good, structurally sound job. Having looked at the job he’s complimented me on stopping when I did and agrees that if I were to start welding I would be trapping rust that would appear in time. I’ve also saved him time, and therefore me money, with the work I’ve done so far.
I suppose this is success of sorts but it doesn’t feel like it at present, especially as the van can’t go in for repair until Christmas. In the meantime Ashley sits on the drive making me feel guilty for not being up to the job.
Wednesday, November 29, 2006
Monday, November 27, 2006
Off to the Isle of Man (I wish)
New project ahoy !
Let me tell you a secret. The next layout my father and I build will be based on the Isle of Man. OK if you’ve talked to us at shows this isn’t going to be a huge surprise. Even if it is, I doubt it is as exciting as the story of Elvis being found on the moon or something.
If you model the Isle of Man (hereafter called IOM to save my fingers) and doing the steam railway, you build Peacocks. Loads of ‘em.
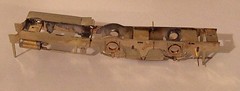
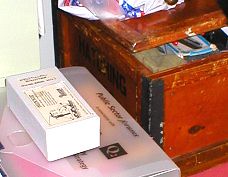
With Warley show at the NEC this weekend I’m going to be adding to the stock of IOM loco kits currently maturing the in the cupboard. It seemed prudent though to see if they were any good before trying to persuade Branchlines to do a deal for another eleven. (Note to self: This is a joke. You will only be buying one kit this time). Digging the kit out of the box labelled "IOM” I find that the wheels are Gibson and not the normal (and preferred to be honest) Romfords. Since the next big project will have Gibson wheels, albeit with EM axles, I might was well get the practise in.
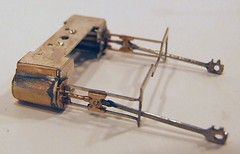
IOM Peacock chassis are complicated beasts. There is a lot on show and what you see give the locomotive most of its character. The Branchlines kit was designed in the 1990’s and was one pretty state of the art then. It’s good today as well. Etched in nickel silver, a lot of thought has gone into its design. So much that I had to follow the instructions to the letter to get this far. What you see is just under two hours work and I still have work to do, notably on the prominent front pony.
It all looks fine so far. As long as it if flat and square I should pretty quickly have a running chassis. Then I get to decide how many more to add to the collection this weekend.
Let me tell you a secret. The next layout my father and I build will be based on the Isle of Man. OK if you’ve talked to us at shows this isn’t going to be a huge surprise. Even if it is, I doubt it is as exciting as the story of Elvis being found on the moon or something.
If you model the Isle of Man (hereafter called IOM to save my fingers) and doing the steam railway, you build Peacocks. Loads of ‘em.
With Warley show at the NEC this weekend I’m going to be adding to the stock of IOM loco kits currently maturing the in the cupboard. It seemed prudent though to see if they were any good before trying to persuade Branchlines to do a deal for another eleven. (Note to self: This is a joke. You will only be buying one kit this time). Digging the kit out of the box labelled "IOM” I find that the wheels are Gibson and not the normal (and preferred to be honest) Romfords. Since the next big project will have Gibson wheels, albeit with EM axles, I might was well get the practise in.
IOM Peacock chassis are complicated beasts. There is a lot on show and what you see give the locomotive most of its character. The Branchlines kit was designed in the 1990’s and was one pretty state of the art then. It’s good today as well. Etched in nickel silver, a lot of thought has gone into its design. So much that I had to follow the instructions to the letter to get this far. What you see is just under two hours work and I still have work to do, notably on the prominent front pony.
It all looks fine so far. As long as it if flat and square I should pretty quickly have a running chassis. Then I get to decide how many more to add to the collection this weekend.
Saturday, November 25, 2006
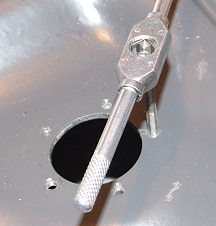
Petrol tank - In
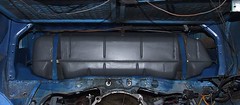
Today was a good day. After weeks of slow and intermittent work, the petrol tank is back in the van.
I poked wire through all the holes to make sure they were clear. Cleaned out the outlet with a drill as it was very full of hard tank paint and then slid the tank back into place.
Obviously there was a bit of pushing and shoving involved but nothing major. The wires to the reversing light need replacing as they got in to way once too often but apart from that everything went fine.
There is extra rubber between tank and tank hole (what else do you call it ?) which I slid in before tightening the retaining straps. The threads on these had to be cleaned up with the die (8 by 125 I think) and as usually every bolt has been greased to build my stock of karma up.
With the firewall in place again the job is nearly done. In theory I could have the engine put back in and drive off into the sunset.
With the lump out of the way though it’s time to tidy up the engine bay. I’ve scraped and re-painted a fair bit already but there is another horror awaiting me. The rear valance is well rotten. With access as good as it will ever be I can’t put off tacking this any longer.
Thursday, November 23, 2006
It's raining lead
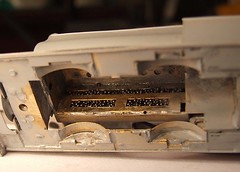
Everyone says that you have to put as much weight as possible into model railway locomotives. Many magazine descriptions say, “I filled the boiler with lead” as though a model that is heavier than your car is a good idea.
Some weight is important and etched brass locomotives definitely need a bit of help. The mineral engine doesn’t offer much scope for lead though – the boiler is pretty much full of motor, gearbox & flywheel.
Fortunately the bulges in the saddle tank are hollow and have holes obviously intended to give access for weight addition. Just the job for some of that “liquid lead” I bought a long while ago and have hardly used I thought.
Pouring it in was out of the question but a small plastic spoon, the sort you get with ice creams in tubs, shovelled it in and some superglue poured on top should have solidified it.
I needed more glue as it turned out. Running in was interrupted by stopping to pull squashed lead balls out of the gearbox. I think I dismantled the model half a dozen times before giving in and pouring more glue into the hole. Even now the odd ball escapes but I’m hoping all the loose ones will soon fall out. I want the ratio of brass to superglue to stay about the same as it is now and not tip in favour of the adhesive.
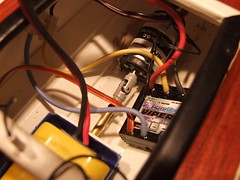
Wednesday, November 22, 2006
Tap and tank
Now I’ve painted my fuel tank inside and out it’s nearly time to put everything back together. Since it’s cold and wet outside, not to mention dark I need a job that can be done on the bench. What better than putting the fuel gauge sender back in ?
Sitting in the sofa and eating chocolate since you ask but I want the van back on the road so it’s into the garage.
All my painting had closed up the holes the sender bolts in to. After careful measurement and a lot of squinting at the top of the bolts the number 8 tap looked like it should clear out the threads. Before I could do this, the holes had to be opened out with a 3.5mm drill.
With everything cleaned up, the sender was bolted back in. It’s rubber seal didn’t seem to line up with the bolt holes very well but was flexible enough to allow some prodding to get things together. All the bolts were greased of course before they went in as I’m hoping the karma will spread and I won’t have to undo too many of their rusty cousins in the future !
Sunday, November 19, 2006
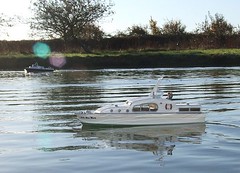
Lovely day
This morning saw a bit of a first. We took two boats (Minty & the 40 year old boat) to the lake. Sailed both and had no problems whatsoever. The boats launched, tootled around for 30 minutes or so and then came out. The weather was lovely, cold with a bright sun and no wind. Model boating isn’t just a summer hobby !
Minty’s new coupling worked well. She has a nice turn of speed, reasonably fast but no scary. You don’t have to concentrate too hard to avoid the bank or other craft. Good thing too as the pair of dogs living on the site decided that we had nothing better to do than kick their football.
The duration of run is very impressive. I sailed pretty solidly for 30 minutes and there was more in the tank (battery). I suspect that another 10-15 mins wouldn’t be out of the question. This makes the boat ideal for regatta days when the water is busy. Since our lake is on the small side half a dozen boats mean “near-misses” are common.
At the end of the day I have built what I wanted. A model that can be quickly charged and taken out for a pleasant sail if the weather looks good. No fuss or setting up, just enjoyable sailing.
Saturday, November 18, 2006
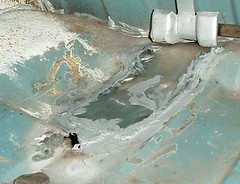
Welding lessons
Welding the Type 2 today. First I tried to repair the tinware but gave this up as a bad job when I spent more time blowing holes than filling them. Grinding another hole in it didn’t help.
Still, with this practise under my belt I moved on to patching the holes under the petrol tank. In theory these would be reasonably easy (read: doable by a newbie welder) but to be on the safe side I made a trial piece up out of a couple of off-cuts. One reasonably successful lap joint later I decided to be bold and try it for real.
First I cut the patches from 0.8mm thick steel. They seemed to fit OK. Next I cleaned the area to be welded again with the angle grinder. I’m smart enough after years of soldering to know that you need clean metal and it’s not clever to struggle with anything else.
Then I took the welder for its first trip outside. The ensuing struggle lasted about an hour I think (don’t wear a watch while doing this sort of thing, a lesson learned a long while and several watches ago) but resulted in two bits of metal attached over the holes. Fortunately they aren’t structural although most of the welds aren’t bad and some of them are very good.
What I learned today is:
Use the red welding visor. It doesn’t have a flip up lens like the black one but what it does have isn’t so dark. I can actually see what I am doing but not get dazzled.
Welding visors protect your head when you keep hitting it on the engine bay roof.
The engine bay roof is in the way.
If you kneel on the lead to the welding torch the wire won’t feed through.
You can’t tell that you are kneeling on the cable when wearing kneepads.
Other than this, kneepads are good. I must buy a better pair that the ones from the 99p shop I’m using.
Getting a good earth on a vehicle isn’t as easy as you think.
Welding isn’t affected by failing light as much as other activities.
Seam sealer is difficult to get off your fingers.
I love my new metal cutting tool. Except when I catch my fingers in the handles.
A small hammer is good for persuading metal into shape. You don’t always need the “proper” tool. Brute force can work. Sometimes.
I would like a proper indoor garage. And a vehicle lift.
Friday, November 17, 2006
Gluey lesson
A lesson to be learned – you can’t stick wood to plasticised* hardboard with wood glue. If you do the parts separate again.
If the parts are a stand for a model boat then you end up dropping the model and breaking bits off.
The flagpole went back on without any problem. The top of the searchlight will be more of a problem.
The stand has been re-assembled with 2 part epoxy. It won’t come apart now !
*It said it was painted, but the paint feels like plastic.
Wednesday, November 15, 2006
New coupling
As an aside from all of this railway modelling, I’ve managed to do a bit of work on a boat.
“Little Miss Minty”’s biggest problem was the coupling between the motor and propshaft. I had used molybdenum tube but this kept failing. It looked like that I’d need to do major surgery to get a conventional coupling to fit – they were all too long for the space available.
At the boat show when I wasn’t buying new kits (yes more projects, but I only go to one big boat show a year so I have to stock up OK !?) I took a look at the Deans Marine stand where they had several couplings. These look like they are modular and the smallest version looked promising. At seven quid it wasn’t a cheap bet but I though I could always use it on something else if needed.
An initial check showed things looked promising. All I had to do was release the motor from its mount with a bit of screwdriver fiddling. The access wasn’t easy but I managed by using a combination of tools. If I had planned better perhaps I’d get a straight run at the screw heads but then I don’t intend taking the motor out much.
The couplings input & output shafts were 2.6mm. This is fine for the motor but my enlarged propshaft was too big. A few minutes with drill and reamer cured this giving me a nice snug fit. Happy I reassembled everything.
Once I’d done this I rotated the prop and noticed it caught on the hull. A quick look showed it had moved backward by about 4mm. The problem was that the propshaft was as far into the coupling as possible and it wasn’t enough. I did ponder living with it but gave in and took everything to bits again.
A big fat pair of wire cutters dealt with the excess shaft with a bit of a struggle but they did it. I then put it all back together. Result a nice free running propeller which under power is quiet and therefore efficient. I haven’t had a chance to try the boat on the water but hopefully (fingers crossed) this won’t result in another drive failure in the middle of the pond.
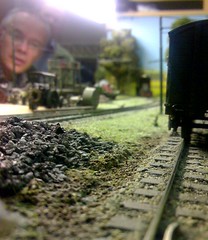
Tuesday, November 14, 2006
Tolworth Part 2
Sometimes at a show you can be standing behind the layout and someone comes out of the crowd to surprise you.
In this case the surprise was in the form of a couple of brick remnants in a plastic bag and some bad news. It seems that the most important surviving survivor of the Hellingly Hospital railway, the engine shed, has been burnt down by vandals.
Until recently the shed had been in use by a garage as a workshop. It featured the original trolley wire in the roof and embedded rails outside the front doors. I had always dreamed of retrieving some or all of this for preservation. The idea of stringing some of the wire across the top of the model seemed good. Of course living 200 miles from the shed meant I couldn’t visit nearly often enough to try and arrange this.
Now the shed has gone but at least, thanks to the generosity of a visitor, I have a small part to display with my model railway. For the rest of the exhibition I merrily told the story and allowed others to examine my precious artefacts.
Coincidentally, my benefactor is a volunteer at the excellent Amberley Chalk Pits Museum. This is home to one of the engines from my favourite railway – The Groudle Glen Railway on the Isle of Man. We spent a good while chatting about this as well.
This sort of meeting makes getting up at 5:30 in the morning, driving half way down the country and standing on a very hard floor for eight hours a day.
Oh, and the answer to everyone who asks, “Do you have your layout set up at home ?” The answer is most definitely no. I just can’t enjoy operating without someone to talk to !
Sunday, November 12, 2006
Tolworth Part 1
We’ve just returned from Sunny Tolworth with the Hellingly Hospital layout.
It’s not a bad model railway exhibition as they go. There were plenty of layouts and certainly in the main hall and not a duff one to be seen. Some seriously impressive modelling was on show. If I’d been a visitor I would have felt I’d had my moneys worth. Since you get three halls for the price of one there really is something for everyone.
I was especially impressed with the American hall. The models in there were proper modelling with dirt and wear and nothing taken straight from the box. No cowboy hats to be seen either.
Trade was good too. Perhaps not the best in the world but no-one could complain about the selection of locomotive kits (in 4mm scale at least) with one kit manufacturer (Roxey) and a couple of stalls with good stocks of second hand kits. Despite my plans not to buy any more projects I have come back home with a couple. Of course they were kits I had planned to buy one day anyway, and they were a bargain…
The biggest downsides weren’t the organisers fault. The leisure centre owners have employed the slowest builders ever to refit their toilets. For two and a half months they have been messing around and still haven’t finished the job. This means a reasonable sized exhibition has to content itself with three loos. Two for men and one for women as the former made up the largest percentage of the crowd by far.
The other problem was the crowd itself. For the first half of Saturday they didn’t speak. At all. Absolute silence despite my best efforts to get some chat going. The first morning is always filled with enthusiasts and they never speak to the layout operators. Oh no we have to far too serious for that. With the Hosptial offering limited operational potential, we are as keen as possible to get to talk about it. There is history and model making techniques to discuss. Or you can just stand and look serious.
Fortunately the atmosphere improved after lunchtime on the first day when the normal people start to arrive and the serious people loosen up a bit. We managed a good few conversations and even some laughs. As we’d left home at 6:30am earlier we needed this to keep our spirits up. Early starts and 104 mile drives tend to take the shine off playing trains even in a good show.
Friday, November 10, 2006
Fame again
Model Boats have published an excellent special edition on kit building.
Best of all (from my point of view) is that on page 72 there is a two page article by ME describing my experiences with a Compass Models (marketed by Ripmax) Slingshot. Fame at least in the model boat world !
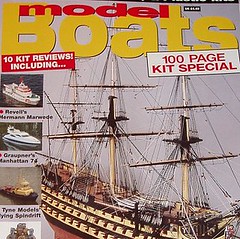
Best of all (from my point of view) is that on page 72 there is a two page article by ME describing my experiences with a Compass Models (marketed by Ripmax) Slingshot. Fame at least in the model boat world !
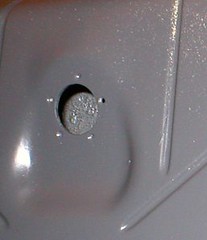
Thursday, November 09, 2006
Rust removed
Time for a quick petrol tank update.
The inside has now been treated with the fuel tank paint. I poured it all in as instructed, sloshed it around and then poured the remainder out. About three-quarters of a can came back out so I’ve put the lid back on and let everything dry.
Peering inside as best I can it looks like everything is painted a silver colour. Where the surface isn’t pitted it looks really good. The previously rusted areas have a rough surface but at least it is a silver painted rough surface. I plan to repeat the sloshing to use up more paint and give a better coverage inside. Better safe than sorry – I don’t want to pull the tank again !
The outside was rubbed down and painted with Smoothright satin grey. This is a bit light for real concours buffs but it’s near enough for me. The results look very nice – like a brand new tank. Hopefully with both inside and outside treated my tank will be better than new.
Tuesday, November 07, 2006
Off to Tolworth
On the road again this weekend. Thanks to work commitments I can’t get the Friday off to travel. This means a 6:30 start but at least the M25 should be quiet then.
We put the layout up quickly to make sure everything works. Apart from a couple of dry joints in the fiddle yard, everything does. The joints wouldn’t be a problem if I bonded around them with extra wires (the joins are in rails soldered together) but it’s not a job I ever get around to.
I took the chance to gather everything into the same room as well. Hopefully this reduces the chance of forgetting that vital lead or important tool.
There was even time to run the new locomotive. Of course it decided to play up. As far as I can tell some glue vapour has got into the gearbox. A bit of power forward and reverse seemed to cue things but some running in will be required. Just the thing to do in those quiet end of days bits of the show.
Sunday, November 05, 2006
Fiddly waggly bits
As light relief from treating the fuel tank in my van, I’ve been working on the waggly bits for mineral engine. I still hope to have it available for test next weekend at Tolworth.
As I’ve found before, the design of this kit is superb. The cylinders fold up and are strengthen with some thin tube that the piston rods run in. The slide bars are etched and also fold. Holes are provided to line parts up. If there is a fault it’s that the cylinder wrappers are on the thick side and could do with annealing before you try and form them. I managed but would do things differently if I built another.
The crossheads are cast brass. Very clean too. You solder a brass piece to the back of each to finish them. This traps the rod so some tidy soldering is needed. I cheat a bit and coat anything I don’t want soldered with permanent pen. Solder hates dirt and this keeps it away from problem areas – mostly.
This whole arrangement is very fine. Although it is stronger than it appears I’ll still be glad once it’s firmly fixed to a locomotive.
Friday, November 03, 2006
McDonalds - the model makers friend
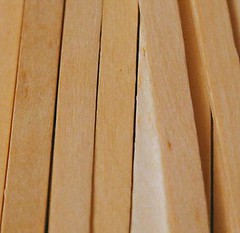
I was picking up my McDonalds order the other day when I stopped off at the straw and napkin stand for, well a straw and a napkin. On the stand was a pot of wooden coffee stirrers. The fast food chain has decided to challenge the Starbucks market and you do so need to swash the contents of your batte latte matte around a bit.
Anyway, I’ve seen these before and they are a useful part of my modelling toolkit.
The first option is to see them as a source of raw material. The wood is close grained and suprisingly good quality. By splitting the stick down the centre along its length you get two nice 4mm scale planks. After a light sand the results are great for loading wagons. There are a couple running around my hospital layout like this.
The second use is in holding bits of brass while soldering. Lolly sticks and wooden chip forks are also good for this. Once the bit of wood gets charred, chuck it away and use another. They last for a very long while. I often push one end of the stick against the board and stuff the brass bit under the other. This keeps my delicate pinkies safe from the nasty heat.
If you can’t face a trip to the golden arches, Weatherspoons pubs and some coffee shop chains also offer these so help yourself !
Subscribe to:
Posts (Atom)