Friday, May 31, 2013

Models from the cupboard: Industrial Garratt


Another loco from the stockbox and a pair of cracking Nevard shots which is all the excuse I need to feature the Garratt again. At least the colliery is an appropriate setting for the industrial locomotive which ran at Baddesley Clinton coal mine. The biggest surprise was that so few people had seen it before - one visitor quizzed me for a while about the prototype.

As far as the model, another thing that people are asking about, it's a Backwoods Miniatures etched brass kit that I built many years ago when in a fit of wealth. Since then regular readers will know that I've produced the same prototype in 7mm scale a couple of times from the Mercian Models kit. In 4mm, the kit is an easier build than you might expect. All the waggly bits are etched the correct thickness so there's no tiresome laminating. Assembled with valve gear rivets and you can do a side every 20 minutes!


My loco might be famous soon - I'm sure that's Ivo Peters Bentley on the bridge!

Thursday, May 30, 2013

Models from the cupboard: H Class saddle tank


OK, so this isn't really a model that's been hidden from view for years in a box. It lives in my OO stockbox but since that lives in a cupboard then the title counts.

The loco is based on a Hornby ex-L&Y (and ex-Dapol) Pug chassis upon which I scratchbuilt a body. The conversion appeared in the August 2012 issue of Hornby Magazine. Although not perfect by a long way, it certainly looks the part and hopefully is a project that many modellers of modest abilities could attempt. To help, I've made the working drawing I put together available as a download.

To be honest, this post is just an excuse to show off this lovely portrait of the loco taken by Chris Nevard at Railex last weekend. The layout is Polbrook Gurney Colliery. Only the smoke is Photoshop, the rest is real modelling. So much more fun than sitting at a computer.

Wednesday, May 29, 2013

Book Review: Model Making in Cardboard by Thomas Bayley

The purpose of this book is make a clear and constructive approach to cardboard model making, which is a craft of considerable importance and extensively used by professional model makers, architects and display artists.

Many of those engaged on undertakings such as housing scehemes, single buildings, layouts, film and theatrical sets make full use of the cardboard model.

Educationally, the value of this craft cannot be over-emphasised and it should be encouraged wherever possible...

So begins the preface of Model Making in Cardboard, published in 1958. As you can see, Thomas Bayley isn't aiming his book at railway modellers, but at the educational and professional establishment.

Starting with a list of tools and materials, the author then describes some interesting clamps for holding materials including the obvious, but incredibly handy, "bit of wood sticking out from the bench that will fit inside a model when you remember there is a hole to be cut out after you assembled the walls.". A roller based tool for making pantiles which involves a pair of wide cogs that the card passes through looks handy but the caption "Little need be said about how to make this device...The diagram makes it quite clear to those with sufficient experience to be able to make it." will frustrate those without such experience, which bearing in mind how difficult making a pair of wide cogs is, will be most of us. Never mind.

The book then continues with plans showing different buildings and construction details. Starting with a flat-roofed building, we move on to pitched roof cottages, a barn, village church, castle, guildhall, Tudor bridge, landscape contours, trees (yes, really), modern house, modern church and ending with a modern concrete bridge.

All the designs are simple but look the part. Unlike last weeks book, this one is aimed at serious modellers. Despite this and the age of the instructions, the information is still pretty relevant. If you are into model buildings, tracking down a reasonably priced copy of this is probably worth the effort just for the plans.

Model Making in Cardboard at Amazon

Tuesday, May 28, 2013

Return of the Boiler House

Boiler House Front

Many years ago, I built a model of the Boiler House from the now demolished Midland Counties hospital in Leamington Spa. It wasn't a precise model, there were no measurments taken - I just counted bricks, but the effect wasn't bad. It looked pretty convincing in its intended home slap bang in the middle of the L&WMRS O gauge layout of the time.

Boiler House back

That layout still exists, but has bee re-worked and the building was surplus to requirements. I know this 'cos it popped up on the second hand stall for £20. A little negotiation reduced this to a tenner and I now have plans for it on Clayhanger Yard.

Construction followed my usual Daler board covered with Slaters Plasticard methods and despite being at least a decade old, they seem to be holding up pretty well.

Boiler House inside
The walls are braced with strips of card and have hardly bowed. Were the model permanently fitted to a board I reckon it would be as square as the day it was built. This isn't down to careful storage either - the original clubrooms was a damp cellar, the next a loft that could get exceptionally hot. Only the current one offers reasonably consistent temperatures.
Anyway, I plan to line the inside of the model with plywood and then remove the side wall that will be against the backscene. That will create a nice size cubby hole for mugs of tea and general exhibition junk.
The outside will need a re-paint as Clayhanger uses pencil crayons for brick painting and the structure has to match. This is a bit of a shame as I think the dry-brushed brickwork looks nice and probably took me an age to do at the time.
It's a pleasure to re-visit an old model and find I'm still happy with it. It's even nicer to think that the boiler house will have a new lease of life and didn't just end up crushed in a pile in the clubrooms or dumped when no longer wanted.
It's nice to return to a 

Monday, May 27, 2013

Modelling British Railways Diesel Locomotives

A new project for me, the production of a one-shot bookazine called: Modelling British Railways Diesel Locomotives

The idea has been floating around my mind for a while - let's get photos of all the BR diesel classes and put them together in order of their TOPs numbers. Building all the BR shunters from 01 to 10 has always been an ambition (still working on it but mostly done) so this is a logical extension.

When mytimemedia, publishers of MREmag.com were looking for idea for a railway themed paper publication, I suggested this and it was eagerly accepted.

Now I'm into hitherto uncharted territory of negotiating for reproduction rights on photos and trying to work out who made which kit of which loco. It's going to be fun but a challenge. At least I'm trying to make something I would certainly buy if it turned up in Smiths.

Of course, that doesn't guarantee sales. However, the deal that means a £9.99 book includes a £10 voucher for ModelFair might help a bit.

Pre-order your book here.

Sunday, May 26, 2013

Matchstick tramcar


File this under "This is what happens to your models when you die."

The model is a 1908 tramcar made from the Matchbuilder kit. Someone has carefully assembled it from card and many thousands of artisits matchsticks. From a High Wycombe charity shop, it's yours for 15 quid.

Is it sad to see the model here? I would be very surprised if it finds a new owner - far more likely that after it gets dusty and a bit bashed, it is quietly shuffled out the back for disposal.

But. The fun with this sort of model is in the building. Once complete, you can stare at your efforts for a while but maybe you then feel the urge to have a go at the traction engine from the same range. If there isn't sufficient space for both models, is there anything wrong with passing the old one on? Maybe I'm wrong and someone else will look at it, fall in love and provide it with a good home.

Me, I'm too sentimental. I'm rubbish at getting rid of anything that has eaten my time. One day I'll be buried under a mountain of model railways and boats.

Saturday, May 25, 2013

High Wycombe & District MRS open day

CakesWhile not a conventional model railway exhibition, the HW&DMRS open day last Saturday featured 14 layouts in various stages of completion. There are plenty of "proper" shows that don't offer that!

Located in the top floor of a rather interesting old industrial complex, a short climb up the stairs (there is a lift) brings the visitor to what the website describes as "a model railway paradise!"

What you find is two rooms stuffed full of British and Amercian protytpe layouts. The HW&DMRC has a healthy section devoted to prototypes from accross the pond and judging by the results, they are pretty good modellers.

N gauge America

In addition to the club layouts, Graham Muspratt displayed "Fisherton Sarum", his 4mm scale Southern shed layout. Three generations of the family were on hand to operate the models along with a fourth in miniature form on the layout itself.

Fisherton Sarum cottage

In the back room there is Hinton Parva, the sort of epic layoput that you only get to build if you belong to a model railway club or have a whopping great house. I snuck into the middle and operated one end the fiddle yard for a few minutes. Since this allowed me to drive both an LMS and LNER Garratt, this was pretty good. I'll be returning to this another day as the operating system is worth closer examination.

Hinton Parva

The highlight of course, was the catering. A pink of beer, lots of suasage rolls (yummy!) and some truly delicious cakes made the event for me. Best of all, the food was laid on for free by the club to attract starving modellers. I understand at least 2 new members had signed up by the end of the day so it's a good start.

A very enjoyable visit from a very friendly group of modllers. Do hop over to thier website and have a look. Sadly, you don't get cake this way but you can't have everything can you?

I've also put some of the photos I took during the visit here.

Friday, May 24, 2013

Models from the cupboard: Class 20

Class20

Class 20 models used to mean Hornby Dublo. The mazak bodyshells were untouchable by anyone other than the most committed modellers with a good supply of drillbits. Then along came Lima with a well-detailed plastic version. Hooray, now we could have a charismatic long-nosed diesel loco for the layout.

Of course, in the good old days things weren't perfect, The handrails were moulded into the side so you were faced with living with a silver-painted lump along the top of the bonnet, or scraping it off, touching up the paint then then replacing it with Gibson handrail knobs and wire. Real masters of the craft did this although why they then left the bonnet catches as moulded items escapes me for the minute.

Underneath, the Lima mechanism either worked well or it didn't. Pancake motors come in for a lot of stick nowadays but the good ones were fine for anyone who wanted to run a layout rather than show of their mechanics. Those who bought models from a shop instead of mail-order knew to get them tested first. Wheels on the other hand, used flanges straight from your local Pizzeria but were easily replaced with a drop-in set from Ultrascale. If you could get them that is, supply was always an issue.

At the front, I removed the headcode box and replaced with with Crafsman models detailing bits to provide lamps. On the top there's an etched grille which replaces the moulded version.

I have a sneaking feeling that the grilles on the bonnet sides aren't perfect but would need someone to explain this, or take a good look at a set of photos. I'm sure I did this when I built the model as it is the only member of the class with round buffers AND a ladder on the bonnet side. This is a bit crude, which is why you're looking at the other side.

Despite this, I'd be happy to take this model out of a box and plonk it on a layout. Considering it must be at least 15 years old, that's not bad. Or I have rubbish standards - you decide.

Thursday, May 23, 2013

Models from the cupboard: Class 24

Class24

Digging out the contents of the kit cupboard the other day, I found a box containing a couple of old model engines I'd built for Melbridge Town, our unsuccessful attempt at a roundy-roundy layout. Since they represent a time long ago when you had to do some actual modelling if you wanted a nice realistic engine.

Today's example is a Class 24. The basis for the model is a Hornby Class 25 - reasonable enough as they are basically the same engine with a few cosmetic tweaks (cue frothing from diesel fans). The work was carried out using Craftsman Models DK9 conversion kit.

My model was picked up from the club second hand stall. The previous owner had fitted it with Ultrascale wheels set to EM gauge. It ran nicely enough so seemed a good basis for the work. Remember that at the time, I was aiming to fill the layout with unusual locos and a 24 would be just that.

The conversion wasn't entirely successful - I think the body sits a bit too high. Worse, this is probably my duffest weathering job with the dry-brushed dirt looking exactly that on the bodyside. This was long before I owned an airbrush and so a light haze of muck was beyond me. The bufferbeam is nice though and I even made a U-shaped Spratt & Winkle coupling loop.

Anyway, for the moment it is back in the box but maybe one day I'll tickle it again with some nicer dirt and tweak the body height. Other suggestions welcome.

Wednesday, May 22, 2013

Making a Miniature Village by Guy R Williams

It's funny when you find an unexpected author. Guy R Williams was Pendon's CME for many years and responsible for some of the finest model railway engines ever built. I'd like to own a Guy Williams loco in the same way I'd like to own a Canaletto painting.

Which means this little book will come as a surprise to many modellers. It's not telling you how to build something for Pendon, or even to anything approaching Pendon standards.

Follow the instructions and you'll create a crude model of a small village. The thing is, that if you do, you will have received a good grounding in basic model making and maybe, just maybe, one day you will aspire to those exalted levels.

The text is simple but doesn't talk down to the reader. Plans include dimensions in mm so you'll have to learn to measure and mark out your cardboard or strawboard (remember that?). A baseboard (60 by 90cm) has to be made and ground contours built up. Add a railway track and you'd actually got the basis for a nice little layout.

 
Despite being aimed at children, I reckon quite a few grown-up modellers would get a lot from reading this. While the models might be a bit crude, with more effort on the details, they could be turned into realistic representations of real buildings.
 
The layout of the village is a bit Pendon-like and not unrealistic. The church, duck pond and green are the centrepieces. Oddly, there are no shops or a pub but I suppose you could convert some of the houses into these if required.


I think the scale is just over 3mm:1foot. I wonder why they didn't go the full 4mm - the plans aren't full sized so it's not a problem fitting them onto the page. Then kids could have used some model railway figures and even a few toy cars. Maybe Williams wished to stick with the bucolic past and ban the motorised menace from his village.


Tuesday, May 21, 2013

Y6 Tram Engine

Finished Tram

Another one for the stockbox. You might have spotted when I mentioned the glazing yesterday, that the body had been weathered. This is down to a spray of various Lifecolour paints that I'm testing for a project. Since the prototype ran alongside roads, I'm assuming that the dirt clinging to it would be lighter than the dark brown stuff that covers everything on the railway. Perhaps I've gone a bit orangey with the rust but this is fix-able later if I decide I don't like it.

Sharp eyed readers will spot a slight problem with my choice of driver. He's looking out through the central woodwork at the end of the cab. I can't move him easily so there will be some searching trade stands to find a replacement. This figure will be transferred to other duties, probably another loco at some point.

Thanks must go to the L&WMRS O gauge team who let me use their layout as a backdrop. Pete even switched off the evil DCC in the shed area so the motor stopped buzzing while I took the photo!

Monday, May 20, 2013

Glazing the Y6 windows

SideWindows

Both the sides and ends of the Y6 tam feature windows. On the model these are supplied slid out of the way as part of the etch. That's great, but you build and paint the model, then have to put some glazing in. It's not a step to be missed out but whereas normally you just stuff and bit of plastic behind the opening.

Not to worry, I always use Krystal Klear for glazing, even when I shouldn't. This time it worked a treat. As well as covering the hole as you can see, it can be puddled into the bit along the side of the body. By holding the tram so the glazing was drying flat and not over-filling the frame, I achieved a flush glazed window that you can see the body side through.

And yes, I am quite pleased with myself thank you.

Sunday, May 19, 2013

Nice weather for trains

Garden Train

A few days ago, the weather was lovely and we brought the garden railway back to life. After some re-ballasting, well quite a lot actually, the power was connected up and the trains ran.

A recently purchase of a Bachmann tramcar in Hersheys chocolates livery performed a few circuits but finally found a bit of dirty track (we had cleaned it) so little Otto was sent around the circuit to rescue it. The result is really pretty little train. I wonder if I can get an unpowered tramcar to make a coach?

Saturday, May 18, 2013

Slim Gauge Circle meeting 2013

CrawlerThe Slim Gauge circle meeting isn't an exhibition per se, more a meeting in a social club on the edge of Rubgy where there will be some layouts, a demo or two, some trade stands and a load of people selling off bits and pieces they need to get out of the cupboard.

The demos by the Pheonix group are always impressive. This is modelling I aspire to. Lots of scratchbuilding, loads of detail. Lots of time to build and probably impossible if you want to make anything larger than a diorama. Doesn't matter though, I still hope to pinch the odd idea.

Trench Digger

Elsewhere, there were a couple of On30 modules. One of them had really nailed the dusty colours of the wild west of America. Or at least what I think the wild west of America looked like based on extensive research watching westerns.

Hopper Train

Finally, I have to mention the chunky PCB based trackwork for a G gauge. Looks great with Code 200 rail and tight pointwork. Once painted, this stuff should look a lot like the typical narrow gauge American spiked trackwork. Better still, it looks great fun to build !

Big fat PCB track

Friday, May 17, 2013

First weathering wash

First weathering wash

I mentioned a few days ago that I wasn't sure if the Matt Leather paint was a bit bright for the Y6 woodwork, but even if it was, I had a plan.

The plan was a wash of Precision Paints new track colour. Not a heavy wash, just enough to give the previously painted sides a bit of life.

Painting isn't sophisticated, I dip a big brush in turps and then into paint, splodge it on the inside of the tin lid and if it looks right, apply to the bodyside. If I need more thinners, a bit picked up on the brush is sufficient. Inside I did the same with weathered black paint, some of which seeped out to the front and mixed in with the brown. You can see the darker staining around the bottom of the edge of the front.

Left to dry, the effect isn't bad. Many people would leave it at this. I think I need more colour though so the next step will be a bit of dry-brushing around the bits that get wear and the a final shot of airbrush dirt.

Thursday, May 16, 2013

Inside the Y6

Inside the Y6This is a more complicated engine than normal to paint - you have to do the inside as well as the outside!

Anyway, here's what's under the body - the boiler unit is painted black, the same Halfords spray I used for the sideframes in fact. I just masked off the motor and gears. A bit of subsequent masking (read: holding a bit of card in front of the spray can) saw it matted down with Dullcote. Next, a dry-brush with rust and Matt 69. Then some weathering powders.

The wooden floor is plasticard painted with Precision natural wood, streaked with Humbrol 64 and metalcote gunmetal. Finally a wash of track colour.

I'm not going to go mad in here - you can hardly see it with the body on top but this is a loco that encouraged peering in to see through the windows and doors.

Wednesday, May 15, 2013

60 plans for small railways by CJ Freezer

Before 50 Shades of Grey, there was 60 plans for small layouts. First published in 1958, this little booklet has deservedly become a classic amongst railway modellers. Still available, although now called "60 plans for small locations", it should be on every railway modellers bookshelf. In fact, I bet it is!

Looking at it in 2013, there is still much that is of use in between the covers. UK houses are tiny compared to the vast homes of our American cousins so we cant' generally contemplate taking over a non-existent basement to build out grand scheme. For most of us that remains an elusive dream that will only be fulfilled if a lottery win appears on the horizon.

Instead, Cyril gives us lots of variations on the theme of filling a 6X4 baseboard with an interesting and entertaining layout. The first few plans assume that the builder would prefer a continuous run to a shunting layout - pretty fair I think - at the price of some sharp curves and, if the board id situated in the corner of a room, some difficult to reach trackwork.

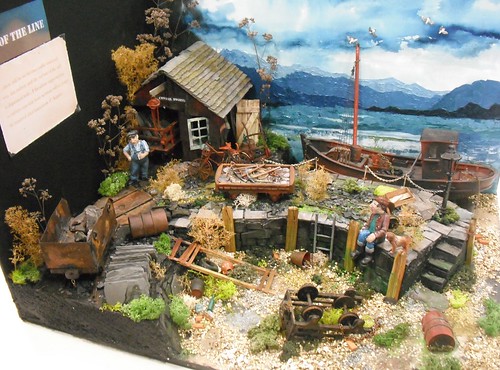
The plans are very much for builders. There's a lot of scenery shown and even today, most of it would have to be made up by the owner. That's a good thing as it means plenty of railway modelling fun.

The range of plans is pretty impressive - as well as the 6X4 layouts, there are L-shaped corner versions, ones with a centre operating well and even a descent selection of end-to-end 6 foot long models.

Of course, the book is best know for containing the classic "Minories" town terminus layout plan - the idea being that country stations tend to be sprawling affairs thanks to cheap land, whereas in town the real estate is expensive so facilities tended to be cramped and better suited to the space available to modellers. OK, so there is a lot more to build as you don't have fields full of flock, but this just adds to the enjoyment.

One thing all the plans have is reasonable operational potential. There are not miniature country stations that take up a huge amount of space but will become boring to operate within a few hours. The plans have bee criticised for being less than perfect representations of the real railway, something there are modelling cliche's in there but that's not a problem. If you want real plans, they are out there in prototype books. Here we are talking model railways and most of the time that means compromise.

60 plans worth studying. Plenty I'd like to build one day.

60 Plans for small locations from Amazon

Tuesday, May 14, 2013

Clean Y6

Clean Tram loco

Black bits painted with Halfords satin black, brown bits as per yesterdays post. The roof was a ngithmare - Railmatch weathered balck dried gloss, subsequent Humbrol matt black dired patchy gloss, three coats of Testors dullcote fixed this but I did wonder if a strip and re-paint would be required.

SMS Waterslide transfers sit on a coat of Johnsons Klear. Those on the bufferbeam aren't right (I think they should be shaded but there weren't any like that on the sheet) but will vanish under dirt soon. Beofore that step though, the engine was sprayed with Humbrol satin varnish from an aerosol 'cos I couldn't be bothered to mix it for an airbrush. Nothing wrong with a rattle can for this sort of job anyway.

Loco now pretty but far too clean.

Monday, May 13, 2013

Correct colours

Body paintedDid you know that butterflies can see a greater range of colours than humans?

Apparently they see ultraviolet light as well as what we call "the visible spectrum".

This must make things very difficult for your average Red Admiral who enjoys a bit of railway modelling when not supping from the blooms. How much harder it must be to work out which pot of colour you require from the Humbrol rack. Worse, they don't even produce any ultraviolet tins so you'll have to mix your own.

All this came to mind because I've been trying to match the body colour of my Y6 tram loco to the models I have found. Since there don't appear to be any colour snaps from LNER days available to me, I'll have to rely on other peoples interpretations.

My feeling is that the brown is quite light so I plumped for No. 62 - Matt Leather. Having sprayed it over grey primer, it might be on the light side but once a few coats of mucky brown weathering are in place, I bet it looks OK. The paint probably faded a bit when exposed to sunlight anyway.

Sunday, May 12, 2013

Cork boats for weddings

Cork BoatOne of my friends says that my life seems a bit "random" sometimes. She's right. A few months ago, I received a request for some cork boats for a wedding.

After a little e-mail discussion, I  found myself having agreed to make up some for Matt Cox and his bride to bes nuptials. They were to be used as table decoration, sailing in goldfish bowls on the tables.

Matt had spotted my posts about the Cokyn-Baba boats we tried a couple of years ago at the boat club. The wedding was to have a nautical theme and so I was the man to decorate the tables!

Anyway, he required 8 boats so I set about acquiring materials. The hulls are cork sanding blocks cut in half and shaped by hand using a surform. Beware if you try this, not all blocks are the same. Cheapo ones from Wilkinson are less dense than pricier versions from a proper hardware shop.

The original sails were from very thin plywood, supplied cut ready to use by a gentleman who wrote the models up in Marine Modelling magazine. I didn't have and couldn't find such thin and stiff wood so 30 thou plasticard was substituted. It has the advantage of not needing painting. The sail sizes were taken from my original boat but I rounded off the corners a bit as there would be children and drunk adults poking these things and at the time of manufacture, one council had deiced that triangular flapjacks were a potential deathtrap, so I thought "better safe than sorry".

The keels had also been supplied in the past but I made my own from a bit of sheet steel in the garage. Some aviation snips and a bit of filing did the job followed by a coat of Smoothright so they matched the sails.

All done, the boats were passed to a relative who was going to the event. Admittedly I interrupted a game of petanque to do this but it was cheaper and easier than posting. A few weeks later, I received some photos showing the boats in use. Apparently they went down very well. In fact one of them was purloined, so who knows where it has ended up?

CorkBoat at Wedding


Saturday, May 11, 2013

National Kit Car show

Buggies"No more kits" - the refrain that both my Dad and I chant every time we visit a show. There are more than enough projects in both of our maturing cupboards and yet we still feel the urge to cram another box in anyway.

The National Kit car show has been held 10 miles down the road from me for over a decade. I've seen the vehicles buzzing around and always wondered what it is like. It's not like I have the time or space to build a car but there is a bit of me that thinks it would be a fascinating project to take on. Never mind running a model locomotive that you've built yourself, how about driving a car that results from your own efforts.

You're right - I'd be terrified every time I hit the brakes in case my workmanship let me down...

Anyway, this year I decided I was going to take a look. Yes it's £15 to go in (railway modellers moaning about the price to go into a toy train show please note) but I only plan to do it once. Anyway, I'm not going to buy anything when I get inside am I?

Does it come with wheelsInside, there were car and lots of 'em. Cars of all sorts of shapes and sizes. Quite a lot of them were sports cars and many of those looked like the products of "real" manufacturers. The biggest difference to me seemed to be the price, and that the Italian supercars are based on Toyota underpinnings so they will probably start every morning and drink fuel at a rate you can afford to fund.

Two exhibition halls showcased manufacturers with par built and completed vehicles shining on the stands. The cattlesheds were home to a massive autojumble with new and old products up for grabs.

I did buy something in the end - a spray can of primer for a price that save about 1/3rd of my entry fee and some rubber strip that will work nicely on model boat stands to protect the hull paintwork from scratches.

I also spent a sunny spring day in the fresh air, took an awful lot of photos and enjoyed myself.

Dutton CommanderDo I still want to build a kit car? Possibly, a Dutton Surf amphibious car would be fun, as would a fake Ferrari but I think my heart would be more in tune with a VW based beach buggy, even if I don't look cool enough to drive it.

For the moment though, I'll keep saying, "No more kits. No more kits."

Photos on Flickr

Friday, May 10, 2013

Resin butchery and manual points in Hornby Magazine

An article in a model railway magazine where most of the action happens under the baseboard? Can it be true?

Yes it is. This month in Hornby Magazine, I'm making the points change on Clayhanger Yard by building a manual point operating mechanism.

Plan A for this involved using bicycle spokes but it seems that if this ever happened in real life, this was back in the days of penny farthings 'cos now I can only buy something capable of reaching a third of the way across the baseboard!

Parker's Guide this month involves hacking up some lovely Hornby resin buildings. Regular readers will know that I see these things as raw material rather than finished models and so it is here. Both a station building and goods shed see the attentions of Mr Saw. I've opened them up and scratchbuilt some interiors, something that's really worthwhile as when you see open doors on a model, you feel the urge to peek inside.

It's not all inside work though, there's also a canopy made from Airfix bits that caused me a fair bit of head scratching. The end result isn't bad though, and far cheaper than a kit version.

Topley Dale Station building

Thursday, May 09, 2013

Fluffing up for the p**n shot

Fluffing upI was in a discussion with someone recently when he described the big photo that opens most "how to" articles in model railway mags as the "P**n shot" (I've asterisked out the letters for the benefit of those reading this at work who don't want the overseers in the IT department appearing at their desk. Cut out these letters - or - and stick them in place if you want). It's the photo that shows the finished model in all its glory, usually across a centrefold, for the reader to froth with enthusiasm over.

Since I don't have a full-sized layout at home to use as a background for these photos, a couple (actually nearly 4!) of years ago I made up a length of track attached to a scenic base. This acts as the background to any pictures I need to take of big engines that wouldn't be appropriate to pose on The Melbridge Box Company or Melbridge Parva layouts.

Anyway, the scenics beside the trackwork were looking a bit ropey. Static grass is fine if you look after it but when your baseboard gets stuffed into odd corners to make way for other projects, it rubs off. Needing to take another big photo, I needed to fix this.

Having put the job off for ages, the work only took about 15 minutes. The old grass was sprayed with hair lacquer and then a new layer of nylon fibres applied with my cheapo static grass tool. I don't understand this but it seems to work quite happily even if you don't earth the lead. Physics gurus can explain this perhaps.

After a couple of fibre layers, more hair spray attached a sprinkle of flock powder to finish the job. My vegetation now looks a lot fluffier and so much nicer in the photos.

Class 14

Wednesday, May 08, 2013

Just Like The Real Thing by Pete Waterman

Since we looked at Pete Waterman's model of Leamington Spa station on Monday, it seems appropriate to devote the Wednesday book review to his latest volume on the building of this layout.

First up, this isn't a book to buy if you want specific instructions to guide you through making models - you need Parker's Guide for that. Apart from the chapter covering creating grass using teddy bear fabric, you will be disappointed.

What we have is the story, so far, of building an absolutely massive model railway based on a prototype. There are lots of photos showing how the layout progressed from a largely empty room to some degree of completion. Quality is a bit mixed except for the excellent Chris Nevard shots at the end but there's nothing you can't see, just a bit of under-exposure which tends to happen when you snap in-progress shots.

You'll also be disappointed by the lack of a track plan, but as I say, it isn't an instruction manual. This is a book to be read and enjoyed from the comfort of an armchair. The text is very Pete - as I read it, I could hear his voice telling the story. If there was much editing involved, it certainly hasn't dampened the character of the text.

There is a lot about the different approach that you take when building a model as large and complex as Leamington. It's something that many club layouts might want to think about as you can encounter the same issues on these sort of big projects. As far as advice goes for the sort of 6ft wonders I'm responsible for, then it's less helpful.

Bought as a pleasant diversion or present for someone who loves trains then it's good stuff. If you know the area modelled, it's good fun recognising the prototype buildings (not hard as the models are superb) from the layout pictures. If you just want a book of photos showing model engines then the mix here is more interesting than most.

As I understand it, you have to purchase from the man himself at shows but with a bit of luck, he'll scribble in the front for you.

Tuesday, May 07, 2013

Brick workshop

Brick workshop

I spotted this very modellable brick workshop while enjoying the Long Itchington beer festival at the weekend. It's not an exciting building but would be very useful in a semi-industrial setting on a model.

At first glance I we have a pretty rectangular structure with a big door on one end, a small one in the side and a couple of windows. The large door is possibly a later addition judging by the bricked up opening above it.

Modelling wise, the pitfalls would be curved brickwork above the doors and windows. I've never worked out a way to produce this to my satisfaction as it has to fit flush with the wall face. Maybe the way is to make it from the same plastic sheet flipped over and scribed, then let into the surface. Dunno - it has to be carried out neatly or the result won't be any good.

The corners could be fun to. They aren't hard right angles but curved. If the model was made from Wills sheet they could be sanded to shape but Slaters embossed sheet wouldn't provide enough "meat" to do this.

On the side, there's a painted sign. Not sure how old it is but there's fun to be had producing it from a print your own transfer kit on the computer.

Plumber and glazer sign


Monday, May 06, 2013

Leamington Spa Station


I missed out on a trip to see Pete Watermans train set over the weekend. That was annoying as some of the photos I've been sent show great progress since I last visited 3 years ago.

The biggest step is the creation of the ex-Great Western Leamington Station building. Despite the resources and contacts available to its builder, tracking down plans seemed impossible. Measurements were taken (I bumped into Pete doing this once) and a start made. Due to space constraints, the model was created with one less bay on the end.

Then plans turned up and a new model has been started and that's what you can see above. The main carcass is laser-cut from 3mm MDF. This time I understand it's all to scale. It's an impressive model of a rather attractive building.


Sunday, May 05, 2013

Maggie the Wavemaster sails

Waverider sails

On the water, my Dad's completed Wavemaster model boat looks the part in the sunshine.

Built from a Vintage Model Boat Company laser-cut wood kit, it's constructed largely as intended by the manufacturer. This one has been completed as a Norfolk Broads style cabin cruiser, something my aged parent remembers holidaying on once. This means there will be none of those nose-in-the-air antics that you see in the website picture. Powered comes from an electric 540 motor rather than an ED diesel.

Detailing involved cutting out each window to flush-glaze them rather than sticking the plastic sheet behind the holes as most will do. I'm told that it's a fiddly job and takes time but the effect, especially around the windscreen, is worth it.

The rails on the bow are soldered up from brass wire. Inside the cabin you find the captain and steps down to the front and rear cabins.

 
(Sorry for the dodgy photo, it was a bright day)
 
On the water, it's a lovely boat to sail. A 2-blade 35mm prop provides slightly more than enough speed. Earlier attempts with a 40mm 3-blader saw the motor smoke but it seems to have survived. I'll drop a 555 motor in when it gives up the ghost.
 
Definitely a pootler rather than a speed boat but exactly what its builder wanted. There were some "interesting" moments in the build - forcing the skins around the hull took a bit of work and one or two slots don't align with their tabs - it is a lot of boat for the money. Those niggles certainly haven't put him off, another kit from the same company is on the bench as I write.

Saturday, May 04, 2013

16mm Association AGM

End of the line

I'll be honest, this years trip to Petterborough was mostly taken up with chatting to people.

Obviously I did have a slice of the fantastic choccie cake sold there but apart from that - and the fact it was a marvellous and well attended show, I haven't got more to say.

Well, that and there are a couple of new projects heading the way of the blog but you'll see those all in good time.

I did take some pictures though so have a look at those.

Friday, May 03, 2013

Y6 loco crew

Loco CrewBuying figures in 7mm is exciting. Yes, it costs a lot of money, but not that much more than you shell out for decent 4mm figures. The great thing is that there are some really nice miniature people out there.

My choices are, on the left a driver wearing a bowler hat from S&D Models (OF23a). To the right, engine crewman mopping brow from PLM cast-a-ways (C300).

Costs are £3 and £2.20 respectively.

That extra 80p buys much finer detailing and sharper moulding. Whether that matters to you probably depends on the loco the little man will be stuffed in to. The driver does have a posable arm, although I had to vandalise it so he could look out of the Y6 engine window. The result is a bit odd (ad fell off as I took the photo, hence the dodgy superglue repair.

I didn't notice the difference in height until the photo was set up. It's not a big problem and will be even less so when they are at opposite ends of the engine.

The S&D range is very impressive though. Modelling as good as the Monty's range in 4mm scale. Even if I didn't have a loco to fill, I enjoyed painting him immensely.

Modelling note: Both figures were primed and painted from the Humbrol range. A final coat of Railmatch weathered black deepened the shadows and added some footplate muck.

Thursday, May 02, 2013

Uncomfortable accesories

Boat DetailsMy Dads boat is nearly finished and he passed a detail pack from Macs Mouldings over to me for painting.

The resin items are quite nice: an old fashioned (to da kidz nowadays, but just how I remember them when I had one to load programmes on to my ZX81) radio/tape player, clipboard, mug, binoculars, ashtray and packet of cigarettes.

These last two gave me pause for thought. I've never smoked, never even tried to. As far as I'm concerned the smoking ban in pubs means I don't have to spray my clothes with Fabreeze after a few beers. If you look at TV and films these days, characters puffing away are rare and those that do are usually baddies - smoking being directors shorthand for "a wrong 'un".

Look back a few year and things were very different. Everyone smoked, even the Thunderbirds puppets. If you wish to build a realistic model, cigarettes are part of the deal. To modern eyes though, they seem anachronistic.

Anyway, I painted the parts up, including the fags and even stuck the paper label on the packet. The ashtray is filled with grey weathering powder. I didn't feel good about doing it though. Slightly grubby if you see what I mean. Maybe realism isn't everything.