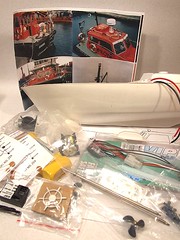
The pilot boat kit has leapfrogged my Brede build to make it to the workbench. I want to finish the model and enter it in the Model Engineering Show in just over a month. A Brede would be a better boat to go into this with but will take quite a bit longer to complete. This model is me easing myself gently into working at a higher level then normal - which should lead to a better lifeboat in turn.
Over the last few months I've gradually been acquiring some bits to fit the model out from various suppliers. As you can see there is quite a pile - but I'll still have to do a lot of scratchbuilding.
All this to carry on alongside the locomotive builds but in the early stages of this boat there will be a fair bit of leaving things to dry so I need something to occupy my otherwise itchy fingers !
Sunday, August 31, 2008
Saturday, August 30, 2008
Boiler badness
The Dunalastair boiler comes partly rolled - much better than many model locomotive kits where you have to do the job yourself. There is even a fold-up former to strengthen the tube inside.
I joined the bottoms with solder and then cleaned most of it off again for a nice neat finish. At this point everything looked fine.
The smokebox is a separate part with a back, front and wrapper. These are all marked with etched indications of the top centre, a boon when you are trying to line everything up and another thing other kitmakers could copy (please). I soldered the front on first with some tacks followed by a seam inside. The ends of the wrapper perfectly matched the bottom of the front former. The back went on just as well.
The centre line was then extended using a square to the bottom of the smokebox back. I used this line to align the join on the boiler.
It was only when I started fitting this to the footplate I noticed a problem. The firebox sides were longer on one side then the other. Then, looking along the loco the holes for safety valve and dome weren't at the top.
Somehow I've managed to get the boiler rotated around slightly. I'm going to have to unsolder this and re-do it. And when I heat it up for this, the smokebox will come unstuck. For a couple of days this is going back in its box while I work out what went wrong and how I'm going to fix it.
Friday, August 29, 2008
Dunalastair footplate
Apparently Dave wants more model railway posts on this blog and less model boats. Well, the good news is that I have a load of railway projects on the go and several of them need to see some progress over the next few weeks. So stop moaning :-P
First up - back to the Dunalastar. This has been sitting around while I track down some photos of the prototype. These showed that the checker plate top I'd fitted to the footplate only existed on the Belgian version of the loco. The Scots were happy to slide around so it had to be replaced with the smooth top.
With that done the combined splasher and cab assembly had to be tackled. The sides are laminated from two sheets. Then a wrapper bends over the top of the splashers and provides the cab front. There's also an extra layer for the cab front proper to fit inside.
All this is fine except the splasher tops. Bending this is a pain. Smooth curves are the order of the day, not a series of straights. I bodged away tack soldering on the outside of the splasher until I was reasonably happy and then made the joint properly on the inside of the part. This is one of the few areas where I'd prefer a whitemetal kit - all the hard work is done for you.
Finally after a lot of cleaning with the fibreglass pencil and a scrub in the sink I think I'm there. Let's hope I've got everything in the right place and the boiler fits !
Thursday, August 28, 2008
Type 2 back brakes...again.
OK, in between other things my time hasn't been wasted, I've been trying to get the back brakes on my campervan into a state where the MOT man won't laugh at them.
Last time I mentioned them, the brakes were a soggy mass of crud and shoe and badness. They were cleaned up and I fitted a new cylinder after a bit of a session hitting it with a hammer to shock the fixing bolt free and not in any way to relive my tension caused by the stupid rusted thing I wanted to remove.
Then I tried to fit the new shoes - which didn't.
It seems my 1971 van uses 1973 onwards brake shoes. And I had the up-to-71 ones. German& Swedish couldn't do me a set of the ones I needed. Just Kampers could, but that meant another delay while I waited for them to arrive. Last night a van pulled up and I got a box of goodies.
9am this morning I'm sat in front of the brake hub.
The new shoes go in fine and after taking a photo (I was proud of my work. I know how sad this is but that's what people with classic cars do) the hubs went back on and we bled the system. Messy but not difficult. Mind you, this is the third or fourth time I've done this - the first go was approached with a lot more trepidation !
The adjusters still didn't want to play ball but the wheel seemed to have some resistance so lowered the jack and cleaned up.
Once clean I tried the van. No brakes. The handbrake came all the way out of it's hole and refused to go back without a lot of jiggling. This made me sad.
You should never work on a van when sad so I left it for a while and had some lunch. This made me feel better (probably something in the chutney) and I attacked the adjusters with a vengeance (and a screwdriver). If you crawl under the vehicle you can actually see the stars rotating so at least you feel something is happening. Each adjuster was initially moved out about half a centimetre.
The brakes seemed a bit better after this so I had another go. Nothing moved much but when I got back in the cab I realised why - the handbrake was still on !
With bricks under the wheels (you don't think I'm that stupid do you ?) another tweak and I think I found the limit of adjustment so I backed off half a turn.
This time the brakes were great. The handbrake moves about 4 clicks and even on a short run on the drive (about 5ft) the brakes can grab and shake the driver up enough to make him wish he'd worn a seat belt.
Anyway, the van is off to Bugshak next week for a bit of welding and hopefully a return to fully legal and roadworthy.
Wednesday, August 27, 2008
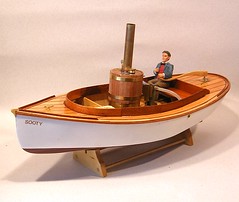
Fantail Launch - Finished
Just one job left on this model boat - make a tiller for the crewman to steer with.
I knew this would be a funny shape so did the right thing and hacked away at a cardboard template until I had found a shape that worked. This was then transferred to one of the leftover bits of basswood which was carved and sanded to produce the finished object.
After a couple of coats of gloss varnish, the arm has been glued to the arm of the figure - at the pivot end it just sits over the top of the rod and can be removed easily. Yes - I did check that the steering isn't impeded by this.
And that's the job done. I'm pleased with the end result. My intention was to produce an attractive boat with slightly fancy woodwork which is what I have. There have been fun and games on the way but I've learned a lot about working with fibreglass and wood so next time everything will be a lot easier.
Of course there is still one task with this model - I have to learn how to sail it properly now !
Tuesday, August 26, 2008
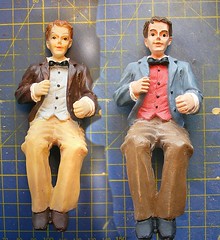
Fantail sailor
All model boats (and real boats too) need a crew. Anything less, IMHO, looks stupid. The Fantail crew isn't huge, one figure, but I wanted a good one. Luckily in 1/12th scale there is a reasonable range available from dolls house shops.
I prefer those moulded in resin as you get a reasonable level of detail as as long as the pose suits your purposes the figure stays where you want it. The horrid rubbery people so beloved of dolls house owners can't be posed as they retain the "stamped out in a press" pose more akin to scarecrows than real people. The faces look scary too like someone who has done too much botox.
For a fiver my man looked the part and the pose couldn't be better with an arm built for handling a tiller. The only thing was I didn't like the paint job. Obviously for the money it's impressive, or scandalous when you work out what the painter will have been paid, to get paint at all. I don't like the skin tone (too pale) and find the other colours on the weak side and indifferently applied.
My usual Humbol dry brushed with Revell paint skin started the transformation and was quickly followed by a complete change of colours. In my mind the sailor is a Victorian enthusiast who is sailing a steam launch he maintains, and possibly even built, himself. The jacket is a coarse material that will survive coal dust and the trousers definitely aren't the best. A hint of character is exposed by the red waistcoat and bow tie.
No - I haven't given him a name, I'm not that sad. But if anyone likes to suggest one I'm listening !
Monday, August 25, 2008
Poster sizes
All the way from 1949, the Model Railway Constructor shows us how big posters are. Not something most of us know for sure.
Handy information for anyone building an advertising board or hoarding for their model railway. You'll need to click on the photo to see it full size and be able to read the text.

Handy information for anyone building an advertising board or hoarding for their model railway. You'll need to click on the photo to see it full size and be able to read the text.
Life raft
I spotted this on a recent trip to Worcester. It's a modern life raft on a pleasure cruiser. Shouldn't be too difficult to model - just a sheet of plastic, probably several 2mm thick rectangles laminated, with beveled edges and some thread. Where the rope joins the raft a cut out is needed but a little work with a round needle file should sort this.
The markings on top are fluorescent so people using it in the dark can easily find the edges. I'm not sure how many passengers this would hold but the boat offers river cruises so those things must be pretty buoyant.

The markings on top are fluorescent so people using it in the dark can easily find the edges. I'm not sure how many passengers this would hold but the boat offers river cruises so those things must be pretty buoyant.
Sunday, August 24, 2008
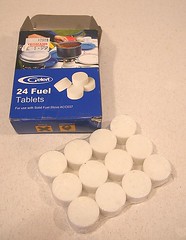
Fuel tablets
While the instructions for this model boat say, use Sterno to power it, I can't get Sterno in the UK. So, I've improvised with these solid fuel tablets from a camping shop.
Another alternative would be Mamod solid fuel tablets intended for running their range of steam engines. I suspect this would be a bit more expressive and no more effective than the camping shop version. For £1.99 I got 24 tablets which I think is enough for 12 runs. I wonder how much an electric boat would cost to charge for a similar number of sessions ?
Another alternative would be Mamod solid fuel tablets intended for running their range of steam engines. I suspect this would be a bit more expressive and no more effective than the camping shop version. For £1.99 I got 24 tablets which I think is enough for 12 runs. I wonder how much an electric boat would cost to charge for a similar number of sessions ?
Saturday, August 23, 2008
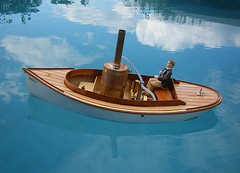
Fantail Launch - Maiden Voyage
It's been on the water !
First up a bag of lead was measured out for the front to drop the bow and counterbalance the heavy resin figure. I'll work on disguising this later, probably in a sack of coal. The hull is very bouyant though and I suspect a bit more weight wouldn't go amiss.
Next I fired up the boiler with 1 1/2 flammable tablets and 50ml of water. Once steam was raised the boat puttered around OK but seemed to run out of puff every so often. Oddly though, the engine did restart sometimes, something a single oscillating cylinder ought not to be able to do.
Steering is fine but I need to adjust the trim to give a bit more right rudder. The boat is badly affected by wind so a calm day is required before a trip to the boating lake. That steam outlet seems to act as a retro rocket sometimes too.
The second run was carried out with 2 tablets and 80ml of water. this was a bit better but I'll try a slightly less water next time. There is a balancing act to be carried out to get the best steam raising capability. At it's peak the engine runs brilliantly but often slows so that drive is non-existent. I also want at least 10 minutes continuous running and reliability as I can't rely on the engine to restart.
On the plus side, the woodwork looks fantastic in the sun. I'm going to need to polish the bras though.
Friday, August 22, 2008
Wiring the boat
In the launch I need to pack:
The only problem is that there is very little in the way of hiding places in this model boat. All I have available is a seat at the front which hides the 4 AAA cells, and the removable seat at the back with the servo and receiver shoved underneath. Because of an earlier error the seat back has had to be altered so the servo can fit underneath. It's not easy sawing away when you barely have room to move the blade.
The power wires run neatly down the centre of the hull and are hidden by the steam plant. Losing the aerial under the edge of the deck is fiddly and I'm not sure how long the masking tape I used to hold it up will last but for the moment it's not too bad.
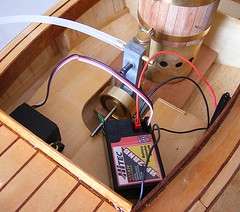
- A receiver
- A servo
- Batteries to run the above
The only problem is that there is very little in the way of hiding places in this model boat. All I have available is a seat at the front which hides the 4 AAA cells, and the removable seat at the back with the servo and receiver shoved underneath. Because of an earlier error the seat back has had to be altered so the servo can fit underneath. It's not easy sawing away when you barely have room to move the blade.
The power wires run neatly down the centre of the hull and are hidden by the steam plant. Losing the aerial under the edge of the deck is fiddly and I'm not sure how long the masking tape I used to hold it up will last but for the moment it's not too bad.
Gloucester model shops
 First, let me say I know there are three model shops in Gloucester but two of them are a bit off the centre and when I visited I didn't have time to tour them all. For the moment this means the only one getting a photo is Antics down in Northgate Street, the unfashionable end of the city centre.
It's not a big shop but for a chain the stock is packed to the rafters. A good selection of plastic kits, diecast stuff, aeroplane and buggy kits plus model railway items. You even find boat stuff including 3 rumagable bins of goodies including props and shafts, chains and the odd fitting.
The usual tools, materials (including the lesser spotted sawn plastic strips in larger sizes) and paint are around the counter. The only surprise omission was a Humbrol paint rack - only Revel is stocked. Plenty of choice in the glue section with several flavours of Zap-a-Gap plus lots of others.
Judging by the posters, aircraft play a big part in the sales closely followed by R/C cars. Not sure about the quality of customer though - the assistant was having great difficulty on the phone trying to explain that there was no point in bringing a particular car in the next day because the person who could help wasn't going to be in. Not even if they brought the car in. Nor if they just brought the bit that might be faulty in. And please would they not remove it from the car as it's not possible to diagnose the fault without the rest of the vehicle. And no there wasn't any point in bringing it in tomorrow as the guy who specialised in them wasn't in then.
One point - it's nice to see the odd made up plastic kit in a showcase. The Titanic on show wasn't the greatest example in the world with a very slight touch of wobbly paint but at least it means the people working there are modellers and that is A Good Thing.
Antics website
Thursday, August 21, 2008
Engine bench test
The cleaned up boiler is wrapped in a fibreglass(?) sheet then then brass, which holds the cloth and gives the height required for the burner wrapes around this. On top of that goes a set of mahogany strips for decoration and extra insulation. These are held in place with brass boiler bands.
The bands come predrilled but I found them to be too long and loped 5mm of one end of each, re-drilled the hole and then prebent them around a can. Bolting the ends together is less fiddly than expected, helped by the strips being stuck to a strip of masking tape.
The baseplate has to be drilled to start the screws that hold the cylinder in place. 3 holes are also made for brass rods that retain a copper "dish" for the fuel. The idea is that the boiler slips over these and is held in place. Fine, except that they are too close the dish and splay out. I redrilled them so that the posts were vertical and everything fitted together.
According to the instructions, the fuel to be used is something called "Sterno". This is a flammable jelly used in hand warmers apparently. It's not available in the UK as far as I can tell so I had to experiment.
With the engine complete and on the bench in the garage I started with the little meths burner I made up to power my plank. This heated the water but wasn't man enough to get it to the boil.
Next I tried bits of firelighter. Much better if I could keep them lit. A squirt of meths into the dish seemed to help as the meths would burn well and keep the firelighter going. It's then that I managed to get the results in the film you can see in this post. OK so the duration wasn't impressive at around 5 minutes but I was mesmerised by my own working steam engine and spent the rest of the evening messing around with various combinations of fuel to no great effect.
I've always felt that one of the best things a modeller can do is build a locomotive chassis and run it up and down a test track. The pleasure of watching something you have made actually working is immense. The steam engine gives the same, not thrill but deep sense of satisfaction. I'd recommend it for anyone.
Wednesday, August 20, 2008
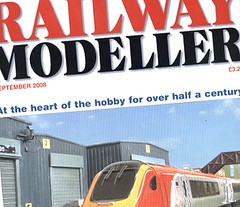
Class 14 in the Modeller
Pages 640 to 643 of the September Railway Modeller feature my article on building the Mercian Class 14. The editor has added some scale drawings and a few prototype photos which help bring the piece alive even more.
The rest of the issue's not bad either !
The rest of the issue's not bad either !
Boiler making
Making a boiler is scary. This is a pressure vessel - in other words it could go bang.
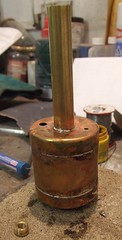
The kit provides a length of copper tube and a top and bottom plate which overlap the ends. All the modeller has to do is slosh some flux in the joints, heat everything up and run solder in. This works very well once enough heat is applied - the solder wicks into the join and through the holes in the ends I can see that it's worked its way to the bottom. I probably overdid it with the solder but I'd rather that than have the thing explode on me.
(Safety note: I'm not sure what pressure this thing runs at but I think it's lower than your average balloon so I suspect the chances of me blowing up the house are slim)
The chimney took a bit of forcing through it's holes - a little easing with emery paper was required. It's then soldered in place with about 1/4 of an inch sticking out the bottom.
Finally the steam outlet tube is annealed and fitted followed by the water filler. No problems there. A quick clean with Hib Brite and it looks pretty !
Tuesday, August 19, 2008
Steam Cylinder
Assembly of the Fantail launch's steam cylinder is pretty easy. The instructions recommend solder and seem to indicate that you need to use silver solder for best results. Re-reading though what they actually suggest is normal tin/lead solder but with solver in it. Nowadays it is easy to get lead-free solder and the best stuff has a small amount of silver in to make it "wet" more easily.
I did try silver solder but can't get the correct flux (it's on backorder) and the flux I have wouldn't make it run. So I used lead free solder with silver in it - and it all worked fine.
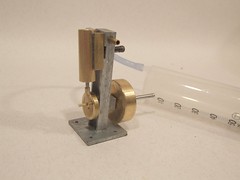
A small gas torch got things hot enough to fix the cylinder to it's block (the swively bit, not sure what the correct term is) and also make up the piston. Both were cleaned up and special effort made to make sure the piston moved freely, but not too freely, in the bore.
Once screwed together I tried testing by blowing in the ports but couldn't move the piston. Plugging a big syringe in did the job though. Compressing the air by about 2/3rds got the engine running for a couple of seconds until the plunger reached the end. A proper compressed air source would have been better but this did the job. And it was addictive - I must have spend half an hour just turning the engine over like this as I was so proud of getting this far and having it working.
I did try silver solder but can't get the correct flux (it's on backorder) and the flux I have wouldn't make it run. So I used lead free solder with silver in it - and it all worked fine.
A small gas torch got things hot enough to fix the cylinder to it's block (the swively bit, not sure what the correct term is) and also make up the piston. Both were cleaned up and special effort made to make sure the piston moved freely, but not too freely, in the bore.
Once screwed together I tried testing by blowing in the ports but couldn't move the piston. Plugging a big syringe in did the job though. Compressing the air by about 2/3rds got the engine running for a couple of seconds until the plunger reached the end. A proper compressed air source would have been better but this did the job. And it was addictive - I must have spend half an hour just turning the engine over like this as I was so proud of getting this far and having it working.
Monday, August 18, 2008
Cranked axle
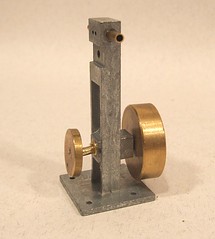
Oh dear. The instructions say assembly of the crank and flywheel is easy. Fit the crank to the axle, put it through the block making sure it revolves (I reamed the hole slightly for this) and then force it through the flywheel by gentle tapping with a hammer on a vice.
I tried that. The tapping had to be a bit more than gentle but it went in. Sadly the same tapping bent the axle. A lot. The only way to get it out was to chop the axle up with a junior hacksaw and take it away in bits.
The problem is the wrong material is supplied. A brass axle is fine in theory but it's too malleable. I was lucky, in a drawer I found some of the correct material - silver steel rod of the right diameter. Although it was a bit short - I had to put a join in the middle of the fat flywheel, this went in perfectly.
Sunday, August 17, 2008
Soggy brakes
Having checked, cleaned and re-assembled one side of the back brakes on my Type 2 camper, I had assumed that the other side would be very similar. To be honest I'd almost planned to leave them for the professionals as the standard jack won't go into the mounting in that side - and no I don't understand why, it's another job to be fixed.
A rare sunny afternoon combined with a need to leave some stuff alone to dry made me have a butchers anyway. Doing both sides is sensible.
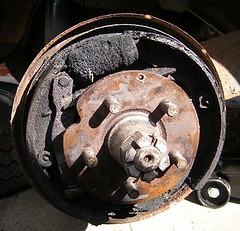
First surprise is that the drivers side is rustier than the passenger side. Perhaps this is because it normally stands against a wall so there is less air movement. That might explain the 4ft long hole that needs dealing with on the side. The back plate on the brakes is pretty manky too.
Inside, what the hell ?!?! A furry brake cylinder !
No rust though because everything is soggy with brake fluid. No wonder the brakes were iffy. A hour spent with turps, brake cleaner and a half inch paint brush and things are a lot cleaner. The shoes are in the bin. In theory you can clean them but for 25 quid for two pairs I'm not going to bother risking it. Instead I'll get a new cylinder ordered and bin the old one. A pain but better than squiffy brakes.
Oh, and while I was in there I discovered one of the brake retaining thingies that gave me so much grief had been replaced with a split pin and washer. This worked quite well but I'll be going back to stock all the same.
A rare sunny afternoon combined with a need to leave some stuff alone to dry made me have a butchers anyway. Doing both sides is sensible.
First surprise is that the drivers side is rustier than the passenger side. Perhaps this is because it normally stands against a wall so there is less air movement. That might explain the 4ft long hole that needs dealing with on the side. The back plate on the brakes is pretty manky too.
Inside, what the hell ?!?! A furry brake cylinder !
No rust though because everything is soggy with brake fluid. No wonder the brakes were iffy. A hour spent with turps, brake cleaner and a half inch paint brush and things are a lot cleaner. The shoes are in the bin. In theory you can clean them but for 25 quid for two pairs I'm not going to bother risking it. Instead I'll get a new cylinder ordered and bin the old one. A pain but better than squiffy brakes.
Oh, and while I was in there I discovered one of the brake retaining thingies that gave me so much grief had been replaced with a split pin and washer. This worked quite well but I'll be going back to stock all the same.
Starting the steam engine
Time to open the second box that this model boat kit comes in. This time I'm building the steam power plant. This is a little scary as I've never built anything like this before and so I'm on a learning curve. In theory the kit makes assembly easy as all the machining has been carried out and only a modest selection of hand tools are required.
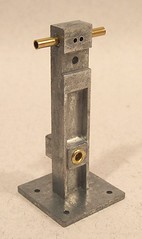
First up is the oscillating cylinder. A metal block supports this and provides the steam ports. I think it's cast from mazak, if not another hard alloy. It's pretty clean but I ran a countersink bit in all the holes to bevel the edges for easier entry. The face where the steam ports are was also cleaned up with some emery on a flat surface.
The pivots are pressed in using a vice. These then need cleaning out with a reamer or drill to allow the axle to rotate smoothly.
Then the steam ports are knocked in with a small hammer. I marked these at 4mm so the pipes didn't go in too far and block the ports on the face of the casting. According to the instructions you can twist them back out with pliers if you go too far but it's easier not to get this wrong in the first place.
Saturday, August 16, 2008
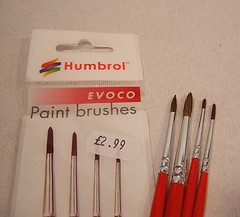
Humbrol Evoco brush set
What sort of name is "evoco" ? Wouldn't "cheap" be more appropriate ?
In the bag you find four fairly average cheapo brushes. Not quite as good as the President range they used to sell but OK for base colours and weathering.
I'll confess I've never been keen on the sable brush route. A fiver for each brush seems like a lot of money to me and the ones I do own don't seem to do a markedly better job than the normal brushes. Of course if I want to do some good painting then I tend towards the airbrush anyway.
However these are perfectly acceptable tools for the money. As they come you need to clean the protective gum from the bristles. I used turps but suspect that water would work just as well. None of them are pointed at the tip but then if you need precision that will cost more than 50p !
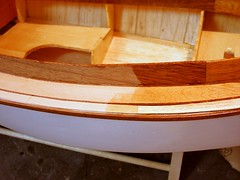
How much vanish is enough ?
3 coats ?
I think this will; be enough. I've been good and given each a light sand before re-coating. The yacht varnish is really bringing the colours of the wood alive like I hoped it would. My big worry is ending up with too thick a finish. Perhaps the varnish should be thinned a bit before use, but then I'm likely to get sags or runs.
Whatever, the result is very nice. Next, I get to put the mechanical bits in.
Friday, August 15, 2008
Dunalastair bogie
Quite a simple bit of construction here. The main part folds up with a couple of spacers across the end to strengthen things and retail the wheels.
The brakes are soldered to a separate spacer that fixes in the centre over the pivot. Finding these bits is slightly awkward as they are spread around the fret but the shapes are obvious enough for this to be a minor irritant - identifying the contents of a box of whitemetal components is far more taxing !

The brakes are soldered to a separate spacer that fixes in the centre over the pivot. Finding these bits is slightly awkward as they are spread around the fret but the shapes are obvious enough for this to be a minor irritant - identifying the contents of a box of whitemetal components is far more taxing !
Thursday, August 14, 2008
VW Brake retainer
What a pain in the backside these things are to fit !
The washer hooks over a pin that comes in from the rear of the brakes. In between is a spring to retain the brake shoes. The new ones in the kit are really strong and (IMHO after loads of attemots and some bad langauge) a bit too long. In the end the old ones were checked over and looked fine so they were fitted.
The "trick" seemed to be to have two people. One holds the pint in place and the other uses a pair of long nosed pliers to grab the sides of the washer. They push it onto the pin with the spring in place and then twist it into position.
What a game. Still once this is done the hub goes back on and the brakes just need to be adjusted. Queue half an hours faffing around and yet another complete failure to do the job.
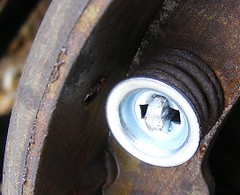
In theory adjusting for wear is a simple case of turning the star adjusters to bring the shoes closer to the wheel. Keep turning until the wheel won't rotate and then back off three or four clicks.
I know my adjusters are free and yet no matter how much I turned them the brakes didn't come on. To be honest I can never work out which way the things have to rotate anyway and the stupid Haynes manual doesn't help because despite showing the direction, quite where this view is obtained from (front or back of the drum) isn't made clear.
Anyway, I have to do the other side so perhaps I'll remember to note this down. And since the van has to go in for some front end re-torquing I'll get it done by someone who knows what he is doing. And has a lift. Which makes the job sooo much easier.
The washer hooks over a pin that comes in from the rear of the brakes. In between is a spring to retain the brake shoes. The new ones in the kit are really strong and (IMHO after loads of attemots and some bad langauge) a bit too long. In the end the old ones were checked over and looked fine so they were fitted.
The "trick" seemed to be to have two people. One holds the pint in place and the other uses a pair of long nosed pliers to grab the sides of the washer. They push it onto the pin with the spring in place and then twist it into position.
What a game. Still once this is done the hub goes back on and the brakes just need to be adjusted. Queue half an hours faffing around and yet another complete failure to do the job.
In theory adjusting for wear is a simple case of turning the star adjusters to bring the shoes closer to the wheel. Keep turning until the wheel won't rotate and then back off three or four clicks.
I know my adjusters are free and yet no matter how much I turned them the brakes didn't come on. To be honest I can never work out which way the things have to rotate anyway and the stupid Haynes manual doesn't help because despite showing the direction, quite where this view is obtained from (front or back of the drum) isn't made clear.
Anyway, I have to do the other side so perhaps I'll remember to note this down. And since the van has to go in for some front end re-torquing I'll get it done by someone who knows what he is doing. And has a lift. Which makes the job sooo much easier.
Woodwork
In between other jobs I've gradually been adding the wooden bits to the fantail launch. Most has been pretty simple except for the coming around the inside of the cockpit. This is 1mm thick mahogany. A couple of parts were die cut for the sides but the front is strip that needs a serious bend putting in it and the material isn't at all flexible as supplied.
I soaked the wood in boiling water for quarter of an hour and then gently worked it into a curve around a tin can. A couple of elastic bands sort of held it in place for an hour when I fitted it to the boat. I know the instructions say to leave it on the can overnight but I decided it would be better in place where exactly the right bend would form.
The only other point of note were the seats - I managed to cut the wrong bit of wood for the back of the rear seat leaving me short for the front pew. With the back of this being basswood I simply used some scrap from another sheet of the same material. This looks better and hides my embarrassment.
The mahogany always looked a bit dull to me but one I gave it the first coat of yacht varnish the colour came out. The basswood planking looks good too - the grain now shows up. I think all that sanding has stained the bass though as it's a lot redder than I expected. Not unattractive but some thinner dark wood might have been better.
Wednesday, August 13, 2008
Type 2 rear brakes
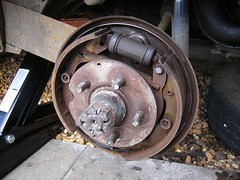
One of the MOT "issues" that my van has involves the back brakes and handbrake not putting sufficient effort into stopping. I had had a tinker with them before the test to do up the adjusters (old VW brakes aren't self adjusting for wear, you get to scrabble around in the dirt for that) but obviously not enough.
Stripping and cleaning up the brakes has always been a job I meant to do but never quite got around to. The thing that scared me was removing the hub - a job that on my Beetle involves undoing the central nut which is torqued up to some phenomenal level. This involves a 3/4 inch drive socket and 6ft length of scaffolding pipe !
Looking in the manual properly and then whipping the wheel off the camper showed this wasn't necessary. The hub comes off by removing two 11mm bolts from the face, winding the adjusters in and then wiggling/levering the part off. If I'd realised it was that easy I'd have done this job years ago !
Inside the parts were reasonably clean. The shoes, which I'd expected to replace, have loads of life left in them. The only obvious problem was a seized front adjuster which (presumably) explained why I couldn't get the brakes working properly.
Having gone to the bother of getting this far, everything was removed and cleaned up. The adjuster freed up after some Liquid Wrench and a bit of twisting in the big vice. Copper grease on this and all the pivots (just a smear) hopefully means it will be a while before this happens again.
As the Haynes manual says, re-assembly is the reverse of above. Except that the springs holding the shoes against the back plate were clinging on to rusty pins with even rustier cupped washers, one of which failed during assembly.
Handy Hint 1 - Get a brake fitting kit (German & Swedish part number 62534, £3.50) when you buy new shoes. If I'd done this the whole job would have been done in one sitting, instead I have to go out and remove the wheel & hub again to finish it.
Handy Hint 2 - Take photos before dismantling things. The picture shown saved my bacon when I was trying to work out how the distance piece fitted. I could see the slots but didn't realise it hooked over the handbrake lever. It's also handy to know when things like springs go in front or behind parts.
Tuesday, August 12, 2008
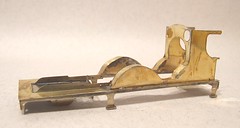
Dunalistair chassis
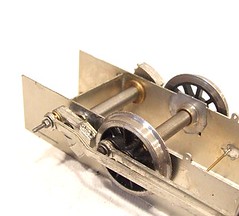
Funny thing this chassis - it doesn't run the length of the locomotive. The bogie hangs underneath the front of the footplate and this also contains the front of the frames including some of the inside valve gear.
What you see is a Morse's worth (about 1hr 45 minutes) of reasonably pain-free construction. It's a bit flimsy when being built but not bad when finished. I don't yet understand how the front end is supported but I'm sure I will eventually.
The only problem was working out the cosmetic valve gear. I replaced a couple of side bits with bent wire because it will look OK but be stronger and whole lot easier to put together and a collection of tiny brass bits. Of course normal people don't like the idea of beating a bit of wire flat in the vice but it's a surprisingly useful technique to get the hang of. I want a forge really...
Monday, August 11, 2008
Planked deck
Creating a fancy planked deck has always been one of my objectives with this model boat. How I've drooled over those seen at boat shows over the years and wanted to create something similar.
Well, now I have.
I started by running planks around the side of the launch. The outside edges were cut to follow the hull. Once dry a pair of compasses marked the line to cut with a sharp scalpel on the inner edge. Next some mahogany strip was soaked in water and glued around the inside of this.
The main planking is 15mm wide basswood and the first plank at the back was carefully glued in place with lots of care as it sets the line for all following work.
From that start the rest of the deck is built up. Each part has to be cut individually but that's not too painful, just time consuming. However long it takes the work has been satisfying so far and I'm pleased with the result.
As an experiment, and 'cos I couldn't wait to see the finished result, the back of the deck has been sanded down. You see the mahogany strips stand taller than the basswood planks but a few (OK, quite a few) minutes with a sander bring everything together and I got the result I wanted.
Once everything is sanded there is some combing and toe rails to go in and then I get to varnish. That's when this deck will come alive and I'm looking forward to it.
Sunday, August 10, 2008
Making a (model boat) stand
There comes a time in the process of building any model boat when you need a stand. Very few hulls are designed to sit solidly and level on a flat surface so no matter how long you put it off, you always want to sort this out for working on the superstructure. Either that or spend time wishing you'd made the think to stop the hull wobbling about !
The kit comes with a couple of nice bits of basswood and some drawing on the main plan. All the modeler has to do is transfer these to the wood and cut around the edges. I traced the outline on some plain paper, cut this out and drew around it on the wood. That's accurate enough for this job if not perfect.
The initial cuts are straight and a modelling saw is adequate. for the curved bits (not essential but pretty) a lot of cuts with the scalpel followed by some carving and sanding (lovely wood to work basswood, I could almost get into woodcarving) do the job. I made the slots for the keel bigger than the plan showed as I didn't want to it to be tight in this area.
The holes for the dowels were drilled on a pillar drill - but this only takes 4.5mm bits and I needed 6.5mm so the remainder were done with a power drill and the hope the pilot holes would guide the bit. A little glue and some twisting to get it to lay flay and it's done.
Perhaps this stand isn't as solid as I'd like but it does the job OK and allows me to get on with the upperworks. At least provision is made - so many kits ignore the stand and leave the modeler adrift.
Saturday, August 09, 2008
Bonnet front
The Barclay model locomotive now has a front to its bonnet - or at least it will do once the laminated version I made up from the etches has been turned into a whitemetal casting.
This is all part of the process of doing the test build and comes under the title "Pattern making". The part I've assembled will have a mould taken from it and then be reproduced in all the future kits. A similar process occurred with the radiator that fits on the front of this and I have the casting to hand. Pity I didn't do both of them at the same time !
This is all part of the process of doing the test build and comes under the title "Pattern making". The part I've assembled will have a mould taken from it and then be reproduced in all the future kits. A similar process occurred with the radiator that fits on the front of this and I have the casting to hand. Pity I didn't do both of them at the same time !
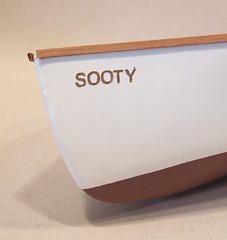
Naming time
My Fantail launch has been named. It will be called "Sooty" after a cat we used to own (or who used to own us - she got up one day and wandered off never to return but we think she might have just changed homes for at least the third time) who had a monika that seemed appropriate for a steam boat.
The name is applied to the boat using BEC vinyl letters using the trick I've described in this blog in the past. White stickers were painted with gold coloured paint to give the impression of brass letters - so much more refined than black lettering I think. And I didn't have any black characters to hand so I had to do this.
The mahogany strips around the top are also in place. I wanted these on before treating the hull to some satin varnish so they get a coat to seal the wood.
Friday, August 08, 2008
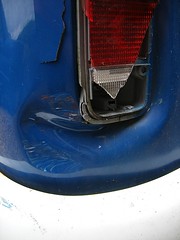
Projects you don't want
My van had some "issues" at the MOT last week so this morning I was waiting in the rain for Bugshak to open. While tidying up an area requiring welding I had found another long hole hidden away that would need attention and wanted to have a chat with Malc about it.
He arrived having just taken a car for an MOT, which it had failed. This meant my remedial work would be delayed. No surprise but a shame. Anyway, the van is now booked in for MOT fixing AND outer sill on the drivers side to be replaced.
As I backed away I made sure I would miss the MOT failure. I didn't make sure I'd miss the broken down fork lift truck.
The forklift came away without a scratch. My van wasn't so lucky. That rear corner took a mighty whack. Considering the slow speed the damage is impressive. Or it would be if someone else was fixing it.
Panicy bottom
This how NOT to paint the bottom of a model boat:
Look at the newly painted sides and think, "They look dry enough to put masking tape on.". Test a bit of tape on the bottom and be pleased when removal doesn't take the paint off.
Mask the sides up using a combination of proper modelling masking tape and cheapo stuff with newspaper.
Grab the can of red oxide primer from the shelf in the garage, give it a quick shake and start spraying. Think that is seems a bit empty but plough on anyway - it's only a small boat.
Run out of spray no matter how hard you press the nozzle on the aerosol.
Put the boat on the bench where the airbrush is (fortunately) still set up. Go and find some paint.
Discover your only can of rust colour is more solid than liquid. Pick another that is nearly the same as it looks like it will stir up OK.
Put the paint through the airbrush ignoring the regular blockages in the nozzle.
Pull the masking tape off and voila ! A nice clean line and well painted hull.
Thursday, August 07, 2008
Dunalastair Kit
With my other projects stalled or requiring me to keep my hands off wet paint I've dug out something new to play with. A Mercian Models Dunalastair HO scale locomotive kit.
The model will be built as an LMS version in black so no fancy Caledonian lining for me thank goodness.
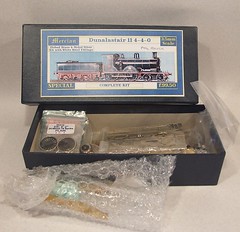
The model will be built as an LMS version in black so no fancy Caledonian lining for me thank goodness.
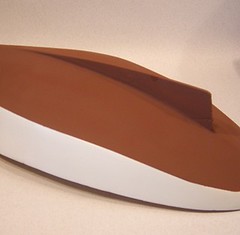
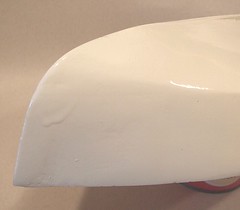
White Hull 2
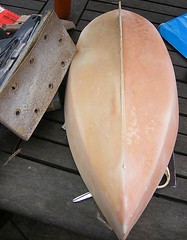
Well the first coat of white paint looks OK on the hull. The chine is reasonably sharp, certainly better than it was anyway.
I've managed to get a couple of runs which will need to be dealt with but this is looking promising. Mind you I won't need as much ballast as I thought - all this filler, fibreglass and paint has made this quite a bit heavier. Good job it was too buoyant to begin with.
I've managed to get a couple of runs which will need to be dealt with but this is looking promising. Mind you I won't need as much ballast as I thought - all this filler, fibreglass and paint has made this quite a bit heavier. Good job it was too buoyant to begin with.
Wednesday, August 06, 2008
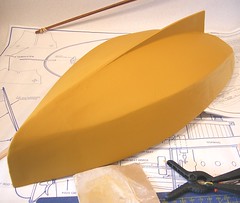
Glassed, fillered and primed again
Having attacked the hull with a sander a coat of primer was wafted over it to see how things looked - it's very difficult to see how good the surfaces are without doing this. The result looked pretty good. OK, there were a few small low spots and the chine line was very soft in places but things were looking good.
Because I'm a picky person, and want to make a really good job of this model boat hull, some smears of Isopon p38 car body filler were then applied to the low spots and the chine. Smears with no real depth but plenty of surface area. One of those fake credit cards that companies send out in the post trying to get you to sign up was very useful here. It's flexible and expendable and puts filler on a treat.
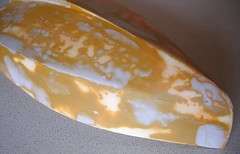
 After a couple of hours this was dry and attacked with the sander again leaving me with the top photo (It looks a bit like a whale to me with that mottled colouring). Hand sanding also came into it's own at last with a sanding block and one of those flexible sanding pads getting into the corners and sharpening it all up. I got covered in dust as it was too wet to work outside but I think the result was worth it once the next coat of primer went on.
Because I'm a picky person, and want to make a really good job of this model boat hull, some smears of Isopon p38 car body filler were then applied to the low spots and the chine. Smears with no real depth but plenty of surface area. One of those fake credit cards that companies send out in the post trying to get you to sign up was very useful here. It's flexible and expendable and puts filler on a treat.
After a couple of hours this was dry and attacked with the sander again leaving me with the top photo (It looks a bit like a whale to me with that mottled colouring). Hand sanding also came into it's own at last with a sanding block and one of those flexible sanding pads getting into the corners and sharpening it all up. I got covered in dust as it was too wet to work outside but I think the result was worth it once the next coat of primer went on.Tuesday, August 05, 2008
Sanding a fibreglass hull
There is no task that can't be completed if you get a big enough hammer.
I had planned to leave the fibreglassed hull along for 48 hours to make sure it was properly dry. Impatience got the better of me and I gave it a little tickle with the detail sander. This made some impression of a couple of the runs in the resin and as they seemed to have hardened all the way through I pressed on.
My detail sander is a basic battery powered DIY model picked up at a car boot sale for a couple of quid last year. It's proved to be so useful that when it dies I'll get another and even pay full price. After about half an hour the battery was obviously going off the boil so I stuck it on charge.
Not wanting to stop I wondered if the mains powered sander would be too vicious. Maybe with some fine paper it would be OK I thought, if I use it gently.
Well, what I learned is - fibreglass is tough. In the end I loaded the roughest paper I had and it worked a treat. Even with the rough stuff I had to work pretty hard but the results are great. The hull now sorts a matt finish except for the low spots which show up as glossy pools. Hopefully a bit of filler will give me the smooth surface I desire.
Monday, August 04, 2008
Cranked rods
In theory building a 7mm scale Barclay should be the same as building a 3.5mm scale one - just a bit bigger.
On the HO model locomotive I had to bend the connecting rods between the jackshaft and front wheels to bring them into the crank. This wasn't a problem on the OO model as we could use a wider (EM) axle of the crank, not an option in O gauge.
So I did the same on this model. And it worked.
OK, the holes in the rod have to be elongated a bit for smooth running but then I tend toward masses of slop in this area anyway. It's only decorative and so the most important thing is not to impede the rotation of the wheels.
So now I have a free running chassis that can be pushed back and forth on the workbench with everything rotating as it should. All that whirling metal looks pretty good too.
Fibreglass hull
This is a step into the unknown for me. I may have read about using fibreglass on model boat hulls but I've never actually tried it for myself. However with the Fantail Launch hull looking so bad I reasoned I had nothing to lose.
The materials used were David's fibreglass resin, Davids Hardener and the finest fibreglass cloth that Halfords (a car parts place for non UK readers) sell. The instructions in the kit, written for modellers in the USA, specify something similar as far as I can tell but some of the products aren't available in the UK so I had to guess.
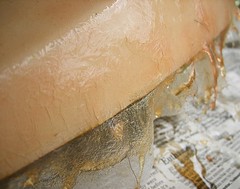
My real worry about this related to the problems of the cloth wrinkling and folding as it curved around the contours of the hull. However once I started I discovered that splodging the resin on causes the cloth to soften. It looses cohesion and can be dragged around the hull by the brush. That's not a great description but what is happening is that the cloth is becoming part of the resin. I had to snip a couple of creases but was then able to work them with the brush and the overlaps disappeared.
The result looks promising. OK it will need a good sand to get a perfect finish but being a thickish coat of a hard material I can do this rather better than I could on the balsa hull.
One trick to learn was to get enough hardener into the resin. My first attempt took a couple of hours to dry but later goes went off quicker, and were redder in colour, thanks to getting the mix better (1cm hardener to 10ml resin).
So far I'm happy. I'll leave things for a day and then attack it with a sander.
The materials used were David's fibreglass resin, Davids Hardener and the finest fibreglass cloth that Halfords (a car parts place for non UK readers) sell. The instructions in the kit, written for modellers in the USA, specify something similar as far as I can tell but some of the products aren't available in the UK so I had to guess.
My real worry about this related to the problems of the cloth wrinkling and folding as it curved around the contours of the hull. However once I started I discovered that splodging the resin on causes the cloth to soften. It looses cohesion and can be dragged around the hull by the brush. That's not a great description but what is happening is that the cloth is becoming part of the resin. I had to snip a couple of creases but was then able to work them with the brush and the overlaps disappeared.
The result looks promising. OK it will need a good sand to get a perfect finish but being a thickish coat of a hard material I can do this rather better than I could on the balsa hull.
One trick to learn was to get enough hardener into the resin. My first attempt took a couple of hours to dry but later goes went off quicker, and were redder in colour, thanks to getting the mix better (1cm hardener to 10ml resin).
So far I'm happy. I'll leave things for a day and then attack it with a sander.
Sunday, August 03, 2008
Hopeless hull
This hadn't gone well. The white gloss dried but not thoroughly after 48 hours and when I tired to sand it back the surface became a mass of wrinkles and mess and I became a very unhappy model maker.
With nothing to lose I'm going to have a go with fibreglass sheet next. Either that or model a Viking funeral with it...

With nothing to lose I'm going to have a go with fibreglass sheet next. Either that or model a Viking funeral with it...
Saturday, August 02, 2008
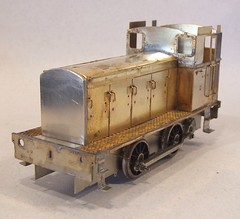
Barclay Body
Practise pays off eventually. Thanks to several goes at this loco in 3.5 and 4mm scales the 7mm scale version took an afternoon to assemble. OK, it's not finished by a long way but apart from fun and games bending the bonnet - it's thicker than the OO & HO versions and needed more force than them to form - all was OK. The techniques used, including the bonnet bending are exactly the same.
I'll admit to a little cheating. Some of the overlays are attached with the Resistance Soldering Unit to same time cleaning up but apart from this a combination of 45w iron and small gas torch (for speed) were more than up to the job.
7mm scale railway modellers have one advantage - those handrails and bonnet handles are a whole lot easier to fit. A coffee stirrer provided a handy spacer behind them. That's much easier than bits of card used before as it doesn't get soggy from flux as quickly.
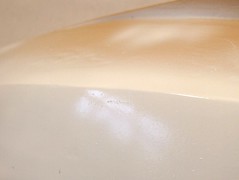
White Hull
Despite my last post, I still wasn't completely happy with the finish of the launches hull. It was OK but I want something very smooth - like a fibreglass moulding or a highly finished wooden boat. I also have a feeling that the filler will benefit from some waterproofing.
To do this I decided to spray on a good thick coat of white glass enamel. With airbrush in hand I got a little carried away and made the coat really thick. There are several runs but I'm not worried as the next stage will be sand it down and spray on the top coat of satin white paint. Of course the gloss coat has to fully dry first and after 36 hours this hasn't happened completely.
To do this I decided to spray on a good thick coat of white glass enamel. With airbrush in hand I got a little carried away and made the coat really thick. There are several runs but I'm not worried as the next stage will be sand it down and spray on the top coat of satin white paint. Of course the gloss coat has to fully dry first and after 36 hours this hasn't happened completely.
Friday, August 01, 2008
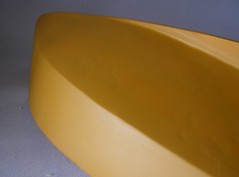
High build filler for hulls
Let's be honest, unless you are really good, a hull needs some work to get it smooth. The Fantail boat hull was no exception, because I'm not really good.
Filler is usually required to cover up joins and dips in the surface but I'm rubbish at using it. This isn't made any easier by the material the hull is made from, balsa wood, being so stupidly soft compared to any filler I can lay my hands on. Anyway, the best solution (I thought) is to use a spray on filler. Get a nice thick coat of it over the model and then sand back to smooth.
The filler is available from motor factors (UK: Halfords) in an aerosol and if you are building a 1:1 scale car you'll use a lot of it as that's what goes between the metal and the paint. I used to see cars being restored and wondered why they went ochre coloured before being painted, now I know.
The filler works but you need to patient. I tried spraying it on, waiting for it to apparently dry and sanding back. The final coat of the day went on extra thick and looked OK but in the morning had settled to look even better. It's still not perfect but pretty good. Next stop a nice coats of gloss paint I think.
Subscribe to:
Posts (Atom)