I know Tomsk is a deliberately mucky boat, but the idea was that this would be paint and not mud ! Most of the corners and crevasses are full of the stuff. Once he has dried out a trip to the sink for a good wash is called for to remove that natural weathering.
The good news is with the mechanics mostly dry I plugged the battery back in and everything worked !
Some water has made it into the bag covering the receiver so this will be replaced but it seems Tomsk's second trip to the bottom has passed by without disaster. Maybe I should start building submarines...
Saturday, February 28, 2009

Friday, February 27, 2009
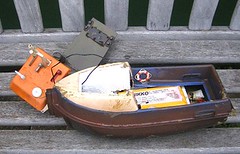
That sinking feeling. Again.
Joining the throng of model boaters not currently gainfully employed at my local club yesterday morning, I took Tomsk along for a sail. Last week he'd worked well so a repeat performance seemed the least stressful option and allow me to join in the banter rather than poking about in the vessels innards.
On the water, for a change the heavy battery seemed to be positioned correctly first time letting Tomsk head for the far side of the lake with hardly a hint of list. Radio reception was fine so on the return to the landing stage I launched our towing load, a large hull decorated to look a bit like a container ship. Last week we'd processed happily around the pond so I expected to do the same again and get a bit more practise in tow handling.
At first everything was fine. Tomsk headed up the right hand side of the pond dragging the larger boat like a recalcitrant dog being taken for a walk in the rain. Turning across the the end the "dog" started to catch up a bit as the breeze got behind it but the tug has plenty of grunt and was easily able to keep the rope taught.
Turning for home and bad things started to happen. The wind was strong enough to sail yachts in, unusual on our water, and much stronger then last week. Some sharp pulls to the side stopped the tow heading for the bank but Tomsk was pointing at some funny angles. A strong list to starboard was the first sign all was not well but this quickly resolved itself and I decided to run for home.
Another gust and the list was back. Then the back of the boat went under quickly followed by the front. Suddenly there was a tow but no tug. "This is not going well" I thought.
Racing over to the bank I pulled the tow out of the water and was pleased to see the rope still taught. I gently pulled expecting to find a bedraggled Tomsk at the end. As it neared the surface though the weight dropped and I found myself holding the towing post but nothing else.
Back to the clubhouse for a rake and I started fishing around in the water with little expectation of success. A diver would describe the visibility as "Nil" thanks to all the mud. The lake is surprisingly deep at this point thanks to the winter water run off from the fields - around 3-4 feet so no chance of a paddle !
 Purely by change I caught something. Gently pulling the rake in I found I had grabbed the top of the superstructure. "Oh, well, at least I got a bit of the model back" went through my mind. Then I spotted the aerial wire. It's attached to the mast and firmly anchored. Pulling this brought the hull up.
Back at the clubhouse I had a very wet and muddy boat. A syringe pulled about 1/4 of a pint of mucky water out of the hull but the Tomsk now sits in a warm room gently drying. We'll see in a couple of days how waterlogged the electrics are !
Model boast, as a general rule, don't sink that often. Any idiot can build something that floats, even me. Yet I this isn't Tomsk's first trip to the bottom. Some deja-vu here...
On the water, for a change the heavy battery seemed to be positioned correctly first time letting Tomsk head for the far side of the lake with hardly a hint of list. Radio reception was fine so on the return to the landing stage I launched our towing load, a large hull decorated to look a bit like a container ship. Last week we'd processed happily around the pond so I expected to do the same again and get a bit more practise in tow handling.
At first everything was fine. Tomsk headed up the right hand side of the pond dragging the larger boat like a recalcitrant dog being taken for a walk in the rain. Turning across the the end the "dog" started to catch up a bit as the breeze got behind it but the tug has plenty of grunt and was easily able to keep the rope taught.
Turning for home and bad things started to happen. The wind was strong enough to sail yachts in, unusual on our water, and much stronger then last week. Some sharp pulls to the side stopped the tow heading for the bank but Tomsk was pointing at some funny angles. A strong list to starboard was the first sign all was not well but this quickly resolved itself and I decided to run for home.
Another gust and the list was back. Then the back of the boat went under quickly followed by the front. Suddenly there was a tow but no tug. "This is not going well" I thought.
Racing over to the bank I pulled the tow out of the water and was pleased to see the rope still taught. I gently pulled expecting to find a bedraggled Tomsk at the end. As it neared the surface though the weight dropped and I found myself holding the towing post but nothing else.
Back to the clubhouse for a rake and I started fishing around in the water with little expectation of success. A diver would describe the visibility as "Nil" thanks to all the mud. The lake is surprisingly deep at this point thanks to the winter water run off from the fields - around 3-4 feet so no chance of a paddle !
Purely by change I caught something. Gently pulling the rake in I found I had grabbed the top of the superstructure. "Oh, well, at least I got a bit of the model back" went through my mind. Then I spotted the aerial wire. It's attached to the mast and firmly anchored. Pulling this brought the hull up.Back at the clubhouse I had a very wet and muddy boat. A syringe pulled about 1/4 of a pint of mucky water out of the hull but the Tomsk now sits in a warm room gently drying. We'll see in a couple of days how waterlogged the electrics are !
Model boast, as a general rule, don't sink that often. Any idiot can build something that floats, even me. Yet I this isn't Tomsk's first trip to the bottom. Some deja-vu here...
Thursday, February 26, 2009
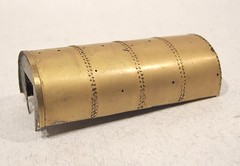
Formed tank
Horrid job time. In theory making the tank is easy. The main wrapper is supplied half etched so there is no riveting. It's also formed very nicely with the main curve . All the builder has to do is make up the inner former and solder the wrapper to it.
Which would be fine except that the wrapper has to bend under the former as well. At the bottom edges there are sharp curves.
So I solder one edge to the former and start work. The metal bends nicely around the sharp bit and then over the top. Soldering iron access is pretty good and the former keeps things in place pretty well. OK so I bust off the legs at one end but then they are too thin and not essential anyway. More a vestigial leftover from the 7mm original.
It's the final bend that is the killer. You've got hardly any metal to grab hold of - less than 4mm. And the bend needs to be tidy. A combination of flat ended pliers and bits of wood forced the metal in the end but it was quite a struggle. If I do this again I think I might try and pre form the curve in some way. Trouble is I can't use bending bars as the corner is a curve not a fold.
Some days you wish you were building a whitemetal kit !
Wednesday, February 25, 2009
Moded gearbox
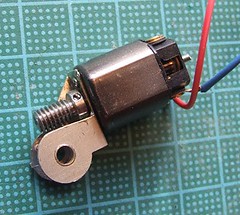
Yesterday I blithely said "and motor/gearbox combo installed " which glossed over the fun involved in this process so today a little more details.
First, a history lesson. In the old days there was no such thing as a model railway gearbox outside the realms of the highest quality model makers with a fully equipped machine shop at their disposal. Normal souls would fit the crown gear to the axle and then fudge some sort of plate to hold the motor and its worm gear in something like the right place. Various suggestions were advanced to achieve a perfect mesh such as wrapping thread around the worm or using a piece of Bronco toilet paper between the two. Most people fiddled and adjusted finally settling on a less than perfect mesh as a better option than flinging the model across the room in frustration.
Sometime in the late 80's along with neon coloured clothing and Kajagoogoo the etched kit business got serious and people started to manufacture gearboxes to help the mesh challenged. Iain Rice's book of the time explains how to deal with both types of motorising as older kits still required you to put a DS10 or even X04 into your cast whitemetal chassis .
Anyway as far as I am concerned a gearbox is A Good Thing. My meshing is always terrible without one. I also like the opportunity to sort it out off the model. When asked how to do the mechanical bits my stock answer usually involves a Branchlines gearbox or for the really keen, something from High Level Models.
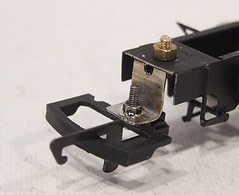
In the S&D tank a 'box is supplied on the etch. Sadly it's designed to use Ultrascale gears which are frequently difficult to obtain. Anyway I'd been supplied with a Romford set. This is fine except that the motor is offset to one side and the worm gear has a boss with the grub screw in it which wants to occupy the same space as the gearbox side.
To fix this I loped the offending metal off with a piercing saw. Hopefully this won't affect the structural strength detrimentally. So far I've got away with it.
First, a history lesson. In the old days there was no such thing as a model railway gearbox outside the realms of the highest quality model makers with a fully equipped machine shop at their disposal. Normal souls would fit the crown gear to the axle and then fudge some sort of plate to hold the motor and its worm gear in something like the right place. Various suggestions were advanced to achieve a perfect mesh such as wrapping thread around the worm or using a piece of Bronco toilet paper between the two. Most people fiddled and adjusted finally settling on a less than perfect mesh as a better option than flinging the model across the room in frustration.
Sometime in the late 80's along with neon coloured clothing and Kajagoogoo the etched kit business got serious and people started to manufacture gearboxes to help the mesh challenged. Iain Rice's book of the time explains how to deal with both types of motorising as older kits still required you to put a DS10 or even X04 into your cast whitemetal chassis .
Anyway as far as I am concerned a gearbox is A Good Thing. My meshing is always terrible without one. I also like the opportunity to sort it out off the model. When asked how to do the mechanical bits my stock answer usually involves a Branchlines gearbox or for the really keen, something from High Level Models.
In the S&D tank a 'box is supplied on the etch. Sadly it's designed to use Ultrascale gears which are frequently difficult to obtain. Anyway I'd been supplied with a Romford set. This is fine except that the motor is offset to one side and the worm gear has a boss with the grub screw in it which wants to occupy the same space as the gearbox side.
To fix this I loped the offending metal off with a piercing saw. Hopefully this won't affect the structural strength detrimentally. So far I've got away with it.
Tuesday, February 24, 2009
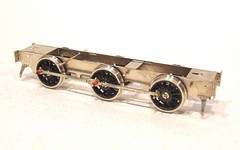
Fox Walker finished chassis
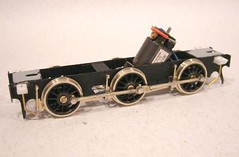
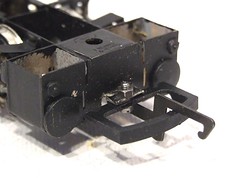
If you were paying attention to yesterdays picture you'll have spotted a nearly completed chassis for the Fox Walker. Since the last update I have dropped the wheels out (you can do this with Romfords which is the main reason I love 'em) primed and painted the frames.
With the wheels restored and motor/gearbox combo installed the whole lot made a few passes along the test track. Some PCB fitted between the frames to give the pick-ups something to hang on. This is a live chassis so I only had to fit these on one side. As usual, 28swg phosphor bronze wire does for these.
Next the brakes went on. Being a Fox Walker there are several options and for this model locomotive I've gone for the earliest wooden (looking) option. The top of the hanger fits the wires with only a little bit of reaming. To solder I use Carrs red label flux and normal solder. Red label is a non corrosive flux and shouldn't give any trouble in the future and won't require the extensive scrubbing the normal stuff needs. It's not as good but works well enough for this task which is why I still have a pot.
Brake rodding is a weird wobbly set of rods that fit very nicely. These are certainly not parts I'd like to make up from scratch !
Finally some sandboxes are made up from plastic. I'd prefer some labour saving whitemetal versions but they weren't to hand and hacking some Evergreen fat strip isn't too difficult and makes me feel I'm making something rather than just assembling a model.
Monday, February 23, 2009
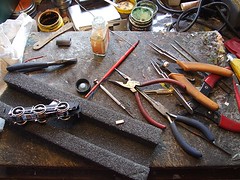
Space - where does it go ?
Welcome to post 1001 on this blog. Originally I'd planned to do some navel gazing about the state of the blog, model making in general etc. You'll be pleased to know I changed my mind and instead decided to look at one of the biggest issues any modeller faces.
Why do we do this ? No mater how much work space any modeller has, he or she always ends up working in a tiny area surrounded by a sea of tools.
There I was putting the finishing touches to a chassis and suddenly realised that despite having an A4 sized cutting block to operate on and this sitting on a 4 by 2 workbench I was still fiddling around on the corner of the board. I aspire to being tidy and putting each tool back in it's place every time I finish using it but despite my best intentions this never quite happens. OK the tools go back eventually but it seems an inordinate number are in operation so often their residence on the bench is semi-permanent.
In the picture you see wire cutters, side cutters, 3 pairs of pliers, 2 pairs of tweezers, screwdrivers, needle files, flux, flux brush and a lolly stick used for holding things while soldering. That's in addition to a Peco loco cradle and the chassis I'm working on.
Perhaps I'm the only one who suffers this way. When you see work areas in books and magazine they are always a lot more organised than this. I'm sure they aren't just tided up for the picture...
Sunday, February 22, 2009
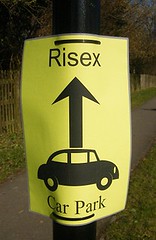
Princes Risborough 2009
I'd not planned to visit Princes Risborough show. In fact I didn't even know it was on when I happened to be in town and spotted a poster in a car park. However, you never know what you'll get with a local show and the town itself hadn't used up all the time on the "pay and display" ticket so I wandered in.
A lot of modellers disparage the local show. Surprising numbers consider visiting one to be beneath them - travel to a specialist event or one of the nationally advertised venues, fine. Go to the leisure centre or village hall and see what the local club are putting on, well I suppose I might but only if there isn't any shopping to do or nothing on telly...
That's always seemed to be a strange attitude. It's one that means "enthusiasts" miss out a lot. I remember seeing the famous layout "Chee Tor" at one of it's first outings in Darlington (I think) and marveled at the scenery. Later at larger events you 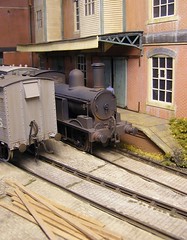 would have to fight through the crowds to get the same view I enjoyed. Most layout owners will test a new model somewhere quiet before heading to a bigger show. That way you get the worst of the bugs out of the system. It's literally a shake down because for the first time the layout is loaded in a car or van and bounced around the road system. It's amazing what this throws up or off !
Exhibition managers miss out too. The good ones trawl small events for quality displays. That way their shows get early appearances from layouts before everyone is talking about them. Anyone booking at a big event is already on the late side. I know you get models from distances appear but it's easy to forget that big shows have big budgets and nasty surprises can await club treasurers if you think you can book that layout seen at Warley because your show is only 20 miles down the road from the NEC - it's likely to be several hundred miles from the layout's home. Not something the bother megabudget Warley show but if you are in a village hall it's going to be a big hit on your funds. I once wandered round a show with a fellow club member who grandly pronounced that the layout we were looking at was the sort of thing that he would like to see invited to our exhibition. Recognising some of the operators I had to break it to him that the layout came from Southport, 130 miles away. And there were 8 operators who would need two nights accommodation. At the time this would have been a problem.
I digress. Risex (did no one look at this and think the schoolboy joke was a bad idea ?) takes place in the Risborough leisure centre filling three large rooms with 17 stands including 6 traders. And there were goodies to be seen. From Swindon, Wood Street is a minimum space 7mm scale model which has some of the best paintwork seen anywhere. You couldn't fault anything but I especially loved the grounded van body at the front. This wasn't just an dead kit sans chassis dumped. Someone has taken the time to add hastily nailed on plank repairs, tear up the roof and even include a door on the end put in by the people using it as a shed.
The Agenoria models Avonside tank was a joy too. Representing the oily sheen you find on a cared for but not pristine shunter is difficult but this had been done as well as I've ever seem. Obviously the model has been dirtied and then cleaned to leave residue behind handrails and in joins. Time consuming but worth it.
The Brewery is an EM gauge model with another strong industrial slant. Again "dirt" is the strong point of the model but I also 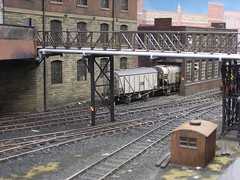 loved the pipe bridge and general atmosphere. OK so I particularly like small shunting layouts - at least to build - but I think most people could take something away from this one.
What else did I pick up ?
Well, handbuilt 12mm gauge track in 3mm scale looks nearly as good as 14.2, or at least it did on Bulverhythe. After all the trouble we had getting things running on Flockburgh I still find this galling. How much easier it would be to employ Romford wheels on the locos and not have to compensate things !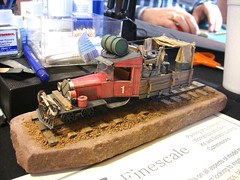 Demonstrators of painting an weathering passed on some useful tips for creating rust effects. I try these out before posting them here but in the meantime take a look at the Galloping Goose. I'm no fan of these lorry based rail vehicles normally but the incredible level of detailing on this one has me converted.
Of course I left the best 'till last. Catering was by the traditional wives, mothers and girlfriends of the club members. At least one of the team can make chocolate cake. And if there is one thing that makes me enjoy a local show, it's good cakeage. You don't get that at the NEC !
Saturday, February 21, 2009
Fox Walker Chassis
No real problems here. After punching the rivets, I jigged the chassis up as usual. The only choice was which set of rods to use. There is a set on the fret with the kit and some Alan Gibson ones as well. I went for the later as they seemed to be a better match for the wheelbase. Apparently the kit set are to be redrawn immanently but this is the very acceptable work around at present.
I did have to ream out the axle holes larger than normal and I think the bearings at one end are out of the centre line of the hole by something approaching 1mm. This is more likely to be my fault as the kits however. The chassis jig I'm using has shouldered ends too fat for the holes in the rods so I had to set things up by measurement rather than just putting them through the rods as intended. One day I will get a set of axle rods with 1mm ends !
The spacers drop in quickly and are followed by ashpan sides. These include holes for wire to aid lining up but I didn't bother with this relying on sprung clips instead. It's only a little thing but I like this extra bit of detail. Once painted I reckon a dusting of rusty weathering powders will look fantastic.
Romford wheels in and rods on (held in place with insulation from thin wire) and the chassis was rolled up and down the test track without any extra fiddling. I think I'm getting better at this thank goodness.
Friday, February 20, 2009
Maiden voyage (sort of)

I know this isn't how you are supposed to do things. Years of tradition tells that a new model boat hull is meant to see water for the first time in the domestic bath (which will be refered to as the "domestic test tank"), but I was down at the lake having a sail so I thought, "why not" and stuck the Brede Lifeboat in the car.
Once the water had quietened down a bit and I'd taken Tomsk out for a run with our towing barge, I launched the hull complete with a bit of lead to see how things were looking.
Since the last post on this project I've filled and sanded the surface a couple more times and am the proud owner of an old jacket that has been bulletproofed with filler dust. I've reached a "good enough" point where any improvements will be tiny and quite frankly I need to move on. An imperfect finished model is always better (IMHO) to a perfect model that never quite emerges from the workshop.
Anyway the main thing is the hull didn't sink. In fact it floated very well with the small amount if lead ballast. I think we're a bit high still so pushed down which confirmed that there is plenty of buoyancy to handle batteries, radio, motors and superstructure.
Sadly, no one could help much with idea for the spray rails. Plastic was suggested but I know I can't get anything triangular 5mm tall so it looks like time to go back to the garage and make some dust with a sander and some wood.
Thursday, February 19, 2009
Fox Walker
OK. Next on to the workbench is a Mercian kit for a Somerset & Dorset Fox Walker 0-6-0 steam engine. I have built this kit in 7mm scale but this one will be in OO (4mm:1ft). The former wasn't a whole lot of fun, partly because the kit was under development but mostly due to the incredible variety in this tiny class of locos.
If there ever was an occasion for getting a photo of your prototype in the condition you wish to model it, it's this one. Apart from a myriad of tiny details such as cab door and back shapes, even the frame length changes in the class. Two of the locos were damaged and rebuilt with longer frames. The saddle tanks also grew and covered the smokebox.
Of course the kit covers all of the variations making it suitable for those with a modest knowledge of the prototype or at least the patience and concentration to read the instructions properly where you'll find all the information. I've been asked to build Number 9 in her original state. That's sloping firebox, curvy cab door and short frames.
I think.
Wednesday, February 18, 2009
Tub and loco
I was right. The coal tubs are a good size for the smaller On30 locomotives. The diminutive "Gas Mechanical" still towers over the wagon as I think it should.
The coupling heights may be an issue in the future, the knuckle on the wagon is a couple of MM lower than the loco. The couple and uncouple OK on the test track but seeing if this works on a real layout will have to wait until I build one !
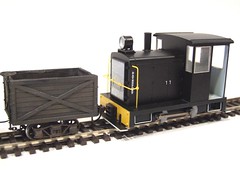
The coupling heights may be an issue in the future, the knuckle on the wagon is a couple of MM lower than the loco. The couple and uncouple OK on the test track but seeing if this works on a real layout will have to wait until I build one !
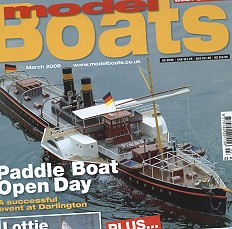
Signal meter in Model Boats magazine
How do you tell if your transmitter is working ? Well there are usually some lights on the front that glow and if you've bothered to read the manual properly (no, me neither) give information on the state of the battery.
If you are lucky the boat will be responding to the controls. If not head scratching happens.
Since I can't see radio waves after a frustrating session at the poolside during the last boat show, I bought an Action Electronics signal meter. It's an easy build and very useful. So much so I've written it up for Model Boats magazine and you can see it in the current issue.
Tuesday, February 17, 2009
Coal tub train
Painting the tubs started with a quick spray of grey car primer - partly to help subsequent coats stick but mostly to give me a useful base colour to work with. Mid brown and gunmetal were then dry-brushed on following the line of the supposed wood grain where possible. The bogies had a quick brush with rust to show up the detail.
Once this coat was fully dry (24 hours) a wash of dark brown (Humbrol 170 RIP) followed by many washes of weathered black built up the dirty look I wanted for this train. Inside this took at least three washes to build up the effect.
Leftover coal decorates the inner corners and floor of each tub. Proper Welsh steam coal (get in touch if you want some) too, none of your fake stuff. Stuck in with watered down PVA the black paint washed round this as well and was supplemented with dry black powder paint which gives a nice gritty finish. I'm going to run these empty for the moment but if they are ever loaded this will be a fake load supported on a platform in the tub so it can be removed easily.
The train is formed as a block with simple bits of wire between the wagons and knuckle couplings at the end. As built they seem to run up and down the straight test track very nicely - not sure how they will cope with points as I don't have any handy to test on but I can't see why there should be a problem.
Monday, February 16, 2009
Coal tub
First stage in building the wagon is making up the bogie it runs on. Not a swivelly bogie you understand it's just a plastic bogie kit that forms the underframe. The most interesting thing about it is the PTFE bearings - I've previously used brass so wasn't sure about this new fangled material. It's all a bit space age isn't it ? The bogie is screwed to the base of the tub with a great big self-tapper and chunk of balsa to acts as a spacer.
The tub is more of a challenge. 68 bolts have to be fitted. That's 68 holes mark out, drill and then 68 little plastic mushrooms to fit in and secure with plastic glue. Fun, fun, fun.
Good job then that I bought a pin vice with a swivelly wooden ball on the top recently, otherwise I'd have worn a hole in my hand...
Inside the box lacks detail so some 10 thou plasticard was scribed up and stuck in there. The floor is a slab of lead to give the things some weight. Without it they bobble along the track and fall off.
The brake handle is made from the supplied wire held in place with melted in bent staples. The instructions show the bottom being bent over but I fancied a piece of chain as this is what appears in photos of similar real wagons.
A bit of distressing around the top and this tub is ready for paint. Most of the build time goes into fitting the bolts - I supposed these could be omitted but the tub would look very plain without them.
Sunday, February 15, 2009
OzSteam coal tub
I've always felt that the Bachmann v-dumps and tipping wagons are far to big for the smaller locomotives in the On30 range. The tops of the wagons come to the same level as the cab roof !
Anyway, on eBay I found a kit from Australian company OzSteam for a set of three 4-wheel coal tubs. The price didn't seem too bad so I "bought it now" and a week later received a package from the other side of the planet.
The kit is ingenious - the tub bodies are the famous crate as seen on thousands of Airfix lowmacs. This rides on bogies provided by (I think) Titchy Trains. Basically OzSteam have pulled several existing components together to produce the kit - very clever.
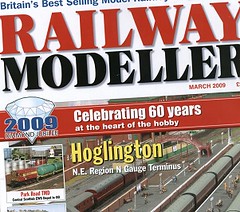
2mm scale Puffer in RM
Readers of the current Modeller can enjoy my review of the Gramodels 2mm scale Clyde Puffer model.
If you are interested in such things you'll enjoy the preceding 4 pages by James Pottinger which give a history of these vessels and include many superb historic photos along with a waterline plan of the typical boat. This alone is worth the cost of the magazine !
If you are interested in such things you'll enjoy the preceding 4 pages by James Pottinger which give a history of these vessels and include many superb historic photos along with a waterline plan of the typical boat. This alone is worth the cost of the magazine !
Saturday, February 14, 2009
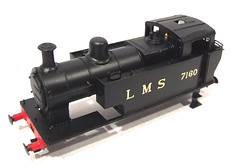
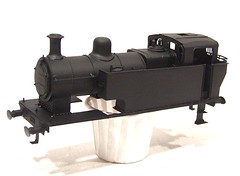
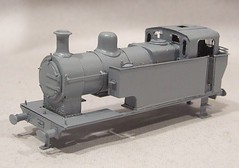
LMS Dock Tank
The Dock Tank is finished. I usually say that I build locos for people that I would be happy to run on my own layout. In this case I can confidently say this is the case - my original version of this locomotive isn't as good as this one !
If I need an excuse it's that the Mercian kit is one of the more challenging on the market. It could scarcely be anything else with all that waggly stuff under the footplate. The prototypes' cab design doesn't help either. What was wrong with proper cab sides and roof ? Since this was my second go at the model, I had learned from my first attempt. Also a good few years had passed and my skills and equipment are both much improved.
Of course all this contributes to the charm of the model. In 4mm scale it looks good. The G1 version is even better - but just as tough a build I'm told thanks to the tight clearances in the valve gear. It just goes to show that as you get older, moving up scales so "the bits are bigger" isn't always a smart move. Us OO modeller at least have the advantage of a bit of lateral space where it matters.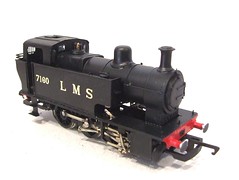
Friday, February 13, 2009
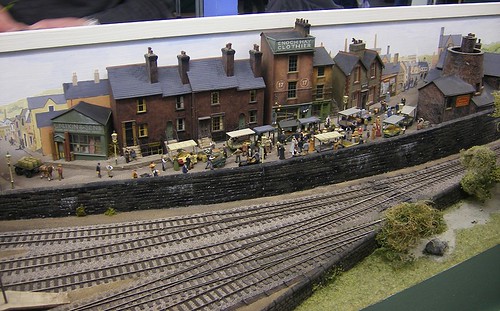
Melbridge Dock in Hornby Magazine
Before Christmas, Mike Wild editor of Hornby magazine came over a took a load of photos of Melbridge Dock. The results can be found in all their glory in the current issue. It looks amazing.
I've only one complaint, the track plan is missing a crossover. The art monkey needs to have another go ! If you want to see the accurate, if less pretty, version - visit the Melbridge Dock website.

I've only one complaint, the track plan is missing a crossover. The art monkey needs to have another go ! If you want to see the accurate, if less pretty, version - visit the Melbridge Dock website.
Finishing touches
I normally leave coaling up a model locomotive to last. It's a tradition that says that everything else is done and the finishing line is in sight. Of course I have used proper, real, welsh steam coal (get in touch if you would like to buy some as I have a big bag) held in place with a PVA/water/washing up liquid mix. It's just sparkly enough to look right, something other types of coal don't always manage.
Fortunately the bunker was water tight. PVA leaking out over the paintwork isn't much fun. Ask me how I know...
Fortunately the bunker was water tight. PVA leaking out over the paintwork isn't much fun. Ask me how I know...
Thursday, February 12, 2009
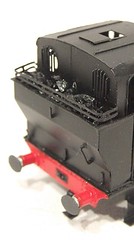
Fitting tension lock couplings
The Dock tank specification includes a set of standard tension lock couplings as fitted by Bachmann or Hornby - in fact a pair of Hornby spares were provided. All I have to do is nail them to the locomotive. Normally I use Spratt & Winkle on my own stock or bits of bent wire. Doing the job properly is unusual and needed a little thinking.
Tension locks usually sprout from somewhere under the buffer beam. There are standards for height but I simply used a Bachmann wagon as my guide. Even if you follow the recommendations to the letter I don't think the job is done until you have tested with real live rolling stock anyway.
At the front, fixing is complicated by the chassis - it's in the way of the pivot. This is turned to my advantage by cutting a couple of slots and bending the spacer up to provide a fixing point. A 10BA bolt hold the coupling in place. I felt it was sensible to allow for the removal of the items should the owner wish to change over to something else in the future. Besides you don't want the glue joint giving up on this the moment you try and shunt a heavy train do you ?
 The back was actually trickier. While the chassis isn't in the way it also doesn't provide anything in the way of support. A small bracket that makes use of the body fixing screw does the job here. It will mostly be hidden by the buffer beam anyway so no one will nitice I drilled the top hole in the wrong place first time I hope. For clarity a brass nut stands in for the body and allows me to test things without risking my nice paintwork.
The chassis now couples to my wagon and hauls it up and down the test track happily enough so it's time for the finishing touches.
Tension locks usually sprout from somewhere under the buffer beam. There are standards for height but I simply used a Bachmann wagon as my guide. Even if you follow the recommendations to the letter I don't think the job is done until you have tested with real live rolling stock anyway.
At the front, fixing is complicated by the chassis - it's in the way of the pivot. This is turned to my advantage by cutting a couple of slots and bending the spacer up to provide a fixing point. A 10BA bolt hold the coupling in place. I felt it was sensible to allow for the removal of the items should the owner wish to change over to something else in the future. Besides you don't want the glue joint giving up on this the moment you try and shunt a heavy train do you ?
The back was actually trickier. While the chassis isn't in the way it also doesn't provide anything in the way of support. A small bracket that makes use of the body fixing screw does the job here. It will mostly be hidden by the buffer beam anyway so no one will nitice I drilled the top hole in the wrong place first time I hope. For clarity a brass nut stands in for the body and allows me to test things without risking my nice paintwork.The chassis now couples to my wagon and hauls it up and down the test track happily enough so it's time for the finishing touches.
Varnished Dock Tank
Hooray for slightly warmer weather. A sunny day made me brave enough to waft some Humbrol satincote varnish over the dock tank. OK so there was still a lot of hair drier action to get things dry before any moisture could get into the coating but at least this allowed me to carry on working.
I've deliberately kept the coat thin. Partly because this is what all the professional painters advise and mostly due to my nervousness about needing to strip the model if it all went wrong. The result looks nice though and that varnish will protect the transfers. Buffer beams and body finally have the same sheen despite the former being painted in gloss for a better colour.
Jobs to do:
Glaze the windows
Paint the buffers
Paint cab floor
Fit couplings
Add coal
Reassemble and test
Wednesday, February 11, 2009
Bad times for your nose to start bleeding: No. 1
When you are in the middle of spraying a model. And wearing a facemask.
Guess how I know this !
Guess how I know this !
Cracking filler
 In an effort to get the hull of my Brede lifeboat as smooth as errr, a lifeboats' bum, I'm using a combination of model filler and spray filler. The former is cellulose based while the later is acrylic I suspect. They don't seem to like each other much.
Cellulose fillers such as knifing stopper are notorious for shrinking as they dry and I suspect that is what's happening here. The filler drys and cracks the spray filler on top. Stupid stuff. How the car repair industry gets on with it I don't know.
Anyway, as it's been too cold to spray I've been power sanding the hull and then recoating it with filler. Again and again and again. Each time duff sections are taken down to the fibreglass leaving only vestigial traces of filler and every time I do this things look a little better. Each time I think I'm there and then decide there is just a little more work to do. The hull is now in grey non-filling primer with Isopon P38 filling tiny marks (not as fine as cellulose filler but non-shrinking) and once I've sprayed I'll have another sand.
Tuesday, February 10, 2009
Hudswell Clarke - done
Time to get up to date with the Hudswell Clarke diesel. As I've mentioned before, this blog doesn't always operate in real time. I'm often juggling several projects, some of which have deadlines. Also there are many occasions where one job stops and I have to go and do something else to prevent me fiddling and ruining things. Waiting for paint to harden properly or filler to set are classic examples of this.
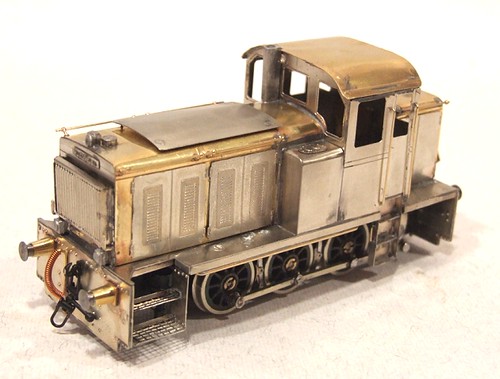
Anyway, the Hudswell Clarke loco is finished. The body required the front bonnet to be made up - the same as the back although slightly trickier to get the sides parallel. On top four holes are drilled, wire fitted through these and then through the top vent to give the proper stand off. This is the first time I've needed to do this in a 4mm scale kit and it's not difficult and the result looks excellent.
The radiator is folded up and tacked in place. I re-did this several times to try and get it square. Sometimes you thing that the part has moved overnight or in the time you've been away from it. Perhaps the modelling fairies have been attacking my work and moving things around !
The boxes on the sides are simple fold-ups put in place with the minimum amount of solder. With no access from the back all the fixing has to be carried out on visible areas. Lots of flux, hardly any solder and then a good strong run with the fibreglass pencil. On the one side there is a second small cabinet in front of the large one. As far as I can tell there are no photos (apart from the one of the 7mm model on the Mercian web site which I didn't spot !)of this side which is why I stared at the etched part wondering what it was for a long time...
The final large part is the cab roof which unusually for me is solder in place. The cab itself has no floor making this possible. If you want to build some detail up then make something out of plasiticard and insert it from underneath.
Detail start with handrails including the odd ones on the side of the cab steps. At the same time I stuck the pipework along the bottom of the valance using fat brass wire. Then the lamp irons fold up and the RSU spots them into place. Whitemetal parts attach with C&L 100 degree solder although superglue would have done OK for this - it worked very nicely for the bonnet doors.
And that is that. The model was to be supplied in the brass so I didn't need to get the airbrush out. The end result is a very nice looking locomotive. It's very similar to the BR 07 diesel and make me wonder if I ought to have this version for the Dock instead of the older rear cab one I have always coveted.
Monday, February 09, 2009
Pressfix Transfers
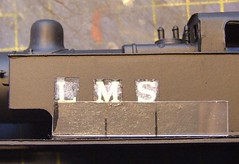 Another make or break moment for this model locomotive - applying transfers. In stock I had the appropriate Pressfix LMS locomotive sheet. These decals give the best result because there is no transfer film around the letters. It's just that I struggle with them.
According to the instructions you lift the top layer of the transfer from the sheet, prod it into place with a final hard push and then float the transfer sheet off with some water revealing a beautiful letter, number or crest. Fine in theory but I'd always assumed that one the thing was in place, that was where it stayed even if you'd got it slightly wonky. Fixing this meant taking off the transfer and using a new one. Since you couldn't get a clear view of whatever you were applying until the paper was removed this made an important job more challenging. Wonkiness would also be inversely proportional to the number of transfers left on the sheet multiplied by your chances of getting more before the model was required. Guess how I know this ?
Apparently I was wrong. While trawling Stafford show for waterslide transfers I chatted to Graham Shaw (now ex-Shawplan models) who gave me a hint. If I mixed up a 3 part methylated spirit: 1 part water mix, this could be brushed on the transfer once the top sheet had been removed and allow me to move it very slightly. Or I could just drink the mix and I probably wouldn't care how wonky the letters were*
And it works. Thanks to a clear plastic guide I managed to get the LMS on first time (in the photo I've not held the plastic against the footplate because I needed a hand for the camera but in used I'm careful to make sure it's in the right place) but the numbers needed a little gentle lifting and prodding to get the best alignment.
Mind you if you can find waterslide then having transfer film showing isn't all that unrealistic according this photo.
*Kids, methylated spirits should be enjoyed responsibly.
Sunday, February 08, 2009
Stafford Show 2009
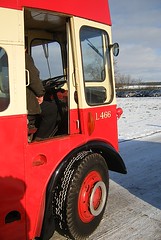 "What is that picture of a bus doing there ?" I hear you ask. Well the weather has been best described as wintry - or in BBC speak, "A snowflake has landed on London ! We're all going to DIE !". Terry Robinson, Stafford Shows exhibition manager, must have been chewing his nails for days wondering if anyone was going to be able to get to the showground for the exhibition.
As it was the snow wasn't that bad and Saturday dawned bright and clear. My train was on time and outside the station the free bus service to the show, provided by the Potteries Omnibus Preservation Society, was waiting. Apparently it's a 60 year old vehicle and I was surprised to discover the seats upstairs were all on one side. People more knowledgeable than I tell me this is to keep the overall height down, the aisle is lover than the seats and downstairs there is less headroom on one side. We would have been in a different vehicle - a younger one one with heating - but that wouldn't start !
6 pounds plus a quid for the A4 sized programme got me through the door. A very efficient set up with several ticket desks means no one is waiting outside very long. At this time a year that's a good thing. The average age of the visitors means you wouldn't want them hanging around outside too long.
The show is spread across 3 interconnected halls and comprised 29 layouts, 20 traders, 7 demonstrations and a couple of preservation stands. Food is provided by an on-site cafe who have an area in the show supplemented by their main premise just outside the door.
I'm not normally a big layout watcher but the quality of those on display was very high. Singling out anything for special attention is impossible. From Scotland "Law Junction" is a lovely modern image 4 track main line with decent length trains looking for all the world like a real mainline seen from a distance. Viewers should normally see a regular procession of trains. I saw a couple and then heard a loud "Woooah" from the back followed by half a dozen people descending to put things back on the track.
Bridport Town from Wigan caught my eye for the superb market scene at the behind the running tracks. It's a very long thin layout and this small area of detail grabbed me.
The viaduct on Nettlecombe looked fantastic. Very striking and quite brave of the builders giving up so much space to a feature that is purely scenic. Although there is loads going on with the rest of the model, it was this bridge that drew and held my eye.
Best foreign layout had to be Bergeller Bahn, Swiss railways that would also win the "tallest layout" category. A proper rabbit warren model with trains appearing from all directions. If I'm picky the stock looked too clean even for Swiss trains and the Faller Road vehicles had worn the road surface a bit (they always do even though this was a superb use of this kit) but the overhead wiring looked great and the overall effect was marvelous. A real crowd pleaser too.
The layout I would most like to build from the show was unusual for me. "Park House" is a minimum space N gauge set in the blue diesel era. Lots of details and a sensible track plan appealed to me. With the smaller scale RTR models improving in quality (running and detail) it was a rare chance to see how you can build a tiny model and have it look good. Apparently one of the baseboards is made of balsa wood too - clever but very light as the builder discovered when he took it out to the garden to paint !
Trade was average if you want specialists. The range was good though from garden rails to etched loco kits to painting to sickly sweet fudge. With that many stands it was difficult to be disappointed though. I went with a shopping list that didn't go too well mind you:
- Waterslide LMS loco transfers - not available 'cos they aren't made. HMRS ones were on sale but I have these already.
- Triangle section plastic - Plastistruct make a quarter round but not a true triangle.
- Cars Red Label Flux - To be honest I forgot this until I was ready to go but my last minute run around didn't reveal any.
The huge number of people in the hall all seemed to be buying stuff. A couple of friends who are traders were so busy I could do no more than wave at them so the credit crunch didn't seem to be biting too hard. Even though I didn't get the stuff I wanted, I still left with a rucksack full, mostly On30 kits and magazines.
 There is only one problem with the event - the show is a mobile phone dead spot, at least in two of the halls. Whist a few hours being spared from poor quality ring tones is a good thing, it means the PDQ machines the trade uses to take plastic cards don't work properly. Several stands had signs up saying cash or cheque only by lunchtime.
The bus back was just as good as the one in and just as well used by happy smiling punters with bags of goodies so technical problems didn't hamper them much. This all looks like a successful event to me.
My photos - sorry the light wasn't great so I didn't get that many.
Stafford MRC website
Saturday, February 07, 2009
Hudswell body part one
 Blimey the is more complicated than I thought. That idiot locomotive designer really didn't think about us modellers when he designed the 12inch to the foot original.
First the footplate is folded up. Then the buffer beams (3 layers) are riveted and laminated before fitting to the footplate. Next comes the valance. Not a nice simple continuous thing but something in several pieces to allow for the steps. I put off doing these as they look a bit fiddly...
The cab is easy enough as long as you check it for squareness. Being nickel fingers stay unsinged even when you hold the corners close to the iron. The rear bonnet is brass though as it's easier to form the top bends - I didn't even anneal the metal. Nickel cracks of gives you a bend with the profile of a 20p piece when trying this sort of trick. Only one end is provided so the builder needs to be careful that both ends of the bonnet are the same - a second one would be lovely but probably mean another etch to pay for.
Once pleasant feature is the access to the insides for soldering. So far even the 40W iron has reached every joint with ease.
Friday, February 06, 2009
Scabby Hull
 That hull looked better than it was. Once I started examining it closely all sort of tiny lumps and bumps and pinholes hoved into view. Plenty of skimming with tube model filler gives me a hull that looks like the surface of the moon.
I just hope that the magic sander can sort all this out. tomorrow.
More brakegear squeezing
What is it with brake gear ? This is the second model locomotive I've built in a row where the clearance between the wheels has been measured in atoms. Thing is, this time the brake angers and shoes are pretty spindly. Squeezing them in meant some simple but careful filing. using a half-moon needle file to reduce the width of the shoes bought me enough gap and if you need justification, replicated the look of well used brakes.
Apart from this the only deviation from a simple path with this chassis was hacking some triangular clearance holes in the top to let the motor sit down properly. Obviously the model needs to be supplied with a smaller motor or two stage gearbox. The later would be nice as there is loads of space in the bonnet. On a shunter trading top speed for extra grunt isn't a bad idea.
Apart from this the only deviation from a simple path with this chassis was hacking some triangular clearance holes in the top to let the motor sit down properly. Obviously the model needs to be supplied with a smaller motor or two stage gearbox. The later would be nice as there is loads of space in the bonnet. On a shunter trading top speed for extra grunt isn't a bad idea.
Thursday, February 05, 2009
Snow

It's too cold to spray and anyway I'm painting buffer beams.
In the meantime, here is a handy hint: A teaspoon makes a smashing tool should you feel the need to carve compacted snow. You too can build a highly detailed snowman to decorate the garden !
I wonder if it would work as well if I became a professional sandcastle builder ?
Glass bottom boat

The Brede hull has been fibreglassed with the finest fibreglassing cloth that Halfords do sell. Even though I remembered to add hardener to the resin the drying took a couple of days. It's cold but surely the stuff is supposed to go off faster than this ?
After this I ended up with a waterproof and strong but lumpy hull. Attacking it with an electric sander helped, once the resin had dried. Until then all I achieved was to clog sandpaper up. Eventually I managed to get one side very smooth. It's opposite didn't look great and a spray of high build primer showed the true horror. Think unrolled pastry and you'll know the texture.
With more sanding and a skin with Isopon filler, things looked a little more promising but I was wondering if this had been a good idea.
My problem is the prototype. Lifeboats are finished to an incredibly high standard so I can't hide anything by weathering. After an hour working the model over again with a couple of big sanding tools (handy hint - charge the battery on the detail sander before you want to use it !), a coat covered in dust and relief that I'd found a mask to keep the stuff out of my lungs, this is the result. Still not perfect but a whole lot closer. The primer has shown up a few areas of concern which will be dealt with using model filler.
And more sanding. Maybe I should have just carved it from solid ?
Wednesday, February 04, 2009
Painted dock tank
Finally, the dock tank has paint. Cold weather over the last few days left me wary of the unheated, broken Beetle filled garage I have to paint in. Try spraying when the mercury is too low in the thermometer and the paint will bloom. Snow on the ground basically means no spray painting.
Sunshine on the other hand means I ought to be OK. To be on the safe side I used my big compressor which has a moisture trap fitted to the outlet.
This locomotive is to supplied in ex-works livery so the paint employed is Precisions's matt black. It's not as matt as Humbrol and a pretty good match for a Bachmann paint job as well if you need to do any touching up on a RTR model. Thinned with white spirit (too cold for cellulose) the coats went on evenly and dried quickly enough with the assistance of a hair drier. The finish is best described as eggshell which ought to be OK for the transfers. A final coat of satin varnish will complete the look.
Hudswell Clarke chassis
Nice simple job this. Set the chassis jig (how I love this tool) using the coupling rods, slide the bearings on followed by the frames, having reamed each out as required, then solder the spacers in.
Result: a nice square chassis. In P4. Oops.
This is the sort of thing you learn building the test etch. Shrinking a model locomotive kit down from 7mm means the spacers are too wide for us OO chaps and our underscale axle lengths.
A quick call found the supplementary etch of correct spacers in the post the next day. Removing the wide ones and re-jigging the chassis allowed me to get this far painlessly. I'm dubious about the rear axle as my jig only has three axles but as it only carries the jackshaft I'm hoping to get away with it. I can ream the hole out a bit more than the others and let the shaft slop around a bit more if required.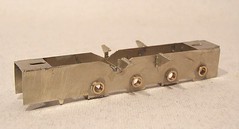
Tuesday, February 03, 2009
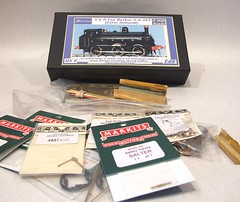
Hudswell Clarke 204hp DM
Introduced in 1961 the Hudswell Clarke 0-6-0's were an odd choice by the LMR as they arrived after the standard 03 and 08 shunters were commonplace. Only 10 were built, based on an earlier design which had the cab at the back as shown in the photo, and they lasted 6 years in BR service.
My task is to build the BR version of this Mercian etched brass model locomotive kit. Shot down from a 7mm version I'm to check that everything still goes together after this conversion.
As supplied to me the kit includes a Mashima motor, Markits gearbox and Romford wheels. The model is etched in nickel silver with some supplementary brass parts where bending is required. Whitemetal parts and Gibson handrail knobs completed the package.
Monday, February 02, 2009
Melbridge Dock web pages
With the dock due to make an appearance in a magazine very shortly, I've been reworking the web site I built years ago for the layout. It would be a shame if anyone following the link at the end of the text or performing a search found it as dated as it was.
Updating the pages is always something I've meant to do but never quite got around to. This was brought home to me when I looked at the first page and realised I needed to update mention of exhibiting the model for ten years to twenty ! OK so the text was probably a bit out of date when I wrote it but it was still a surprise.
Anyway, the information has been considerably revised and extended. Hopefully this will be useful to visitors and if it isn't they will let me know what else they would like to know.
Melbridge Dock Web Site
Still looks like a Jinty
The dock tank has been primed. Then tinkered with. Then primed again.
And it still looks like a Jinty !
And it still looks like a Jinty !
Sunday, February 01, 2009
Sanding sealed hull
Since I've used a very thing plywood skin for the Brede hull I think it's going to need a fibreglass cladding to protect it. Before slapping this on though I've given all the woodwork, inside and out, a coat of sanding sealer.
This is a smelly job so I did it in the garage. Unfortunately the garage is pretty cold at this time of year and the sanding sealer wasn't exactly liquid - it had the same viscosity as porridge. I did try thinning it a little with cellulose thinner which helped a big getting it to the viscosity of runny yogurt. This brushed on eventually. The inside isn't perfect by a long way but it's OK and should protect the wood from any water ingress. Outside went a lot better but then I'm not contending with the ribs and stringers.
Drying time was negligible. Smelly time last a lot longer.
Subscribe to:
Posts (Atom)