Saturday, December 31, 2016

I built a beetle

Lego Beetle - 10252

Thanks to the generosity of my sister, I got to spend a few evenings building a Lego model of a VW Beetle. 

Long term readers will know I'm a big fan of the bug, my first car being a '73 model that now awaits serious repair after being left in the care of a maniac mechanic years ago. Maybe this year she'll go back on the road.

Lego Beetle front

1167 pieces go to make up the car, drinks cooler and surfboard. Assembly is interesting with some fascinating detail work along the way. Lego isn't ideal for building models of cars made entirely of curves so the factory could reduce the amount of steel used (the curves avoid the need to inner strengthening parts required for flat panels) being brick shaped, but the only custom parts appear to be the wings. 

The designers have done a top job, although this isn't the first attempt. That was the incredible 10187 set which is now highly prized and very pricey if you can find one. Set 10252 is still in the range, although possibly not forever.

Lego flat four Beetle engine

Unsurprisingly, I really enjoyed making this model. The huge booklet is perfectly clear and as long as you follow the pictures, you don't go wrong. There was a single missing part in the bonnet but as it was hidden, I improvised with some of the spare parts. Construction was spread over 3 evenings to prolong the enjoyment. 

Lego is normally thought of as a kids toy, but it was interesting to read Jonathan Clay comment on Facebook over the festive period that 13 friends had mentioned thay had recived some, but none were kids. I can add another who is very proud of his TIE fighter model. The Beetle kit is listed as being suitable for ages 16+...


Friday, December 30, 2016

Transrapid 07

Revell Transrapid 07

I've always been fascinated by Maglev and monorail systems. In model form they are rare, but a few hints saw me receive a tatty box containing the Revell HO scale model arrive at Christmas. There is a dusty corner of the Hereford Model Centre that is a little bit emptier now...

The Transrapid concept was developed in German around the turn of the century. Sadly, despite the prototype information in the model's box, the only working application is a short line in China. The planned links in Germany lost out to conventional railway systems - you can build an ICE train cheaper than a fancy-pants monorail maglev system and travel sufficiently fast for practical purposes. Even the Emsland test facility has been scrapped.


The model is a pre-painted plastic "kit" designed as a desk ornament. At just under half a metre long, it's an impressive beast. Detail is limited, just like the real thing, although electromagnets are moulded underneath the "track" if you look underneath. 

Conversion to a working model might just be possible. You need to plan on making something that looks right rather than is right. The air gap on the real Transrapid is 10mm. Scaling that down results in a gap best described as bu**er all. This pretty much rules out proper maglev working as you'd need an overscale gap and the thing would probably move oddly. 

Get past this though and I can see why wheels shouldn't be fitted inside, picking up from wipers operating under the track. 

Two sections of track are supplied and as far as I can tell, spares were never available. Making your own wouldn't be too bad although some experimentation would be required. Apparently pre-fabricating standard sections on the prototype isn't as easy as it looks, everything to form a curve has to be bespoke. 

For the minute, this is just a collectors item, but I am sure a Maglev model will feature in my future. 


Thursday, December 29, 2016

No space for the buffers?


At the station end of Ruston Quays, there is a big hole in the fascia support. It's there because I found the DMU operating on the shuttle service would hit the woodwork at the end of it's run.

Bacisally, I needed to move the diode that stopped it's progress by a few mm, or make a hole to stop the buffers being beaten to death. I make a big hole.

It's fun, kids love watching the train heading towards them as they peer through it. But now there is a prototype.


From the Royal Deeside railway Facebook page:

How to fit a 26 ft steam loco in a 25ft shed?

It's not all been about Santa today, and some of the Steam Team have been addressing the physical challenge of how to fit a 26 ft steam loco in a 25ft shed.... as you can see, it was perhaps easier than first thought.... and for the first time since Salmon has arrived at the Royal Deeside Railway, this evening she will be undercover!


Wednesday, December 28, 2016

Warehouse Wednesday: Cement silo

Cement silo front

For the last Warehouse Wednesday of the year, something a little different - a cement silo. 

This can be found on Foxes lane, a short walk from the city centre. Google maps has an interesting aerial view of the fairly small site. Quite where the conveyor belt is lifting material from is a bit of a mystery, even looking down on the site. 

Cement silo

Constructing something along these lines for a model shouldn't be too hard. There's a load of corrugated iron and a steel hopper. Add in some suitable lorries and this could be squeezed into a odd corner of a layout pretty easily but provide some real industrial atmosphere. Best of all, this is a permanent site, not one put up for building works and then spirited away later.

Tuesday, December 27, 2016

Not so local bus


Where is this photo taken?

The Lake District?

No. It's on the road to Leamington Spa station. 190 miles from the lakes.

This bus has been running around with its destination board shouting "Windermere" for at least 6 months. I'm pretty certainly a daily service between the two towns hasn't been introduced so I can only assume it arrived from the north and hasn't been re-programmed.

All this is a lovely "prototype for anything" for railway modellers. No more worrying about the correct destination blinds on your miniature PSV's, just tell sharp eyed bus-blind observers that the vehicle concerned has been transferred from another area. That and go away and bother someone else.

Monday, December 26, 2016

Rock stand


All being well, my sister is now the proud owner of a lump of rock. I'm not exactly sure what sort of rock it is, and probably wouldn't spell it correctly if I did, but it's a really nice and interesting green colour. 

It's also an odd shape, which made the request I built a stand for it to sit on a bit of a challenge. A bit of web surfing provided some ideas, but most of them didn't seem quite big enough, or I had to buy the things in bulk. I reckoned that I could make one myself however. 


The wooden base came from eBay, a nice piece of oak for a few pounds. The 4.5mm diameter brass rod is from Eileen's Emporium. This cuts well with a tube cutting tool, you even get a nice chamfered end that only takes a tiny amount of cleaning up with a file. 

The rear support was bent in a vice, not as neatly as I'd have liked (it looks worse in the photo) but as this is hidden by the rock, I could live with it. Holes needed to be vertical so I dug out the pillar drill. No glue required, just firmly pressing the rods home with a vice or long clamp. 

Finishing touches involved Brasso and some metal lacquer to save future polishing. 
 

Sunday, December 25, 2016

Merry Christmas

Christmas train

Merry Cnristmas to all my blog readers. As usual, I hope Santa has brought you some lovely presents and your day will be filled with happiness and chocolate. 

And yes, I do know that the front wheels are off. It's Christmas, let it go.

Saturday, December 24, 2016

Down in Santa's workshop

Lego Elves

While in the Leicester Square Lego store (I just went in out of curiosity), I bought myself a Christmas decoration. A pair of elves working away in Santa's workshop. 

Half an hour of enjoyable building later, it's finished. Quite why putting a Lego model together is so pleasant I don't know, but it is.The best thing is, someone has obviously been very good, because they will be getting a new toy train from the man in red. 

Friday, December 23, 2016

Hornby Peckett 0-4-0 R3429

Hornby Peckett

I don't buy RTR locomotives. I like to kit build small industrial steam engines. And yet here is a small industrial in a box from Hornby. How could I resist?

When the Peckett was first announced, it was immediately high on the list of models I'd spend my own money on. No freebies here, my local model shop is £70 better off and I have a nice new red box. Compared to the RRP of £87.99 this is a bargain (and not from a box-shifter) and is easily comparable to the cost of kit and bits for a model you have to make yourself.

I've chosen the Huntley and Palmers livery as I like biscuits and it's the prettiest on offer, but Manchester Ship Canal and 565 Dodo are also in the shops at the moment.

Hornby Peckett

Comparing the model to prototype photos, I can't see anything obviously wrong with it. There will doubtless be nit-pickers but these locos saw more than the usual number of detail changes and modifications during their lives so you'd need to pick a particular date for the prototype you are comparing it against if you want to moan. 

Since this is a sort of review which means I'm legally required to moan, the smokebox door/handle looks a little flat to me but they weren't exactly bulbous. Whatever, it's certainly more than a match for my kit-built models and will happily sit amongst them. The under-tank pipework is particularly well done, far better than my efforts with bits of wire.

What I do see is flawless paintwork. The decorations is superbly applied and well beyond the ability of the vast majority of model painters. Again, to be pedantic, I wonder if the chimney top and dome should be a better colour match. Both could be replaced with turned brass aftermarket parts if preferred, the paint isn't an especially good representation of unpainted brass. A bit of weathering would fix this and save attacking the model with a saw.

Peckett Chassis 1

Take the body off, two screws with one hidden under the front coupling, and you see the chassis in all it's glory. The five pole motor drives a compact gear train allowing enough space up front for a DCC chip should you feel the need. A 4-pin in-line socket facilitates this. Finding space for a speaker would be more of a challenge.

On the track, the model runs very, very sweetly straight from the box. How much improvement running in would provide is questionable. I've not built many chassis that could hold a candle to it.

Peckett Chassi 2

So there it is. Superb. This model should be a cash cow for Hornby if they make it available in 4 or 5 different liveries each year. Purely on cuteness, I'd see many collectors buying one of each. There aren't even any detail bits supplied to confuse anyone.

So, it's a superb model and will doubtless inspire lots of people to have a crack at some minimum space layouts. I've a few ideas in that direction myself. 

Let's finish with some numbers:

Length over buffer: 83.5mm
Width over bufferbeams: 32mm
Height to cab roof: 48mm
Wheel diameter: 12.8mm
Wheel width: 2.8mm (measured over tread & flange)
B2B: 14.4mm
Haulage: 0.02kg (0.7oz)


Thursday, December 22, 2016

Binding magazines cheaply


As we reach the end of the year, many of us will have piles of unbound magazines that need organising. Buying the correct binders is obviously the best way to do this. The mags will fit and lines of many years will look fine on your library shelves. 

Not every mag produces a bespoke binder however. Model Boats have (apparently) stopped doing this so we needed to find an alternative method. 

Rymans stationers have come to the rescue with some Magazine Holder strips from Durable. Each plastic strip fits into a 4 ring lever arch file. The mag slips into a slot down one side of the strip. 

Not only is this quick to do, the mags can be removed easily if required. 

Magazine holders are a web-only product but you can order them through the shops where they will be delivered for pick-up. 

At this point, I'd normally include a web link, but in the last few days the links has vanished. Not to worry, here is the original on Durable's website.

Wednesday, December 21, 2016

Warehouse Wednesday: The Royal Spa Centre

Regular readers will have spotted not a lot of actual model making going on around here recently. The reason is simple - time. As well as my magazine work, I'm doing some front of house work at a local theatre and since it's panto time, that's eating into the time available. 

Because of this, it seems appropriate to use the theatre as this weeks building photo, complete with a short history I wrote some time ago for a local magazine. 


In the late 1960’s, the former Leamington Spa Borough Council decided to embark on the building of a new multi-purpose complex. It was to be suitable, not only for shows and concerts but also conferences, exhibitions, dances and even some sporting events.

A central location was required. The one chosen on Newbold Terrace was occupied by Harrington House, a large and impressive Gothic building constructed in 1869 to a Pugin design, by William Gascoyne. Described as both “one of the most outstanding Victorian Buildings in the town” and also an “Unrestrained Gothic mansion, rampant and bristling with ugliness”, the building succumbed to demolition in 1967. Had the outcome of World War 2 been different, it is rumoured that Harrington House might well have become Hitler's seat of UK government.

The new building was designed by Coventry born architect, Sir Fredrick Gibberd. Ten years earlier he had been responsible for the iconic Liverpool’s Metropolitan Cathedral, had designed Didcot power station as was at the time working on the London Central Mosque. Initial designs were considerably larger than the building that eventually emerged. The green circle at the front was introduced part way through the process to use the space no longer required and provide a more pleasant aspect to the frontage .

Total cost of the new building was £410,000, slightly above the initial £405,428 estimate. Savings were made by abandoning the footbridge intended to connect the site to the nearby Jephson Gardens, although this was a late change and the bridge appears on the architects official painting.

Tenders for construction were accepted in 1970 and the pace of progress was such that the foundation stone was laid in November of that year by the secretary general of the Arts Council.

In June 1972 Sir Anthony Eden, who had become Lord Avon, told a packed audience in the Avon Hall (now the Main Stage) which had been named after him, that “The civic effort you have shown is so immensely encouraging. You have demonstrated what can be done, which is just the message needed in these times.”. Another dignitary described the venue as “the most modern general hall in the world.”

After the speeches on the opening night, the audience were treated to a concert by the Warwickshire Symphony Orchestra playing Tchaikowsky’s B flat minor piano concerto. The Courier (the local paper) reviewer praised the acoustics in the new hall saying that “every note and nuance however soft could be heard distinctly. The good will sound very good in this building.”

Not everyone was so pleased with the new venue. Two letters to the paper the following week expressed dissatisfaction with the new seating claiming that you would need to be “Seven feet tall” to see the acts properly on the stage. After several revisions over the year including two complete changes of the seats, the current tiered arrangement hopefully solves all these problems!

Worse was to come. Tuesday nights had been earmarked for youngsters and at one of the very first discos to be held, teenagers scratched walls, pulled a door of its hinges and flooded the toilets. The then manager, Harry Wood, threatened that anyone caught damaging the centre would face a lifetime ban.

In addition to the Avon Hall, the building housed a smaller venue called the Newbold Hall (now The Studio) with 208 seats built as a film and lecture theatre. Films were not shown immediately as the projection equipment didn’t arrive until the September after opening. Some visitors may remember the Junior Film Club established in 1990 with an annual membership fee of £2 plus £1 entry for the film (£1.70 for non-members) which was rapidly followed by leasing the hall to become the Robins Cinema for a few years. More recently it has been refitted to act as both cinema and performance space for small shows.

If you'd like a look around, the Spa Centre appears on Google Maps

Tuesday, December 20, 2016

Vehicle hold-downs

The diescast models in yesterdays post we photographed against a white background. This wasn't as easy to achieve as you might expect. The release the Bulldog tractor from it's plastic display plinth, I had to do battle with these:


Triangular screw heads. What the heck is going on here? Are Klingon's assembling these things? 

Of course, I don't have a triangular screwdriver, and nothing else could be forced in to do the job, I thought I could just cut through them with some snips. This wasn't a good idea. 


Oh well, I needed a new pair anyway. And yes, I would have used bigger cutters, but I couldn't get them in under the tractor. 

In the end, I cut the plastic plinth up with a saw and eventually reduced the hold-down so a pair of small pliers could grasp the screw head to turn it. A few minutes later the tractor was free. Although I've ruined it's collectability as that base is never going to be fixable...

All this is in sharp contrast to the Corgi bus. 


Underneath the model is a pair of plastic clips that fit into the back of the hollow wheels and hold it in place on the cardboard box liner. Far easier to undo and put back. Things haven't improved much in the 20 years that separate the model have they? 


Monday, December 19, 2016

New tractor and bus for the collection

Lanz Bulldog tractor model

Collecting is all about the thrill of the hunt. There's loads of fun in finally tracking down an elusive item for your display. I'm pleased to have finally acquired a diecast Lanz Bulldog tractor. While I have a HO scale version, in fact the Sport model, I have been on the lookout for some time for something bigger. 

This isn't because I'm a huge fan of farm machinery, but because the Bulldog takes a prominent role in the end of my novel (Blatant plug: Available in paperback and e-book here. Get yours in time for Christmas) and it's a useful size to photograph for marketing purposes. 

The diecast model comes from the Tractors and World of Farming partwork series published by Hachette in 2008. The models are now appearing in boxes at the end of second hand stalls and I've been digging through for a few months with no joy. Then, on an "antique" stall in Hereford indoor market, there was the Bulldog - which was quickly snapped up for £8. 

It's a well detailed model in roughly O gauge and would make a useful and cheap addition to a model railway. Some matt varnish and loads of weathering would really set it in the scene. Mine will stay shiny for the moment, but looking at the quality of the castings, I could be tempted by a second for "modification".

Corgi bus

While I'm at it, the Beatties collection has been swollen by a Corgi bus with their advert on it.Mint in box for under 7 quid thanks to ebay. I always wonder how toys manage to stay in this condition. I'm sure none of my childhood toy cars are in anything like this good a condition.

Sunday, December 18, 2016

Scalextric "Supersound"


The companion unit to the Hornby Supersound unit I looked at a couple of years ago, if anything it's worse than the railway version. 

I don't understand why you'd want this thing any where near your slot racing set. If traffic noise is your bag, just open a window.

Playing with it under DCC equiped model diesel depots could be fun though (evil laugh).

Saturday, December 17, 2016

GWR hand lamp

GWR hand signalling lamp

Last week, a generous chap from the model boat who had been cleaning out his loft gave me this. He wanted rid, and though I might like it. He was right. 

This is a GWR signalling lamp. Inside the body is a metal cylinder holding three colours of curved glass - red, green and clear. The green is intact, the clear missing if it exists at all, and the red is broken. The spirit burner looks OK although I haven't tested it.

On the side is a plate marked 4530. 

My guess is that the body has been repainted at some point. I've not seen these any other colour than black. However, I like the patina of the current paint with rubs and knocks. Restoration would be an option, but why? There are loads of black lamps put there and making it look new would take the "life" out of it. 

Replacing the red glass should be possible. I'm sure I've seen this stuff on sale in the past (ebay?) so I'll probably do this at some point. For the minute it's an ornament and a nice one too.If anyone out there can tell me more about this, I'm all ears.

Friday, December 16, 2016

What's that on the trackmat?

One reason to use a trackmat (I refuse to call it trakmat) is that it give the appearance of scenery, even just in printed form. There are suggestions for accessories to be placed around the train set - a great idea when trying to prompt friends or family for future presents.

This all falls down when it's impossible to identify the aerial view of some accessories.

Quiz time, what's this?


or this?


They clip in to the sides of the rails but otherwise I can offer no suggestions. The Hornby website isn't much help either as the mat shown there is different from this one.

Thursday, December 15, 2016

You can't solder to Hornby track, so how do you get the electricity in?

Phil from in front of a layout he is trying to wire says:

Arghhh!!! I'm trying to solder wires to some old Hornby track and the stuff won't stick. Even with flux, the solder just smears on the surface like toothpaste on a mirror. 


Phil answers: Hornby steel track is coated with a lacquer to stop it rusting. I think this applies to both old and new rails - the coating helps keep the track clean (good) but you really need to to use one of the companies proprietary methods of attaching wires to it. Either the R602 power clip or  the more substantial section of track with screw terminals applied with some sets, are the solutions. 

That's fine except where you need lots of feeds. On nickel-silver track I'll happily solder wires to the side in a matter of seconds. Here, it wasn't working. 

After much head scratching, the chap I'm building the layout for reminded me that the local model shop had supplied him with some Peco pre-wired fishplates

Perfect! OK, the track had to be lifted and the existing fishplates replaced but the result was very neat and effective. With small holes drilled beside each one, the wires poked below the board, any obvious wire could be painted or covered with ballast. 

Maybe on finescale I'd still prefer solder, the wires don't bend much so you can't route them directly down under the board for total invisibility, but here they were the idea solution to the problem.


Wednesday, December 14, 2016

Warehouse Wednesday: Veron Building

Vernon Building

Despite it's outward appearance, the Vernon Building in High Wycome isn't a 1960s office block, it's a series of industrial units. A quick check on-line shows a number available for rent along with a video walk-through that starts with the muppet driving around and filming at the same time...

Anyway, another good modelling opportunity here. The pre-fab construction means lots of repeated sections. Steel windows have virtually no depth so could be scribed on a sheet of perpex and the lines filled with paint. Despite the age, there's very little weathering apart from a few streaks on the end.

Best of all, it has no style so changing the location won't be an issue. You could even just use several end views along the back of a layout instead of a backscene.

Tuesday, December 13, 2016

Hornby trackmat based layout


A few weeks ago, a guy appeared at the railway club wanting help with building a layout for a present. He'd picked up a Hornby trackmat and needed advice on baseboards etc. 

The track mat is an interesting beast. I've no idea who drew out the plan but they didn't do a particularly good job IMHO. For instance, why is the main station on a siding and not next to the running lines? With a bit of shuffling, I can't see what this couldn't have two platforms complete with a footbridge between them. 

The siding coming out of shot heads to an engine shed, but only a single road one despite the model being designed for two roads. Perhaps a goods shed would have made more sense? 

I know this isn't finescale, but I can't help feel that a better plan with more play value could be easily arrived at. 

One challenege for our beginner builder is that a single board would be too big for storgae. It had to split. so much advice was given on doing this. Avoiding the points meant a slightly inelegant result with a pair of narrow bards either side a wider one, but it all seems to work, even if there are an awful lot of track breaks. 

Anyway, last week, the nicely made boards arrived at the club and tracklaying commenced. Within an hour, we had a loco running around and all appeared to be well. Than I tried to do the wiring...

Monday, December 12, 2016

Slot car "shelfie"?

Micro race track

I always like to have a "Layout I'd like to build" winner at every model railway show, well this is the one from the Slot Car Swapmeet described yesterday. 

A time trial rather than racing circuit, I recon there's a lot of fun in a small space here - a lot like Paul Marsall-Potter's "Shelfie" layout ideas

In use, you'll be looking to improve your lap times. At first, just keeping the car on the track will do it. Then you'll have to get better at putting the power on for the straights and getting it off again for those tight bends. Reaction times are all. 

Construction (of course I asked) involved routing the slot and then sticking copper tape around it. This stuff is flexible but achieving a smooth finish must still take a lot of work.

The board folds in the centre for carriage and storage, making this a handy home circuit that most people could own. Very clever indeed. 

And yes, I had a go. I kept the wheels on the ground but can't claim to produced a great time.

Sunday, December 11, 2016

Slot car swapmeet

Minic roadway

Back in the 1960s, my dad was a car racer. Specifically a slot car racer at the Luton slot car club. At the time, he helped them build a 120ft long 6 lane track and then enjoyed racing converted Airfix kits around it. Sadly, the club lost its premises and the track was dismantled. He them moved out of the area and never raced again.

Spotting a flyer for a slotcar swopmeet at a recent show, we went along out of curiosity. I know there is a bit of a hobby left, but didn't really know very much about it, but it's fun finding out.

The event at Coventry Transport museum was mainly trade, but there were a few operating tracks.


Minic RoadRailer

First I found some Triang Minic on which there was the rare operating Road-Railer unit. The owner tried to give it a run for me but it wasn't playing. He did explain how the ingenious chaps at Triang made the thing work as the prototype does. He also showed me the double gearing fitted to the steam lorry to make it trundle slower than the rest of the traffic - clever stuff.

And yes, a bit of me thinks that Minic Motorway would be a nice adjunct to the Triang working models collection, but I must resist.

5 lane Mini raceway

Next door was a rare 5-lane racing circuit. Triang sensibly tried to jump on the slot car racing boom of the time with a 4mm scale (ish) version using the same mechanisms.

Pit lane

In another hall was a full sceniced model based on Silverstone. This was new to me and while nowhere near the quality of a model railway, it looked good and there were a lot of scenic accessories available.

Sadly, there isn't a slot racing club near Leamington, but if we could find premises, I think there are a few people around here who might be interested in starting one. Maybe I might build a racing Beetle or TR7 after all one day.

Saturday, December 10, 2016

Peterborough show seen by normal people


Most videos of model railway shows are shot by enthusiasts. Because of this, they tend to be heavy on the trains and don't really capture the essence of the event. 

This promo film by Warner's video people (the same ones who make the BRM DVD) is interesting precisely because it hasn't been shot by enthusiasts. Instead it shows people enjoying themselves and to my mind, catches the feel of visiting a show if you aren't a hard core model railway nerd.

It makes visiting a show look just as much fun as it really is. And yes, I can be seen in the background towards the end, but watch it anyway.

Friday, December 09, 2016

Sanding sticks

John asks:

Just a small question, if I may? Having read your article on BRM article "Horse Power" I see that you used a interesting abrasive stick (sanding stick) and I wonder where you may have obtained these. I have not come across them at Shows and I wonder if you use a particular trader.


This is embarrassing. I do my best to ensure that all the tools and materials I use for magazine articles are easily available, or that I can point people in the right direction to buy them. My sanding sticks came from a trader at the IPMS, and when I go looking for their details, I can't find the sticks on their website. It looks like these are a show-only product.

My initial suggestion to John was to try any abrasive stick from Boots - the sort sold for filing nails. I know John well enough to know that he probably won't have of these to hand, preferring a professional manicure at an exclusive high-class establishment.


But, At Warley, I found a suitable alternative. Albion Alloys sell a range of abrasive products including these rather nice sanding sticks. Each is 165 by 20mm, double sided and covered with a variety of grades of abrasive. They aren't as padded as the sticks I've used in the past so should go into small (3mm+) gaps as well. Less tearable when you accidentally sand a screw head or slightly exposed nail too.

Packs cost £5.00 and are available from model shops and trade. 

Thursday, December 08, 2016

A big station, barns and little lorries in BRM

Stanford East Model

It's time for a new major project for me in the latest issue of BRM. A few months ago, I was introduced to a 4mm scale model of Stamford East station which had arrived in the magazine stores after being turfed out of the local museum when it closed. 

My task is to take the model and turn it into a layout. This isn't as easy as it sounds - first, this is a popular station with both OO and N gauge versions currently on the exhibition circuit. Second, it's half a metre long and really needs a 15ft long layout to do justice to the real trackplan. 

Like most modellers, my space is limited, in my case to around 6ft. What can I do to fit the model in this space AND make it look different from others people will have seen? You'll have to read the mag to find out.


Old stone barn

Staying with buildings, a project I've wanted to do for some time has finally come to fruition.Skytrex's excellent derelict barn casting is lovely as supplied, but what would it have looked like when new? And how did it end its life?

I've taken the model and built it four times - once when new, a couple of examples as it falls down and finally, a Grand Designs inspired barn conversion. 

Ruston Quays Road vehicles

Finally, I'm looking at the road vehicles to be seen on Ruston Quays. I'm a bit old skool in that I don't think the only place to acquire little vans and lorries is the diecast section of my local model shop. Nor do I think they should be left in fresh out of the box condition. I've shown how you can build an interesting selection for the layout, which will hopefully encourage others to do the same. 

Over on the DVD, I'm sitting out in the garden doing a bit of modelling. This time it's assembling resin buildings for garden railways. Just the job for winter!

Wednesday, December 07, 2016

Warehouse Wednesday: The NEC

Hall 5

One of the features I look for in this part of my blog is usefulness to modellers. One thing that is helpful, is to have a building so large,it forms a backdrop to a layout, saving the modeller from a 2D backscene. Large warehouses count, and so does the NEC.

Opened in 1976, the National Exhibition Centre can be found sandwiched between Birmingham International Airport, the M42 and Rugby to Birmingham railway line. As such, it's huge halls can be seem from the train.

Hall corner

The first halls were boxy affairs with concrete lower levels and gaudily painted corrugated steel sections above. A particular feature are the numbers with mock shading effect. 

Later halls, added in the 1990s, such as the one above are a more streamlined design with far cleaner fonts. Detail fans will like the use of vents painted red. There's quites a lot of pipework on the building and rather than hide this, they have made it almost sculptural, perhaps inspired by the Pompidou Centre in Paris.

Access doors

Modellers will need to concentrate on the rear of the buildings rather than the public frontage. That means large entrance doors and lots of parking. None of this is difficult but it would be worth checking out some of the maintenance vehicles scattered around the site. Cherry pickers of various designs are popular, as are golf buggies used by staff to move around the site. There is even a fire station, although this isn't visible from the trains.

Hall 9

While a fair bit of compression would be required, I really could see this on a layout. Either scratchbuild the structures, they are plain enough to make this easy, or use some of the modern Wills kits intended for model shopping centres and industrial parks.

Tuesday, December 06, 2016

Lorry spotting

Dana from Frozen Ottawa asks:

I'm primarily a modeller of things with wings and a modelling friend in the Canary Islands wants to build a diorama of the vehicles in the image attached. Its from an airfield on the occupied Channel Islands.

We think its a Commer Parcel truck (Excuse this colonial commoner!)... err Lorry. Would you know if such a beast is available in O Gauge? I've searched Google to no avail and thought I'd ask someone in the know!


I have a feeling the answer is "Yes", but I'm no expert. In my mind, Bob Barlow's Classic Commericals range contained something similar, but I can't remember (or find out) where it moved on to after his death. 

Can anyone help? Answers/suggestions in the comments please.

Monday, December 05, 2016

Death of a cutting mat

Cutting board

The time has come for a new cutting mat. Mine is covered in lumps and bumps - I'm working around the leftover blobs of glue and that isn't a good thing. I can't remember how old this mat is but certainly ancient enough that I probably should have replaced it a long while ago. 

On the right you can see the marks made by my efforts with bow and Bob Moore lining pens. There's a few other random blobs of paint knocking around too despite my efforts to keep things clean, or at least wipe up the mess. 

On the left there is evidence of my extensive use of talcum power on model buildings. It's actually worked into the rubbery surface of the board. 

Anyway, this mat is now in the bin and a new one has taken it's place. Not sure this will improve my modelling, but it can't hurt.

Sunday, December 04, 2016

When you are tired of Warley, are you are tired of life?

I've taken to playing a little game when I visit exhibitions. I like to imagine that my novel has taken off in a massive way, and that I am as rich as Rowling.

Then I make a list of stuff I'd have bought if this were the case.

I'm reminded of this because post-Warley, Facebook (at least the bits involving toy trains) filled with pictures of stuff people had bought at the show. Several excitedly laid out their booty for us all to marvel over.

Always wanting to be down with the zeitgeist, here we go:

Toymaster wagon

Yes. One cheap Oxford Rail wagon. Well, that and four packs of Ratio guttering, but those are for work so they don't count. 

Two days at the largest model railway show in the country and all I wanted was a funny advertising wagon. Something so unpopular that even selling for a fiver each, I could have chosen from 3 in the bargain basket at 4pm on Sunday. Mind you, the basket was full at the start so I wasn't alone. 

I'm not even sure why I bought it other than I quite like silly advertising liveries. That and I thought I really ought buy something. It was a cracking show and I sort of feel that if I don't come away with at least a few purchases, I'm not taking part properly.

It's a very nice wagon. One day it will find itself marshalled into a train of Beatties wagons perhaps. Or maybe I'll do something nasty with paint stripper to it. Probably not though as it's a pretty colour. And yes I know that's not the "proper" reason to chose a model. 

Maybe it the millions were in the bank, I'd have a fatter bag at the end of the show, but maybe not. Maybe I'm not so down wid da kidz after all.


Saturday, December 03, 2016

Warley 2016


Warley this year was as ever, very busy and of course, I didn't really get the chance to have a look around much during the weekend, despite having two layouts that could largely look after themselves leaving me to chat to people. This is a pity as it looked to be a vintage year for layouts with loads of superb models on display.

What I did see tended to be either before the show opened or on a trip to pick up the delicious pork baps that made up my lunch each day. 

North Queensferry

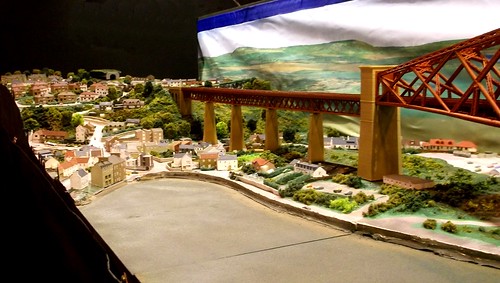
One advantage of the NEC is that it can swallow up huge layouts, such as this audacious model of the Forth Bridge in T gauge. What could have been a bit of a gimmick is actually a superb model. The bridge is good, but North Queensferry at the end is brilliant. They have even modelled the restaurant that I recall enjoying a meal at Scaleforum Falkirk many years ago!

VW

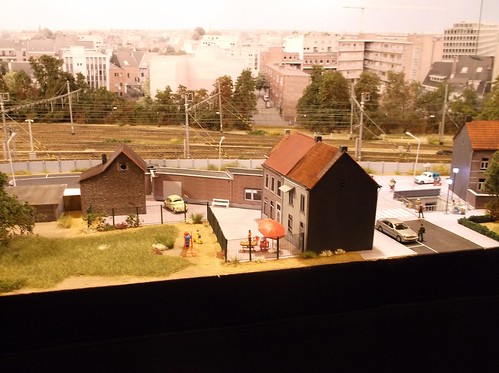
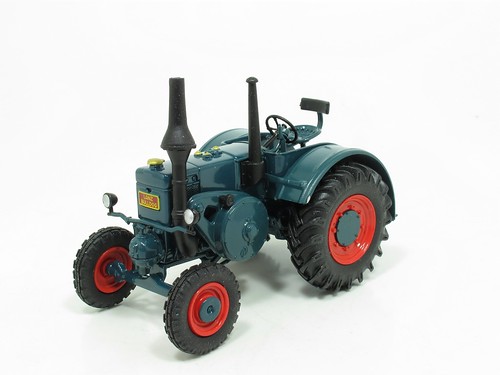
The other monster was a German model, built and exhibited by a husband and wife team. I think I'm doing well if I take out a 10ft long display with two people, not something that needs a 7.5ton truck!

Panoramas of both of these layouts are in the Flickr album so you can get a better idea of the scale.

On30 port

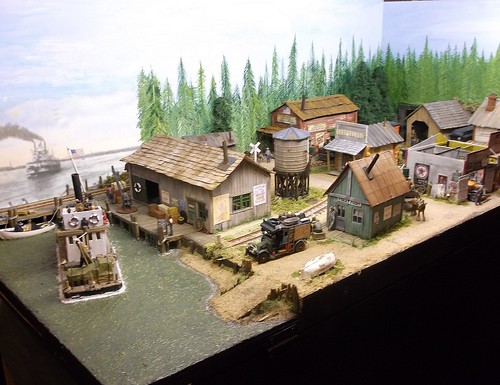
Being nearer the foreign layouts, I saw quite a bit of the On30 American modelling and enjoyed it a lot. I tried to take a photograph of a fascinating Thai layout Mahachai where a Bud railcar travelled up and down through a street market causing all the shop canopies to swing in and out. Sadly the lighting in the hall left this too fuzzy to show, but it's worth a look if you ever see the layout at a show.

Cake was limited. Basically, I didn't get any although someone delivered a small square of millionaire shortbread for Andy York, which I generously didn't pinch!

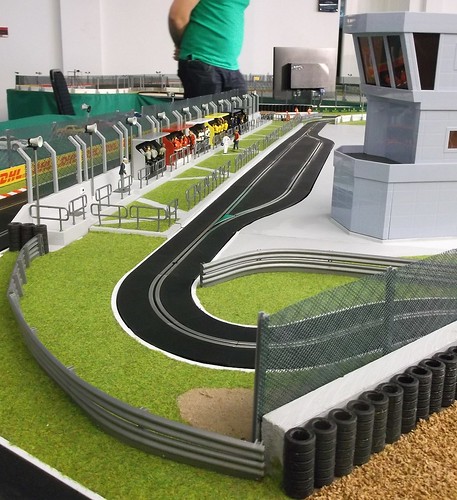
Being on the BRM stand and in front of Andy York's photo booth did present an interesting opportunity. Over the weekend, many new exciting models find their way to us for photography before everyone froths all over them. One such model was the rather tasty Heljan L&B 009 loco, which promptly found itself doing a few circuits of Owen's Bridge. I'd expected it to look ridiculous on the Peco setrack nosing its way around the curves, but instead it looks fine. OK, larger curves would look better but the model certainly ran very nicely with nothing falling off. 

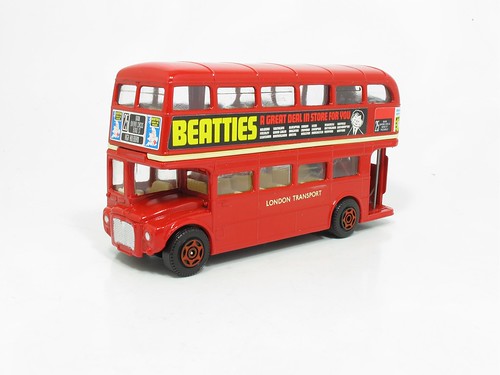
One of the show highlights happened so quickly I didn't get the chance to thank the gentleman concerned. On the Saturday morning, I suddenly found a brand new tube of Beatties plastic cement pressed into my hand.

Another goody for the collection. I'm assuming that the generous visitor is a reader of this blog - the idea that someone is randomly going around forcing tubes of glue from defunct model shops onto unsuspecting exhibitors is too terrible to contemplate - so thank you very much sir. I've actually used a little glue in a project. Don't worry, I didn't squeeze the tube though so it's still perfect!

Getting in and out was pretty good this year. On the way in I discovered that my pass didn't allow me in until after 2, but at least being in the waiting area at noon meant I was third in the queue when we did set off, after lunch hot chocolate and crisps at the adjacent hotel. Out was even easier as I got into the car park next to the hall and thanks to Kyle from BRM's camera team, was on my way home an hour and a half after the show closed.

My Warley album on Flickr.