Thursday, September 30, 2010

Wilro Prairie Tank motorising kit

Wilro kit...or stuff I bought 'cos it interested me even though I have absolutely no use for it.
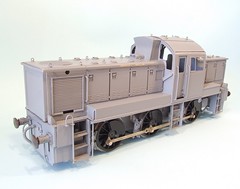
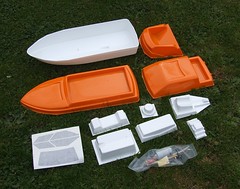
The Wilro kit is old. I'm not sure quite how old it is but I would guess 1960's. There were quite a few kits to make the Airfix plastic kits work available then - I have a Perfecta powered Pug somewhere - and this is a really nice one.
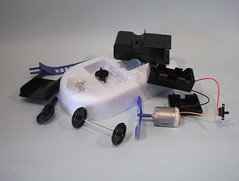
In the box I found:
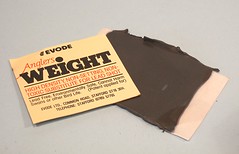
  • Some instructions produced on a typewriter and then banda duplicator
  • A K's 5-pole motor
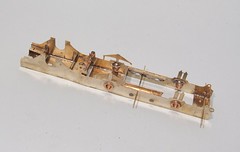
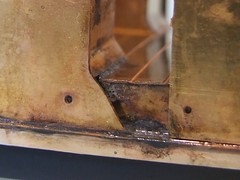
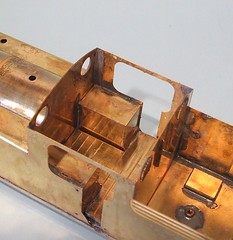
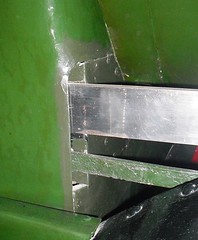
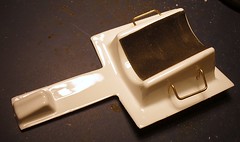
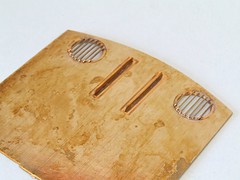
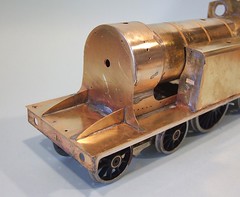
  • A very nice whitemetal chassis with pre-fitted axle bushes
  • Romford driving wheel conversion kit No.7
  • Some gears
  • A packet of whitemetal bits for the pony trucks
There are many things I don't understand. For example, how were the pure Mazak wheels insulated ? I could take them out of the packet and read the instructions but as they have survived this long without disruption I'm loath to do this. The wheels date to a time before Romford adopted the square ended self-quartering axle too.

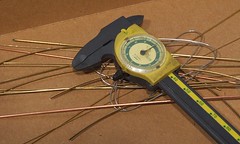
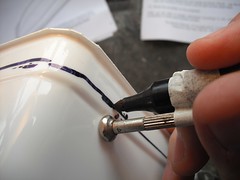
A nice touch is the pre-drilled bullhead rail supplied to act as con-rods. I've done this in the past but am a bit surprised that anyone actually manufactured and sold such a thing.

At the moment I don't have a clue what I'm going to do with this kit. It seems a shame to build it just for the sake of it but then , the kit was designed to be built. For the minute it can live in the cupboard as a curiosity, part of the collection of interesting things. After all it's not like I'm short of projects !

Update from the fount of all knowledge that is Colin Snowdon:

If this is an origional Wilro kit you should find that one set of wheels has a slightly larger bore than the other set (working 3 and three as a set). There will also be a length of stiff but flexible stuff which looks like paper, this is the insulation. To fit you wind a section of the paper cut to the exact length round the axle and push the wheel on over it. Too short, it arcs between the axle and the wheel, too long, and the wheel runs egg shaped or breaks as you fit it. I had one for a pug which contained spoked wheels as there were none of the correct type and being a touch earlier than yours had bronze bushes to fit to the frames. These kits were for Kitmaster kits i.e. pre Airfix and came for several of the kits.

Wednesday, September 29, 2010

Dirty black chassis

Chassis sprayAfter dismantling the Class 14 diesel, I took the chassis down to the sptray booth and mixed up a nice paint cup full of Precision Dirty Black paint. For some reason the paint was the consistance of double cream and filled the jar to the brim. I've no complaints but is was a suprise and took more thinner than normal.

There are a lot of nooks and crannies to get the paint into. Using the airbrush was the right move as doing this by hand would take ages and more than one brush I suspect.

Tuesday, September 28, 2010

AB500 Portable Spray Booth

SprayboothI've always wanted a spray booth. While I do all my airbrush work in the garage and for health reasons wear a spray mask, there is still a smell produced that pervades the next door kitchen. The atmosphere gets pretty thick as well which isn't pleasant to work in.

Normal spray booths don't work for me. They need to permanent setting and a connection to the outside world to blow the fumes away. I don't have the space for that, so when I spotted the AB500 portable booth in the Hobby's catalogue for a very reasonable £69, I ordered one.

The booth arrived in a couple of days and on unpacking it I found a box the size of a small suitcase. The front opens out to make the booth part and a cable comes out of the back for power. Unlike other similar devices, the whole lot can be folded up again for easy storage and transport. The cord even retracts inside at the push of a button - a feature I played with quite a bit to start with.

Air is sucked through a blue filter at the back of the device. These filters are available for a fiver. I'll check the instructions to see how long they should last and order spares.

The photo shows the G1 Class 14 getting it's coat of pale green. The model sits on a 6 inch turntable that came with the device. After spraying for around half an hour, there was still a thinners smell but nothing like as bad as before. The air was still thin. Mind you I'll not be eshewing the facemask but this is a definite improvement.

Monday, September 27, 2010

Class 14 Diesel, in Guage 1 !

G1 Class 14What a beast. Yet another Class 14 diesel on this blog, but this time the model is in Gauge 1 which makes it a bit of a whopper. Over the buffers it measures 35cm and weighs as much as a small car.

The model is from a soon to be released etched brass kit from Mercian Models. Trevor dropped it off for me to wave the airbrush at. I escaped building duties as the guy who mastered the castings took care of this. I think I could have done it although my soldering iron might have been usurped by the gas torch for most of the work as there are some pretty chunky lumps of brass to play with.

The model is 10mm to the foot but will be produced at 1/32nd scale to suit the majority of modellers in G1. I think it might be popular as the resulting model has rugged good looks and plenty of space for the sort of motor capable of dragging dead steam engines and trains out of harms way.

What you are looking at is a test build of course. There will be more development before production. Much of the brake gear will be cast in lost wax brass rather than whitemetal. A cab interior is going to be developed, flycranks will be in milled steel and a few other little niggles will be attended to.

Mind you, even at this stage of development, I wouldn't mind one. Not sure what I'd do with it though - micro layouts in G1 are still pretty large !

Sunday, September 26, 2010

First run of the Club 500


Last weekend my Club 500 got it's first outing. Due to work pressure I couldn't stay for the race in the afternoon, but at least I could give it a test run and see how it went on the water.

The result, it goes really well. The boat is up on the plane almost immediately and top speed is impressive. I reckon the centre of gravity is pretty well sorted as there's no hint of diving in the turns. There are some problems with radio reception at the extreme edges of the lake but this could be the slightly bent aerial on my transmitter. Some adjustment of the receiver aeriel helped a bit but I definitely need to more work on this. Perhaps if I feed it through the spoiler to get more height, this will help.

Steering is good but the boat tail-slides across the water and since our lake isn't very big, the M-pattern course is going to be a real challenge. As you can see from the video, I need a lot of practise !

The skill seems to be to slow down on the chicane and only use top speed on the straights - exactly as you'd expect. Another plan might be to drop the top speed on the ESC and accept I'll be slow on the back straight but stuff everyone on the difficult bits. As it was, I was glad to be the only racer on the water.

Saturday, September 25, 2010

Brushless power

Brushless PowerSeen last weekend on the lake, a 36 inch long Aerokits RAF Rescue Launch. Nothing exciting so far but when we looked inside the motor was a brushless item and tiny.

You might expect that a tiddler like this the boat would have pootled around. Not a bit of it, the owners problem was that with the prop he originally had fitted (an X-prop, whatever that is) he couldn't use more than 2/3rds power. Even then the bow was well clear of the water.

Re-proping the boat, which for those who don't know is of reasonably heavy plywood construction, tamed things a lot and the model could then attain a greater than scale speed but not too much.

Power comes from ni-cads giving 9.6V. Two packs are fitted for ballast and length of run reasons.

Components come from Giant Cod. I reckon the motor is one of the KD 2217's which cost sensible money at just under 13 quid. It fits in a mount for a 400 size brushed motor. Speed control is a Sea King at a slightly more scary £38. The later also requires water cooling.

All this is astounding. My 46 inch Huntsman needs power and a Torpedo 850 was the preferred beast. That's £35 and produces about the same power as this thing. I reckon the time has come to have another look at this brushless thing.

Friday, September 24, 2010

Banbury Show on Sunday

At the last minute I've arranged to take Flockburgh to Banbury show on Sunday. If anyone fancies saying hello, we'll be pleased to see you.

Show details here

100 degree solder

C15 Vacuum cyclinderI've mentioned this before but here's a job I wouldn't have fancies without C&L's 100 degree solder. The vacuum cylinder have whitemetal ends joined with a nickel silver wrapper.

The later is bend around a handy pen to form the U-shape. The I tacked it into place with the solder. All this was done with a 45W iron - do it quick and the whitemetal doesn't melt. To be on the safe side I also heated the nickel.

I suppose I could seam the joins nicely but this part isn't stressed so the tacks will do. And I'm scared of pushing my luck and doing some damage.

Of course in the "good old days" the nickle would be bent, then tinned with normal solder and then the joins made with a low temperature iron and whitemetal solder. This would still work, although the tinning would have to be very thin so it didn't affect the fit of the parts, but this stuff is worth the money.

Thursday, September 23, 2010

Chassis work

C15 chassisNeeding to make progress on the C15 locomotive, I decided to get the chassis ready for paint. In 4mm scale this would mean stuffing a couple of wires through to hold the top of the brake hangers.

7mm requires a little more work, the pull rods for the handbrake need to be fitted (OK, we do this in OO too) and there is a whole load of other stuff to go on - but not until I get the wheels in place. At least this designer thinks to provide a slot for the rods to fit, no hanging in mid air and guessing the position here.

The ashpan is a bit more basic. I suppose it does the job but I'd like to have seen a little more construction. Still, it will make a superb ledge for the PCB that the pickups will be attached to.

Wednesday, September 22, 2010

Essential measuring

Wire measuringFor years I considered a micrometer or caliper a bit of a luxury. Then I found this one on a tool stall (probably Squires) for under a tenner and though, "Well it might come in handy".

How right I was. To be honest once I'd got over the initial stage of playing with it, finding out the size of everything within arms reach, the tool went back in it's box and didn't see the light of day for a while. Gradually though, I found some real uses for it - picking the right plasticard for one.

With a kit like the C15, it's pretty much essential. Lots of thicknesses of wire are supplied but if you want to find out which one to use where then you need a method of measuring them. Either that or get good at differentiating between 0.9mm and 0.7mm by eye.

Tuesday, September 21, 2010

Handy scrap etch

Step infilThe C15 floor folds up and drops into the cab easily enough. Bits of the sides fold down to support it off the footplate correctly. All the way along the sides except where it crosses the doorway, where there is an unprototypical gap.

Never mind, etched kits contain the solution and a couple of lengths of spare etch from the side of the fret were quickly soldered in place to make up the deficiency.

It's for this reason I keep some strips of metal chopped from old kits in a drawer. I know you can buy strips of metal but my eco-credentials are much stronger for doing it. And my Scottish blood won't let me throw away something that might be useful !

Monday, September 20, 2010

Splasher boxes

Splasher boxesIt was nice of the C15 locomotive designer to provide such a spacious cab for the driver and fireman to work in. Pity he then went and spoilt it by filling it up with great bog boxes over the wheels.

On the model these are a pretty simple fold up job. Although the instructions show that the cab end goes right to the bottom, they actually finish just below the top of the floor. That's not a problem although it did give me cause to wonder if I have released the correct parts from the fret. Sometimes the rectangular bits of brass all look the same.

A little fettling was required to fit the boxes snugly in the corner and not have them stick out over the cab doors. Only a few minutes with a file, and a good reason to own something bigger then a needle file, but important for the look of the model.

Sunday, September 19, 2010

First flight of the 500

Remember to charge your batteries - that's what I should have done. Instead, I plonked (sorry, carefully launched) the Club 500 boat on the pool in the garden with only the delivery charge inside them.

On the plus side this proved that everything worked, the boat sits on the water OK and I need to think about extra waterproofing to keep the wet stuff from creeping under the top.

Sadly though the only burst of top speed was for about 10 feet and then I was out of juice. It looks like this is going to be a pretty nippy boat though. She gets up on the plane almost instantly. The turning circle is pretty good too, I recon we can do a 180 degrees in about 4 feet when dead slow.

Maybe I'll enter the docking competition instead of the racing !

Saturday, September 18, 2010

Buyer beware

Clock faceAccording to the listing on eBay, this is an LNER clock. The text goes on to say:

looks as though the face may have been repainted , may have had an earlier company name, before lner ?


good condition for its age though

looks as though ?!? It's been done with a bloody brush from B&Q and paint from Dulux. The LNER script is courtesy of some rub down lettering from Smiths. Even this hasn't been exactly artfully employed. To add to the effect the "artist" scribbled the letters in place before putting the transfers on.

If we ignore the amount I paid for the timepiece, and the lack of responses to my e-mails asking for proof of provenance and my doubts about the real age of this thing (Update: now have a response although it hasn't helped), I have a challenge on. While I might be good at many modelling tasks, painting letters isn't one of them. My efforts aren't likely to be any better than those I already have. Anyone know a signwriter ?

Friday, September 17, 2010

Wrapping chairs

Hellingly seatsIt appears that I finally got something right !

On the Hellingly Hospital Railway, I have modelled the delivery of a set of boardroom chairs. In truth the scene was influenced by the purchase of a set of Springside whitemetal furniture rather than a deliberate attempt to recreate the prototype but that doesn't matter.

I decided that it would be unlikely that fine furniture would travel in a van without some sort of protection so the castings were wrapped in a bit of toilet paper and painted to represent hessian. The man peeking underneath makes the cameo for me and visitors to exhibitions seem to like it.

Wrapped chairAnyway, it seems that the people at the GWR museum thought the same. On display in Steam is some furniture, and it's all wrapped up. Admittedly they have used brown paper but I suspect this might have been expediencey rather than absolute fidelity, however I assume they were working with some reliable information so we are both right.

Thursday, September 16, 2010

The prototype isn't very well built, is it ?

Dean Goods rivetsBeing stuck next to a Dean Goods locomotive for most of Saturday gave me the opportunity to properly examine the beast. And I was not impressed. I mean how badly built are these things ? Was every day at the works Friday afternoon ?

Take, for example, the rivets running along the footplate. Are they in a nice straight line like we endeavour to achieve on our models ?

Are they heck. Look at them, wobbling all over the place. I appreciate that this is a Great Western, or Great Wobbly as many people call it, locomotive, but you think someone in Swindon works would have owned a ruler.

Obviously not.

Dean Goods frontMoving to the front, we find the hole in the smoke box for the sandbox lever.

This could have been a nice neat hole but no, what we get is a gap. If I did this on a kit people would assume that I'd left a bit out, or that I'd cut the metal wrong.

At the very front there is a flap which doesn't shut properly either.

Dean Goods reversing leverFinally at the firebox end there is the hole for the reversing lever to exit. And yet again we just get a gap. Now this is reminiscent of some of my less than brilliant model making. I've often wondered exactly how this bit of a locomotive looks. In my ignorance I'd assumed something nicely squared up.

Yet what I find is just a gap. In the photo the flash actually makes it look better than it is. You can represent this on a model by not soldering the corner and then waggling a sharp knife to open the hole up enough for the operating lever to poke out of.

All I can say is, I am very disappointed. We modellers go to great lengths to produce nice, neat work and yet again we are let down by the real thing.It is just not good enough I say.

Wednesday, September 15, 2010

Centre of gravity

Battery tray 1If I want my Club 500 racing model boat to run well, it seems that I need to pay attention and not rush the construction. We I doing this a few years ago I could have enlisted the help of a colleague, one Richard Newey who could have asked his son Adrian for some advice. As it is I have to work this stuff out myself.

Anyway, at my multi-million dollar research facility I tried the battery tray in the boat. There seemed to be an inordinate amount of clearance above the prop shaft. Since the battery is the heaviest component this would raise the centre of gravity and make the vessel less stable than it needs to be.

You could argue that a lack of stability is a good this as it makes the boat agile. Battery tray 2The Eurofighter is a hopeless lump of metal without a bucket load of computers as it is very unstable but that aids it's dogfighting abilities. I don't think I want an unstable boat though. In my experience, smoothness makes the difference between winning and losing races. Overall speed matters but if you keep your turns tidy then you won't do badly. Tortoise and Hare etc.

Anyway, I lopped about 12mm off the bottom of the legs and stuck it in the hull so the bottom just clears the shaft. Running some epoxy around the bottom has fixed it firmly. Let's hope it makes a difference.

Tuesday, September 14, 2010

Swindon Railway Festival 2010

Dean Goods TableOff I went on Saturday, avoiding the magic roundabout but encountering just about every other one in the world, to Swindon. I'd "volunteered" to help Trevor man the Mercian Model stand at the Swindon Railway Festival.

The show takes place inside the old locomotive works which now house an "Outlet Store", whatever that is, and a steam railway museum.*

The museum is fantastic, or at least the little I saw is. Lots of superb displays including lifelike mannequins that everyone found a bit creepy. Our stand was opposite a signal box and I kept turning round thinking someone was looking my way to realise the "someone" was made of whatever fake people are made from.

We backs on to a Dean Good locomotive which was handy as Mercian will be producing a kit of this soon(ish). New on display is a Gauge 1 Class 14 which will be appearing on this blog soon when I get to paint it. The model isn't just a blow up of the 4mm version but a new etch and obviously new castings. The result looks fabulous. It's a handsome model of a handsome locomotive.

Elsewhere in the show there were some traders and some layouts. That's about all I can say as I didn't really get to have a proper look. It's not that the show was busy, it was but not so you couldn't move around, it's just that I spent a lot of time chatting to people. Sorry if you were hoping for a full report.

Erm, if it helps, the country style burgers were very nice and I ate mine between 4 traction engines. Which I didn't photograph because I was holding food and digital cameras and ketchup aren't a good mix.

Danger of deathI did take a good look at the land speed record holding steam car. It's very long. And sleek. And a bit good really. You could have your photo taken sat in the cockpit if you paid them some money. Or not if you were the Mayor who I'm sure got in for free. There is the most fantastic sign on the back though. I want one !

Maybe I need to go back for this show. Much more my sort of thing !

*A more fashionable friend explains to me that an Outlet Store is something to do with selling fashionable clothes to people. You will be suprised to learnt  that there appeared to be no crossover between this event and these stores.

Monday, September 13, 2010

Killin Pug part 2 in Hornby Magazine

Back to the Killin Pug for my Parkers Guide in Octobers Hornby Magazine. Last time I had built the body and produced a nice looking little model locomotive that sadly had more in common with a Formula One car than a branch line operator.

This time I've replaced the Hornby chassis with one from a Branchlines kit. The result looks a lot better and more in keeping with the rest of my locomotive fleet. It runs a whole lot slower too.

In other news, there is a new feature in the magazine - The Clinic.

In this, modellers questions are answered by "experts". At the top of the page are a slightly sinister photo of editor Mike Wild and a bizarre cherubic one of me, grimacing. I think it originates from a picture taken at Hornby Live in Hartlepool. Obviously I was trying to pretend I was enjoying chatting to whoever it was at the time. It's a dangerous thing being photographed when you aren't expecting it. However there are worse examples out there, or maybe I just look stupid in photos.

Sunday, September 12, 2010

Fashion notes

Old modellersBrowsing some old magazines, I found this wonderful scene from 1941. Swiss modellers looking at a Royal Scot they were building.

What a wonderful scene. The guys would visit their club every week dressed in suits. The chap in the front is obviously some sort of beatnik with his jumper over a shirt. Everyone else sports a jacket and tie.

How different from today's modellers dressed nearly uniformly in jeans. Personally I'm not complaining but in 60 years, even railway modellers fashion choices have changed !

Saturday, September 11, 2010

Layout idea - Mini Crich

Mini Crich

Standing on the over bridge at the Tramway Museum, Crich last weekend, I had an idea for a layout.

Model tramways suffer from the problem that operation can be little more than dull. Unless you model one of those rare systems (in the UK anyway) with a bit of freight traffic then every movement involves a single unit car moving between one point and the next. Building a model tramway would be fun as there is loads of interesting detail work to be carried out for effective street scenes, but I wouldn't want to be stuck behind it for a weekend at a show.

The other problem is that although large tramways might have a variety of cars, it's never going to be a huge range. What you really want to do is run trams from around the country. That way you get a variety of liveries. What better a prototype than an museum ?

This doesn't solve the operation problem but if we can find a way of automating this then it's just a case of keeping an eye on things and drinking tea. I also would prefer to keep the stopping and starting off stage or some clever electronics to provide the trams with simulated inertia will be needed. Admittedly tramway modellers don't normally seem to worry about this nicety preferring the on/off control system, but I want to go better.

Finally, from my efforts with the Hellingly layout, pantographs only please, no trolley poles.

While a bit bored at work today (my computer was in for repair) I doodled this little plan, sort of based on the layout in a box. The only running happens along the back lines. Stopping and starting happens in the fiddle yards. Sorry about the lines but the only paper to hand was my notepad.

On the front I suggest that you could do a nice little event, such as the one I was attending. It was a VW car show and in the yard were lines of nice clean cars. In front of the tram sheds were trade stands. This stops all movement in the yard of course but does provide an interesting focal point. To make things even easier, the trams in the shed can be static diecast models. I reckon only 2 actual working models will be needed although a couple more for spares would be a good idea.

Of course the plan isn't scale and I have no time to build the model, but if you fancy a go, let me know how you get on.

More of my photos of the "Beetle Drive" event.

VW lineup

Friday, September 10, 2010

Motor damping

Motor mountThe motor in the 500 should be glued down but I didn't fancy just sitting it on the plastic mounting. Damping out as many vibrations as possible. That's what they do in high performance motor cars so I suppose it's what I ought to do in my racing boat.

The damping is provided by a sheet of rubber bought from the local bike shop for a couple of quid. I could do three boats with the amount I bought so it's a good deal. Ask for giant puncture repair strip if you fancy obtaining the same stuff.

The rubber is self adhesive on one side and ribbed (stop sniggering at the back) on the other. That ought to stop the motor rotating around it's axis. Retaining the motor is now down to a few fat elastic bands which hook over those wire handles. I better follow a postman to see if I can replenish my supply.

Thursday, September 09, 2010

Club 500 hull

Hull MarkingThe first job on the Club 500 boat is to trim the top and bottom of the hull and then join them together. According to the instructions I have to trim the lower part between 3 and 15mm from the top. For the life of me I couldn't work out how to mark this accurately, there are no straight lines to work with, the lump of plastic is half a metre long and slippery.

In the end after half an hours messing around with masking tape, I gave in. Looking at the top, the overlap was huge so maybe the bottom didn't need to be either hugely accurate or particularly neat. Looking at the two with the aid of a nice big mug of tea, it seemed that if the top was parallel to a bulge that runs around the hull (there will be a technical term to describe it but I don't know what it is) then that should work OK.

The only pen I could find that would work on the surface plastic film was a chisel tip permanent marker. A bit of digging around on the bench turned up a screwdriver, which when taped to the pen gave me a suitable separation. The line around the hull was wobbly but with some scissors I managed to cut along it reasonable straight.

Hull jointTo fix the upper and lower sections the instructions suggest Araldite. I've been reading the reviews reproduced on the Model Slipway website and one of these helpfully suggests that epoxy glue will result in a firm but brittle ring. This makes sense to me and I can see why it's a bad idea - one racing "incident" and the joint will develop cracks that will let in water. We have a similar problem with the Slingshots which can leak around this seam after a while.

So I took the two parts into the garage, turned the unit on it's back and filled the gap with shower sealant left over from some DIY. This should remain flexible forever and keep the water out. It's a bit like icing a cake with something  smelly but the join seems good and strong.

Wednesday, September 08, 2010

Flexible weight

FlexiweightYou are looking at the holy grail. Well, sort of anyway. I've have known for years that fishermen have access to lead free weights intended to replace the traditional shot. This sounds like just the thing for the inside of locomotive boilers, wagons and other places where I need the vehicle to be heavier. Even model boats can benefit from this occasionally.

Needless to say I have asked in fishing shops and they just look at me like I'm stupid. This has been going on for a long while. To be honest I'd given up on the stuff. Then at a car boot sale of all places I find a box of the stuff at 20p a packet. Result !

The weight is a sort of heavy putty and weighs around 20 grammes. It's very flexible and sticky. I've not tried eating it but according to the packet I won't die horribly, or at least not if I'm a swan or other form of bird life. Mind you they can eat some pretty horrible stuff and not peg out so perhaps that isn't a guide.

Needless to say a quick Google is useless. Evode Ltd is now part of the Bostick group and there is still no sign of the stuff anywhere. Looks like I need a trip back to the boot sale. If I get enough, maybe I can make my fortune flogging it to railway modellers !

Tuesday, September 07, 2010

Anti coal bars

Cab backOn the C15 locomotive, it's time for a job I dislike, fitting the coal bars over the rear spectacle plates.

At least this is a 7mm scale model so the bits of wire are a reasonable size to play with rather than the fiddly things you get in 4mm. The wire is even a nice 0.45mm so holdable with pliers.

First up the etched holes had to be opened out with a drill. I used 0.5mm to allow a bit of wiggle room. Then discovered this wasn't enough and twiddled a small broach in them as well.

Each wire has to be bent individually. I tend to do three at a time and then solder them in place from the inside of the cab. Once the window is complete the solder is heated again and I prod them around until they are equally spaced and something like parallel. If you are doing this, keep the solder quantities low of it will leak out and blob around the visible side of the wires. Removal with a small file is possible but there are better ways to spend your time.

Monday, September 06, 2010

Club 500

Club 500 bitsThe project I'm engaged in at work has stalled. There is a lot to do and I can do precisely bugger all of it while I wait for other people to do stuff. Frustrating and annoying. It's not like I can even randomly surf the web to waste time thanks to our draconian IT department.

So I'm having the day off. It's either that or go around murdering people.

And on that day off, I will eshew the jobs I should be doing and having a go at a model that's been on the bench for a few weeks - A club 500 racing boat.

For several years our boat club has raced Slingshots, but these are no longer made and the spares will run out eventually yet the members have developed an appetite for competitive sailing. Well, charging around in circles and occasionally passing each other when not parking the boat in a muddy bank.

The new class is to be the nationally recognised Club 500. By placing bulk orders with Model Slipway we have managed to get the price down for a bargain 35 quid a kit. Everything in the photo is included. All I have to do is stick it together, add radio, speed control and a servo. First race is in a couple of weeks. Not time enough to finish the model but since two evenings are enough to build it to running condition then I reckon a day should get me to the start line.

The model is formed from thermo moulded plastic. There's quite a lot of trimming to do but I've seen the results of other members efforts and they look great.

Sunday, September 05, 2010

Bat boat

Bat BoatWhat a fantastic evil looking boat I thought when I saw this in the corner of our model boat clubroom. It had been left over from a sale of "proper" boats. It seems that only I saw the potential.

Taking the top off, I discover the this is a model by Tyco, and a quick web search revealed it to be a Bat boat.

So, after donating a fiver to club funds I find myself with another project I don't really need but can't resist. At a guess I'm thinking that everyone who reads this will understand where I'm coming from.

My prize turns out to be less than perfect. There is no radio transmitter and experiments with another 27mhz one make me inclined to think that the electronics in the boat are dead. I unscrewed a few bits but couldn't see anything obvious. What I did find was a hull filled with blue polystyrene and a small block of cement in the front about the size of two small matchboxes.

Anyway, one day this boat will ride the waves again. Dunno when and I don't even quite know how. My suspicion is that the outboard style motor will be rubbish, these things tend to tootle along at a speed a stupid child can't do any damage with. What it needs is oomph which presumably means something rather better in the way of a motor. Which means I have to rebuild the inside and turn the outboard into a rudder. This means I have to link a servo to it and bin the current electrics but then I'd have had to do that anyway as we'll want a proper radio in there.

Dangerous stuff this.

Saturday, September 04, 2010

Evesham Vale Light Railway

St EgwinGarden centres are horrible. Once upon a time they were places where people bought plants. Now they have expanded into mini department stores selling some stuff you want and other stuff that shouldn't really be in the same building as plant life. Evesham garden centre is a case in point. I get the idea of bird feeding equipment and even books, although only those on gardening the others are superfluous. A lot of the clothes aren't suitable for weeding and as for home wares ? Garden Centres I say know your job and stick to it please.

Anyway, on the same "shopping village" there are many other attractions including somewhere that sells Guinness polo shirts and a shop for horrible looking shoes. On the edge though is a gem. A delight that makes up for all the other horrors. Evesham Vale Light Railway.

The line is a 15 inch gauge railway that runs in and out and back configuration. There are excellent views, an intermediate station for picnicers and best of all, real live steam engines. Two of them when I visited. Proper engines too, not replicas of mainline ones. The coaches look realistically miniature railway too. I'm no expert but I think they look similar to Arthur Haywood designs. They all have a roof which shows sensible thinking on behalf of the designers.

The TunnelThe run doesn't take that long but for a couple of quid you can't complain. You do get to see the locomotives spun round on a turntable and who doesn't want to see that ?

More photos on Flickr.

EVLR official website.

Friday, September 03, 2010

Amphibious vehcile

Amphibious craft bitsI don't go to university. There are lots of reasons for this but the most important one is that I was too thick to get any A levels and you don't get to be in the papers jumping for joy if your results show that all you have to show for two years work is an E in General Studies. Well, that and you have to be a girl who attends a posh school and wears a short skirt, but mostly you have to get some results.

Still, it's not too late. I found this handy kit that claims to be from Cambridge University. I assume that this means that if I can put it together I can claim to have some sort of degree.

The kit is for an amphibious vehicle. From the photo on the box I took this to be a hovercraft but on opening it I see that it's more of an airboat with wheels. It's also not that similar in some other respects - the fan and protective cage are a bit less pretty than the picture. Never mind. I can't take it back as the car boot sale has closed for the day.

The main body of the vehicle is a polystyrene block into which all the plastic parts are assembled. A small packet of screws is provided along with instructions which suggest some parts should be explained by a competent adult. Not having one of those handy I decided to carry on and try not to chop my fingers off with the propeller blades.

Handily, the electrics come pre-wire. Not just soldered but with each joint covered with glue from a hot glue gun. I think this is to waterproof them but perhaps the manufacturers are worried about the joints breaking too. The motor slots into a bit of plastic, the switch screws in the side and then another cover screws over this. It makes sense to test the thing first to work out which way around the switch should go as the plastic casing is marked on and off and we wouldn't want to get these the wrong way around would we ?

Wit this done, the whole thing pushes into the polystyrene along with the battery box. The blue blade protection bends over the top to save little pinkies from damage.

Underneath the wheels are slotted in place. It's a tricycle undercarriage with some steering on the front. No screws required for this stuff just a firm shove to clip the rear axle retaining plate in place.

Amphibious craftAnd that's it. 10 minutes work and the model is ready for testing. On the land it's a bit rubbish. A vinyl floor proves too much for it but on a sheet of MDF we have reasonably good movement. Afloat (well in a basin) things look a lot better and the craft nips along. I look forward to getting it out on the lake some time. It might even get a decent set of batteries which might pep up the performance even more.

So, a successful job. This university lark isn't so hard after all. I think I might go and update my CV.

Thursday, September 02, 2010

Front wings

Smokebox frontScottish steam engines have always had very elegant "faces". For some reason up in the far north of Great Britain, people like to see wings either side of the smokebox. Combined with frame extensions above the footplate and the result is very attractive.

The kit requires only three parts to do this - 2 frame extensions and an extra smokebox front. In 7mm scale this means some pretty big lumps of brass but apart from snipping off a couple of tabs which didn't align as well as I would like with the slots, all go together well.

For fixing I blobbed solder in place using the electric iron. Then loads of flux was slopped around and the solder heated with the small blowtorch. This blows the molten metal along the joint leaving a neat result. I suspect things could be achieved without gas power but it does make the job a lot easier. If the solder is molten all along the joint, capillary action will keep things tidy, as long as you've not piled on tons of the stuff anyway.

Around the top of the smokebox, I just smeared solder between the false front and the existing one with the electric iron. The excess was filed off and polished with some emery paper and a fibreglass stick. As I always tell people, it's not great skill building the model a lot of the time, it's being able to clean up and hide the untidy stuff that makes for a good modeller !

Wednesday, September 01, 2010

Nut fitting

Nut fittingI've been ploughing on with the C15 locomotive and just realised that I'd managed to forget to fit the nuts that grab the bolts to hold the body and chassis together.

This isn't a problem at the back end. The hole in the footplate is clearly accessible so a quick smear of flux and solder were enough to sort this out. I even managed to line up the hole in the brass and the centre of the nut first time.

At the front though - who put the boiler in the way ?

Anyway, I tried to hold the nut in place with tweezers and that didn't work. Then I tried a clip and that didn't work either.

Finally I took a risk. The bolt was liberally coated with permanent marker and then some oil. It was screwed into the nut and pulled down. I went in quickly with a big soldering iron and blobbed solder around it. And it worked. The result isn't a neat joint but the nut is secure and best of all the bolt unscrews. If I'd soldered it in I'd have been in real trouble !