 The first job on the Club 500 boat is to trim the top and bottom of the hull and then join them together. According to the instructions I have to trim the lower part between 3 and 15mm from the top. For the life of me I couldn't work out how to mark this accurately, there are no straight lines to work with, the lump of plastic is half a metre long and slippery.
In the end after half an hours messing around with masking tape, I gave in. Looking at the top, the overlap was huge so maybe the bottom didn't need to be either hugely accurate or particularly neat. Looking at the two with the aid of a nice big mug of tea, it seemed that if the top was parallel to a bulge that runs around the hull (there will be a technical term to describe it but I don't know what it is) then that should work OK.
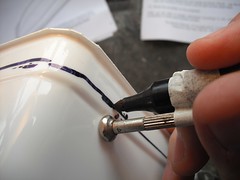
The only pen I could find that would work on the surface plastic film was a chisel tip permanent marker. A bit of digging around on the bench turned up a screwdriver, which when taped to the pen gave me a suitable separation. The line around the hull was wobbly but with some scissors I managed to cut along it reasonable straight.
 To fix the upper and lower sections the instructions suggest Araldite. I've been reading the reviews reproduced on the Model Slipway website and one of these helpfully suggests that epoxy glue will result in a firm but brittle ring. This makes sense to me and I can see why it's a bad idea - one racing "incident" and the joint will develop cracks that will let in water. We have a similar problem with the Slingshots which can leak around this seam after a while.
So I took the two parts into the garage, turned the unit on it's back and filled the gap with shower sealant left over from some DIY. This should remain flexible forever and keep the water out. It's a bit like icing a cake with something smelly but the join seems good and strong.
No comments:
Post a Comment