Sunday, September 30, 2012

Halfords are getting on my nerves


Now we have been forced to watch digital television, for many men, this means seeing quite a lot of Channel 12 - Dave. It's not as good as Ceefax but now we have no choice.

Dave have brilliantly worked out that if they buy every episode of Top Gear, it fills the schedule with stuff that people will watch no matter how far into the programme they arrive. Since every time I flick through the channels, every one of them seems to be showing adverts (it's not just me, how do they do it ?), it's as good a place to stop as any.

Dave's motoring programmes are sponsored by Halfords. Not a problem you might think except that the latest little adverts at the sides of the commerical break are taking the mickey out of people who upload videos to YouTube showing how to perform simple tasks on your car. Changing a light bulb seems to be thier main target.

The films show the people making these helpful videos to be bumbling ameatuers. Everything goes wrong.

The message is: Don't learn how to do basic tasks on your car, take it to Halfords and pay us to do them.

Which, of course, I think is wrong. Motorists should know how to do the basic stuff. Changing a cam belt, fair enough, leave it to a mechanic who knows what he is doing. Changing a bulb, you ought to be able to do it yourself. Bulbs fail at places other than the car park of your local shopping centre and technically, you shouldn't be driving without a full compliment of them. Even if you don't think the Highway Code applys to you, remember that it's an easy way for a bored copper to get some scores on the board.

Also, you reply on your car. Why wouldn't you want to have an idea of some of the basics ?

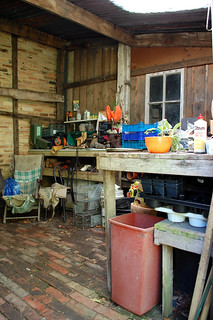
Anyway, I'm sure Halfords techies can change a bulb and all the other stuff they are supposed to do. Well, apart from the time we took a car in and watched the bill spiral as they replaced the radiator and stuff. A Grease monkey mechanic would have probably fixed the thing. Always pick a mechanic with a scruffy workshop. Ability is inversly proportional to cleanliness in my experience.

Also, if I'd bought my battery from Halfords, the thing would have been rattling around in the box as the official one is too small in my opinion. Read more.

Anyway, Halfords, tell your marketing monkeys to stop taking the p**s out of people trying to help others. You are a fine and useful store to have around so there is no need for it.

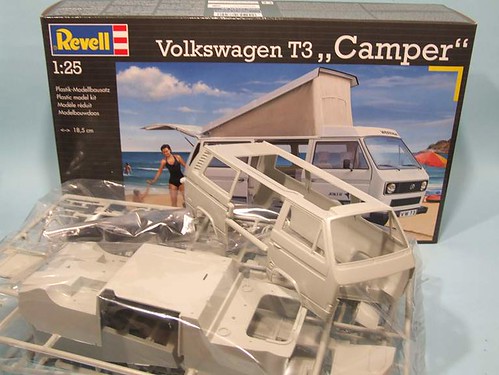
Note: I couldn't find any of hte current films on the web so I linked to an old version on YouTube. I chose it because there is a VeeDub van in it. Amoung other things.

Saturday, September 29, 2012

Model Railway Show Programme - 1987

St Paul's Steam Festival 1987 Programme

Digging through a folder of old paperwork and stuff last night, I found this gem. A programme from the St Paul's Church Birmingham Steam Festival held on May 10th 1987.

The show took place in central Brum back in the days when the Birmingham Science Museum was in it's old location of Newhall Street. All the engines in the museum were steamed and various steam vehicles were roaming around the streets outside the building. As part of the event, the nearby St Paul's church organised a model railway exhibition.

The show is particularly special to me as it was the first show we were invited to with a layout. Previous appearances all related to the model railway club my father and I belonged to where the fact the model was OK, we were members and would turn up for free mattered more.

WistowOur model was The Cawood, Wistow & Selby light railway. As a first exhibition layout, it wasn't too bad. Once the horrible, dayglo Jarvis flock powder was replaced with nice Woodland Scenics green stuff and a couple of the fields planted up with plumbers hemp corn, it wasn't bad at all. Bits of it still exist in the shed because we can't bear to throw them away.

As I recall, the day started with a nightmare drive involving getting lost in the city centre. The layout worked sort of OK but the highlight was Mr Z gauge packing his models away at the end of the event. Each item went back into its own individual box. As he never tired of telling people during the day, he had the largest collection in the country, which meant he was still boxing stock and getting annoyed with his families attempts to help, long after we had packed an departed.

No more invitations were forthcoming from the weekend and eventually we took the lessons learned from this layout and built Melbridge Dock. Which, since it's still on the circuit, we must have done OK with.

Friday, September 28, 2012

How not to buy a Beetle

BeelteKiteBay is bad sometimes. I love the Volkswagen Beetle. I've even got one in the garage awaiting restoration. I also love making things. So when I spotted a Meccano Beetle up for auction and cheap, I bid and won it.

After a few days, the box arrived and I settled down with a cup of tea and bar of chocolate, for a happy evening making it up.

Now the listing did say:

On offer is my son's unused but opened Maccano Beetle car set.

He opened the box, realised it didn't involve sitting in front of the TV with a game controller in his hand so lost interest straight away.

As a result I have no idea how many little bolts and nuts may be missimg, (if any)
There are a shed load of them in the boxes and everything appears to be there but i'm not 100%

some of the stuff is still in unopened bags in the box.

I really should have noted the Comic Sans, the font of doom. Once I started building, I realised that there were several parts missing. A seat for instance. Then the running boards. And some tabs that would hold part of the "bonnet".

Basically, I bought a pup. I can't complain, after all the listing was accurate.

The other thing I discovered was that I don't really like Meccano. Doing up all those nuts and bolts seemed to be fiddly and take ages. There's probably an hours work in the bits you see in the photo.

Perhaps I need to be developing my own model. Maybe that would be a lot more interesting. What I was doing wasn't much more than making a metal version of the wooden Beetle I constructed last year. Even if I'd finished it, the result would have been a toy car that was big enough to be a nuisance to store and yet I wouldn't have wanted to reduce it to component parts.

Mind you, it is frustrating not to finish it.

Never mind. For the tiny amount I paid, I've got a pile of useful Meccano bits for projects. I know I've wanted the odd bracket in the past and now I have a supply.

Thursday, September 27, 2012

Scratchbuilding a lifeboat box

Lifeboat Box under constructionSome model boat fittings can be bought and some are best scratchbuilt. Some probably would be bought but if you forget when placing an order, you end up scratchbuilding them.

If there are any model boat shops out there that carry a full range of fittings, they are few and far between. The nearest one to me is in Leicester, which is too far for a quick visit.

That's why I had to build the lifeboat box for the front of the my Pilot Boat the hard way.

To be fair, it's not that hard. The box is made form 2mm thick plasticard. Cut the funny shaped ends and then a long strip of plastic the length of the desired item. Slice this up to run around the ends. Size is 45mm long, 20mm high and 35mm wide. That looks about right on the model.

Lifeboat BoxI did drill some holes in the bottom to let solvent fumes out.

The basic box was left to harden overnight before being filed to neaten up the joins. Then a strip of the same plastic 3mm wide runs around the edge and some more over the top and bottom. I think these are the joins between top and bottom along with the retaining straps. To be honest, I was modelling a model at this point. Bad. Bad. Bad.

Still, it looks OK to me and my version is lighter than the resin version I'd probably have bought so that's a good thing.

Wednesday, September 26, 2012

Book Review: The Wonder Book of Trains by Paul Atterbury


Christmas is coming and the presents are arriving in the shops. Paul Atterbury has produced many books that the railway enthusiast might like to find under the tree. Now he has served up one for the enthusiast's grandson.

In the 1950's and 60's, when trainspotting was fashionable, many companies produced books for young boys that showed railways to be wondrous things. Accurate paintings were the order of the day rather than photographs and the subjects were not restricted to the British Isles.

This book emulates these even down to the type of paper used within the covers. In fact the only thing that differentiates it from an old volume is that the hardback cover is somewhat better than the pasteboard normally used.

Inside, there are 120 pages profusely illustrated with colour paintings that I assume date back to contemporary publications. A few black and white photos do make it on to the pages as well.

This isn't just a picture book though, each chapter covers a topic such as building trains, mail trains, guards and signals. The text is written at a level suitable for youngsters and seems to be pretty accurate. OK, it's not an exhaustive primer of any subject but then that's not the point. When you are under ten, you need enthusiasm, not lots of detail.

One slight problem I did spot was a photo captioned “One of Britian's earliest, most distinctive and still surviving narrow gauge lines is the Ffestiniog Railway” is showing the very distinctive and still surviving Vale of Rheidol.

Apart from this, the pictures are wonderful. The Khedive's personal train or the Tay Bridge disaster, the later shown to child-friendly dramatic effect, certainly grab the eye. Many show a world that no longer exists but we try to recreate in miniature. Perhaps the book is just the thing to explain to the Playstation generation, what we are trying to do !

Tuesday, September 25, 2012

How do you make vents ?

Boat VentsNo, not ranting, air vent on the Pilot Boat.

I suppose these are pretty easy in modelling terms - you buy something suitable, drill a hole in the superstructure and glue them in place.

At the front we have mushroom vents and behind, the other sort. According to the model on the stand when I bought the kit, they should face backward. Presumably if forward facing, at speed the air inflow would inflate the cabin !

What I don't understand is how anyone makes a master for these. The stalk is narrower than the gaping mouth. They have to be very hollow too - you can't supply them blind and tell the modeller to drill them out because no known drill could get narrower as the hole turns to head down the shaft.

And before some says "they come out of a mould", yes I know that, but how would you make one by hand ?

Monday, September 24, 2012

Ballasting garden railway track

Garden Railway Track

Winter is approaching and so it's time to do a little work on the garden railway to ensure it survives the poor weather - at least in a state where it won't take too much effort to get things running again in the spring.

This year hasn't been kind to outdoor railway fans. While we model boaters might have appreciated all the rain filling up our sailing pool, I'm not playing trains in the wet. Therefore the railway has seen very infrequent trains during the year and even less maintenance. To be fair, the LGB track has stood up well to being ignored but the ballast it sits on has been less impressive.

I spent a lot of time looking at ballasting options when we built this line and liked none of them. Brought up on indoor lines, I don't want to spend hours getting the railway ready before playing trains. In desperation, I did what we do indoors - fine gravel held in place with  watered down PVA.

In theory this shouldn't work. PVA, especially the craft stuff, isn't intended for outdoor use and even the stuff that is, should live between two bits of wood, not in gravel. You know what though ? It actually works pretty well. The track itself is still, after 2 years, firmly held in most places. The shoulder around the edges has suffered a bit but that's probably because the glue didn't concentrate in this area.

Anyway, I've re-packed the ballast and given it another dose of the glue. I didn't find getting a smooth mix difficult and ended up with some pure PVA blobs in places. Then I realised everyone was out and there was an electric hand mixer hanging up in the kitchen. A quick buzz with this and my mix was perfect. The glue washes off easily enough, after all, it's a weak water-soluble liquid, so all is well.

After 24 hours, the gravel seems to be pretty solid. I suspect another session in the spring will be required but hopefully this will be cosmetic and take little time. For the moment, at least the line looks nice from the warmth of the house.

Sunday, September 23, 2012

A little bit more on 3D printing

This week, 3D printing popped onto my radar again.

First up we have Sad little Keanu Reeves.

From the website, it looks like he is a pretty realistic model figure. The important bit is that he's printed in colour. Realistic colour. The sort of colour you would normally have to apply with a brush.

It's not quite the future - Keanu is "printed" in sandstone rather than plastic. According to the description he's pretty heavy because of this and very fragile. On the other hand, mini Keanu is a less wooden actor than the real thing.

Elsewhere, over at The Register, Simon Rockman and Gary Sheinwald ask "How hard is 3D printing ?" by running through the process to produce a simple logo. If you want to know more, I recommend a read as they talk about the technicalities of using a simple machine. While most of us will send stuff to a bureau, one day we might all have a replicator in the corner of the workshop.

Saturday, September 22, 2012

Pilot boat mast

Boat MastTime to crack a job that I've been putting off for a while - the mast sticking out of the Pilot Boat roof.

As far as the kit instructions are concerned, it doesn't exist. No mention is made and the builder is left to his or her own devices to make something up. I spent a lot of time on the interweb trying to find a photo that would give me an idea. All I discovered was that all such vessels had a mast but there was no common features I could copy.

Looking at the display model and my collected photos, they all had aerials sticking out of the top and some navigation lights. Not much help really. I didn't even have a set of dimensions to work with.

All I could do is root around my tube stocks and find something that looked about right in brass. For the base, I used plastic tube drilled out so the brass was a tight, sliding fit. A baseplate with supports was knocked up in plastic.

The main structure is soldered up from bits of 1mm wire. Three aerials appears to be enough. A cross piece for... well all boat masts seem to have one although I'm not sure why.

It looks OK to me but then I know nothing. Navigation lights and a radar reflector thingy will be added in due course. At least I can move on to something else now.

Friday, September 21, 2012

Noch and Prieser stocking fillers

Noch and Prieser bits

To finish the week, I have a few little bits from Noch and Prieser.

Starting with the biggest box, some laser-cut strawberries for the small holding or allotment. 48 plants in the finest cardboard, pre painted and just needing releasing from the sheet to make ready to pop in the ground. This is another item on the list of things I've meant to have a go at, and now I will. They require a more serious project to be part of but as soon as I have an opportunity, I'll let you know how I get on.

Laser cut Ho scale strawberries via Idealo

Prieser ArtistWe also have some figures, two boxes of which can wait until more appropriate points in the year - I think you can guess which these are !

I have to mention the Landscape Painter from Prieser though. For an interestingly posed model, supplied pre-painted and ready to use, the price compare favourably to buying a similar model in unpainted whitemetal from a specialist supplier.

I suppose you could be picky and say that it's fine if your landscape matches the painting he's working on, but I'm sure pedants could easily replace the canvas with a photo, perhaps run through a watercolour filter, of their layout. Or just place him with the back of the easel facing the audience.

Preiser Landscape painter via Idealo


Thursday, September 20, 2012

Revell Volkswagen T3 Camper

Revell T3

OK, so the original idea was that I would buy some model railways, but once I started digging, another possibility opened up - a model VeeDub.

Long term readers of this blog will remember my unsuccessful Dampervan project based on the Top Gear amphibious Volkswagen T25 camper. The Revell kit I used was lovely and I'd had it in mind to revisit it and produce a perfectly stock model. Well, this is still the plan although Revell changing the box artwork did throw me a bit and I didn't realise what I'd done until I got the model home.

Anyway, in the box are 80 components including the rather good one-piece bodyshell. The side and rear doors can be modelled open as can the poptop roof. I haven't decided which way to go with that yet. Plastic kit modellers tend to have every hatch gaping but I think a more normal closed look might be better. It would certainly be easier to store ! At the back, a detailed engine is included.

Inside the model is a Westafalia camper interior. Quite a modern one if the box-illustration is anything to go by (I didn't use any of this in my previous attempt so I don't know) which is good because Westy plaid seat covers are a nightmare tartan mix of olive greens and oranges.

All this produces a 1:25 model 18.5cm long.

Incidentally, for non VW nuts, T2, as per the box and T25 as per me, are the same vehicle. T25 was the UK nomenclature for the third shape VW van.

Revell Volkswagen T3 "Camper" via Idealo

Wednesday, September 19, 2012

Faller River Cargo Boat

Faller Barge kit
 
In the United Kingdom, most people tend to think of river transport in terms of narrow boats. Abroad, large barges still ply their trade on many watercourses which is why Faller produce this kit for a Dutch Barge.

The model can be built in two lengths, the longest being 36cm. 102 parts, mostly moulded in suitable coloured plastic should make for speedy assembly.

You might not think a foreign barge is what your model railway needs but plenty of people would disagree. I'm pretty certain that Chris Nevard has used something similar on one of his layouts, although needless to say I can't find a photo to back this up at the moment.

Not to worry. A quick perusal of "Britian's canal and river craft" throws up a number of UK possibilities. Both the Aire and Calder Navigation and Bridgewater Canal saw craft that looked just like this. In fact I'd be reasonably happy to build the model straight out of the box and use it this way.

With a little more imagination, the kit could be the basis for a decent live-aboard. Dutch barges are very popular in this respect - the width makes the insides more akin to a real house rather than the corridor living a narrow boat forces on its occupants. While that broad beam reduces the number of waterways open to you, at least being able to lover the roof and windows of the wheelhouse means bridges hold no fears.

Faller selection via Idealo
 

Tuesday, September 18, 2012

Faller Children's Merry-Go_round


Faller Roundabout kit

OK, it's big kid time now. I know I'm not alone in looking at the various continental manufacturers range of working accessories and thinking, "That would be fun". On Sunday, I said there was a huge range of goodies that I wasn't aware of and simply drilling through the Faller selection pretty quickly made me decide to have a go at this kit.

The model is a fairground merry-go-round for children. The box is stuffed full of plastic mouldings. According to the wrapper there are 157 pieces in 10 colours, a drive unit (motor) and sheet of stickers for decoration.

You can probably work out most of the details from the photo. The motor/gearbox unit is a single pre-assembled item (the yellow cylinder by the silver top) that apparently drops into place with everything to rotate sitting on top of it.

The riders will sit on or in many different types of small vehicle including cars, boat, fire engine, horses and a steam engine. Most of the parts, and the instructions, cover assembling each of these. In theory you don't even need to paint them as everything is supplied in different colours of plastic. When I get on to this, I think I will replicate the colours in paint as I never feel self-coloured plastic looks right, but then I'm just being picky.

I bet this model could be built and operating within a couple of hours. Certainly if you are happy not to paint anything, an afternoon should see it done. Finding a spot on the layout for it might be harder as the based is a 12cm diameter circle. Maybe it could live on a village green as part of a fete. Add a bit of bunting and a few stalls and the results would be eye-catching.

A huge rage of Faller stuff via Idealo

Monday, September 17, 2012

Hornby R590 Station Halt

Station Halt

My review of the products sourced through Idealo starts with a dream project. Hornby's station halt building has long been a favourite of mine - I really think that the little building is a gem despite it being in the range for over 30 years - and this is an opportunity to get my hands on one.

In the surprisingly small box you find the building (in two parts), a straight section of platform and two ramps. Fencing it provided to stop your passengers falling of the back. If they need to sit there are benches and for the really lazy, a motorised luggage trolley.

The set continues a tradition of old model railways with names from main line stations for the nameboard. I want to build York then it's going to take a big gulp of modellers licence to believe this is going to do it. Who cares though, this set isn't aimed at me, it's for kids who want a station for their train set and if the train calls at York or Crewe or Derby on every circuit, who cares ? As long as Network Rail don't get any ideas on rationalising these stations from this we'll be fine.

I particularly like the adverts which appear to come out of the same school of art that produced the 1975 Hornby catalogue.

Is this suitable for more serious modellers ? I think so. The shelter would benefit from a coat of paint and weathering but I could see it on a Colonel Stephens type branch line. The platform isn't bad although those white edges are a bit garish. Maybe some toning down would help but the biggest problem is the tapered plan. This is fine if the model is on a curve but really, you want straight platforms. I'd be inclined to stick at least one more straight section in anyway.

The blockwork faces look modern. You could cover them with plasticard or maybe this is a station on a preserved line where they are a friend to Mr Breezeblock.

As I say, possibilities. I think a little bit of a diorama is in order for this one day.

Hornby R590 Station Halt at Idealo

Sunday, September 16, 2012

Introducing the Idealo projects


I've been plugging away with this blog for 6 years and all of a sudden have been offered some free stuff. A gentleman called Tommy George got in touch, said some nice things about the blog and then hit me with this:

I work for a company called Idealo, a price comparison website who, amongst other things, compare the prices of model railways, trains and accessories. While the area is something of a niche, we are trying to expand our knowledge and prominence in this area; something which we'd love for you to help us with.

A price comparison site for model railways, trains and accessories ? Blimey, that really is a niche business ! Cudos for taking the time to go hunting for model making blogs and supporting them though.

Using the site seems a bit eBay to me. You drill down through categories and find products at the end. It doesn't matter where these are coming from, the site handles that bit, you concentrate on looking for the item you are after. In web terms, this is the correct way to go and fits in nicely with usability geeks thoughts on the "scent of information". Every step takes you closer to your goal and as long as you feel you are on the right path, you'll stick with it. Unlike eBay, you can just buy the stuff at the end rather than hanging around waiting to be outbid by someone with 1 second to go.

Anyway, we converse a bit and I end up with a voucher to go shopping with. Initial thoughts involved buying a train set. Neil Rusby did just this when made the same offer. However, this is a blog about making things, not buying train sets so I took the opportunity to hunt for a few projects. Like Neil, I've gone for things that I wouldn't normally consider. Well, most of them anyway.There's dream project in there and I'm showcasing the breadth of product available.

Over the last week, packages of good things have been landing on my doorstep and over the next week, I'll take a look at each one to give some initial impressions. Look out for them then appearing in a more detailed build over the next few months among the other stuff. Rest assured that I have spent the moeny, so I can say what I like !

Idealo price comparison website

Incidentally, Neil did a bit of comparison with Google Shopping and the results seem to be in favour of Idealo for price. I looked in a similar way and was more impressed with the range on offer including several manufacturers I'd not seen before. Maybe I just need to get out more, or maybe this sort of window shopping is just the thing to start you off in a fresh direction if your modelling has gone stale.

Model railway section of Idealo

Saturday, September 15, 2012

Adding slop adjustability

Adding adjustmentSetting up the drive train in a model boat is one of the most important steps during construction. The motor shaft and propshaft should be in as near perfect alignment as possible. Anything less than total trueness will result in vibration, loss of power and noise.

Since perfection is unattainable, we put a coupling in the system. This is either a length of tube to join the two, or for more sophisticated models, a universal joint. This allows the motor to point in a slightly different direction to the propshaft and everything to work OK. The aim should still be as little deflection as possible, but at least the model will work.

My problem is, with the motor mount glued in place and the propshaft likewise fixed, why can't we have more adjustment in the system for fine tuning ?

Looking at the Pilot Boat setup, I realised that the holes in the mounting plate were exactly the right size for the screws passing through them. By reaming these out a bit, I could slide the motor around a bit. If I'd realised this earlier, I'd have done the central hole as well.

While on an innovating streak, when I put the crews back in, a tiny O-ring was put inside the face of the mount as well. This held them in place while I added the motor and then, when the screws were tightened, squashed between the plate and motor. My idea was that they would add a flexible coupling between the two, cutting noise. By happy accident, they allow me to alter the angle of the motor to the plate by adjusting the tightness of each screw. Not a lot, but enough to make it worth doing.

Result - I've tuned the drive so it's a lot quieter and hopefully wastes less power producing a noise.

Friday, September 14, 2012

Silver Link

On the workbench lands a box branded Wren but with "Trix A4" scrawled on the top in thick pen.

A4 DamageOpening it up, I find a rather nice mode of the first A4 class steam locomotive, Silver Link. Trix are generally considered to have got the elusive A4 nose most "right" until the more modern Bachmann model came along. Best of all, it's in the original LNER grey livery which always seems the most appropriate for this particular engine. When it received a cosmetic restoration years ago, the results were a joy to behold.

Sadly, this model had been in the wars and needs a little repair to the front end before it can make an appearance on any layout. The buffer beam has been walloped and fallen off. Luckily, it appears this is a separate moulding glued in place so a few moments work with superglue sorted it out.

A4 MotorPutting the model on the track, it ran but sounded a little dry. Hardly surprising as it's sat on a shelf for many years. Access to the motor, which is in the tender, is via a single screw where the fall plate should be. Undoing this followed by unhooking the back reveals a whopper power unit atop a gear train.

While nothing looked in trouble, in fact it all appeared very clean. I suspect that this loco has hardly turned a wheel in its life. You might clean the treads, but only a real anorak would polish the commutator. Anyway, I smeared some molybdenum grease on the metal gears and squirted a touch of light oil into an bearings I could see.

Reassembling the body and running on the track, things were a bit quieter. To be honest, this locomotive needs a good thrash on a layout, not trundling back and forth on 18 inches of track. With a bit of luck, later on, that's what it's going to get.

Silver Link

Thursday, September 13, 2012

Dapol coach in Hornby Magazine

"Blimey. That's a bright yellow cover !" is the first thing you'll probably say when you see the October issue of Hornby Magazine.

Inside you'll find my latest "Parkers Guide" where I've taken a Dapol CKD coach, built it, and for good measure, improved it quite a bit as well.

There's nothing really wrong with the coach as it arrives. The price is especially good but compared to more expensive modern RTR, it's a bit lacking. Not to worry, some messing around under the floor plus a few handles and it looks the business.

Brake 3rd coach

Elsewhere you'll find Dr Phil answering all your most intimate railway modelling problems in the clinic. Headcode, window repair, wasp stripes and cutting pipes - I truly am a renaisance man.

Finally we get to staff projects with the introduction of Topley Dale, the latest HM layout. Needless to say, Mike writes stuff and I get my hands dirty with some clay based tunnel mouth bodgery.

Hornby Magazine Website

Wednesday, September 12, 2012

Book Review: GWR Signal Box Cats, Liveries and Allocations by F.E.Line


Just when you thought you'd read everything ever written on railways, here comes a book providing full details of the prototypes cats. Everything from livery information to the correct shed and station allocations.

No it isn't.

In fact, the book is a collection of random tales from real railways. Amusing incidents, behind the scenes activities. The cats do get a look in, 3 whole pages devoted to cat tales (not tails) no less.

We all know that life in a huge organisation doesn't always run as the rule book, or senior management, believes it should. I'm sure neither made provision for weighing a pony at Kidderminster, despite there being a perfectly good reason for it.

On the other hand, is this any more ridiculous than an official inspector dropping bags of flour as part of his work finding out how an accident had occurred ? Pity it didn't work out as well as he had hoped.

Possibly more enjoyable than the text, which could have done with a bit more proof-reading in places, are the illustrations. Both Peter Barnfield and Christopher Burton providing entertainment on many of the pages. I'd pay the price of the book for the formers Whimseyrail cartoons on their own.

Buy this book from Noodle Books

Tuesday, September 11, 2012

International N Gauge Show 2012

Well, it's just around the corner from my home and I wanted to go and see Dave at Dapol so why not spend Sunday morning looking at tiny model railways ?

GWR BenchesBefore I made it in the door, I spotted somethign I wanted to buy - replica GWR benches by Cox's Yard. Proper, full-sized versions that were lovely and comfortable to sit on. Far cheaper than buying the real thing, although since they supply to the Cotswold line, maybe they are the real thing ?

Inside, I went off on a mission to talk to as many suppliers as possible to scare up some news for MREmag. There weren't as many manufacturers there as at the 7mm event, but I still managed to find some. Most of the stands were importers and resellers but the range of products is huge.

Quality has come on in leaps and bounds recently too. The days of looking at a 2mm model and wincing at the wheels are fading. A look at the N Guage Society inspection saloon is a real gem and probably worth joining the society for on its own.

Banbury

My favourite layout, just, was the one closest to the venue - Banbury station. As far as I can tell, it's a pretty accurate model of the current station complete with Chiltern DMUs shuttling through. It's rare to see a modernisation era building modelled so well. Most people would have eshewed the current structure and done something from the 1950's. In fact the model shows just how well this "modern" building fits in with todyas railwat.

Elsewhere, two layouts with a seaside theme oozed atmosphere. I think I've mentioned St Ruth before but around the corner from it was the much smaller Herrenscar Harbour. The later could almost convince me to have a go at this scale. A Terrier pulling a single coach into the platform just looked right even though the loco is probably at the wrong end of the country.

Photos from the show.

Monday, September 10, 2012

Guildex 2012

Hemyock WarehouseWith my new role as MREMag editor firmly in mind, but with more than a passing interest in a future O gauge project (possibly), I headed to sunny Telford for Guildex 2012, the place where all those working in 7mm scale are drawn in September to empty their bank accounts and re-stock the cupboards of maturing projects.

My aim was to talk to as many traders as possible. MREmags news service has traditionally been home to product announcements for the main RTR suppliers but I want to expand this out to include the thousands of cottage industry guys who support our hobby so well. To this end, I did a lot of chatting and took relatively few photos for you to look at. Sorry.

The show itself is massive - 128 stands. It fills 2 large halls of the International Conference Centre. Some of those stands are layouts, some are demonstrations, but most wish to flog you something.

And what a range there is. One of my first stopping places was Steve Beattie diesel kits who had some fascinating diesel engine models in display. Not locomotives but the power units within the locomotives. I remember building something similar, although nowhere near as good, to fit inside s 10201 kit a couple of years ago. Fitting a detailed model into a 7mm loco ? I suppose it makes sense. You do the cab interior, why not the engine room ?

ON30 Goods DepotThe first layout for me was Racoon Canyon, a 6m by 1.3m )n30 model. It appealed because I recognised a couple of the building kits used, partly because they are in the "one day" stash of On30 stuff we have.

Actually, I was a bit shocked to realise that there were 15 layouts in attendance. My gas-bagging meant I got a good look at less than a third of them. Mind you, with such a big venue, even a 7mm model gets a bit lost.

One benefit of the floor space is that the aisles are wide and moving around was always easy. OK, so fighting your way to the front of a stand sometimes took a few minutes but that's the sign of a popular exhibition, you can't complain too much.

By the end of the day I was talked out. I cou7ld have spend thousands, as it was, I bought lunch. Maybe next year.

My Guildex photos

Sunday, September 09, 2012

Pot plants and resin buildings

View From The Potting ShedListening to the radio a few days ago, the presenter mentioned an article on gardening in the Daily Telegraph that resonated with me.

You can "Traditional gardening skills being lost" here.

The Royal Horticultural Society is concerned that gardeners in search of instant gratification are buying pot plants from garden centres rather than growing plants from seed and because of this, traditional gardening skills are being lost.

Sound familiar ?

I've commented along similar lines on resin, ready to plant, buildings. In fact there are plenty of parallels between the two. To quote from the article:

This, the RHS says, is not only short-sighted but also expensive. Gardeners are paying over the odds for potted plants, when those with their roots exposed offer far better value than those sold in containers.

Such plants are not only cheaper but, having been given time to bed in, they are also more robust and capable of withstanding whatever the weather might throw at them.

Well, ready to use buildings are more expensive than constructing the same thing from cardboard and plasticard, especially for the larger models. The home-grown version will probably blend in to the model better than an unmodified "near enough" version in a box.

Does it matter ?

The old Potting shedThere will always be people who can grow plants from seed and bulbs. For most of us, doing this requires time and facilities that we either don't have or really can't be bothered to acquire. Buying a plant in spring means we get a nice dose of retail therapy and a pretty plant. Maybe it's not as hardy as the one we potted up in the autumn, but do we care ?

Likewise, if you don't have time to make a model from scratch, is it so bad to buy a ready-to-plant rather than go to all the trouble of making our own. After all, there will always be some idiot who knows how to do this and they can make the master for the Chinese factory to copy. We know what we'll get then rather than wonder if our own version will be as nice.

Maybe it's all down to the levels you want to hit with your hobby. Some gardeners love the idea of spending autumn in the potting shed and delight in saying "I grew that". Others just want a nice display and are quite happy to say "I bought that". To the uninitiated, the garden probably looks exactly the same. It all comes down to what you want from it.

Saturday, September 08, 2012

Chucky handrail construction with confidence

BackhandrailsOne of the benefits of my boat and railway modelling is the chance to "cross pollinate" the skills from one branch of the hobby to the other.

The latest example of this arrived when I had to build the handrails for the Pilot Boat. Brought up in a world of wood, plastic and fibreglass, many boat modellers are scared of soldering metal. It's not something that many of them have need to do anything like as often as we railway modellers, especially those of us who love an etched kit.

The handrails required weren't that difficult but they did need to be chunky, at least compared to the sort of thing I usually get involved with. On a model loco I don't use wire fatter than 0.7mm diameter and even that's for 7mm models. Perhaps on G1 then going to the full 1mm is acceptable but on a 1:20 scale boat, 2.5mm was more like it. At least that was the thickness of wire I found in the material stash, and it looked about right, so that's what I used.

Most of the job just involved a bit of bending and cutting. The soldering posed an interesting challenge - in an ideal world I'd perform this off the model but I couldn't get the positions of the various bits right this way. Instead, the wire was cleaned and tinned then fitted to the hull with superglue. Finally, with plenty of flux and a hit 45w iron, I dodged in and out to make the joins.

Where possible, I gripped the wire nearest the plastic with some pliers to act as a heat sink but mostly it came down to speed and confidence. The confidence that you get soldering near metal held in your fingers. Fingers that you wish to remain un-singed.

Friday, September 07, 2012

Holding the superstructure down

Top loose

When I plonked the Pilot Boat superstructure down on its deck, all wasn't well. The join between the two was poor to the point of being unacceptable.

For testing, I had simply taped the top down. This isn't an option for a completed model. Even if the tape doesn't peel the paintwork away, it's going to look unsightly. I want this to be a good-looking boat so another solution had to be found.

Plan A involved magnets. Glue a couple to the inside of the superstructure and another to the deck lip and they should happily hold each other together. Ideally I'd have used really strong rare earth magnets. I'd bought a few with just this sort of job in mind months ago but could I find them ? Of course not.

Trying conventional alternatives recovered from fridge magnets was hopeless. They simply weren't strong enough. Even the ones from magnet door catches weren't any better.

Top ClipPlan B - clip the two halves together. Sticking some plastic to the outside top lip on the deck and right at the bottom inside the cabin. Sounds easy but there was quite a lot of pondering before I reached this point. An added benefit of this method is it stops the wheelhouse sliding from side to side - it's not a great fit and needs around 5mm taking out of the slop.

Back on the water, the top is secure even in tight turns. So secure in fact that I can lift the model by the superstructure to carry it around. Not something I want to do a lot, but very handy for launching the model and recovering it, especially if the water level in the lake falls again and requires a good reach from the landing stage.

Thursday, September 06, 2012

Sovereign of the Seas

Cannon

Is there a 110cm space in your house that would look fabulous filled with a 17th Century Warship ?

There is ?

Great stuff. Get yourself down to your local newsagent and pick up part 1 of the latest part work from DeAgostini - HMS Sovereign of the Seas.

The partwork runs for 135 weeks and all in will cost you £805 by the time you've finished. For some reason, the Daily Mail is getting very offended by this, a good enough reason for me to suggest that it is a good thing. They've even managed to persuade Rashid Lalloo of Premier Ship Models to say that you could buy a similar model, ready built, from him for £300.

I'd take issue with this. The partwork, when properly assembled, will produce a very detailed model indeed. I'd suggest that this is nearer his platinum rage which weigh in at well over a grand. Not that this is expensive, just that for £300 you don't get anything like as much detail.

You could buy a kit and get your model in a single hit, but if you are capable to building a kit such as something similar from Jotika, then you know about it already. You'll also not need the extensive instructions that arrive weekly.

Anyway, should you buy this one ?

Well, if you want a model of a big ship then possibly. Remember though, it's big and fragile and unless it lives in a showcase, will be a nightmare to dust. If you enjoy making things and fancy a challenge, why not ?

Even if you don't, I venture to suggest that the first issue is worth acquiring as the 2 quid buys you a cannon kit (see above) and some very useful cord. If bought from "proper" suppliers then I bet these cost more than the mag. I also like the handy hints for DIY plank bending involving a tea light and old tin can. Watch out for this be re-cycled in print by people over the next few years.

Deagostini - HMS Sovereign of the Seas

Wednesday, September 05, 2012

Book Review: Paul Atterbury's Railway Collection

Another big fat book of fascinating photographs from the prolific Mr Atterbury. To ring the changes  from previous books, the theme with this latest issue is a very personal journey.

The book starts with a short autobiography telling the story of his life in railway photos and reflecting on the important locations along the way. I've not seen this done before and yet it works very well - maybe Paul could start a trend, a bit like the Facebook timeline but properly edited and with interesting images ?

The rest of the book continues in a similar manner - the first 70 pages include a selection of the authors favourite journeys illustrated with dozens of pictures from various eras. It's strange how nostalgic BR rail blue looks now.

After this, there is the more familiar tour of the regions with sections in each for a mass of photos, information and more pictures of closed down lines, posters and ephemera (good word that) and finally railway postcards from the appropriate locale.

Between each region there is an off-topic selection. Staff, bridges, foreign travel, narrow gauge, incidents and eccentricities all feature.

I've been digging through previous volumes quite a bit recently looking for photos to assist in various projects and as such I've begun to spot odd images that have appeared in more than one volume. But in this book, they all appear to be new. I'm sure there must be the odd re-used picture but I haven't spotted one yet. Considering the shear volume of material in here, that's amazing.

As usual, photo reproduction is top quality and there is a proper index at the back. Page design is lively and interesting without getting in the way of seeing the pictures or losing captions. A book everyone can enjoy.

Buy Paul Atterbury's Railway Collection from the Hobby Warehouse.

Tuesday, September 04, 2012

Bachmann press day

Bachmann lunchLast Sunday, in my new position at MRE Mag, I snagged an invite to the Bachamnn Press day. It's where they announce new products for the coming year and generally schmooze those of us in the media. Well, that's the idea anyway.

This year the normal base for this is being re-organised so we were asked to meet, along with around 100 members of the collectors club, at Rothley station on the Great Central Railway.

On arrival, everyone was tagged with a coloured spot. The press corps were blue, trade yellow and others red. This allowed the organisers to shepherd the right people to the right places. We were presented with packs containing some press releases, a CD with photos and a couple of booklets with the main news items in. All good and exciting stuff.

Tan coloured Class 31After a little wait for chat, we were herded on to a train and taken for a tour of the carriage and wagon works. Then back to the station where lunch was provided - 2 rounds of sandwiches (one cheese, one ham. Sliced bread. Very nice), crisps, banana and choccie roll. I mention this before someone complains that corporate hospitality has pushed the price of model railways up.

Finally, we had a tour of the TPO sets containing showcases (the ones you see at model railway exhibitions) with some of the new goodies in and the best of the old. Obviously I'm not going to tell you what was in there, you'll have to scoot over to MRE Mag for this, but suffice to say, I could have brought at least one item home with me if there hadn't been too many Bachmann staff to stop me...

It's years since I've been to the Great Central Railway and I was quite impressed. Not by the locos like you are supposed to be, but by the atmosphere. One set of coaches arrived dirty, just like they should be. OK, so it's nice to see gleaming carriages but that's not how they really were on the "good old days".

There were quite a lot of very nice and extremely modelable buildings too. I'll pop some pictures up later this week of these in case anyone fancies getting the plasticard out.

Monday, September 03, 2012

My first issue of MRE Mag TODAY !

Today sees the first issue of MRE Mag under my editorship.

I've fought the Content Management System and hopefully won.

A long editorial has been prepared setting out my stall and probably boring all the readers to death but hey, you only get to do a first editorial once.

Letters have been edited and published.

Anyway, because of all this, there's nothing much to read here, so please head over to mremag.com and take a look. After 7am please 'cos unlike Blogger, I can't set the main page to go live automatically.

And I promise I won't be writing this post every time a new issue goes live.

Sunday, September 02, 2012

You can't call it that !

Goboakham

I've just built a Dapol (ex-Airfix) signal box for a project.

It comes with a rather nice set of printed names to stick on the front. Since the kit is based on Oakham. you find this one. In addition there is Gobowen, a town I only know because it's as far as you can go on a West Midlands rail rover ticket.

Now, we weren't going to use either of these for a fictitious station. Nor, it appears, are we going to be using a combination of the signs either. Shame really, as I think Goboakham has quite a ring to it.

Saturday, September 01, 2012

Mystery sack truck

PO TrolleyThis is a sack truck saved from a skip and currently residing in our garden.

Its last home was the Town Hall. The staff believed it to have come from Leamington station, and knowing my interest in railways asked if I wanted it. Of course I did. You don't get offered ex-railway stuff like this very often. Even if I couldn't keep it, at least I could find it a good home.

Anyway, knowing a local real railway expert, I asked him to come over and take a look. He examined the truck and pronounced that it isn't railway. More likely a Post Office truck, although it may have lived at the station for moving mailbags in the days when these were shipped by train.

Now I need to research GPO sack trucks to see if this should be painted or varnished. Since it will be living outdoors, at least in the summer months, the wood and metal all need proper protection. Ought I to paint the wood red ? Should it have lettering ? If so, what should it say ?

Is there a society for the preservation of sack trucks ?

Answers please.