Thursday, May 31, 2012

Hunslet shunter and 07 in MLI

Sometimes I buy a mag because it's full of a subject that really interests me. Such is the case with the latest issue of Locomotives Illustrated. Number 195 covers The Small Shunters - excluding BR designs.

Basically, it's odd looking diesel heaven.

Better still, there are two photos by me in the section on modelling the little beasts. Both my 07 and Hunslet DY1 pop up carefully posed on Melbridge Parva. That big, anonymous corrugated iron wall is a real winner for locomotive photography.

The mag itself is an excellent buy, profusely illustrated with well reproduced photos in colour and black & white. Quite a lot of them are new to me and I own the main books on the subject. In fact I suspect that some of the books will look a bit pricey compared to this magazine.

So good is it that what I really want to do is dig out the 01 kit and a couple of others for prototypes in the pages and get on with them.

Modern Locomotives Illustrated Website

Wednesday, May 30, 2012

Barclays PayTag vs modelling tools

My bank recently sent me a "PayTag". It's a sort of fat sticker which anyone can wave near a contactless payment device to hand over money. According the adverts on the telly, I am supposed to stick it on the back of my mobile phone. My bank feels a mobile isn't enough of a thief magnet, so why not add the ability to extract money from my bank account too ?

I didn't even ask for this stupid thing, it's just rubbish that the bank sends out. Despite this, it's my problem to deal with it. Sadly, you can't just chuck something like this in the bin. That just gives your rubbish the ability to empty your account. No, it needs to be disabled. What a good job I am tooled up.

First up - 45W soldering iron. This melts the plastic satisfyingly but it's a slow process. Covering the soldering iron bit in bank gunk won't improve it either, leading to me spending more money on a replacement if I'm not careful.


Despite this.  I felt I was on the right track. The job just needed more heat. Time to fire up the gas torch !

Warning, this part of the job is smelly. The card burns well but produces thick black smoke which I blew out of the window with a desk fan. It's probably not good for you so if you follow my example, don't breath in. Or wear a mask. Or a spacesuit. But not a flamable one.


The card itself very quickly became crispy. Poking at the remains with a screwdriver, the RFD chip inside is more charcoal than silicon. I reckon that the hoards of terrorists and identity thieves that the government assures me are going through my rubbish will be stumped by this !


So Barlcay's bank, your evil plan is foiled. Now, I wonder what else I can destroy ?

Tuesday, May 29, 2012

Minicraft circular saw table

Filed in the "tools I've not really used" pile is my Minicraft Circular Saw table. The full sized version scared the hell out of me when I used them at college which didn't help. Truth is, I don't often have a need to split wood in quantity anyway.

Then a need arose so out to the garage with it. While not a big tool, I reckoned that it would make a lot of mess and I was right.

Plugged in to the Minicraft transformer, the on/off  switch is located under the body which means it's well under the table bed. A bit fiddly but unavoidable. If I was really worried, an extra switch in the lead wouldn't be a problem to fit.

Ideally you screw the tool to the bench but of course I didn't bother. My task involved slicing lolly sticks in half but if long lengths were on the agenda then this would be a wise move.

A couple of devices are supplied to aid feeding the wood through straight and consistently. They clamp into place reasonably securely although a square is required to make sure the one shown is perpendicular to the table edge and parallel to the blade.

Safety is well covered, pretty much all the blade is anyway and that's what's going to hurt you.

In use, the machine hacks through lolly sticks and 4mm thick mahogany with ease. I expect it would be happy with plasticard and other woods modellers are likely to use (OK, MOST modellers, I wouldn't risk jelutong).

The main problem is the tools simplicity. If it does what you want then it's fine. But you can't adjust the blade height so my plan to cut partly through the mahogany didn't work and I was back to hand tools for that bit.

So - a good tool as long as your needs are simple. Not sure it's in the current range but you'll find plenty of eBay.

Monday, May 28, 2012

Railex 2012

Bile BeansRailex is the last significant shopping opportunity of the model railway season before the summer fallow period. This year it was also a rare opportunity to see three layouts whose blogs I follow, next to each other. These being, Albion Yard, Brewhouse Quay and Bron Hebog.

Arriving on the Sunday just over half an hour before the doors opened, we parked near the hall on a bit of lumpy grass. Tickets purchased we joined the odd juxtaposition of model makers and gym bunnies in the entrance. They sweated it out on torture machines, we just stood there. Neither side was a credit to the fashion industry.

Inside, the hall is pleasant, reasonably airy and well lit. The aisles were wide enough and getting about not a problem. Although not a large show, it's well worth the money (£7.50, no concessions for the coffin dodgers) as the quality is high on both the layout and trade side.

Wandering around, I picked up all of my short shopping list with ease including a couple of goodies that I hadn't planned for. There were interesting conversations to be had, some of which I can't mention here, with interesting people. I did manage to make a joke about show accommodation being not as good as Basingstoke to the guy I though was the Basingstoke exhibition manager, only to realise a few minutes later that he was from Ukfield. People who run toy train shows are starting to look the same. Or at least they give me the same "are you mad" look when I talk to them.

I'm not going to pick favorites here as there were several layouts I'd like to build. More to the point, there were several items of rolling stock I want to have a crack at. Every time I walked past the Gauge 3 stand I coveted their resin-bodied wagons. The crane on Canada Road appeals too - detailed Triang which has been with the builder since he was a kid and now takes pride of place on his finescale model, albeit with a few modifications.

ex-Triang crane

The Parry People mover on Bron Hebog was a bit of a star, quite a feat on a layout with Garratts as I love Garratts.

Parry People Mover

Anyway, go and look at the photos on Flickr.

Sunday, May 27, 2012

This is what you need to fix anti-social behaviour

platform5 coverTheresa May is rattling on about replacing ASBO's with something that sounds different.

The media are wringing their hands about "broken Britain" and wondering what can be done whilst loving the chance to fill news programmes with footage of scumbag chavs.

I've blogged this before, but the problem is simple. Lots of people have nothing to do. If they don't have jobs, none of them have the imagination to do something interesting.

More to the point, if they do, then they will be pilloried for it.

The photo shows a Platform 5 train spotting book. If you have one of these, almost everyone will laugh at you.

Until we reach the day when people who smash up things or beat up pensioners are treated worse than those standing on the end of a platform taking train numbers*, or that ownership of an ASBO is seen as more desirable by telly people than the ability to fully line a 4mm scale locomotive, then Britain will stay "Broken".


*I could also say pretty much any hobby that people reading this blog indulge in. Trainspotting is just the most extreme case.

Saturday, May 26, 2012

Shortarse resin people


Last week, I posted a picture of creepy part-painted resin people. Someone kindly suggested that they would like to see the finished models, so here they are. After adding the eyes, a few detail colours and a wash of weathered black paint, they look pretty good and certainly have character.

But, and there is always a but, there is a problem. The tallest figure is 80mm high. At 15mm to the foot, this makes him 5 foot 4 inches high. In his shoes and hat.

That is officially (on this blog anyway) short.

Too short for locos. Too short to stand next to the other figures. Basically, too short for the garden railway.

Friday, May 25, 2012

Next year, Chelsea

Eccles in the shopping centreYears ago, to advertise the Leamington & Warwick MRS show, we took a stand in the local shopping centre. For the first couple of year, small layouts were shown to husbands delighted to have some entertainment rather than another trip around M&S.

In a large building, the sort of layouts we were taking along looked a bit lost. OO trains can't be seen very well from a distance either so it was difficult to attract an audience. What we needed was something bigger.

I had a brainwave - why not build a garden railway for the day ?

The plan was simple enough. A local garden centre kindly loaned us a load of plants - the sort of bushy low growing sort you actually want around a garden line. We just had to put up a board thanking them which we were very happy to do. Buying a couple of trays of pansies helped too but it wasn't necessary. In January they didn't see much business and it didn't actually cost them anything for the advert.

On the Friday night we'd borrow some staging from the centre, set it up in a ring with one of their big pot plants in the middle and lay plastic O gauge track on a bed of pea gravel. The landscape would them be made up of polystyrene and a few bags of compost. Finally, the plants were added, still in their pots. Careful placement and leaning hid these. A few details such as huts and, in the last year, scale penguins and the display was ready.

Saturday saw my cheapo 16mm scale trains circling the track while the public looked on amazed. At the end of the day, the who lot was packed into the back of my camper, the peat returned to bags and later our garden and everything swept away.

Why am I telling you this ?

Well the BBC is getting over-excited about the Chelsea flower show. So I wonder, why shouldn't we build a garden railway there ? I'm sure no one else does and I bet the crowds would love it. How do I apply ?

Thursday, May 24, 2012

Bridge ahoy !

BridgeCanberra's bridge now has green decks. It's also been fitted together - with more than a bit of fiddling to get the parts to fit properly.

It would be a good to point out that the crossed part on the top is supposed to lean backwards. It's just the photo makes it look like it's leaning to the side as well. This is not the case, I spent a lot of time poking the drying solvent joint to make it so.

At the front we have the windows. Now this boat is peppered with windows and portholes, all of which need to be painted to look right. After some cogitating, I'm going for weathered black to do this. Pure black would be too stark against the white paint and greys or blues too pale. The prototype photo makes them look black anyway so that's good enough for me.

The kit windows are moulded proud at the top and flush with the sides at the bottom. To achieve a nice neat edge I used a thin strip of Tamiya masking tape along this. A fine paintbrush and they show up nicely.

Wednesday, May 23, 2012

A Class 37 would fit.


Among the box of diesel loco bodies that Mark brought along to the show was a Class 37. This caused me both joy and pain.

The Class 37 locomotive is my favorite big diesel. I have a few 4mm versions and a DJH kit for the same thing in 7mm (I know, I know, there is a RTR version but I wanted to build the kit) so there would be a lot to be said for adding a 3mm model to the fleet.

I could even buy an excellent kit. Building wouldn't take long as the body is a resin casting a lot more impressive than the one in the photo. It's just that I can't see any change from £100, which is a bill I don't need right now for a toy train.

So, I convinced myself that the loco wouldn't fit in the headshunt. With the real thing being 10ft longer than our largest current loco, I was sure that we'd be back to shunting one wagon at a time if I built one. We can't do that so there was a good reason not to splash the cash.

Just to prove my point, I tested the model. It fits. With two wagons. Even allowing for buffers'n'stuff on the ends it will work.

I'm not sure if I'm happy or sad.

Tuesday, May 22, 2012

Pilsworth 3mm scale

Resin bodies

A few months ago, we were approached at a show for information on suppliers of casting resin. The answer was simple - Alec Tiranti Ltd - but the contact didn't have e-mail or the web so any message had to be passed through several people if it was getting there at all.

The reason for the request appeared to be that the person asking had the moulds for a series of 3mm scale diesel loco bodies produced my Maurice Pilsworth. Opinions differed on the quality of these but generally, people wern't impressed.

This was where things stayed until the weekend, when Marl Priest turned up at the show with an ice cream tub full of bodies. Loco bodies that is. I snapped a photo quickly which you see above.

At the front are a pair of Pilsworth bodies, LMS 10000 and a Deltic. They are crude by todays standards but ingenious in that 2 types of resin have been used. Clear(ish) for the window area and opaque for the rest. This was probably more trouble than it was worth as later examples (I have 10000) are all opaque.

While the details are limited, the shapes aren't bad at all. The LMS loco is certainly a better shape than anything produced as a kit in 4mm scale. I still intend to build mine as it's a loco I've always liked.

Monday, May 21, 2012

Lutterworth 2012

Flockburgh at LutterworthThe Lutterworth model railway exhibition programme is unusual in that it's written in the manner of a tour guide for the event. If a visitor starts at stand 1 and reads each entry, they get a pleasant tour of the show. Our entry read as follows:

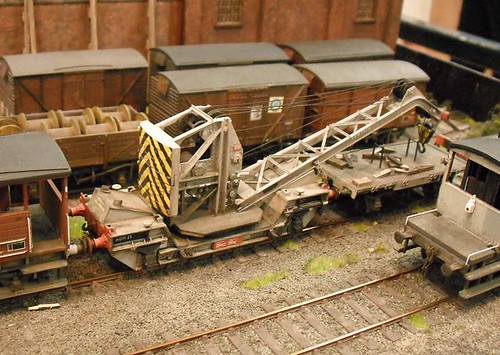
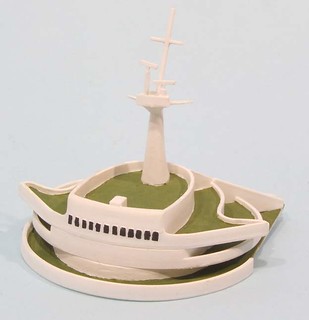
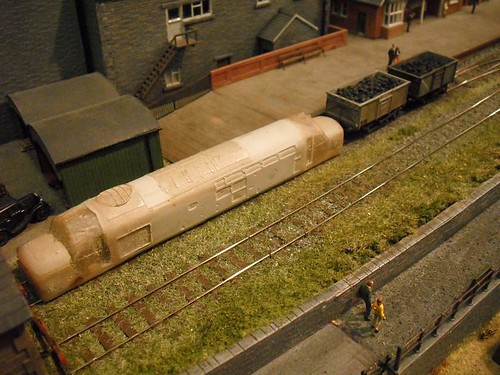
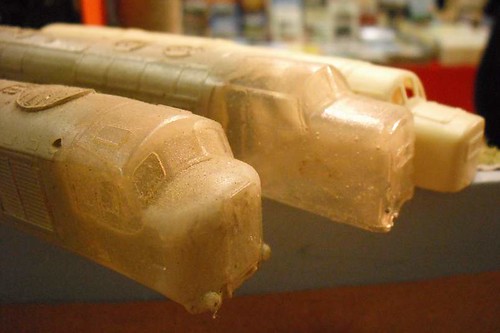
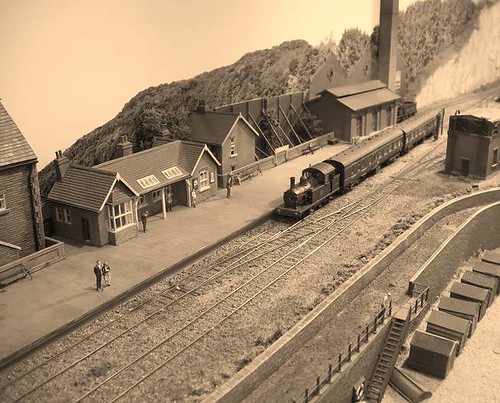
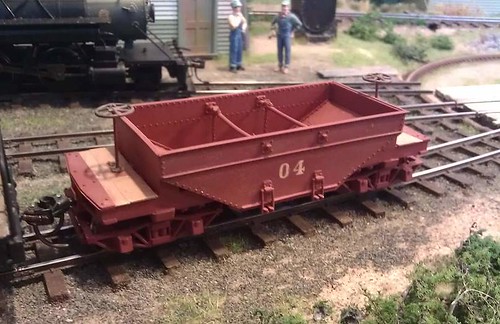
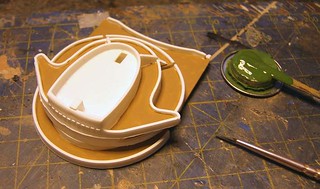
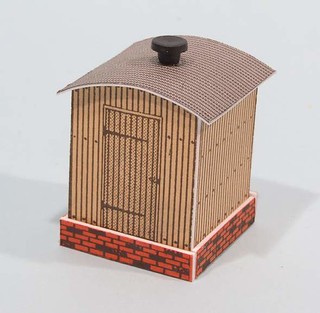
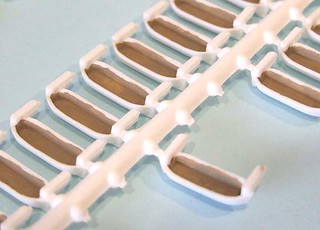
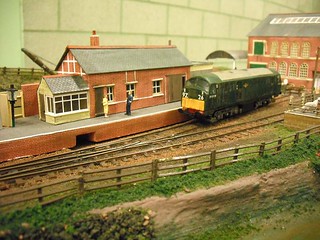
No3 Flockburgh - Phil Parker
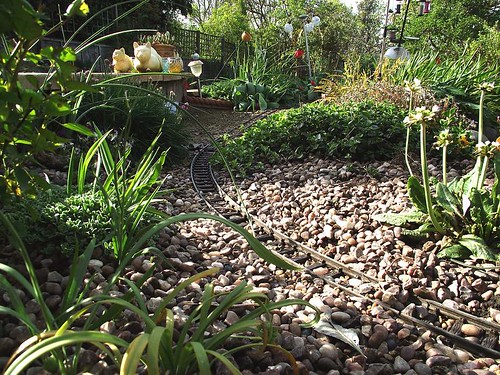
The next layout is somewhat unusual in so far that this mdoel is based on a scale of 3mm to the foot, everything is just that bit smaller than OO gauge. These are quite rare owing to the fact that the modeller has to make most of the pieces himself. Kits are available with the aid of the 3mm Society for the modeller to build rolling stock. The layout was intended to be a test bed for trying out 3mm stock and represents a small branch line on the English/Scottish border circa 1960s. The track was hand built as were the rolling stock and locos. The operators will be pleased to answer any questions.

Writing a programme in this style is a fair bit of hard work for the editor - no cut'n'paste from the supplied texts - but it makes a change. I couldn't see it working for a large event but when you are hoping for a large contingent of non-enthusiasts through the door then it makes perfect sense.

The show wasn't large, but for their 40th Anniversary a sports hall had been hired. It's a cracking venue, large enough, warm enough, bright, and with a good floor. There was plenty of circulating room too.

Tremore carpark
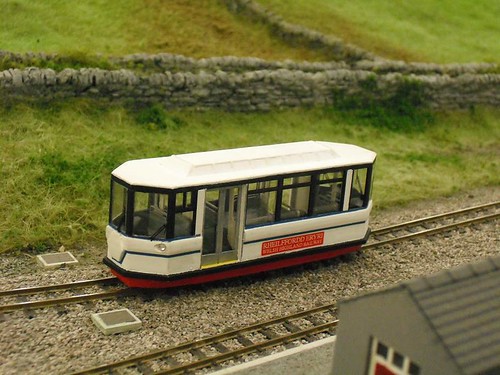
There were a couple of layouts that really appealed too. "Layout Phil would build" award goes to Tremore. Taking a parkway station as its prototype, it is compact any yet has intensive operation, albeit automatic and consisting (prototypically) of a single car DMU shuttling back and forth. For added excitement, an 08 shunts a few wagons in the background. I've been looking for ideas in this area myself and now feel a bit inspired to have another go.

On the other side of the aisle was Rowthorne, a different proposition. Whilst still OO, this is a 13ft long roundy-roundy with a small station and modest fiddle yard. I could quickly see where the buildings had been sourced and appreciated that this was very much an attainable model for anyone with the space to build it. For the average exhibition visitor, it licks a lot of boxes. You can let the trans circulate or do a bit of shunting. While there is a bit of building required, not too much and using Peco track on simple baseboards would see the builder with a layout operating pretty quickly. Amongst all the finescale stuff, this is probably more important as it helps get people into building things. I bet a few left the show with new enthusiasm after watching it.

HemlockWe weren't the only 3mm layout in the hall either. One stand away was Hemlock. The gauge this time is 12mm and (boo) it's Great Western. Mind you, he could run a Class 22 without being wrong !

Finally, the all important food note: Tea - Good and free to exhibitors. Cake - None. Lunch - Excellent - Thanks to The Frank Whittle pub to whom the task was contracted by the show. (You can see it here but it was obviously called The Balloon when Google visited)

Oh, and I won 2 raffle prizes ! A book on the London, Tilbury and Southend Railway plus a DVD of Express steam trains. This IS a first.

More photos on Flickr.

Sunday, May 20, 2012

Hellingly Hospital in "Modelling the Southern"

There I am innocently standing in front of a nice man selling books at a show when my eye alights in a new publication called "Modelling the Southern - Volume 1: Ideas and Inspiration". I suddenly remember that I was asked to supply a couple of photos for a model making book along these lines a few months ago.

I wonder if it is this book. Picking it up to flick through from the back (we always do this, I wonder if Chinese people flick through from the front), I don't flick far before finding my layout, The Hellingly Hospital Railway, on the inside back cover.

Nice photo too - my favourite of the selection supplied.

Needless to say, all I get is credit. Not even (as far as I am aware) a free copy. If you feel this is a bad thing, click on the link below to buy your copy at a discount price from Amazon. Using this means I get a little cash as well - result !

Don't worry, there are lots of other good things in there for your money, at least there are if you think the modelling north starts at Watford anyway.

Buy Modelling the Southern - Volume 1: Ideas and Inspiration from Amazon.

Saturday, May 19, 2012

Fred, chatting with the driver

Fred chatting

Down at the Vale of Melbridge Light Railway, Fred Dibnah chews the fat with the driver of Number 6, Peveril.

Taking some photos of the garden railway, I snapped this one which, while useless for publication, has a nice bit of atmosphere. Imagine yourself on a sunny summers day (remember those ?) at a steam railway. You are sitting on the platform as the train sits there sizzling and producing that oh so wonderful aroma of hot steam oil and coal.

Friday, May 18, 2012

Lutterworth tomorrow

Sepia Flockburgh

We're back on the road tomorrow. This time we're taking Flockburgh to Lutterworth show, under 30 miles away, so not (hopefully) on the road for very long !

The layout hasn't done much since it's last trip out but I will be packing a bit more lead in some of the locos to see if it makes a difference. The Jinty certainly worked better last time after gaining weight faster than a fat bloke with a free pass to Greggs.

See you there !

Lutterworth MRC website

More details on UK Model shops (with satnav postcode)

Thursday, May 17, 2012

These part painted figures are giving me the creeps !

Creepy

Is it just me who finds these figures creepy ? Once the eyes are finished, they'll be fine but at this stage, it looks more like a zombie apocalypse than some little model men for the garden railway.

Don't worry, with my magic paintbrush and faithful pot of Humbrol, I'll soon re-animate these undead !

Or perhaps I should use these eyeball transfers ?

(Note: The figures are G scale models from the old George Turner range. As far as I know, they are currently unavailable)

Wednesday, May 16, 2012

Snaefell Mountain Railway wagon

The Snaefell Mountain Railway is a tramway that runs up the only mountain on the Isle of Man. As such, it doesn't have a lot of good stock. There was a car specifically designed to haul coal to the boilers but nowadays you get trams and not much else.

However, there is a webcam pointing at it and I have this on my iGoogle home page so when I switch the computer on, I get a view of Manxland. A couple of days ago, I screen grabbed this sequence of pictures. The cafe at the top of the mountain has no road access, so if a new display unit, or supplies of food have to be delivered, these are pushed up the hill on a small wagon by a tram.

SMR wagon

During the off-season, there is still a need to get to the top of the mountain - the RAF have a couple of large transmitter aerials that need to be serviced after all. Thus, when the trams aren't running, there is a Wickham railcar to act as transport for people and supplies.


Does anyone know of a plan for this vehicle ? It would look rather fabulous on my garden railway.

Tuesday, May 15, 2012

Pilot boat, brush and saw in Model Boats

A couple of reviews by me in the current (June 2012) issue of Model Boats magazine.

First up are some brushes from Trumpeter. I'm using these on the Canberra as I write (well, not as I write, I don't want paint on the keyboard,. You know what I mean, stop being silly) and they seem very nice.

From the same source is a nifty little saw. In full size it would be described as a "Keyhole saw", a very useful bit of kit in the real world. For modellers wanting to hack away at stuff where the access is poor, then this little device is very handy. Sadly the blades are more suited to wood and plastic than metal. A finer tooth would make it a must buy.

Finally, the biggie - first review of the Speedline ex-HFM Pilot Boat. Model Boats often do reviews in two stages and this is no exception. Part 1 mentions the kit and shows a shot of the contents. It's little more than a mention the thing exists. Part 2, in a few months, will be a build of the model with all the niggles exposed. Or the builders incompetence. We shall see once it hits the workbench.

Monday, May 14, 2012

Slim Gauge Circle 2012

Steampunk railwayI should be working hard on some garden railway stuff for a mag, or painting a miniature cruise liner. Instead, I took a break for a couple of hours to head over to Rugby, for a day the centre of the universe as far as narrow gauge American railways are concerned.

The most startling model was some steampunk model making. How about a chunk of asteroid with a space ship, literally a ship for space, moored to it. In the middle is a little mine railway...

For those who want to know, the ship comes from Industria Mechanika and is called the Remora. For $150, you'd better want it pretty badly, although compared to some locomotive kits, it's not bad.

More conventionally, there was a rather nice bogie hopper wagon from Grandt Line that appeared on the more complete of the two layouts on show. The other layout was very much under construction as we wandered around. This one was pretty complete but most of the locos were unpainted brass - presumably from Korea with prices that deter you from unpacking the airbrush. Mind you, they looked beautiful and ran like a dream.

Steel hopper


The buildings were laser cut wooden kits which I'd previously only seen in magazine adverts.

Wooden Station

Wooden Shed


It's a funny event - half the room was random people selling off their old bits and pieces, a sort of specialist jumble sale. Great fun as you never know quite what you will find. I managed to resist projects but did come away with a superb book on building model bridges. An American publication that I'd never seen before and possibly is the only copy this side of the Atlantic.


(Photo Note: All these pictures were taken on my mobile phone. I've been trying to persuade Chris Nevard that he can ditch his DSLR for one and I think I've proved my point.)


Sunday, May 13, 2012

Some people liked the rain

Deep Water

The sign is finally correct - at the Knightcote Model Boat Club, we have deep water !

A dry winter had left our lake seriously short of the water that is so vital for our hobby. The metal railings you see in the photo lead down some steps. A couple of months ago you walked down the top two before getting your feet damp. Now you can't even step down from the concrete stairs without becoming soggy. Clever navigators can launch a large boat within the railings and steer it out to the water !

The lack of depth wasn't all bad - the railings and steps have been painted with anti-rust stuff and this is now under water. We were getting worried though. At the last committee meeting there were discussions about the future of the club if we reached the point were sailing was no longer possible.

Now all these fears have been laid to rest. The only trouble is, sailing in the wet isn't much fun, so now the pond is full, could we knock it off with the downpours ?

Saturday, May 12, 2012

I gotta bigger wall

Nice neat garden railway trackwork

On Monday I showed the state our garden railway track had got into thanks to the winter weather and a lack of maintenance. Well, that and some bad planning which saw a hill of gravel beside the ballast. My plan to use some Jigstone walls to hold the tide back wasn't going to work.

Now, however, all is neat and tidy. A combination of garden centre coloured concrete wall that looks like stone (actually like finger sponges for trifles but since I like those, it's OK with me) and slivers of slate, we have a wall that will keep hill and ballast apart.

On the lower side, a wall of the Jigstones stuff denotes the other side of the track. A new sprinkle of small stones and the whole area looks a lot better. Time taken, apart from moulding and visiting garden centres, was about an hour. Once the plants grow a bit and soften the hard edges, I think this is going to look lovely.

The other thing that looks lovely is that curve. I know proper modellers use flexitrack but set track does give nice smooth results doesn't it.

Friday, May 11, 2012

N gauge wagon and 3D print in Hornby Mag

Hornby Magazine this month goes all N gauge. Packed with the main mag is a free supplement on building a N gauge loco shed. I've seen this and it looks very impressive, especially (cough) the retaining wall which I made.

Parker's Guide carries on the theme with a Parkside wagon in the tiddly scale. The photos of it on the L&WMRS layout remind me I ought to get it back from Nick some time and thank it for testing it at Basingstoke show.

I've also done a bit of digging into 3D printing, basically summarising the stuff I've found so far. Controversially, I'm not saying it's the most wonderful thing in the world. It isn't and anyone who has seen a curved surface will know what I mean. Yes, you can smooth the steps but then you wave goodbye to all the rivet detail don't you. And some of the material is HARD.

I'm sure there will be letters. And rants on RM Web.

You also get a staff project on extending Flockbrugh, reviews of Geoscenics wagon loads, 1-plank wagon and a light up track tester.

Oh, and there is a load of stuff on the Hattons Garrat. Which I have on order. Looking forward to it a lot.

N gauge wagon

Thursday, May 10, 2012

I'm pooped

Go Away !Due to a couple of unexpected "opportunities" to work the last two evenings - after a full days work and with magazine deadlines looming - I've been a bit too busy to write a post for today.

So, Gents (and Ladies), at your convenience, please would you bog off and read one of the other posts today. Or try something from the blogroll on the side. What have you got to loose ?

Normal service will be resumed tomorrow.

Wednesday, May 09, 2012

Chosing brushes

BrushesThese are the brushes I'm using to paint the Canberra's decks. For most of them, the Number 1 Humbrol is ideal. There's a lot of dodging in an out of deck fittings and working up to, but not up, walls.

For the larger and clearer deck areas, I've been trying a Trumpeter F01 flat brush. In theory it ought to be idea and as a tool it's lovely. The resulting paint comes out very thin though. Maybe my tin of Humbrol is a touch thick and doesn't flow off the bristles as well as it does from the Humbrol. Maybe it is actually better since the coat in thinner.

I don't know. Any comments ?

Please don't say "Go and buy some sable" - I have a few and while lovely, I don't think they are as lovely as people say for model making work. They cost a lot more too, which is a consideration when working in tight spots and poking the hairy bit around. I'd rather b****r up a cheaper brush thanks.

Tuesday, May 08, 2012

Airfix gets it wrong

Bridge in BrownThis Canberra kit takes a lot of painting. Much fiddly pre-painting before I get to the fun bits of sticking things together. I've been working on the decks and followed the notes on the instructions.

Which was a mistake. Apparently the decks are brown. But if you look at the rather excellent photo, suggested by Tanllan a few days ago,  below, you see that the ones around the bridge are green. Bright green. To be fair to the Airfixers, the painting guide says sea grey but that's as wrong as brown. The only excuse will be if the paint numbers have changed over the years, but I don't think they have, have they ?

So, my two coats of brown will need to be replaced by green. That will teach me to look at the photos before getting into the job.

(Note: The parts of the bridge shown above are just clipped together. I will be sorting out the mould lines before gluing them together)
ss Canberra

Monday, May 07, 2012

I'm gonna need a bigger wall

Untidy Line

With the weather finally giving me a break, I've moved out to have a look at the garden railway. Whilst basically intact, it needs a bit of tidying up. The overgrown narrow gauge railway look is fine in theory and I'll admit that the photo certainly imparts a bucolic air, it's a bit rubbish if you want to run a train.

On the corner in question, the problem is the ground level rises so over time the gravel creeps down and covers the track. Brushing it out of the way will work, but I'd rather not have to do this all the time.

Man and wallMy plan had involved a line of those Jigstones wall elements between track and "hill". On taking the first outside, it became apparent that this wasn't going to work. As you can see from the photo, they aren't very tall. My hill is too big for them to retain, so I'll need to find something taller.

This isn't to say that all my wall casting has been in vain. On the left hand side of the curve, we also need to hold the gravel back. It is the same level as the track so all I have to do is demark the to areas with wall. Then the small stones for ballast will stay one side and the decorate versions on the flowerbed, the other.

Sunday, May 06, 2012

Build the Spitfire partwork

SpitfirePartwork


It's partwork season again and the exciting modelling one this year appears to be Build a Spitfire.

In 125 weeks, the keen collector will create a 1/12th scale model of the most iconic World War 2 fighter to take to the air. With a wingspan of nearly a metre, this is going to be quite some model. It has to be, you are looking at 2 years and £750 quid.

Normally, I'm a keen defender of the partwork. The money goes into high quality instructions and often, surprisingly detailed models. My Dad is building the Bismark and the end result will one day be of a quality to rival the very best hand built models and put most kit built ones in the shade. UK modellers howl about the cost but spread over the period, it's not too bad if you compare it to smoking or serious drinking.

This one though, well I don't see where the 125 parts come from. Some issues will have to contain seriously tiny amounts of woodwork or single metal plates. Maybe there is a lot of hidden internal detail but I can't see the appeal of paying for that. You don't even get a pilot figure. Even the stand is an extra !

At the end of the series, what you have is a very large, static (OK, the prop goes around) model of an aeroplane. Is that nicer than the 1/24th Airfix version at under 50 quid ? How many people would find the smaller size a lot easier to display ? Quite a lot I expect.

Build the Spitfire website

Saturday, May 05, 2012

Jigstones cast wall

Cast WallsFor the garden railway, I need a wall. Quite a lot of wall. It's job will be to stop the gravel covering the garden from encroaching on the gravel that acts as ballast for the track.

Plan A involved some very nice scale bricks. If I indulged in a lot of scale bricklaying then I could have a really rather special wall. But I'd go mad in the process.

Plan B involved a cast dry stone wall from Jigstones.

What you get for your £9.00 is a mould for two halves of a wall. The builder (me) has to cast lots and lots of sections using quick drying cement, stick them together with more cement, and voila, 3 inches of wall.

A big tub of Blue Hawk cement is on the garage workbench and every so often I go out there and mix a small amount up. The bowl in use once contained a rather nice possett I had as desert at York exhibition. Seeing it was to be thrown away I decided that for this pot, landfill could wait as I was sure I had a better use for it. Many castings later, it's now gone pretty solid and has been replaced with a washed out Heinz Beans tub from a microwavable portion.

The mix needs, as far as I can tell, to be porridge consistency to pour and work into the mould properly. Too runny and the shrinkage as it dries is great, too stiff and it won't go in the mould.

Drying takes about 2 hours so this isn't a quick job but the results look good and hopefully, if it ever stops raining, I'll plant them on the line side.

Jigstones at Back 2 Bay 6

Friday, May 04, 2012

Little, plastic, lamp hut

Lamp HutLast Friday, I showed you an EJAY Easykits kit for a lamp hut and promised that I would try and get it built for today. Well, I hit the deadline as you can see.

Construction involves cutting the parts out of the plastic sheet and gluing them together. This sounds easy but as each component is a bit of card stuck to plastic, what do you use as glue ?

In the end I treated this like a plastic kit - the corners were fixed with plastic cement and then washed with liquid glue, being careful to keep it inside the model and not let either reach the card.

The brick base overlays the main carcase so UHU was the tool for the job. A little wash of liquid glue along the bottom edge fixed things with any damage to the printed card hidden in the joint. The ventilator is also attached with UHU.

The finished model is, how shall we say, reminiscent of a less sophisticated era. The colours are bright, but could be weathered down a bit. The corners should be, according to the instructions, touched in with matt enamel. It still looks all printed though, and not printed as well as I could do on a modern computer printer either. I guess that's why EJAY aren't a big manufacturer nowadays, unless anyone knows different anyway.

Thursday, May 03, 2012

Terrible part fit !

Stern FittingBlimey, you can tell the Airfix Canberra kit was introduced back in the 1960's - the parts fit together just like a kit from the era. Not a good one either.

To be fair, the moulds have produced many thousands of the things. On the other hand I don't recall some of the fuselages of the many aircraft kits I ruined built back in the day being a whole lot better. In the last few decades the process has come on so much that modern modellers are as spoilt with part fit as a guest at the ambassadors buffet is when shut in a room with the Ferrero Rocher pyramid.

At the front end, the box goes together OK - at least if you flood the joint with liquid glue and shove the bits hard to squish the plastic. Around the much more complicated stern, the decks don't line up well at all and the walls come within shouting distance of each other but not much more. Some masking tape hauling things around is the solution, I just have to be careful in case the glue squeezes out under it and forms a mess for me to clean off later.

At least these parts are detail free. I wouldn't fancy doing this and having to re-instate a load of portholes that I'd scrubbed off with sandpaper...

Wednesday, May 02, 2012

Ratio N gauge huts

A little quickie project was passed over to me the other day, a couple of Ratio huts, in N gauge.

Hut Sprues


The tiny buildings arrive as a pair of brown and beige sprues. All the builder has to do is cut out the bits and glue them together.

Unpainted huts


For such tiny models, there are quite a lot of bits, although I've not seen a pitched roof supplied as a single part before. There are some benefits to 2mm scale obviously. The brick hut needs modification to my eye as there are too many brick courses above the door which makes the rook look a bit too high.

Painting is fiddly but to too hard. A quick wash of mortar colour followed by dry-brushed bricks (they look a bit big for bricks but too small for stone to be honest, but the instructions say they are brick. Some glazing with Krystal Klear and the job is done.

Painted huts

Tuesday, May 01, 2012

Man the lifeboats !

Little BoatsBefore any assembly can happen on the Canberra, it needs to be painted. The days when I waved the brush over a model after construction are long gone. I've looked closely at the instructions and know that there are plenty of parts that will be all but inaccessible, while remaining clearly visible, on this ship.

First colour was white. I know the plastic is white but it's the wrong white. Satin white looks a lot better as well as being easier to touch up if required !

Basically, everything got two coats from the airbrush. Then I could move on.

According to Airfix, the lifeboats are brown inside. The same brown as the decks it seems. Painting them seemed to take forever as I was being careful - touch up is one thing but the less I have to of this the better.

But, I have a question. Were the boats stowed uncovered ? Surely, even when tucked under the decks as they are, rain and seawater would get in. I've had a good look at the photos I can find and can't answer this. Maybe in 1:600 scale it doesn't matter, but I'd like to know anyway. At least until it's too late to do anything then please don't tell me !