The BBC reports that Humbrol has gone into administration. This is VERY bad news and not just because it means another delay to the promised Severn Lifeboat kit.
While the media have focused on the plight of Airfix – mostly by banging on about kids making Lancaster bombers – I suspect that another manufacturer will quickly snap up this part of the brand. Let’s face it, you don’t get a more iconic name in the world of plastic kits than Airfix. Everyone remembers having a go at something they produced at one time. Even the BBC 6 o’clock news managed to find itself with three presenters on screen at the same time (including the female lead – shock horror, girls can make plastic kits) after veering toward the anorak stereotype in the report.
My worry is Humbrol’s excellent range of paint. No-one makes better enamel colour. Revell’s is thin and watery. Other makes tend to lack pigment and come in annoying screw top jars that jam is you forget to wipe the lips before putting the cap back on. They also cost more and are harder to get your hands on.
This calls for panic buying and stockpiling of supplies. I want to give the market time to get the product back on the shelf without having to hunt for a different makers product. Tinlets will be laid down in the manner of fine wines immediately. One day we might be saying, “It’s a cheeky Midland Maroon. 2006 vintage – a very good year.”
All this is the fault of the French. When Heller, another Humbrol company, went bust it refused to hand back the moulds which caused cash flow problems for the parent group. I think that this alone should cause the government to explain to the French Ambassador why we are breaking of diplomatic relations. All French markets, bread and stripy T-shirts must be made illegal at once. Sinking a great British company (Humbrol is a contraction of the full company name Humber Oil) is about as close to an act of war as you get without actually shelling the white cliffs of Dover.
Thursday, August 31, 2006
Tuesday, August 29, 2006
Stand by your boat
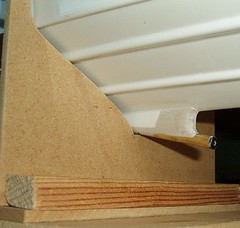
OK, my last post wasn’t really accurate. Before you start drilling holes in the hull of a new model boat, you are supposed to make a stand for it. This stops it wobbling around and makes fitting out so much easier.
My Dad makes the boat stands. He fiddles around with card templates and then, in this case thin MDF found in the garage, to produce a nice support for my model.
I might try and argue that you can’t finish the stand until the propeller tube is in place because this will affect the shape of the cut-out but the instructions neglect to mention this.
Anyway, the boat in the air and stable you can see the prop tube in all it’s glory. Once I had tacked it into place with superglue, loads of car filler was gobbed around to restore water-tightness. This was a real mess but once dry a big file and some emery paper made for a nice neat job. And a load of dust.
Sunday, August 27, 2006
As one box closes, another box opens
Time for another project. I know I have several on the go at present but this is a hobby and so I get to work on the things I like when I like and if you have any complaints about this I’ll see you outside. You have to let things dry and the only way I can do this at times is to go away and do something else. Manys the model I have made a less than perfect job of because I wouldn’t leave it alone to dry.
Anyway, the new entry onto the workbench is a George Turner Models launch. In theory this is a quick kit to build thanks to the construction being a series of vac-formed mouldings. Many model boat kits are like this, which means I have had to deal with a plastic kit format not seen in the model railway world.
The resulting model boat ought to be a very pleasant size to take to the lake. At a eighteen inches long I can tuck it under my arm but it is large enough to look sensible on the water. How builders of huge boats manage with their monsters is beyond me. Pigeon Pie is quite big enough and the magazines describe it as a “small boat”. This must make my new model a miniature !
First job on any boat (OK, boat kit with a plastic or GRP tub) is to take the nice waterproof hull and drill holes in it. Obviously this isn’t a good thing for its buoyancy so these have to be plugged with a drive shaft and rudder tube.
Lining up the drive shaft and motor was fun. I glued the shaft in, first with superglue and then with car body filler. The motor was then attached with a bit of plastic tube drilled to take propshaft and motor shaft. This placed the motor (in its mounting cradle) in the right position. Gobs of car filler then fixed this.
Then I left it alone to dry.
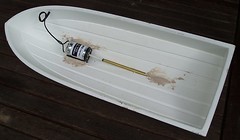
Thursday, August 24, 2006
Cruel Camera
The camera lens can be unforgiving as many modellers have found to their cost. Those wonky lines and iffy paintwork you see, and probably laugh at, in the magazines often aren’t apparent to the naked eye.
So it is with my finished VW. Until I looked at the photo I hadn’t spotted the thin layer of dust covering the paint. The dust is there because the model was sat on the workbench while I was vigorously sanding some filler on another project (watch this space for more details). The bits are really tiny and of course I hadn’t looked properly.
The model has turned out OK. Not a showpiece job in any sense but fun to do. The Polish mouldings aren’t as crisp as we’d expect from a UK or US plastic car kit. Some of the part fitting was a bit iffy too but nothing that a little filler can’t sure. Fortunately the prototype would have been a bit rough so the end result is reasonably realistic.
I’m quite pleased with the headlights. Many people use jewels or silver paint but looking at real car headlights when they are switched off, they are quite dark. I coloured the back of the lenses with black marker pen and stuck them in place. Still shinny but dark. Possibly a bit too dark – maybe a dark grey rather than back would have been better.
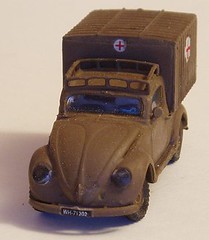
Wednesday, August 23, 2006
Pretty face
The Merchant Navy Locomotive is very, very nearly finished with only a couple of minor details to attend to. On the tender the light lenses need painting in and the model has to go through its paces again on the club layout. It certainly looks better than the slightly battered example I started with.
The front coupling is good and strong although I doubt it needs to be as I express locomotives never hauled much in reverse. Behind the buffer beam the hook is held on with a spring and bit of wire through the shank. Since the spring had long since vanished I had to replace it with one from a ballpoint pen suitably shortened. You would get a full locomotive set from one pen, which is probably cheaper than buying them from coupling manufacturers !
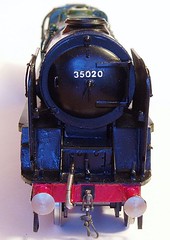
The front coupling is good and strong although I doubt it needs to be as I express locomotives never hauled much in reverse. Behind the buffer beam the hook is held on with a spring and bit of wire through the shank. Since the spring had long since vanished I had to replace it with one from a ballpoint pen suitably shortened. You would get a full locomotive set from one pen, which is probably cheaper than buying them from coupling manufacturers !
Monday, August 21, 2006
Plates
Heading toward the finishing post with the MN, I need to refurbish the nameplates.
The plates are etched brass and had tarnished over the years. Rubbing the surface with a very fine jewellers sanding stick – a pink one if this helps – burnished the brass. Using the stick means that I didn’t remove the paint that is a danger if you just use your finger. Also the abrasive is very, very fine, rough paper feels bumpier to the finger.
A quick coat of gloss varnish should seal the shine in for a while now. I touched up the blue centre s as well. These should have a pair of flags in but I haven’t a clue where to source the transfers. If I could find a good clear colour picture I might be tempted to paint them in by hand but for the moment I leave them blank. Sometimes not doing a job is better than doing it badly.
The front numberplates were more fun. They had the wrong background and had to be painted black. Then the numerals were picked out in white. The black was touched up where the white had spilled over. The white was re-done in places where it wasn’t quite right. Then the black was touched up again. I wish they were brass colour – I could “paint” this with sandpaper !
Sunday, August 20, 2006
I Am Very, Very, Stupid.
This entry was nearly entitled “I Am A Very Dead Person”. Very nearly indeed.
The artfully cropped picture shows a newly fitted lampshade. Bought at a sale today, it appears to be an Art Deco piece. The glass shade attaches to a metal base. It looks good and fulfils a need for an enclosed bulb in the room. All the modern lampshades I’ve seen haven’t appealed as much as this one does and I’ve looked at a lot of them.
Buying lampshades doesn’t kill you though, fitting them can.
The old pendant lamp is interesting in that it has two switches. One on the wall by the door and one hanging from the ceiling on the other side of the room. Remove the old rose and fit the new one - easy.
Since I am by nature a careful person I switched the light on and then off again to make sure there was no power in the wires. Then I unscrewed the cover on the rose. Inside there were lots of wires. Three red ones connected together and three black ones. Two of the later connected to one wire on the bulb and the other went to complete the circuit on the other side. Obviously the electrician had been playing fast and lose with the colours when he wired the house.
This isn’t good but it didn’t seem too difficult to work out. When I replaced the fitting the three red wires get connected together in a chocolate block and the black wires go into the connection for the bulb.
It was when I disconnected the third red wire that it hit me. Literally. A nasty electric shock that made me make a hell of a loud noise. Despite my care I’d not bothered turning off the electricity to the house lights and one of the wires was still live thanks to the weird wiring. I only touched the wire for a fraction of a second and yet felt the tremors in my arm. Despite standing on a 2 foot tall wooden stool in thick rubber soled shoes on a wooden floor I had nearly electrocuted myself.
There is still the chance of brain damage thanks to be beating myself on the head for being so stupid. No more basic a rule for working with electricity exists than - Turn It Off When Fiddling.
Finished and working, my light looks really nice. Pity it was nearly so expensive.
Saturday, August 19, 2006
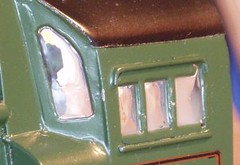
Windows
If you want a detail that says “unfinished model”, try leaving windows unglazed. Even though we are talking about a transparent substance, its absence marks a model down, at least in my eyes.
The Merchant Navy locomotive is nearing completion (I screwed it together properly today) and one of the jobs I had promised to do was fill in the windows.
While I could spend hours cutting out clear bits of plastic or glass, I have got better things to do. The results, when I do it anyway, always look hopeless. The glazing never fits properly and whatever glue I use is always visible at the edges. The first time the model is handled they all get pushed in anyway.
So I cheat and use Krystal Klear. Applied with screwdrivers, a skin is formed in the opening with the liquid (a high quality PVA) and then the model is left to dry with the window as horizontal as possible. Anything else gives a thicker pane at the bottom than the top.
Of course it does dry transparent, slightly flexible and quite reflective – as you can tell from my photo !
Friday, August 18, 2006
Gratification
It helps if the model goes together well. Building a kit that doesn’t fit together has the opposite effect and is likely to result in the parts being thrown in the direction of the nearest wall !
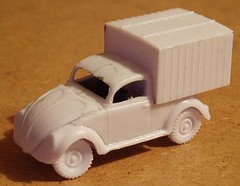
Anyway, I started a plastic kit. Plastic kits fit nicely into the role of quick, satisfying task. In theory all you do is cut out the bits and stick them together. Of course I had to pick a kit that needed a bit more work than this. A Polish model of the rare Volkswagen Type 93.
The prototype was built during the war as an adaptation of the famous Beetle. This hadn’t actually gone into full production when the war started but the factory was responsible for a number of German military vehicles. The logic of building a small van based largely on the bodyshell which the presses already existed for. Strangely the design wasn’t perpetuated after the conflict. When VW produced a small van they made a completely new design based on the Ghia chassis, the Fridolin.
The kit is from “Military Wheels” range and cost £5.99 from Gee Dee models of Nottingham. It’s not expensive but that shows in the quality of the parts. Flash, the like of which I haven’t seen for years is all over the place. It’s not difficult to remove but would be a challenge for a novice. The plastic is a bit softer than we are used to as well.
That said, the kit fits together OK and a couple of hours after I opened the box the model was as you see in the photo. I’d had a relaxing evening and the box isn’t going to make it into the store cupboard.
Wednesday, August 16, 2006
Satin
Paint can make or break a model. The Merchant Navy has reached the stage where it needs the paint tidying up. I’ve had to patch a few green bits but the black parts were the worst.
Fortunately black takes patching well and you can’t see all of the joins – Humbrol satin black goes on really nicely with a brush. Once this was done I cleaned the loco up and gave it a quick spray of satin varnish to brighten things up. It was a real transformation with the colour coming alive again.
Time to touch up the chassis matt black and then screw the thing together properly now.
Tuesday, August 15, 2006
Everyone loves a bargain
While most people visit a car boot sale looking for a bargain that will appear on the antiques roadshow, there are lots of other bargains to be found. Just stop looking at the china.
People clearing out garages are fertile ground for the modeller. The photo shows just such a bargain that I nabbed last week. It’s a big reel of 0.5mm copper wire.
50p
How great is that ? Years worth of electrical droppers or even beading wire in the larger scales.
Of course get too much of this stuff and you need to clear out your workshop, which means a trip to the local car boot with your own stuff..
Sunday, August 13, 2006
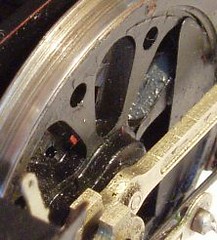
Pipes
This was an easier job than I expected. The old pipework at the bottom of the cylinders was missing on one side and mangled on the other.
Fortunately it was reasonably easy to pull out with pliers – a level of brut force and ignorance that most people won’t employ for fear of damaging something.
I had to replace one nut and then use 0.7mm wire for the pipes. This was soldered to the nuts and also to the other pipes to strengthen things. These bits are pretty vulnerable on the loco. A good clean up with the fibreglass pen and you can’t really see the joins.
Squires
What this country needs is national service, sorry I mean lots more model shops. There should be one on every corner. Each to be fully stocked with a comprehensive range of tools and kits. No one should ever be more than 5 minutes walk from a tool for cutting plasticard.
Until that happy day arrives we have to reply on a few specialist shops and mail order. I’m lucky, there are good shops within 5 miles of my home. Two railway shops, one for radio control cars and another covering aircraft.
Of course, none can compete with a good mail order supplier for the supply of specialist tools. The market simply isn’t big enough locally. Cover the country, or better still the world and your sales might be enough to feed and clothe your children.
This entry is basically a plug for the excellent service provided by Squires Model & Craft Tools of Bognor Regis.
Yet again this week they can through with some clamps I need. A quick ‘phone call to 01243 842424 at lunchtime resulted in a parcel the next morning. I think that over a couple of dozen orders placed there has been only one occasion when the goods didn’t turn up the next day and then they were in my hands the day after. The service is superb, they know their range and can help you out if you aren’t sure what you need.
The stand at exhibitions has to be seen to be believed. A cornucopia of delights. Better still, if you buy anything the question, “Have you got our latest catalogue ? “ is always asked. This is free and yet is a vital resource for any modeller. It can eat your time though – hundreds of pages to tempt you. Simply browsing through out of interest takes several hours.
So if you haven’t got this publication, get on the ‘phone (no website and they don’t need one) and order your free copy. You’ll thank me later !
Saturday, August 12, 2006
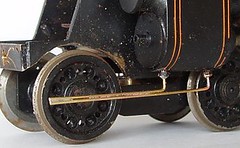
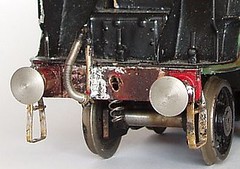
Buffers
One of the signs that the Merchant Navy needed a bit of tidying up was that its front buffer beam was a separate item. Not just that, it consists of a flat plate which has two buffers, a wonky vacuum pipe and some mangled strip attached to it.
The mangled mess at the ends was the front steps. On this locomotive they are unusual in that they are attached to the beam and the buffers instead of the more normal footplate. A fair bit of unbending gave me something that looked right. Once the intermediate steps were added from spare etch leftovers everything looked OK.
The very nice vac. pipe was straightened easily enough. All I had to do was re-fit the beam on the body.
A 7mm scale express locomotive is a pretty big beast. This means a large mass of metal. Soldering a thin bufferbeam to this required heat from a small blowtorch. The paint you see in the picture was red before I started burning it. And when I’d raised the temperature enough for the solder to run – the steps unsoldered themselves and the vac. pipe went wonky again.
The moral of this story is – attach the little bits to big bits one at a time. If you must have a subassembly , bolt it or glue it to the other sub assemblies.
Still, at least the buffers etc. were tinned (covered in leftover solder) and the re-attachment wasn’t too bad. With front buffers the loco is now looking a lot better. Since the photo I’ve primed the metal with car touch up paint pots. Once this is dry I’ll dig out the red paint.
Friday, August 11, 2006
On the right track
One of the benefits of belonging to a model railway club is the chance to test a locomotive on a layout without the effort of building one. OK, you might join in the team but it’s always going to be less work than going alone.
So it was very handy last night to be able to test the Navy chassis in our O gauge layout. While I was happy it worked in a straight line, real layouts have curves and points and even gradients. And this is a real layout.
It worked. There was the occasional spark but nothing that I can’t fix easily. The bogie needs a spring to push it onto the track harder than its weight alone does. But it works. We ran it around without derailments or any embarrassing incidents for me.
The audience approved as well. The downside of club modelling is that you can’t sneak a test like this without someone spotting. Half a dozen people made comments containing varying amounts of useful advice. One person looked at it and commented how he wished he could build a kit. This resulted in a quick run down of how easy kit building is and passing on a few hints and tips. That’s what club life is about, a bit of give and take.
Wednesday, August 09, 2006
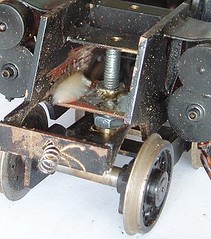
Twelve wheels on my ..er.. loco.
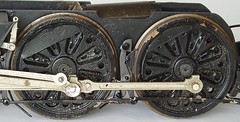
The biggest problem with the Merchant Navy Locomotive was that the front bogie wasn’t attached to the chassis. What was worse was that it appeared never to have been attached to the chassis.
This has puzzled me for a while. Why finish the model as far as painting and not complete the chassis so it can run on your model railway ? The answer wouldn’t have helped of course. What I needed to do was rectify the problem.
Now there is a hole above the place the bogie should be but it’s very high and too small for anything that you’d want controlling O gauge wheels. After a bit of playing around I worked out that a largish (M4 I think) bolt would fit reasonably well. Since the bogie stretcher has a slot in it I needed to bush this. Digging in the bush pot I found what may be a 7mm scale axle bush. This fitted the bolt and was slightly too large for the slot. Opening out the later with a file cured this.
The plate the nut is attached to came from some leftover brass from the G2. Always hang on to useful bits left over from kits as they are very handy. Just don’t forget to turn those empty frets into strips or you will quickly find your work area taken over by them !
Yet again I couldn’t solder to the frames. They are 2mm thick brass and despite my best efforts with a mini blowtorch, no solder will stick as I couldn’t get the metal hot enough. If the whitemetal cylinders weren’t attached I might have been more courageous but I really didn’t want to have to replace these. Because of this, some nice thick Araldite hold it in place. Unfashionable though this method is – it works.
After letting the glue dry I was able to run the model on the test track – a 6ft straight. The fireworks (sparks caused by short circuits) showed I needed to cut the frames away a bit or the loco wasn’t going around corners. More work with the big file, no good using needle files on this stuff, and the sparks stopped. I might find myself insulating the back of the front brake shoes with superglue just be extra sure.
Monday, August 07, 2006
Bad paper
The MOT went pretty as mush as expected. I now posses a fail sheet listing various deficiencies. While the rear valance wasn’t an issue but the MOT man’s hammer found another area of rot that needs attention.
The main problems are brake related. I could do these, I’m sure of it. If only it were possible for me to get the van in the air to a comfortable height, a few hours work with spanners should see the job done. My rosy view will ignore the skinned knuckles and stuck bolts reality normally throws in the way.
Lifting the van would probably have averted the welding too. Lying on your back crawling around under a vehicle isn’t pleasant and certainly is not conducive to taking a proper look. The nooks and crannies are ignored to punish me for my laziness at this time of year.
It’s a very impotent feeling. I could so nearly do this work. I want to do the work. What I don’t want to do is fix one side and then have to bleed the brakes so I can turn the vehicle around to get at the other side – I have park next to a wall. Actually I don’t want to be working in the blazing sun either. Lying under the axle and welding doesn’t sound too fun either – setting myself on fire is more likely than achieving a proper fix.
I imagine it’s like being a newbie model maker. You look at people like me with a reasonably equipped toolbox and think, “it’s easy for them, they have all the kit.”. Truth is that I acquired tools in dribs and drabs over a long period. Mostly they come as solutions to problems, or at least as ways of making the job easier. A good example is the box of reamers and cutting broaches. You can manage with a needle file but the right tools are so much nicer.
So I look at those with good size garage and some sort of lifting facility and envy them. I know they too have built a workshop up over years – indeed a proper workshop should have some very old but very usable tools, preferably from a long closed garage.
In the meantime I will contract the work out to someone for whom getting a one ton van in the air is easy. Someone who has done the job before and probably won’t bruise his knuckles as badly as I would. He won’t lavish the care I would like to think I would, cleaning and greasing every part, perhaps even painting stuff that has surface rust, but then I do get the chance to spend time doing things I enjoy. Perhaps I am happier with the dream and the reality wouldn’t be as good as I expect. Just like the newbies envying the modelling I do don’t see the burns and frustration when bits don’t fit together on the latest expensive kit.
Of course if anyone HAS got a barn they would like to let me use…
Sunday, August 06, 2006
The future is light up light switches
One of the benefits of all this model making is that I’m not bad at DIY jobs – or at least I’m not scared of them.
The Problem: The garage is dark and it’s difficult to find the light switch.
Solution: Fit a light switch glowing thing. Now I can find the switch easily !
Of course this was partly influenced by finding the glowey thing on a car boot table and thinking, “Wow, how fantastic is that, glowing light switches !”. Best fun I’ve had for 30p for a long while. Perhaps I need to get out more.
Technical note: The glowey thing is a plastic plate that fits behind the switch. It’s got two lamps in it and wires straight into the switch. It comes from MK but I’ve never seen one before. Bit fiddly to fit but worth the effort.
Saturday, August 05, 2006
Rotten, just rotten
Why is it that car jobs ALWAYS get worse not better when you approach them ?
The photo shows the state of the read valance on my Volkswagen Type 2 air-cooled campervan*
With the MOT approaching I thought I’d better start getting it ready. Two jobs were needed before it went for the first attempt – Adjust the brakes and bodge the rear valance.
Brakes. Oh dear. This is supposed to be an easy job. I’d done it on my Beetle in the past but hate it. I jacked the van up so the wheel was a little off the ground. The adjusters didn’t seem to want to move. Thinking better of crawling under the vehicle with it supported only by a jack I got the axle stands out. They aren’t quite tall enough as they are designed for a normal car, not something fat blokes can crawl under comfortably. Anyway, we have a gravel drive with slabs for driving on. No slab where I needed to put the stand though. Oh, well, I hate it anyway so someone who knows what they are doing can handle this one.
The valance. My idea had been to slap a patch over that little hole in it. I have the replacement part in the garage but reckon I need at least two full days to fit it. Of course when I saw this, the patch idea went out of the window. No chance of any days off work this month for me unfortunately.
Sooooo, my new plan is to take the van for it’s MOT on Monday. It will fail. Then take it around to Malc saying, “Get it through the MOT and take all my money.” And cry at the bill. Sometimes there aren’t enough hours in the day to do everything you want to do.
Next year can someone remind the MOT is due earlier than two weeks before it is please ?
*Yes I am writing a lot of keywords in the text. I need to make those Google adverts pay. Please click on them – it costs you nothing and makes me a few pence richer. How else am I to pay for these projects you enjoy reading about ? :-)
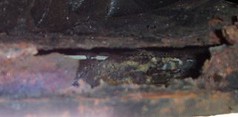
Friday, August 04, 2006
Quick change on the workbench
With one project leaving the workbench, the space is quickly filled by another. This time I have a 7mm scale, O Gauge rebuilt Battle of Britain. The locomotive is complete, it just needs a little tidying up.
The first job was to have a good look and see what is needed. The most obvious work is with the chassis. Brake gear is loose, valve gear is bent and the paint needs a fair bit of TLC.
The brakes weren’t too bad. It was only the rear shoes flapping in the wind. Soldering didn’t work so some good strong glue did the job instead. With all the paint and dirt plus the mass of brass I was never going to get enough heat into the joint without damaging something. I did replace some wire which makes for a nice solid job.
The valve gear was straightened and then I took the time to fettle it a bit by removing some excess lumpy solder that was present in a few places. Valve gear is very important to the look of a locomotive. If it’s wobbly it looks wrong. On the prototype those rods are big think lumps of steel. Anything bent represented a Very Bad Thing.
Paining comes next, what’s there is lumpy and flaking off – the model has done some miles but with a bit of work it’s going to be ready for many more.
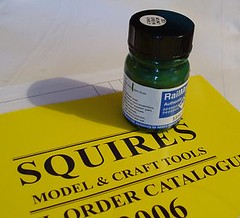
Wednesday, August 02, 2006
Of paintpots and teacakes
The photograph shows a 50ml tin of Humbrol matt black paint just before it went in the bin. As you can see there are lots of dried “tide marks” in it where the paint has formed skin and I’ve poked a stirrer through it to get at the liquid stuff.
50ml pots are a bit like Tunocks teacakes really.
Let me explain. I love a nice Tunnocks teacake. It’s a delicious pudding in a foil wrapper. Ideal - one is sufficient and not too calorific. When I finish chomping I sometimes think, “That was nice, I fancy another.”. Most of the time I resist but just occasionally I go for it. And then I regret it. You see the second teacake is nothing like as good as the first. I don’t know why, it just doesn’t satisfy in the same way.
50ml pots of paint are like this. Normally I realise I will end up throwing most of the pot away but every so often it seems like a good idea. After all I use a lot of matt black paint so surely it’s cheaper to buy in bulk ?
It never is though. Like the second teacake, the bigger pot never works like it supposed to. And I know I’ll never learn. That second teacake still seems like a good idea.
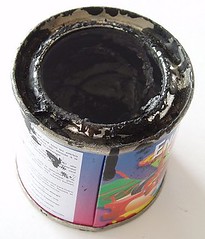
Tuesday, August 01, 2006
OK, so I'm a big kid.
All breakfast cereal should be like this. Open the packet and out fall a plastic car. This one even has stickers you can decorate it with.
Those who keep their eyes open will be aware of the Disney film “Cars” is out now – this is “Doc Hudson” from the film, or in this case from a packet of Cherrios.
The makers (of the model not the ever litigious Disney) have pinched a trick from Dinky cars. There are a couple of light tubes from the roof to the headlights so they actually appear to light up. Ingenious. I’m always fascinated by the cost of tooling up for something like this. Someone has designed a set of moulds, made the parts and then assembled them. Somewhere in a factory, probably in China and paying pathetic wages, there are factories full of people making these things up.
Of course the cereal approach to modelling isn’t perfect. I want a “Filmore” but there isn’t one in a packet near me. Still, if all breakfast food included plastic model, surely the problem of people skipping breakfast would be ended. Mind you, the new issue would be people playing when they should be going to work…
Subscribe to:
Posts (Atom)