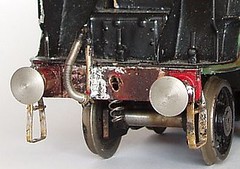
One of the signs that the Merchant Navy needed a bit of tidying up was that its front buffer beam was a separate item. Not just that, it consists of a flat plate which has two buffers, a wonky vacuum pipe and some mangled strip attached to it.
The mangled mess at the ends was the front steps. On this locomotive they are unusual in that they are attached to the beam and the buffers instead of the more normal footplate. A fair bit of unbending gave me something that looked right. Once the intermediate steps were added from spare etch leftovers everything looked OK.
The very nice vac. pipe was straightened easily enough. All I had to do was re-fit the beam on the body.
A 7mm scale express locomotive is a pretty big beast. This means a large mass of metal. Soldering a thin bufferbeam to this required heat from a small blowtorch. The paint you see in the picture was red before I started burning it. And when I’d raised the temperature enough for the solder to run – the steps unsoldered themselves and the vac. pipe went wonky again.
The moral of this story is – attach the little bits to big bits one at a time. If you must have a subassembly , bolt it or glue it to the other sub assemblies.
Still, at least the buffers etc. were tinned (covered in leftover solder) and the re-attachment wasn’t too bad. With front buffers the loco is now looking a lot better. Since the photo I’ve primed the metal with car touch up paint pots. Once this is dry I’ll dig out the red paint.
No comments:
Post a Comment