It’s the end of the year, just the time for a little rant I’ve had kicking around for some time. So sit back and let it wash over you…
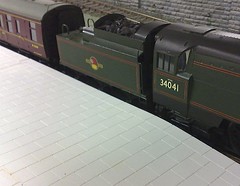
In the picture you can see my J50 traversing the station crossover on Flockburgh. It’s a nice model that went together well but just occasionally we can have problems with the compensated chassis. Normally these are minor and happen at the start of the show when the locos have been sat in a box and bounced up the motorway for a few hours, got hot and cold and been generally unloved. A bit of running frees everything up normally.
Anyway, at a recent show the loco fell off on this bit of track. Since the only crowd was a single person who had already claimed to be a 3mm scale modeller I persevered with the loco knowing it would be OK in a few minutes. Of course it would pick this opportunity to take quite a few minutes to settle down so there were a few more niggles.
“Huh. I would just change the loco on my layout.” The audience said. Now I wasn’t at my best as operating a layout that is misbehaving (we had a sticky point motor at the time) annoys me so being lectured by someone whose total modelling abilities revolved around buying second hand Triang wasn’t going down well. Besides, since the models on Flockburgh are hand built I don’t yet have a huge stock of them to replace iffy ones with. It’s easy if you only have RTR, spare stock only damages your wallet, not eats your time.
Also what would be the point of swapping out a Triang Jinty ? They made them on a production line, if one works over a bit of track then they all will.
Anyway, he lectured me some more on other topics and I manfully resisted jabbing him with the sharp end of the doofer. Then he started to move off and noticed our request for suggestions for the content of our scenic extension board.
“Oh, I better help out with this”, he said.
“No, go away and look at another stand”, I thought.
After a few minutes consideration he came up with a blinder. We should have a lake.
Yes a lake. All of 10 scale feet from the sea, a lake.
Perhaps, I suggested, we were a bit close to the sea for a lake ?
“Oh is it supposed to be near the sea ?”, he asked looking a bit bewildered, “you should make it look like it is”
I explained I thought the giveaway was the beech and beech huts under his nose.
“Oh, I didn’t notice those” – what the hell had he been looking at for the last, what seemed like a week ? “What about some fishing nets or similar on the station ? “ Obviously I have failed to notice all those prototype pictures of station buildings covered in stuff from the back of a trawler. Silly me.
So, here’s some handy hints for visiting a show:
The people behind the layout really like to talk but don’t lecture us.
Please look at the model. We’ve spent a lot of time on it and it is what you paid to see.
If you notice something not fully in accord with the prototype, please do not tell us in a tone of voice you normally reserve for your lowest ranking servants.
Things go wrong sometimes. They do on your layout too. Live with it.
We are not getting paid to do this, we do it for fun.
We have a myriad array of sharp and hot tools to hand. Even if you have just made a purchase from the tool stall, you are out-gunned so behave yourself.
Happy New Year.
Monday, December 31, 2007

Sunday, December 30, 2007
Clapperboard making
At the other end of the layout to the new extensions, repairs are going well to the clapperboard building squashed at Sudbury.
A new end wall has been cut out of Daler board and then planked with strips of paper loped out of an envelope. Since this came as junk mail I think this is the most useful this piece of paper has been in its life ! No point in wasting some nice white, high-quality material though. Doing this is more eco-friendly than recycling.
At the bottom of the wall some plasticard represents the brick base. 4mm bricks are used because I’ve never seen a 3mm version. Nobody notices though so I won’t worry about it.
Saturday, December 29, 2007
Mockup buildings
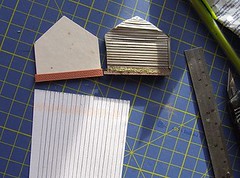
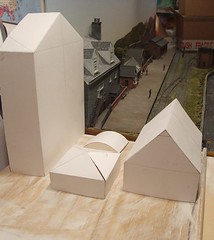
When I knocked up my Christmas building a few days ago, it wasn’t entirely plucked out of the air. I knew it would fit in on the layout because it wasn’t the first time I’d built it.
Mark 1 had been a somewhat simpler version though. It had no windows, doors or indeed any detail at all. Made out of cheap card it was just a mock-up to get the “feel” of the model. This sits alongside mock-ups of the warehouse and chapel on the new extension board.
I like mocking things up. It might look like an unnecessary step but most of the time it actually saves effort because you don’t put a load of effort into a model only to discover is somehow looks wrong. If you do then there is the dilemma – do I scrap the effort and start again or do I plough on regardless and hope things turn out OK. Most of the time it’s too painful to dump the part completed item which leaves a layout that you are dissatisfied with.
This time we learned just how much space you get in 3mm scale as opposed to 4mm. The assumption had been that the chapel would fill the space available. In fact I wasn’t sure that the little office wouldn’t do it on it’s own. With the mock-ups in place it became obvious that even this modest space would take more filling than originally thought. Behind the office there will be some open sheds (the round toped thing in the picture) with plenty of space to move a small lorry.
We also get a feel for what the layout will look like with it’s new extension. Ideally you need to leave it to sit and keep looking occasionally to see if the arrangement still satisfies. No time for this but I think we’ll be happy with the result.
Friday, December 28, 2007
Build the Flying Scotsman

Like many people I've picked up the first issue of the new partwork enabling you to build a 7mm scale Flying Scotsman. For 50p, how can I resist ?
www.buildtheflyingscotsman.co.uk/index.html
and I've been doing my sums. Total cost of the partwork is £619.26 (124 issues at 4.99 and the 50p Part 1) which gets you a nice looking static model. If you want a motor, you have to pay a bit extra.
To buy the DJH kit complete with wheels but no motor from Tower Models is £584.30
Which means you are paying £34.96 for the instructions, DVD and other stuff.
My Dad is building the Bismark kit from the same source and the instructions for this are superb with proper photos for every step. This makes the partwork almost worth the money. If you are a beginner it makes it definitely worth the money. The kit is marked on Tower's web site as suitable for a beginner and since most of the bits are DJH quality pewter castings I suppose you can just glue them together. A quick look at the instructions for part one (The cab) shows this to be how they assume you will be building.
Watch the DVD that comes with the package and the whole thing looks even more interesting. It appears, although there is no mention of this, that the boiler and tender sides are pre-painted. Matching the green for cab sides & splashers would be “challenging” I suspect but not impossible if they’ve used a recognised brand. Transfers are promised for the lining and hopefully these would be bespoke.
The only criticism I have is that the DVD shows the cab being placed back to front when the builder puts it in place on the footplate, but that’s only the sort of “plonk the bits together” style fitting that every builder does, not a proper test fitting. Some attention to detail would have been good though.
On the plus side, by issue 5 you have a footplate, cab and mainframes so you’ve got a lot of loco very quickly.
So will I subscribe ? No. I don’t need or particularly want Flying Scotsman. If I’m going to spend that sort of cash on kits I have others I want to build. Of course if anyone wants to send the bits to me to build… Any takers ? :-)
Update: Well I bought part 2...
Thursday, December 27, 2007
Dockside office
I’ll be honest, Christmas is a nice but fairly quiet time in our household. It doesn’t really start until 10ish and winds down after lunch with no huge parties full of people stuffing their faces with food and drink.
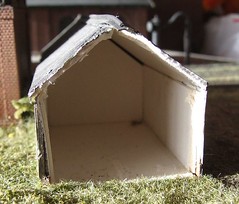
So it was that rather than sitting around getting bored, I did some work with bits of cardboard. This little building is based on one seen in the distance in a photo of Gloucester Docks. The proportions are worked out from the picture, then I made a very rough mock-up which has been sat around for a few days.
So, after breakfast on the 25th, I had a bit of a dig around in my building bits box. This gave me windows and after making some slight tweaks to the proportions in light of these, I started cutting the walls from offcuts of Daler board. After the windows were glued in, sills and lintels were added from microstrip.
Other details is from various thinknesses of card and paper. Roof slates are paper. The chimney was a last minute addition when I realised that sat on the front in Scotland you’d want a bit of heating !
Total build time was 3-4 hours I suppose broken up into chunks and accompanied by various bits of telly. Lets be honest, most people watch that much on the goggle box, I just did it while building.
I think the result looks really nice. Once painted I hope it fits in on the layout.
Wednesday, December 26, 2007
Boxing Day Sails
It’s the last day of my Christmas holiday and the weather is smashing. I could head off with the herd to the local shopping centre to find some “bargains”. I could head off to find some hooray Henries sitting astride horses and looking for foxes to kill (sorry, trails to chase not foxes for legal reasons). Instead I headed off to the boating pond with my Dad to sail for an hour or so.
The water was perfectly flat, the sun shone and there was only the merest hint of a breeze. Puffin was soon on the water, followed by Pigeon Pie once I diagnosed an iffy switch on the transmitter causeing a lack of signal. For future reference, if this happens, try all the switches including the stick reversers as this time one had been knocked to a mid-position.
We sailed for about an hour and a half. Longer than planned but some people came up from the nearby holiday cottage and provided an inquisitive audience. It’s a simple transaction, they ask sensible questions and say nice things about the boats, we answer them properly and keep sailing to provide entertainment. Everyone is happy.
Well, I wouldn’t have found anyhting to fit me in the sales anyway…
Tuesday, December 25, 2007
Merry Christmas
Someone up there reads my blog. Inside today’s festive cracker I got a plastic kit - my Christmas is made !
With only a few moments application I can be the proud owner of a multi-coloured BMX style bike. Mind you that hat was flimsy and the joke terrible but then you can’t have everything.
Anyway, Merry Christmas to all my readers.
With only a few moments application I can be the proud owner of a multi-coloured BMX style bike. Mind you that hat was flimsy and the joke terrible but then you can’t have everything.
Anyway, Merry Christmas to all my readers.
Monday, December 24, 2007
Dull blade
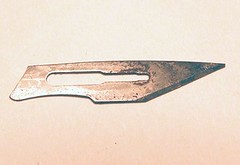
Here’s a rare sight, a used scalpel blade. It’s not rare because I don’t wear them out, it’s rare because I never seem to get around to changing them as often as I should.
It’s not like I throw them away either – the blade migrates from my cutting scalpel to one of my poking and spreading knives. The have the dull blades because even when the cutting edge has gone they are good for applying small amounts of filler or scoring surfaces. The cutting knife is a Swan Morton retractable handle, the others are Number 3’s.
My parsimony with new blades isn’t a financial thing – they are cheap enough and I always have plenty of spares. It’s just that a bit of me thinks the current blade is fine. I forget just how much better the new edge will be. For some jobs, such as card modelling, a new blade before starting is a no-brainer but otherwise; well, it still works so we carry on.
So, here’s a handy hint. Treat your modelling knife to a new blade today. It will think it’s Christmas…
Sunday, December 23, 2007
Building repairs
With that special Christmas time on my hands (shopping done, no desire at all to go and stand in mad crowds of people desperately looking for that last item) I’m catching up on some layout maintenance.
Last time Flockburgh was out I dropped a board face down during the packing up. Most of the damage was quickly repaired but the little clapperboard building at the front of the board bore the brunt and needs restoration.
I’m not going to try and fix the model by bending it back to shape. That’s not going to work no matter how temptingly easy it might appear. No, I’ll take a cue from the classic car world and cut out the damage, to be replaced with new material.
So, sharp new blade in scalpel, I chopped the end wall off as cleanly as I could. It looks like the roof can be saved so there’s just one new bit to make. I’ve cut along the original joins and since I made the model in the first place, all I need to do is make this bit of it again…
Saturday, December 22, 2007
Cracker junk
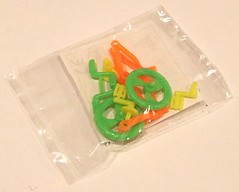
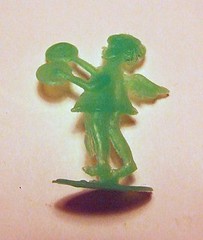
I do wonder why people bother sometimes. The photo shows a “gift” that fell out of a Christmas cracker at my works lunch. In case you can’t tell it’s a little model of a cherub playing the symbols.
Now you are probably thinking it’s just another bit of junk that comes out of a cracker. Why is it making an appearance here ?
Well, it annoys me. We are always encouraged to avoid creating waste but this is nothing but waste. It’s got no useful purpose. It’s not part of a set you can collect. It’s not even very good – what are you supposed to do apart from throwing it away ?
Someone, somewhere has spent money making a master and then tooling up a machine to produce these. In a meeting, a businessman has made a decision that what the world needs is more badly moulded green cherubs playing cymbals. A whole lot of effort, a reasonable amount of money and quite a bit of skill has been expended to bring this idea to fruition.
Why ?
Just imaging being asked one day to make the master for this. You’ve spent years honing your skills and this is what you get to do. I suppose the only consolation is that, judging by the amount of flash indicating mould wear, you’ve mastered something that will be produced by the million.
Now don’t get me wrong, I love a good cracker novelty, probably more than I should. There are many in my spares box. Sometimes they give up useful mouldings for all sorts of jobs. At least one boat I’ve built has a dog that started off as a translucent pink bit of plastic and with a bit of paint turning into a very presentable model.
I love puzzles and things to be fiddled with – it makes my crimbo if I get a little kit to build at lunch. What a pity then to find that you can still get goodies that everyone loses interest in before they hit the table.
Friday, December 21, 2007
Sticking plastic
It doesn’t matter what we make buildings out of; there is always a stage where plasticard has to be stuck on the surface. Although not an exciting part of the job it’s vital to do it properly.
Years ago the glue of choice for this task was a Dunlop contact adhesive sold in a yellow bottle. You smeared glue on the wall and plastic, left it to go clear and then pushed the two together. The grab was instant and after a while the adhesion was great. Model buildings 20 years old still look fine having been done this way.
Unfortunately the glue was made up from chemicals extracted from hens teeth and rocking horse droppings making it particularly hard to get hold of. I think in 2 and a half decades we managed to get two bottles.
Necessity being the mother of invention, I have tried other glues. It’s important not to use a solvent based product or it will eventually attack the styrene. So I tried “Liquid Nails”, a builders glue with fine sticking properties. This works but isn’t the easiest substance to smear thinly – builders like to gob the stuff on but modellers need a more controlled approach.
Now we are trying Bostick Solvent Free glue. It comes in tubes and is reasonably easy to get. Unlike Liquid Nails its runny enough to smear and there is no stringing like UHU or Evo-Stick. Only time will tell if it stays sticky for a couple of decades but the results so far are promising.
Thursday, December 20, 2007
Fire stopper
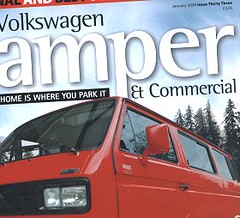
Just in time to be a nice surprise for Crimbo, I’ve been published again in the ever excellent Volkswagen Camper & Commercial magazine.
This time you can read about a 2 quid fix I picked to help prevent engine fires in Type 2 vans. Mind you, since I picked it up from the Type2.com mailing list I suppose the fee had better go in that direction.
Still, if it helps stop a single engine fire (especially mine !) then it will be well worth it.
Wednesday, December 19, 2007
Wooden quay
Once the cardboard promenade has been hacked around enough to satisfy us, it is replaced with a plywood version. I’m not going to claim credit for this, as my Dad’s the woodworker. He tells me that forming the curve around the end was a nightmare because for some reason none of the normally reliable glues would work.
Once the join in the curved end is sanded and the whole lot covered in stone effect plasticard this is going to look nice. With the pain of construction forgotten we’ll be glad we went for the realistic rounded end to the quay and not an easier to build square version.
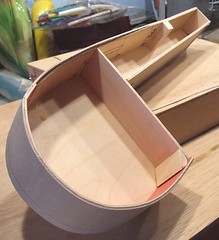
Once the join in the curved end is sanded and the whole lot covered in stone effect plasticard this is going to look nice. With the pain of construction forgotten we’ll be glad we went for the realistic rounded end to the quay and not an easier to build square version.
Monday, December 17, 2007
Mock-up
We’ve always been a big fan of mock-ups. A few hours with bits of cardboard can save may more spent finishing a model building and feeling the realisation dawn that “something” isn’t quite right about it. No matter how much detail you chuck at something, if the basic proportions are wrong then the model will look odd.
This mock-up is bigger than most, it’s the new promenade and quayside for Flockburgh. Our plan is to extend the current prom, taking it around in a curve to form a protective wall for a small harbour. On the curved end there will be a small lighthouse - the sort that marks an entrance rather than warns of rocks.
Further along the quay, behind the buffers, will be a chapel and then the end of a warehouse.
Getting the prom right wasn’t to bad. We scribbled on the baseboard quite a bit and then chopped the Daler board test piece around. Now we’re happy, my Dad is off to start work in plywood.
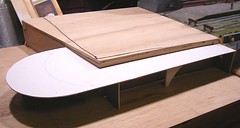
Sunday, December 16, 2007
Cylinders
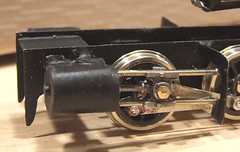
It’s time to stop building new stuff for the 1361 locomotive and start facing the bits I bought. For the chassis, this means cylinders as everything else goes in the bin.
I’m not sure how these were made originally but what I had after carefully removing them from the old chassis (read: waggling the parts until the glue broke) were whitemetal cylinders with slide bars apparently moulded in and then attached to a metal support bracket. Running in this is a whitemetal crosshead attached to a whitemetal & brass coupling rod. As bought the brackets stuck a long way outside the footplate.
While not a fan of soft metal crossheads, they did work well and looked quite nice so I’ve hung on to them. Originally bolted together, the components are now soldered. The bolt just attaches the coupling rod.
The cylinders were cleaned up which made the brackets fall off, as they were just glued on albeit with loads of old, hard, difficult to remove, glue. The slide bars seemed to vary in length very slightly and were all longer than those found on the prototype. This is (probably) to compensate for a non-scale crank throw so I left well alone.
On one side I simply soldered the casting to the chassis with low-melt and then moved them around until things looked right. Then tested the chassis with the body and moved the cylinder until it looked right and didn’t get in the way. A simple coupling rod was made from rail filed flat on the face. Everything worked and there seemed to be plenty of clearance.
Over at the other side the clearance disappeared. I’m not sure why, but fixed it by building up the missing metal with low melt solder. Not sophisticated but in this case, effective. The result is hidden under the footplate anyway. I did made sure that the cylinders were in about the same position on each side of the model and were level so the front on view looked OK.
The final job was to put a grove in the moulded valance under the footplate to let the body sit down on the motion brackets. A junior hacksaw did the job giving a 1mm wide slot which give enough space for the bracket and allows for my lack of precision in the work.
I’m quite chuffed with the end result. I’ve built a compensated chassis with waggly bits that don’t stick out the side of the body. Everything runs without jamming up solid too, apart from when one of the crank pins unscrewed itself but we won’t mention that. All I need to do is fit some pickups and brake gear then move on to the pretty bits.
Saturday, December 15, 2007
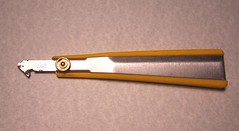
Olfa Plastic Cutter
Having mentioned this tool a couple of times, I’ve been asked what it actually is.
That’s it in the photograph. Tools like this used to be known as “scrawkers” for some reason. They also used to be hand made by people using left over hacksaw blades and bench grinders. I only have junior hacksaw blades, which are too small, and an angle grinder, which would do the job but I’d probably lose a limb in the process.
My tool came from Squires. Part number CKP450. Current cost £5.99. Spare blades available for £2.99 for five – I’m still on my first one though.
In use the tool is held parallel to the material being attacked. You drag the blade backwards along the sheet and a sliver is removed. The effect is different from a knife cut because the later doesn’t remove material. On plastic you get quite a nice styrene spring shape of waste which I’m sure must be useful for something…
To cut plasticard, make the groove with a couple of passes and then snap the sheet. You can do this with a knife as well if you prefer. I reserve the cutter for scribing plastic which it’s much better at than any other tool.
It also helps with metal. Here I do use it to scribe a line and then snap the sheet. I’ve never found a better way of cutting straight lines in sheet nickel silver or brass. For the kitbuilder it’s a good way of improving relieving lines on the back of bends if they aren’t etched deep enough.
All in all, a very useful tool. Until I bought one I didn’t realise just how useful but now I wouldn’t be without it – hence it’s position in a drawer within arms reach of the workbench.
Friday, December 14, 2007
Nice slabs
Sometimes you’ve got to marvel at the quality of work some people manage for the most mundane of projects.
The paving slabs on our club O gauge layout are hand scribed in plasticard. Not that tough you may think but them the platform is 5 feet long. And there are no mistakes, no slips or bits where the scribing of the short lines got out of sync.
The lines were made with an Olfa plasticard cutter which gives an excellent result. A bit of filling and finishing will be needed but I’m told the finished product will be painted by our show in January next year.
Lets’ be honest, the best this modeller can hope for is that his work is so good that no one notices it. Paving is the sort of thing that lives in the background and you’ll only notice when it’s not right. However the picture that is a model railway is a sum of it’s parts and this part is really nice.
Wednesday, December 12, 2007
Bug-a-Lug
All this work on the chassis will be to no avail if I can’t solve one little problem. The motor won’t go in the body. Hmmm.
Hopefully (I haven’t done it yet) all I’ll need to do is remove these lugs. I think they are meant to allow you to mount the motor horizontally. Can’t work out why you’d want to do this though as the gearbox is taller than the motor in the vertical configuration so there’s not height benefit.
Anyway, out with the piercing saw…
Tuesday, December 11, 2007
Butt hinge
Not one new project, but two for me at the moment. The other job I have in hand is to get Flockburgh’s scenic extension into an exhibitable state.
The extension is an 18 inch long board. Despite it having no track it’s being attached in the same way we’ve attached baseboards to each other for nearly 20 year. Loose pin hinges.
The method is simple enough, clamp the boards together and screw a hinge on the front and back. To separate the boards, just pull the pin out. This method is easier than using bolts – you don’t have to crawl under the board to fit them or do them up at a show.
Even in 14.2 the hinge is good enough to sort out all the track alignment which is good news to someone who started his modelling career helping with layouts where 10 minutes alignment at every joint was common. All that baseboard hitting and bolt fiddling is in the past.
The hinges are available from all DIY stores, no need to visit a specialist supplier either.
Monday, December 10, 2007
What a difference new wheels make
Time to get back to an old projects. The 1361 class has been sitting in a box for over a month and I really want to get it finished. New readers can read about the fun & games to date in the archive.
When I left the model the big problem was with the wheels. Lack of anything suitably round to go under the footplate had slowed the project so much I had to move onto other things. However, I did manage to get two set of wheels to go in the box and so I started by removing the dogy K's originals and replacing them with a nice shiny set of Romfords.
What a difference ! Straight away all the effort jigging the chassis paid off. The wheels roate in both directions smoothly at all controller settings. Assuming I can cram this lot into the body, I will end up with a very nice little loco.
You can even watch the chassis work on YouTube.
Sunday, December 09, 2007
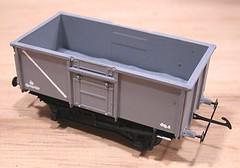
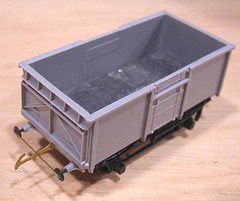
Paint your wagon
There’s not much easier to paint than a 16 ton mineral wagon. Black underframe, pale grey body. The only tough thing is a the end door stripe and I put this on with a bow pen. Just the job for a simple practise task.
Numbers are just blobs of paint when I do them in this and 4mm scale. I know I should use transfers but hate them enough on locos so wagons aren’t going to get a look in. Besides, once weathered I don’t think anyone really notices, or at least they are too polite to say if they do !
I tested the wagon on the layout again and disaster* struck. It kept falling off on the crossover. A quick check showed that somehow the whole model had twisted leaving one corner a millimetre or so off the rail. In 14.2, this matters. I suspect that the solvent used to assemble the body had set hard and pulled all the sides in a bit, and a bit more on one corner. Normally if you spot this early, twisting the ends in opposite directions sorts things out. I should have paid attention.
In desperation I slid a sharp blade under the offending corners and levered the solebar off the floor. When happy I ran some solvent along the join hoping to fix it where I wanted. This took a couple of goes but all seems well now.
*When I say “disaster” I realise this is in the context of making a toy train so it’s not important at all really.
Saturday, December 08, 2007
Hospital Tramways and Railways
While at Warley last weekend I had the latest copy of "Hospital Tramways and Railways " by David Voice thrust under my nose. This is the third edition which has features many extra lines including the military camp on the Isle of Man. I must admit that I was sorely tempted to update my first edition to this latest hardback version.
Of course the best bit is the photo of my model of the Hellingly Hospital Railway in the appropriate section.
Find the book on Amazon here.
Of course the best bit is the photo of my model of the Hellingly Hospital Railway in the appropriate section.
Find the book on Amazon here.
Friday, December 07, 2007
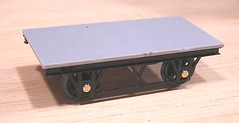
Body built
Aren’t modern Parkside kits wonderful ? By modern I think I mean anything released in the last 5 year – the older ones were good but the latest ones are amazing. The good news for a 3mm modeller is that the Society sponsored kits are all the latest style.
Which is why after a couple of hours lazy work my chassis is now looking much more like a wagon. I’ve even managed to fit couplings. Nothing clever here other than the brake gear. I put a cross shaft in from V hanger to V hanger. Then the brakes were cut in the middle so the operating links clipped either side of the cross shaft. Much easier than drilling a hole or just putting the shaft between the brakes.
I want to model this wagon empty as all the others are running full. To get the weight required for decent running I’ve made a lead floor. Once painted and with coal residue in the bottom I’m hoping this won’t be too obvious but we’ll see when I get it done.
Wednesday, December 05, 2007
Hard work
I have it on good authority that the sign of a successful demonstration at a model railway show, is that you’ve not built anything. On the basis of this, my efforts at Warley this weekend were very successful indeed.
By the end of the first day I have taken a wagon kit out of the box, put it on my modelling board and dug out some pinpoint bearings.
Day 2 saw the bearings fitted and then the solebars were glued to the floor.
And that’s it. A triumph I think you’ll agree.
By the end of the first day I have taken a wagon kit out of the box, put it on my modelling board and dug out some pinpoint bearings.
Day 2 saw the bearings fitted and then the solebars were glued to the floor.
And that’s it. A triumph I think you’ll agree.
Tuesday, December 04, 2007
Manchester Workboat
I've just returned from a couple of days in rainy Manchester, hence my lack of posts.
However, I return bearing a nice picture of a genuine workboat in the Manchester docks. Boat modellers will notice that the paintwork si beast described as "worn". The handrails aren't exactly straight either - it's a pity that that never looks right when you model it...
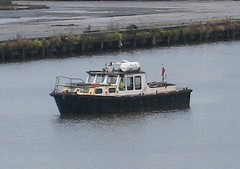
However, I return bearing a nice picture of a genuine workboat in the Manchester docks. Boat modellers will notice that the paintwork si beast described as "worn". The handrails aren't exactly straight either - it's a pity that that never looks right when you model it...
Sunday, December 02, 2007
Warley Demo day 2
Wow – a busy Sunday !
As I’ve commented before, Sunday’s are traditionally quieter than Saturdays at any show. People hoping to bargain hunt obviously want to be in the door as early as possible to make the best of any opportunities, while others just want to have the maximum chance to wander around. In the case of the NEC, public transport is better on the first day of the show so that rarest of beast, the railway modeller who actually gets on a train will need be present in much lower numbers on Sunday.
This year things seemed different. Thanks to the bigger new hall we were in, wide aisles were the order of the day. Last year the only way to breathe was to get behind a layout. This Saturday getting around the hall was easy. Sunday I struggled in several places – not badly but enough to make me think there were more people around.
As yesterday, chatting was pretty constant between 10 and 4. Our visitors were pretty varied too (hello if I mean you !) with Canadians, Irish and Swiss appearing to ask questions. In turn we quizzed them about the hobby in their countries.
We’ve helped with a work of fiction too – an author of children’s books (sorry, not names due to rubbish memory, but even if I hadn’t forgotten, this is like a confessional, everything is in confidence. Sort of.) plans to include a character who is a railway modeller and stopped for a chat to see if we could explain what makes us tick. Not sure if we helped much but we did our best. It was a nice break from explaining what Daler board is anyway…
That’s the second best thing about being a demo stand. You never know who will turn up next and what they want to know. Some ask a question and then proceed to tell you the answer. This is especially amusing if we know you are wrong or have plainly never done what you claim, and yes we do laugh about this afterwards. Most ask or comment on what we have on the table and off we go on another conversation that probably digresses quickly from the original point.
Some need a specific thing explained, others have a much more general need for information. “How do I start” give plenty of scope, “What sort of coupling should I use for 009 models” doesn’t. The later stumped me a bit as I’ve never actually built a 009 model but after a bit of digging it seemed that the modeller wasn’t setting up the Bemo’s that were giving him grief constantly. A quick explanation of my Spratt & Winkle setting up track and he went away vowing to build something similar. I hope he does and that it gives the desired results. Getting coupling working properly is a job easily overlooked but one that will pay dividends far in excess of the work required.
One lesson learned is: Go to the cashpoint before the show. I forgot and so the trade didn’t benefit from my visit as much as I might have liked. There is a money machine in the NEC and it has a permanent queue of 50 in front of it, or so it appeared anyway. I still managed to come back with a couple of kits for Russian locos (I know, I don’t need them, but then what has that got to do with it) and some card Manx wagons.
The best thing about being a demo is that you have little to pack away and so you get out of the hall quickly. We packed out entire stand in one of my Mum’s scuba diving bags, which wheeled in and out on a little trolley. No need to get the car in the hall for us which meant we were home an hour after it shut.
So, a good weekend. Thanks are due to the Warley Model Railway Club and especially Paul Jones and Nick Tilson who organise the event and demo stands respectively. Also, the slightly camp bloke in charge of the exhibitor catering and the two NEC car park stewards who astounded us by being helpful and giving the right directions. Thanks also to Jackie from the Larger Scale Model Railway Society who provided the required banter for the whole weekend from the stand next to us.
And the award for “Phil’s Layout of the Show”, that prized trophy (Ok, mention on the Blog) for the layout I’d most like to have built ? Tim Watson’s model on the L&WMRS stand. It’s a really lovely little model with detail and operational interest. Bets of all, it was tiny and hopefully has persuaded a few people that they can find space to build a model and they can actually finish one. And that is what we are there for.
Saturday, December 01, 2007
Warley Demo day 1
What a busy day !
The first people arrived on the stand about 10am and there wasn’t a time when someone wasn’t in front until 4pm. Considering all we are doing is a demo, that’s pretty amazing. What’s more every demo stand had the same problem ! Thanks goodness there were two of us so we could take turns, although sometimes we both ended up working at the same time.
This is excellent news. It means that there are lots of people out there who want to make things. I know I spoke to at least half a dozen who were coming back in to the hobby after being away. They wanted to know how to get started again and had loads of basic questions which we did our best to answer.
Some definitely went away inspired. Several went away in the direction of trade stands to hand over money.
Actually, I ought to say welcome if you are a new reader of this blog having picked up one of my cards. Please have a good read through the archives, dig around the rest of the site and then let me know what you think. Comments, good and bad are always welcome.
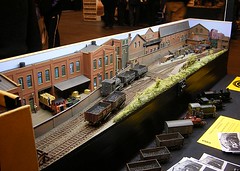
Anyway, the show is a good ‘un. My favourite layout (I think, didn’t really get that much of a look around) is a Dutch model of a dock in O gauge. The quality of the work is fantastic and the boat on the front is really impressive. In fact there were several good looking boats on layouts this year. Perhaps people have finally caught on to what we’ve been doing for the last few years !
Trade was nice too. I have personally saved well over a thousand pounds by not buying everything I wanted. A couple of Isle of Man locos in G gauge, 3 ½ inch coaches to go with the Hornby Rocket, loads of Triang Battlespace and a good few kits have not come home with me tonight. Who knows, if I resist tomorrow I will have saved the money two days on the trot !
The first people arrived on the stand about 10am and there wasn’t a time when someone wasn’t in front until 4pm. Considering all we are doing is a demo, that’s pretty amazing. What’s more every demo stand had the same problem ! Thanks goodness there were two of us so we could take turns, although sometimes we both ended up working at the same time.
This is excellent news. It means that there are lots of people out there who want to make things. I know I spoke to at least half a dozen who were coming back in to the hobby after being away. They wanted to know how to get started again and had loads of basic questions which we did our best to answer.
Some definitely went away inspired. Several went away in the direction of trade stands to hand over money.
Actually, I ought to say welcome if you are a new reader of this blog having picked up one of my cards. Please have a good read through the archives, dig around the rest of the site and then let me know what you think. Comments, good and bad are always welcome.
Anyway, the show is a good ‘un. My favourite layout (I think, didn’t really get that much of a look around) is a Dutch model of a dock in O gauge. The quality of the work is fantastic and the boat on the front is really impressive. In fact there were several good looking boats on layouts this year. Perhaps people have finally caught on to what we’ve been doing for the last few years !
Trade was nice too. I have personally saved well over a thousand pounds by not buying everything I wanted. A couple of Isle of Man locos in G gauge, 3 ½ inch coaches to go with the Hornby Rocket, loads of Triang Battlespace and a good few kits have not come home with me tonight. Who knows, if I resist tomorrow I will have saved the money two days on the trot !
Subscribe to:
Posts (Atom)