Tuesday, June 30, 2015

Summer modelling tools

Lollymen

Summer is here and it's time to start collecting model making tools.

How better to paint 4mm scale figures than by supergluing their feet to a lolly stick? I've found that ones from Magnum ice lollys are the best offering a wider area for the feet to be stuck down.

Of course, the sticks don't last forever (NO, they don't) so it's wise to keep working on collecting plenty to tide yourself over the cold winter months.

Monday, June 29, 2015

Scale Rail International - Launch Issue

Not so long ago, well known railway editor, Chris Ellis produced a magazine called Model Trains International. For those who remember his time at Scale Trains back in the 1980s, the format was very similar, the main feature being that he ignored the traditional British dislike of foreign trains and treated modelling as modelling.

This ensured a small but loyal group of readers. So loyal, that when Chris retired from publishing, over a curry, they decided to have a go in a similar vein themselves.

Scale Rail International is the result.

A5 in size and with 38 pages plus covers, the content is a eclectic as ever. Christopher Payne, well known for his fantastic atmospheric NG layouts, looks at a possible French prototype with 2 different gauges. There's more French NG, some Czechoslovakia in continental TT plus Peter Bossom doing something British in British TT.

Even when a more conventional subject appears, such as the Class 37 diesel, it's tied to a feature suggesting a suitable small layout to use it on.

For anyone interested in oddball modelling prototypes and unusual layout, this will be well worth keeping an eye on.

SRI isn't available in the high street shops (you might find it in some model shops) - contact scalerailsinternational@gmail.com for subscription details. Price is £21.60 for 6 issues.

Sunday, June 28, 2015

Great Central Railway model event 2015

CakeTo Quorn for the first MREmag.com exhibition stand!

With the magazine under our control we decided it was time to do some events handing out leaflets and encouraging new readers. You can make an on-line mag as good as you like, it still needs readers, especially if you want any advertisers.

The event runs for three days, Friday to Sunday, and I was otherwise engaged for the first two. Sunday though, I was there to talk to people and give them little bits of paper.

The show takes place in a giant marque at Quorn station. Visitors can ride on real trains as often as they like as well as spending time enjoying an excellent selection of model ones.

Both layouts and trade were very good.

Those with models had a bit to complain about as the tent got very hot - causing the bridge deck to buckle on a superb 4mm scale Connel Bridge for example. The floor was also very bouncy in some areas providing miniature earthquakes every time someone walked by. For long layouts, this was a serious handicap.

That's a shame as the selection of layouts was as good as you'd see anywhere. I loved the tiny slate quarry, Hornby Magazine's Twelvetrees Junction (especially the bits I built), a crowd pleasing museum that set the purists frothing and many others.

Slate Quarry

By late morning I was feeling hungry and so decamped to the Bistro (pretentious for a preserved line, what's wrong with a cafe?) to buy a sausage roll and really superb Victoria Sponge cake. It's probably good that were busy after this as I could have munched another slice or two...

One very unusual demo showed the building of O gauge steam locos in cardboard. The results were as good as many kit-built examples and proved that persistence and skill can overcome a slot of financial limitations if you really want. OK, you'll still need to buy motors, gears and wheels, but even so, you can have models if keen enough. More on their website.

Cardboard loco

After a busy day, I was happy to escape after packing up. The rest of the team don't have my exhibition experience so we feeling it more than I was.

If I'd paid to come in, I'd have been a very happy punter. Numbers were 30% up on previous years and there were a few moans that the trains were packed. Next year, perhaps a few more coaches? After all, the 9F could easily handle them!

Photos from the GCR Model Event on Flickr.

Saturday, June 27, 2015

Super cheap clock repair


Years ago, I bought a computer monitor shaped clock from someone on eBay. I've always liked clocks and have to stop myself building a vast collection of them in all shapes and sizes.

The Nokia monitor is only 10cm wide and sits on a shelf by my real computer. When I first bought it, monitors were this shape. Now the one I type on is thinner than the clock!

Anyway, given out as a freebie at some show, it wasn't built to last and the mechanism stopped working after a couple of years. Sensible people would throw it away but I'm not, so I didn't.

Instead, during a recent trip to Ikea, I bought a VÄCKIS alarm clock for the breathtaking price of 80p. I don't even want to think how they produce something with mechanical bits so cheaply...

(I tried the "Ask Anna" link on the page by the way but she wasn't very helpful on this point)

 
Taking both clocks to pieces was a matter of some cross head screwdriver work and prising the clear plastic out of each gently with a tiny, tiny, screwdriver under the edge. Hand and adjusting knobs bulled off the back of each.

Sadly, the Nokia hands won't fit the Ikea mechanism but its own hands don't look too bad.

 
Neither clock uses a screw in holder around the hands. The Nokia clips into place behind the face. As Ikea don't use the same clips and their mech is slightly smaller, I put a couple of dots of superglue between face and black plastic casing and then wedges some 1mm thick plastic sheet behind the clips to grip the part firmly.
 
After this, the face is clipped back on its body and all is well again. There's even so much space in the monitor that the old mechanism can be tucked in there in case this turns out to be a rare collectable and needs to be restored.


Friday, June 26, 2015

Swizzle yard

Swizzle-yard

Here's a clever idea spotted at the weekend. The fiddle yard on Loughborough Midland is vast and it's important to stop trains in the right place.

What you need is some handy markers that can be seen over the top of the model trains. What better than swizzle sticks normally found in pub drinks?

Best of all, if you break a few, there's likely to be a supply at your nearest hostelry for the price of a drink or two. Something to think about if you are enjoying some Friday refreshment.

(If you need swizzle sticks faster, they can be bought from here.)

Thursday, June 25, 2015

Wiring a multi-pin plug

 
I'm making up an inter-baseboard lead for a new project and this involves wiring up a couple of multi-way plugs.
 
Back in the old days, these would have been honking great things that you could have used a blowtorch in. Nowadays we have stuff more suited to being stuffed in the back of a computer than a Lancaster bomber, so the work is more delicate.
 
After much practise, here's my (hopefully) helpful suggestion.
  • Tin each wire and then cut the exposed length to the same as the pin to be soldered to.
  • Tin the pin.
  • Bring the two together and with a tiny bit of extra solder on the iron tip, heat the joint. Take the iron away and let it cool, a matter of a couple of seconds.
  •  Tug the wire. If it stays on, the join is probably good.
  •  For extra security, you could slip a length of heat-shrink tube on each connection but I'm too lazy for that. A length of insulating tape between the rows of pins is pretty quick though and worthwhile insurance.
It's important to hold the plug/socket securely. A small but heavy hand clamp does the job here but a big blob of Blu-Tack will do if nothing else is available.

Wednesday, June 24, 2015

Stroudly ex LBSC D1 Class

Stroudly ex LBSC D

Another interesting loco in the Webb collection is this Stroudly ex LBSC D1 Class. Beautifully built and painted, it's a Wills whitemetal kit.

Another early model, from the days before John became a firm Midland modelling man.

Most fascinating (to me) is that the chassis is split frame but runs on Romford wheels. To achieve this, the axles have been carefully cut and then filled with slow-set epoxy glue.

Split axle Romford

I've read about this technique in the past but never actually seen it in practise. Sadly, the model is without a motor & gearbox as well as being Em gauge, so I can't tell you how well it works.

(Thanks to "Muz" for identifying the loco for me.)

Tuesday, June 23, 2015

10000

10000

Working through the late John Webb's modelling stuff, we've managed to whittle it down to his greatest models. The ones that took gold medals at the Model Engineering Exhibitions. The ones we were all nervous about handling on his layout, Ambergate, for fear of damaging something.

Among the collection are, what I assume, some much earlier Web models. These are just as interesting, at least as far as I am concerned.

For a start, how about this model of ex-LMS 10000.

Made mostly from wood and card, it's scratchbuilt and I suspect, contemporary with the prototype. The curved windscreens are acetate with thin card frames.

Unpowered, the wheels appear to be Airfix. Sadly, only the outer axles are fitted and one of those has broken. That wouldn't be a problem except that the frames are 3mm thick hardwood, so don't flex to allow replacements to be fitted.

Young modellers will be horrified by this sort of modelling but for many, it's how they cut their teeth. There wasn't much in the way of RTR or even kits, especially for those new-fangled diesels, so you got your limited tools out and made everything yourself.

I think the model has real charm and certainly looks like the real thing, even if it would give forum-ites a dose of the vapours!

Monday, June 22, 2015

Cottage now ready for occupancy

Cottage in position

The last job on the cottage was to fit the windows. These are cast in clear resin, the frames need painting and then fitting to the model.

A coarse file is required to make them fit in the holes in the walls. Several mm of material needs to come off the top and sides, but the result is a good, snug, fit. A little epoxy resin run in between the frame and wall from behind finishes the job - these things aren't coming out in a hurry!

End rest - a really nice looking model building. Really chuffed with this one.

More details from Pendle Valley Workshop.

Sunday, June 21, 2015

Moving the Knightcote Tardis

Knightcote Tardis

Being a member of a model boat club isn't all about sailing you know. There is work to be done.

With new toilets built, it was time for the old and smell portaloo to be moved out for collection.

If it's any help, an empty plastic bog can be slid along the ground at impressive speed when propelled by 5  older chaps. If you ever need to move one, that knowledge might be valuable.

And no, we didn't try to sail it on the lake. Sliding it is one thing. Picking a portaloo full of water out of our pond is another thing entirely...

Saturday, June 20, 2015

London today, Great Central Railway tomorrow

Ready for GCRIt's a busy weekend. All being well, today I'm in London at the Double O Gauge Association AGM.

Sunday sees an early start as I'm manning the MREmag stand at the Great Central Railway Model Event. Now we've taken over the on-line mag properly, there is a push to increase the readership and to that end, we'll be chatting to visitors.

Hopefully since the mag is FREE, it should be an easy sell!

If you are dropping by, we'll be at Quorn Station, Stand 5A.

Friday, June 19, 2015

Outdoor artistry

Outdoor painting

On a sunny morning, it's nice to find a modelling job that can be carried out on a table in the garden. Slapping some paint on the cottage is just such a job.

Using art acrylics, I started with a base coat of grey. Mixing a little white into the paint, I picked out some stones, then more white and more picking out.

After this, a wash of very thin black/brown mix to fill the mortar courses and depressions in the stones.

No fancy modelling brushes, just some cheapo bristle ones designed for kids. No fiddly fine detail work. No chemicals. No smell. Nice job.

Finished stonework

My supervisor seems more concerned that I was in the way of him kipping in the cat mint!

Thursday, June 18, 2015

Chimney Cheat

 
After yesterday commenting on incorrectly fitted chimneys on a model cottage, how about this?
 
A chimney hauled up to the top of a house under construction whole and plonked in the roof as decoration. There's no brickwork in the rest of the building yet, although eventually the walls will be clad in brick. Certainly, there isn't a chimney breast under this thing.
 
Is it from the Wills building packs? Life following model making?

Wednesday, June 17, 2015

Garden railway cottage

Unpainted cottage

My Dad is indulging in a bit of garden railway modelling at the moment. Basically, he's realised that he'll be 103 before I get around to assembling some of the kits we've bought over the years so decided to do them himself. As long as I paint them anyway.

First up is a Pendle Valley Workshop Crofters Cottage kit.

The kit is cast in the slipperiest resin ever but sticks together well with epoxy resin.

P38

For extra strength, this thing is going live outdoors all year round after all, Isopon P38 has been squished into all the internal corners. That's probably over-engineering but never mind. Better safe than sorry.

It's only when I came to prime the model I noticed that the chimney pots are a bit too close to the roof ends. Still you don't notice these things in the garden and we'll just grow plants up the sides...

Primed cottage

Tuesday, June 16, 2015

On the (painted) road

Cobbled road

I was loitering around the BRM office the other day when someone chucked a Kibri plastic roadway section complete with cobbled tramtrack in my direction. I think I was the last stop before the bin as part of a tidy up of random objects.

Anyway, I looked at it and though it might be fun to paint up. A couple of evenings ago, I was at a lose end and fancied noodling around with some paint. A hour later, the grey plastic had been coloured up and looked quite nice.

It's mostly Humbrol and Precision enamels. The laters new and faded tarmac don't look as brown in real life. Not sure what happened there when I took the photo, and yes I did tweak the white balance.

Anyway, now I can re-create traditional cobbled track in the road scenes with either trams or suitable railway locos. At 20cm long by 12 wide, the results are a bit limited though. I wonder if I can get some more?

Cobbled street

Monday, June 15, 2015

Cyclist, railcrane, tractor and a dead 08 in BRM

Sorry for the delay in my monthly British Railway Modelling post, the subscription copies were delayed and if I'm honest, I'd forgotten what I'd got in this one.

As it turns out, loads of stuff.

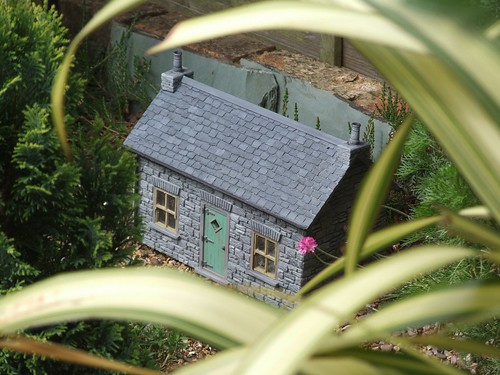
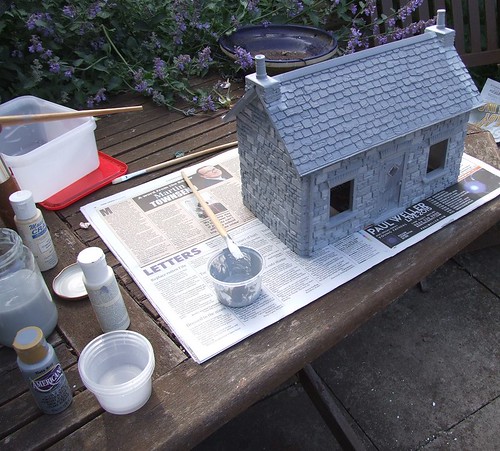
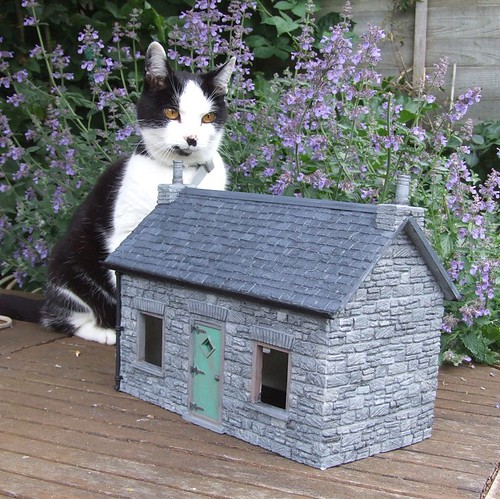
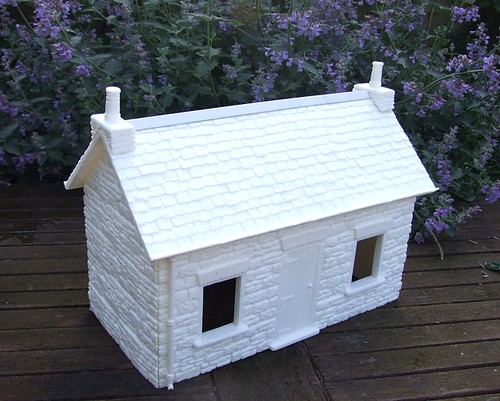
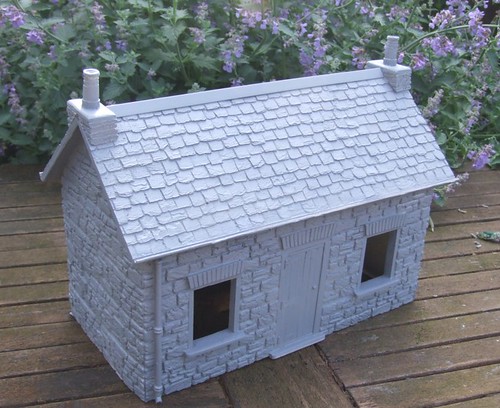
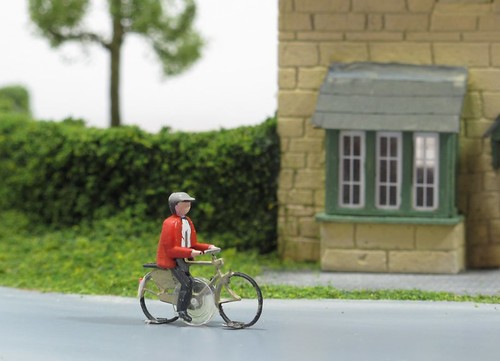
In both print and on the DVD, I've wrestled the Magnorail HO scale working cyclist kit from the office and built a small diorama using last month's Petite Properties cottage.

Cyclist diorama

It's a bit of a fiddle, but the resulting model looks amazing with the mini man cycling around apparently by magic. Except it isn't, and I'll show you how it works...

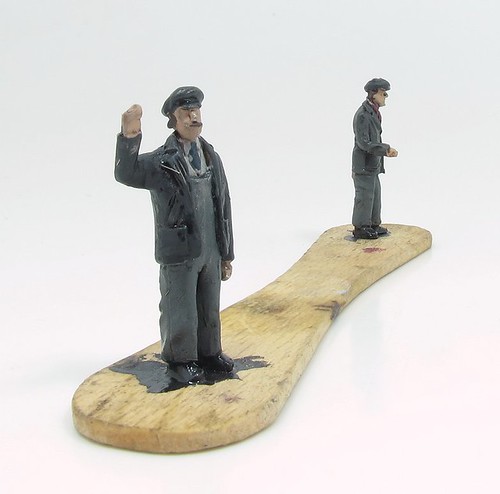
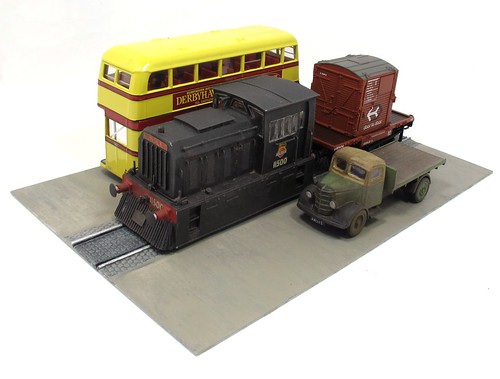
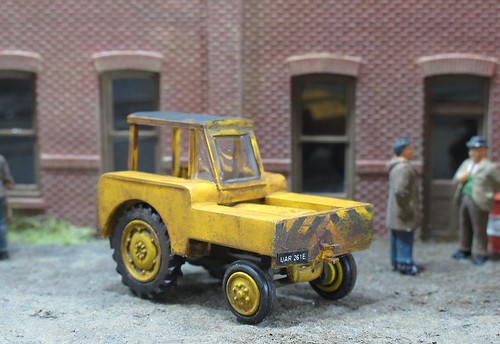
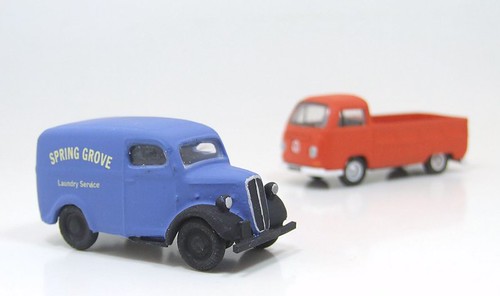
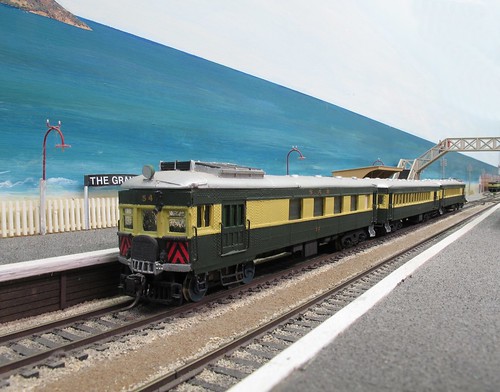
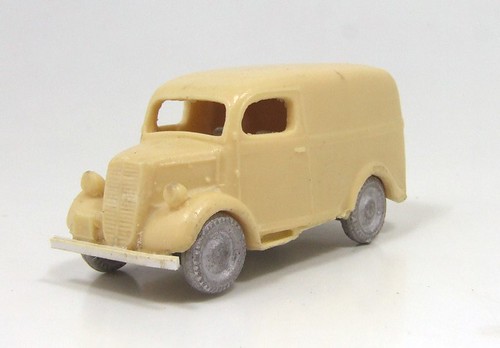
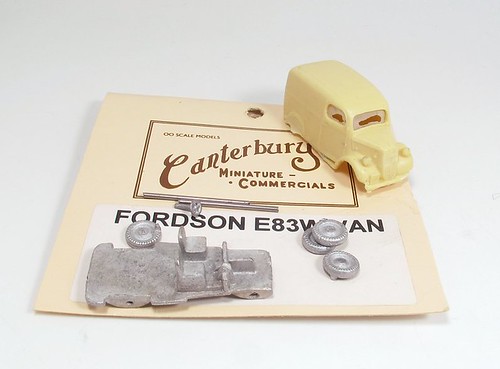
Andy York has written a piece on goods handling and in there we find a photo of a shunting tractor. Somehow I volunteered to build a model of one and the results are in this issue.

Shunting Tractor

I built two models, the one above based on a Fordson and an older version using a Ferguson. The yellow model took longer but the older beast that I slapped together on a couple of hour looks better to me, but then I always did like slightly ramshackle things!

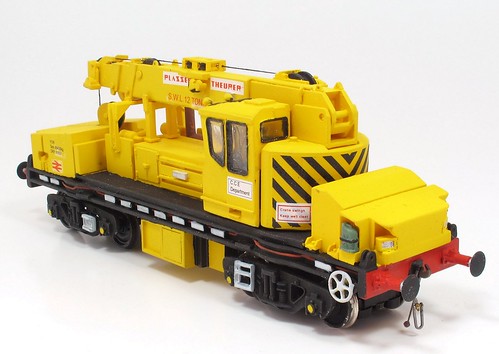
Staying with yellow models, how about a railcrane?

Rail Crane

This is a resin kit from new (to me) manufacturer Make your Mark Models. Although not designed as a working model, I couldn't resist powering it.

What's interesting is that amongst all the moans that the hobby, and especially the cottage industry manufacturers, are dieing, here were have a new entrant who has produced the best resin kit I think I've ever built.

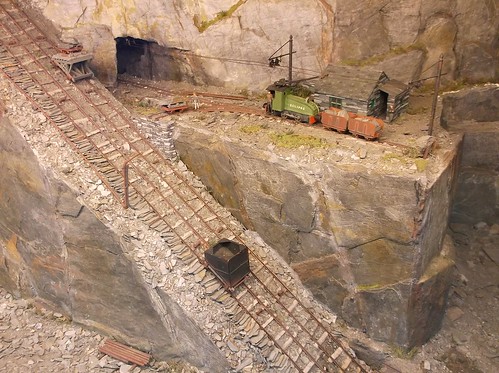
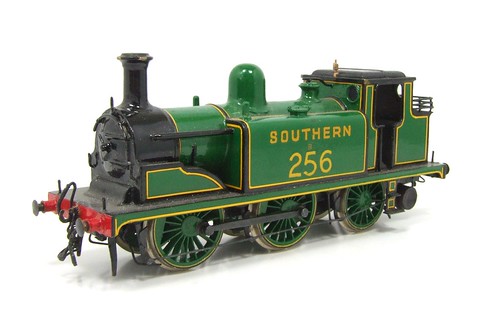
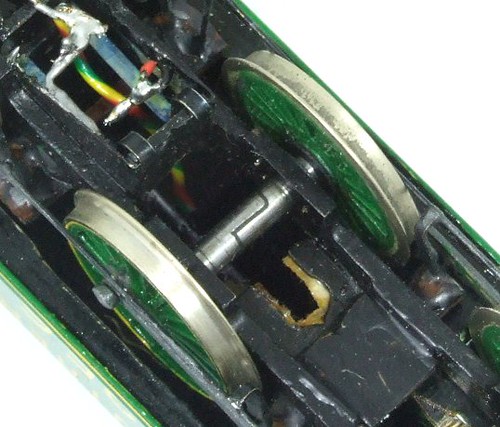
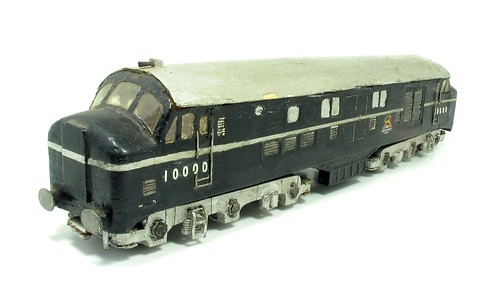
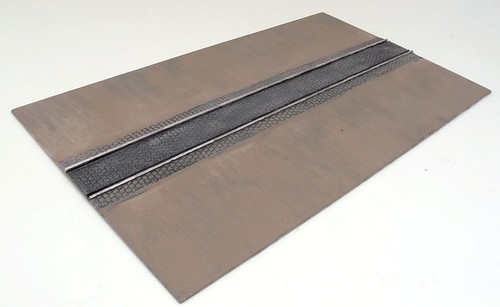
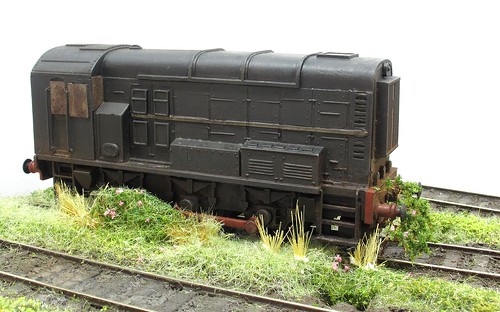
I've used an older kit in "Second Hand Saviours" this month, a Kitmaster 08 shunter.

Abandoned Loco

Inspired by a thread on RMweb (yes, it can happen) I've turned a battered pre-built plastic model that was otherwise only fit for the bin, into an interesting scenic feature.

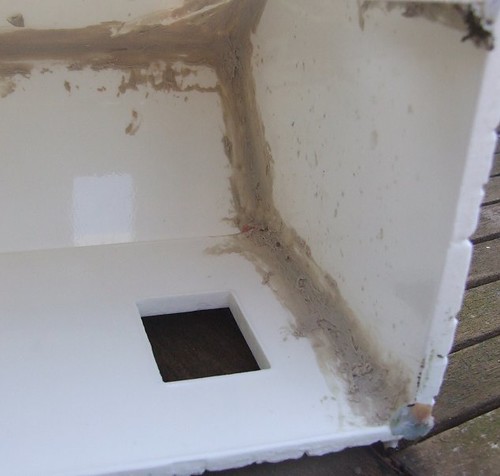
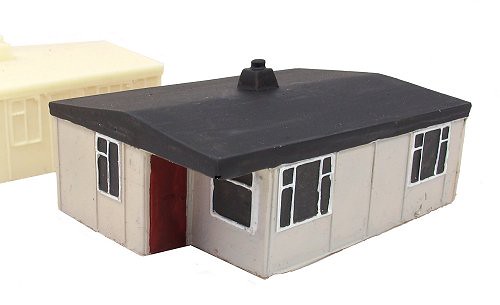
Over in the reviews section, I've built a 1970s house from Peedie Models. While doing this in 4mm scale, I tried some of their N gauge range as well. The prefab cottages are especially nice.

N Prefabs
 
And just in case you think I've been taking it easy, there's also reviews of a Wild Boar Models PFA kit, Molten Metal Paint, Severn Models etched hut and Modelrailwayscenery roadside cafe kit.
 
Plus some basic metalworking advice on the DVD. Phew!

Sunday, June 14, 2015

History groups

On Wednesday, I watched a talk by my friend Andy Roden given to The Western Front Association. He was talking about railways in WW1 (from his book Trains to the Trenches) and they are a national history group interested in the first world war running monthly talks for their members.

It strikes me that there are lots of groups offering talks like this. Back in my theatre days, I used to make an effort to be on duty for the National Association of Decorative & Fine Arts Societies (NADFAS) because the lectures were generally very interesting.

I'm pretty sure there is a Warwickshire Steam Society, I used to go to meetings many years ago in Warwick.

More details can often be found on the web, at your local library or even on posters in your local model shop or museum.

Why not go and have a look? Get out from behind the computer and meet people occasionally, who knows what you could learn?

Saturday, June 13, 2015

No.5 in the shed

No5 in shed

Back in 1993, the Manx Steam Railway locomotives and rolling stock were housed in a vast corrugated iron shed at the side of Douglas station. Nowadays the space is occupied by a rather less dilapidated shed housing a Tesco.

Back in the good old days however, the shed doors were left open and so my father and I snuck in one evening. Expecting to be thrown out at any time, we wandered alongside the rolling stock and were surprised to find locos 5 and 6 mouldering away towards the back. Fortunately we'd bought some big flash guns for the trip and so were able to capture these scene. Maybe modern digital cameras would do a better job of the colours but to get shots in the gloom was pretty impressive and I'm glad the film was expended.

Now, I think No.5 lives at the back of the new shed wrapped up in a plastic bag for fear of asbestos contamination. Will she ever run again?

Friday, June 12, 2015

Steam on the MER

Steam on the MER

This week, I've been watching the Isle of Mann TT races in the evening when I probably should be model making. Regular readers will know I'm a big fan of Mona's Isle and still plan to build a model of part of it one day.

My first visit was back in 1993, during the TT practise week. The motorbikes were a lot more interesting than expected and evenings were spent watching then hurtle by at close quarters on the back roads of Douglas.

During the day, many railway events were laid on, one of which was "Steam on the Manx Electric Railway". At the time, we baulked at the ticket prices and just photographed the train. In retrospect, this was probably a bad idea as it's never been repeated.

Now, if I could find a kit for those coaches, this part of Laxey would make a nice model. In G gauge I think...

Thursday, June 11, 2015

London Road

It must be Aussie layouts month in the UK model railway press this month. I open up my copy of Hornby Magazine and there is Alan Harrison's London Road, photographed by my host for the Adelaide section of my trip, Andrew Emmett.

London Road

The layout lives in a purpose built railway room and when I visited, as part of the BRMA conference, there were quite a few of us in there. Space for a tripod was a bit limited so only the top one of these shots is focus-stacked. Both can be clicked on for a larger view though.

London Road Station Building

My favourite feature was the station building which despite being a Walthers American plastic kit, fits the location perfectly with its Gothic architecture. You'd be hard put to scratchbuild anything more appropriate.

Wednesday, June 10, 2015

Showing a clean pair of vans

Two vans

A couple more projects finished!

The Ford van has gained some transfers from a pack sold by Road Transport Images. For just over 7 quid I have names and numbers for around 10 similar sized models. Lack of transfers actually stalled the project for a few weeks - there wasn't anything suitable in my extensive stash.

The VW is a longer term issue. I can't remember why I took it to pieces but I do know the plastic box it lived on on the workbench was really starting to annoy me. No longer, a coat of orange and some matt varnish followed by picking out the lights and indicators sees it looking good.

Sadly, although I have words the right size, the pickup version of the VW Type 2 doesn't look right sign-written. I know the panel van was sold on the basis of being a mobile advert years ago, and I'm sure that there were examples with the owners name on the sides, it just doesn't look right to me. I need to find a photo first.

Both models will be weathered at some point but not until they have a home to go to. I think the van will appear on an immanent project so watch this space.

Tuesday, June 09, 2015

Aussie railway posters

While looking for the photos used in yesterdays, post, I found some more shots, this time of Australian railway posters hung on Trevor's railway room wall. I thought they looked fantastic at the time - you can almost feel the heat from the lands they advertise.

Trans-Australia Railway poster

I'm assuming the camel partly refers to the Ghan, a traditional camel train that was the only way of crossing the desserts before the train arrived.

Central Australia Railway poster

Is there much to see in the middle of Australia? Surely it's mining towns and creepy crawlies that can kill you?

Trans-Australia Railway boomerang poster

A boomerang, we really are in a land down under.

Monday, June 08, 2015

Huntingdale and Grange

I don't normally buy Continental Modeller magazine - I'll flick through it in Smiths most months to see if there is any inspirational On30 stuff, but most of the time it stays on the shelf.

Diesel on viaduct

This month, I received an e-mail from Andrew Emmett to alert me to the first part of an article on Kevin Kavanagh's model, Huntingdale and Grange appearing in the pages.

When I visited Aus last year, this was the first true, native layout I was taken to see - and what an introduction it was! The room is huge and the layout runs all around the sides with a spur in the middle. We just don't do this sort of thing in the UK.

484

Anyway, seeing the model in the magazine reminded me of those warm but fascinating days last year and I decided to dig out some of the photos I took. The 4 here all required focus stacking to keep everything sharp, so large are the scene. I've finally processed them all and present them here. You can click on each for a larger view.

Railcar in station

What I can't be responsible for is UK modellers deciding to up-sticks and move "down-under" for extra space...

Turntable

Sunday, June 07, 2015

Bedroom furniture for railway enthusiasts

Bedroom Furniture

While at the NRM last week, I spotted this fantastic bedroom furniture in one of their exhibitions.

The caption with it reads:

Dreaming of trains

Imagine all the train stories that were read in this bed.
It was made for a little boy called Christopher Oldham by his grandfather in the 1930s. Every week, Christopher's grandfather travelled to Paris in a luxury Wagon Lits carriage. He wanted to share this with his grandson, so he copied the design when he built this bedset.

Fantastic!

Saturday, June 06, 2015

B&Q Adria garden table

Today is my sister's birthday. She's asked for a small table for the garden. I bought her this:

 
From B&Q, it's an Adria table (like this one but without the chairs and for £35) that arrives flat packed for assembly.
 
I don't mention this because I'm short of blog content, but because I was really impressed with the thing.
 
For a start, all the parts are powder coated to see off the weather. I'm not convinced it's the thickest coat, or best applied, but I reckon it will be good for at least a couple of years.
 
More impressive was the fixings. These are vac-packed to a sheet of card and include an Allen key and spanner - no other tools are required. The Allen key is made from some soft-ish alloy and won't be much use after doing this one job but at least I didn't have to go looking for one.
 
Once bolted together, 15 minutes lazy work, all the nuts (nylock by the way) and bolt heads are covered with plastic caps that match the colour of the table. Nice touch.
 
Talking of colour, you may notice the bright table top. My sister loves pink things so to personalise the table, I gave the top around 10 coats of paint.

My initial thoughts were to find some pink aerosol spray but this Ronseal paint seems to work fine. It says it's suitable for metal with a primer so assuming that the powder coat would do this job, I slapped it on.

A white primer would have sped the job up at at least 5 coats were required to cover the grey base colour. The rest were just to use the stuff up as I don't have many occasions to paint things hot pink.

Drying time was about half an hour on a warm day. Brush cleanup is with water which is very handy.

Friday, June 05, 2015

Drying times

Painted bodies

Since the Ford van is to be decorated with transfers, I though it a good time to have another go at spraying gloss paint. A fetching blue (Humbrol 14) looked good so I mixed some up and shot it over the body.

While I was at it, I gave the diecast VW pickup that's been kicking around in pieces on my modelling bench for ages a coat of Pheonix BR NE station sign orange - a proper 70s colour.

A couple of hours later, the blue was touch dry, the orange still tacky. Overnight, both dried and hardened. Don't know if this is helpful to anyone but if you are gloss painting, Humbrol appears to go off faster than Precision. Mind you, both need a dust-proof drying box so unless you are in a hurry, maybe it doesn't matter.

Thursday, June 04, 2015

Building the Fordson

Ford van kit - built

Nothing to challenging about this build - the resin body just needs a little cleaning with a sharp knife around all the openings.

The whitemetal chassis is fine and the wheels just require a touch of the file to remove moulding nibs.

Hardest job is cutting the axles to length. Prototype photos show the wheels tucked well into the arches. The steel is hard but some man-sized wire cutters and a file did the job followed by superglue to hold the things together. Unlike the diecasts there won't be any zooming this one along the carpet I'm afraid to say.

A front bumper has been added from microstrip and I managed to lose the steering wheel casting. You can't see it when the body is on anyway so no sleep will be lot over this.

Wednesday, June 03, 2015

Canterbury Miniature Commercials Fordson Van

Ford van kit

Now for something very unfashionable - building a model road vehicle from a kit.

I think I bought this one in along with 3 others at Chatham show around 10 years ago. At the time you couldn't buy the huge range of ready to use diecast models that you can now and since they were bargains, I stocked up for future layout projects.

Even now I'd look seriously at this kit as the cast resin body is really rather nice. Small vans are great for detailing scenes on layouts too as you can legitimately use them to add a bit of colour. With many of my layouts being a sea of brown and grey, this is very handy!

Tuesday, June 02, 2015

Mystery Tool 5 - Solved!

Bompers

Back on May, I asked you all about this mystery tool. At the time I thought it might be for bopping annoying people at the front of my layout when exhibiting.

It appears not. The man known as "the excellent Dave from boat club" has solved the problem. He e-mailed to say,

"These things are called fillet balls, I use them to create a tidy fillet in glass fibre jobs.
I make smaller one for models by super gluing a small bead onto a bamboo skewer.

Have a look at :-
http://www.fibreglassdirect.co.uk/tools-ancillaries/fillet-balls/fillet-ball-set.html "

According to the website, where you can still buy sets, these are;

Filleting balls that are ideal for placing wax, plasticine or filler to create an accurate fillet. Fillet ball radii are 6, 9,12,15,19 & 25mm

Mine are 6.2, 14.2, 15 and 20mm so either John, who made them, didn't need a 9 and 12 or they vanished in all the moving.

They are common though, Dave's father worked as a pattern maker at Rolls Royce, whereas John did the same thing for Rover.

I'll still be using them to bop annoying people though.

Monday, June 01, 2015

Be careful where you dip your brush...

On the left, Plastic Weld, and excellent adhesive for sticking ABS to anything.

On the right, DCC Concepts Clean Flux, the first flux I've used that both aids soldering and doesn't require cleaning away afterwards, and I've tried several.

You will notice that the bottles look very similar.

I was hard at work soldering the glasses together for Little Phil, and I didn't.

Not for at least 5 minutes as I wondered why the flux wasn't working properly...