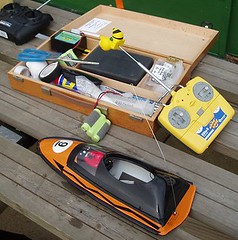
This racing lark is harder than it looks. As it was the last Sunday in the Month the time had come for Slingshot racing. About eight of us turned up at the waters edge with our boats and proceeded to run 4 heats with each of us running in 2 of them.
Needless to say my racing jinx struck again. My boat managed two laps before crawling back home.
First thoughts turned toward water in the speed control. The symptom is a running motor even with the boat switched off. I had the added excitement of smoke and a strong smell of burning when I opened the hatch. In a plastic hull this is not A Good Thing.
Normally letting the inside of the boat dry out cures the fault (guess how I know this) but not this time. It seems that if I want to race I need a new boat. I know the old one could be fixed with a new motor and controller but Malc has managed to get a very good deal on new models so it’s time to take everything I have learned from this one and use it on another.
Is it too much to hope that I could complete a couple of heats without a breakdown ?
Monday, April 30, 2007
Sunday, April 29, 2007
Expensive tastes
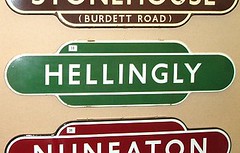
Since building my model of the Hellingly Hospital Railway I have gradually collected various momentoes of the line, which are displayed with the model. There are luggage tickets from the station and bits of the hospital buildings.
Yesterday I spotted one of the ultimate souvenirs at a railwayana auction – the 1950’s station sign !
Now I hadn’t gone intending to bid. To be honest I went out of curiosity as the event was only down the road. Like most people in the hobby I have a few real railway bits and pieces but the ones I really want are usually wallet breakingly expensive.
Still, the Hellingly station sign was on the front cover of the catalogue when I got there which was a real surprise (I had no idea what was there before going) so I thought, “Perhaps today is my lucky day.”. Registering to bid was free and the totem was lot 14 so the wait wouldn’t be too long.
The earlier lots went well with prices that the antique trade would describe as “strong”. There was a room full of (mostly middle aged) men and they had money to spend. I knew I was going to be out of luck when the bidding started on commission at £800.
It kept going and finally ran out of steam at £3600 !
With commission and VAT someone has paid over 4 grand for that sign. It wasn’t even in that great a condition. Wow.
I later discovered that I should have modelled Nuneaton. That sign went for £360. Of course it didn’t have an asylum. Hmmm.
Incidentally if you do have any Hellingly items, please get in touch. Donations are always welcome !
Saturday, April 28, 2007
Coal
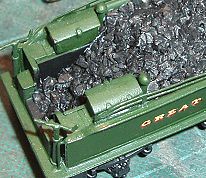
All steam engines need coal, even those that are models powered by electricity. The traditional method used since Frank Hornby was in short trousers has been to take a lump of real coal, hit it with a hammer and glue the results of this into the tender/wagon/bunker as required.
Real coal isn’t a bad approximation for model coal but I and many others feel it doesn’t quite do the job. I think it’s probably too black or too grainy compared to seeing the stuff at a distance - hence my models are fuelled by something from my rapidly emptying packet of fake coal.
I’m using an American product picked up at a show years ago but think that Greenscene do something very similar. It’s got the sheen that real coal has but isn’t quite as black. It’s also a good deal cleaner to work with.
In use all you do is pour the stuff into the tender and then fix in place with a watered down PVA mix applied using a pipette. The mix is roughly 50/50 PVA/water with a couple of drops of washing up liquid to break the surface tension and allow the liquid to flow through the load properly. Too much washing up liquid though and you get bubbles which ruin the effect so be stingy with it.
Once dry I ran a bit of thinned matt black of the mound to accentuate the shadows and hide any PVA that hadn’t dried clear. A little dry brushing with metalcote gunmetal and gloss black made things even better. A finishing touch was to dust it with black powder paint to give the slightly dusty look of real coal.
Thursday, April 26, 2007
Brass Prop
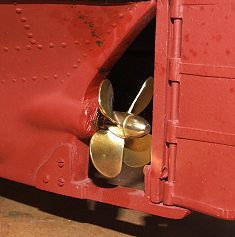
The perceived wisdom in the model boat world is that brass propellers are better than whitemetal ones. Therefore a sensible upgrade for my Puffer would be to get rid of the prop that came with the kit and fit something shiny.
In theory this is an easy job. Unscrew the unwanted prop and then replace it.
Why is nothing that easy ? To effect the change I had to take the motor out so the shaft would move back a bit so I could work between the hull & rudder. Because the nut at the motor end of the shaft was rusted on and the one at the prop end didn’t seem to want to come all the way off it was a really struggle.
Eventually I managed the job. To make sure it stays put the prop has a little bit of superglue on the threads. This should stop it unscrewing. I know that doing the nut hard up against it is supposed to do this but I’ve had things go wrong before and with the price of brass propellers these days I don’t want it to descend to Davy Jones Juniors locker at the boat pond !
Tuesday, April 24, 2007
Armstrong Update
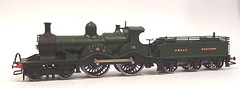
Over the last few days I’ve been working the airbrush among other tools, bringing the Armstrong locomotive to life.
Since spraying the green body colour I picked out the black bits with a paintbrush and Humbrol matt black. I never bother to airbrush this colour if it’s not the main one as it brushes on so well. As long as the paint hasn’t gone off in the tin too badly you will get a superb finish with no brush strokes. If you can get through the skin on top with something less than a chisel this paint is probably usable.
The transfers (Presfix) were applied to the tender – I’ll write this up in a later post as this involved some fun and games.
Nameplates were painted. This caused me some grief as the round centre one below the name is an old GWR crest which took a bit of research. In the end I had to make an educated guess based on slightly later versions. Strangely I don’t seem to have any colour details of this sort of thing, a gap that needs to be filled in my library I feel (anyone got an suggestions ?).
Once this was done I airbrushed Humbrol satin varnish all over the model. This tamed the toy-like finish from the green and brightened the matt black and red buffer beams.
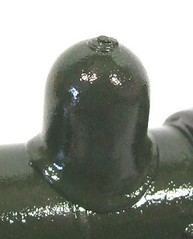
Finally the smokebox has been painted matt black. It’s not gone quite as matt as I’d like but there is a bit of contrast between this and the green boiler.
What’s left ? Well the tender chassis needs finishing and pickups need attaching to this and the driving wheels. All the wheel rims need painting. The tender needs coal and the cab a crew. The nice set of screw couplings will hang from the buffer beams, oh and the buffers need paint. Not much then !
Since spraying the green body colour I picked out the black bits with a paintbrush and Humbrol matt black. I never bother to airbrush this colour if it’s not the main one as it brushes on so well. As long as the paint hasn’t gone off in the tin too badly you will get a superb finish with no brush strokes. If you can get through the skin on top with something less than a chisel this paint is probably usable.
The transfers (Presfix) were applied to the tender – I’ll write this up in a later post as this involved some fun and games.
Nameplates were painted. This caused me some grief as the round centre one below the name is an old GWR crest which took a bit of research. In the end I had to make an educated guess based on slightly later versions. Strangely I don’t seem to have any colour details of this sort of thing, a gap that needs to be filled in my library I feel (anyone got an suggestions ?).
Once this was done I airbrushed Humbrol satin varnish all over the model. This tamed the toy-like finish from the green and brightened the matt black and red buffer beams.
Finally the smokebox has been painted matt black. It’s not gone quite as matt as I’d like but there is a bit of contrast between this and the green boiler.
What’s left ? Well the tender chassis needs finishing and pickups need attaching to this and the driving wheels. All the wheel rims need painting. The tender needs coal and the cab a crew. The nice set of screw couplings will hang from the buffer beams, oh and the buffers need paint. Not much then !
Monday, April 23, 2007
BANG. And the dirt is gone.
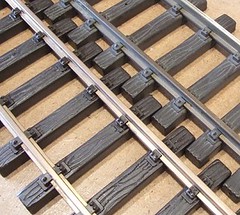
A couple of years ago I bought a load of LGB track from a car boot sale. A bin liner full of the stuff including a couple of points for, wait for it, a fiver ! (That noise you can now hear is LGB fans teeth grinding and their envious howls).
It was, unsurprisingly, second hand but not badly so. There isn’t any concrete stuck to it, just lots of dirt. While this isn’t a huge problem it would be nice to lay clean, untarnished track.
The first attempt to sort this out involved emery paper on the running surface. This worked fine but you only get the top and the imperceptibly small scratches would attract muck when it was laid in the garden.
My Dad was watching telly the other day and saw the advert for Cillit Bang degreaser. This features a shouty bloke dipping a penny in some of the magic liquid. After a few seconds the dirty penny comes out clean. He decided that it was worth a go on the track and took a bit outside to squirt with the chemicals.
These were left for about a minute and then the track washed off. Amazingly it actually worked. All the rail was clean including the bits between the chairs. Even the sleepers were brighter. I wouldn’t say that it was quite as good as new but not bad for very little work.
Sunday, April 22, 2007
Tea
What better way to spend a sunny Sunday morning than sailing model boats in the country ?
The only sounds to be heard are nature in the raw or the drone of a distant light aeroplane.
To make life even better I debuted my new tea table. Bought from a VW show for a couple of quid it just saves me the trouble of bending down to pick up my cup.
Proper luxury.

The only sounds to be heard are nature in the raw or the drone of a distant light aeroplane.
To make life even better I debuted my new tea table. Bought from a VW show for a couple of quid it just saves me the trouble of bending down to pick up my cup.
Proper luxury.
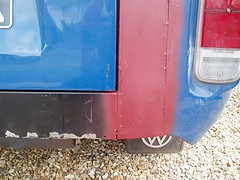
Fill her up
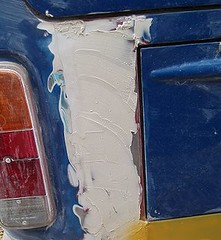
With the Type 2 back on the drive all I have to do is blend in the new repair panels. I’m going to try and learn my mistakes and take some time to do the job properly.
First up I’ve ladled some Isopon onto the affected areas. This was left to dry overnight and then sanded back with a power sander. Rushing to get the job done, resulting in sanding the filler before it is dry has hampered previous efforts. The filler sticks to the sandpaper and the tears, leaving holes in the surface.
Never again. While it’s going to take a long while to finish, I want top quality results. In theory car bodywork requires more patience than skill, let’s hope the books that tell me this are right.
Saturday, April 21, 2007
Getting thinner
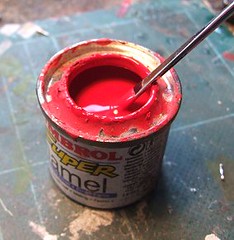
I have a pot of red paint. It’s only reason for existence is for painting buffer beams . As such I don’t actually use much of it so when I do the consistency is usually that of double cream. Sometimes this is OK for me but today even I had to admit it would be like painting with jelly.
In theory I would rush straight down to the shops and buy another pot. In fact if I were proper modeller I’d have bought a new pot of the approved shade before starting painting.
Not me of course, I take the ecologically sound option not to throw away paint just because its covering powers are the same as Polyfiller. Squirting thinners into the top and mixing it in does the job. Mind you it took nearly a quarter of a tinlet of thinner and a lot of stirring to get a nice brushable paint !
It took two coats to paint the locomotive buffer beams though. Perhaps a little less thinner next time.
Friday, April 20, 2007
Van back*
My VW Type 2 has returned. I picked it up from the mechanic this afternoon. For quite a few quid the rear valance has been welded in, repair panels applied either side of the engine bay hatch and various other bits of metal put in the back to replace panels made of rust. And the engine is back in and connected up.
But there is still work to do. To save money, and allow me to “bond” with the van, I will be finishing off the job myself.
First jobs was getting it back. To start, or rather not to start with I had a flat battery. It seems the one I have isn’t holding a charge anymore so a borrowed got me out of the yard. This entailed a fiendish reversing manoeuvre around three right-angled corners with all sorts of stuff out of site but eminently hitable. Not having driven the vehicle for 4 months didn’t help !
Because of the long time spent standing the brakes made a hell of a noise. I think this quietened down after a mile fortunately so I guess (hope) that’s it’s just a bit of rust on the drums.
The lack of a vacuum hose made tickover non-existent (not an unfamiliar situation to old car owners) but there was worse to come. The accelerator didn’t seem to do very much. Sure it moved and we accelerated a bit but there wasn’t any real power. I know that a Type 2 isn’t a racing car but something was awry.
A nervy half mile later I had to pull up at a set of traffic lights. The engine died. I couldn’t restart as the accelerator didn’t seem to respond either.
Fortunately the hazard lights worked but I was still in the middle of the road.
I had a shrewd idea what was wrong. The accelerator pedal is attached to a cable that runs to the engine in the back. To remove this you have to disconnect the cable. Opening the door showed the cable was connected but slack. It had been tight enough for use around the yard after install but gradually slipped once on the road.
Old car owners carry tools. It’s what we do. I have a multi tool in the glovebox which includes pliers. A few seconds saw the cable clamp loosened, cable pulled tight and then re-clamped. I started the engine and had loads of power to make the few hundred feet back home.
Writing this now it all seems like fun – the sort of thing old car owners boast about. I’m proud that I knew what the problem was and fixed it. I just hope I don’t have to fix it again in a hurry as on my return I found I was shaking slightly through a combination of nerves and embarrassment at breaking down.
Lets just hope the bonding process goes well. I want to go camping in a few weeks and at the moment driving a modern car sounds a whole lot more appealing.
*A little joke for the Tram fans
Tuesday, April 17, 2007
Fast paint
Unable to get GWR green in tinlet form suitable for airbrushing, I was able to buy it in a aerosol can. Now I like aerosols for boat work – they put out loads of paint allowing quick coverage resulting in a good even finish. I used to employ them on model railway locomotives as well for years. The finish I got from a Humbrol mini spray of matt black couldn’t be beaten even with an airbrush.
Of course I’ve had the airbrush for a few years and several locos have received its attentions. Hence I wasn’t quite as prepared as I might have been therefore for the speed at which a Precision Paints spray can covers the small primed model.
The coverage was really good. Three thin coats and the green was really solid. Airbrushing can leave thin bits where the undercoat affects the main colour. No such problems here. The biggest worry was drips or runs and I fixed this with a quick shot from the hair drier between each coat. The only other risk would be putting too thick a coat on. I checked the model in daylight and stopped when the coverage was sufficient. No, “one more coat for luck” this time – so no more runs either !
Monday, April 16, 2007
Front coupling
Sometimes you wish that real railways were more like models. This thought often pops into my head when it’s time to add couplings. What were they thinking with these chains or screw couplings ? Even the Americans managed to use something better (at least for modelling purposes) on locomotives and wagons, and this is a nation who can’t spell the word axe !
The model Armstrong locomotive is to work with Bachmann coupling fitted stock, so I have to get a wire loop fitted at the right height. Normally this isn’t too big a problem but in this case the front bogie gets in the way.
Ideally the loop would be soldered to the back of the buffer beam and come out underneath it. I’ve no space for this, as the GWR didn’t design a nice gap between buffer beam and bogie top, so it has to be fixed to the front in the least obtrusive manner possible. I filled the thin brass flatter to reduce the impact. One “leg” is next to the vacuum pipe as well for extra camouflage.
Once painted my non-prototypical addition won’t show too badly. It will definitely be less obtrusive than the plastic version fitted to RTR stock.
All of this would have been a lot easier if I’d remembered to do it before priming the model. I do this partly so I can get a proper look at how the model progresses. Normally I don’t realise I have forgotten a big bit though… Still at least I spotted everything before the proper paint went on. I hope.
Sunday, April 15, 2007
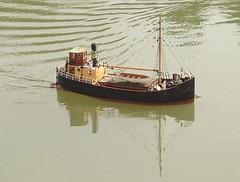
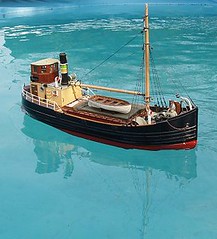
Puffing on open water
The final big test for the Puffer is to get it on the lake. Trying it out on a pool is fine but if anything fails or falls off you can reach over and do something about it. On the lake there is no chance unless a deep paddle & swim in muddy water is contemplated.
So with some trepidation the boat was launched for the first time.
And it works. Pretty much.
OK, I need some more weight at the back as it is still a little high – burying the propeller a bit more will help especially in reverse. It’s not that I want to go backwards much, just be able to slam the brakes on without spraying water everywhere.
The Electrolize speed control needs more adjustment as well. It doesn’t seem happy running the motor slowly. We’ve got an identical unit in the 40 year old boat where it works well but then that boat runs at speed all the time.
Finally the propeller will be changed for a brass one. The whitemetal version works but there is a lot of noise from the drive and I think it’s cause by an unbalanced prop. Hopefully the brass one will be quieter and, if the stuff I read in magazines is to be believed, give more power.
On the plus side the boat shrugs off even a stiff breeze with hardly any listing. Best of all though it looks superb on the water. My Dad sailed for most of the time and he was entranced, weaving around the water for nearly three-quarters of an hour. We both love the boat and hope that’s it’s first trip on the water is one of many – a fitting tribute to the original builder.
Saturday, April 14, 2007
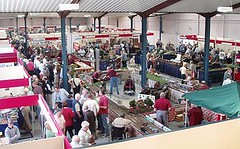
Larger Scale Show
Another weekend, another show to visit. Life is tough…
This weekend it’s the Larger Scale Model Railway show. Catering for gauges O and above, especially the garden railway scales of 16mm and G, it’s not really relevant to me but since it’s around the corner and one day there will be a garden railway, why not ?
The show takes place at the Warwickshire Exhibition centre, which as you can see is pretty light and airy. Plenty of space too. The side doors can be partly opened to allow for ventilation which is good news when the hall is full of working steam engines !
Plenty of trade present. Obviously there is a lot of LGB and Bachmann but the engineering scales are represented. Lots for the kitbuilder too since working in these scales normally means you have to make something. Since your baseboard is likely to involve mixing concrete I suppose building rolling stock and structures is quite a pleasant diversion.
Entry is £7.50 which seems a bit steep – many model railway exhibitions of similar size will charge half this – but it didn’t seem to put anyone off as the crowds on Saturday morning were plentiful. I saw money changing hands on trade stands too. Of course there aren’t many of these type of shows catering for the garden railway modeller so I guess you tend to save your money for the event.
Over the years the layouts present have changed quite a bit. Once they were little more than test tracks with trains hurtling round at breakneck speed. Nowadays scenery is becoming more and more effective. One model features a section of India (Darjeeling to be precise) complete with a plethora of Tuk-Tuks. Others are more traditional generic narrow gauge lines but even then the quality of the modelling has improved. Locomotives have always been well made but now rolling stock looks better, although there is often still some way to go, and the buildings are now much more than the rudimentary boxes of old.
I enjoyed the event anyway. Not much retail therapy took part but I handled goods that might one day be purchased. Doubtless a lot of this goes on. I don’t like buying via photos if I can help it and I’m not alone. These events allow you to get a proper look so the pictures make some sense. Besides you can always dream can’t you ?
Friday, April 13, 2007
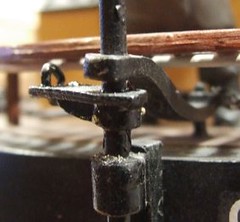
Steering gear
After its trip around the pond I had a few little jobs to finish on the Puffer. One was that the steering was moving on its tiller. Not much but it’s not something you want. I tried glueing it but that wouldn’t hold forever. A mechanical solution was required.
In theory this is simple. Drill a hole through the “tiller” (sorry I can’t remember the proper term, it’s the bit the servo is pushing on the rudder shaft) and the shaft. Insert a bit of brass wire and the two will be inexorably fixed.
Of course real life isn’t so simple. Drill off centre and you miss the shaft, probably weakening the tiller at the same time. The shaft is steel and the tiller whitemetal so if the drill skids on the shaft you’ll chew up the softer metal and ruin the part.
I started the hole with a pin vice but wasn’t making headway into the steel so I replaced my hand with an electric screwdriver and hoped. The whole arrangement, drill it, pin vice, chuck & drill was longer than desirable but amazingly it seemed to work.
A little bit of brass wire fixed in with superglue finished the job. Had I made sure the tiller and rudder were perpendicular and not a few degrees off then the job would have been perfect, but then you can’t remember everything.
Wednesday, April 11, 2007
Clock hands
Every locomotive needs a nice "face" and I don't feel that some moulded whitemetal or plastic "hands" do the job.
Luckily there are several makers of turned brass versions that are easy to use and improve the front end hugely. The biggest problem is locating them in the Mainly Trains web site. These are Gibson ones bought at a show but I have used Romford ones in the past. For all I know they may come out of the same factory !
Never sure what position to put them in I copied a photo of the locomotive under construction which is what proper modeller are supposed to do I'm told...
Rip of "VW" show par 2
In response to my angry e-mail, I received this explanation of the rubbish VW show I attended on Sunday:
For several years previously Vintage and Classic Events has run a successful VW show at Donnington Park , usually in the Autumn months, but for the last couple of years, it has been extremely difficult to secure suitable dates at Donnington, so we decided to try and create a new show at Stoneleigh Park, which has far better facilities to offer. Last weekend was therefore a "first" show for us at Stoneleigh for VW’s. However, from the size of the mini show, you can see we are normally successful show organisers. I can assure you just as much effort and cost was put into the VW show as the Mini, with regard to advertising, contacting VW specialists and clubs etc.
We were not helped by the fact that clubs and traders contacted us saying they would like to be there, reserved pitches, and then either pulled out on the Saturday, or just did not turn up to the event. You will note that at 11.30 (I was back home by then) a sign was displayed at the entrance to the exhibition hall, stating the show was 90% mini orientated due to the amount of "no shows" we had experienced that morning. I am saddened by the fact, that so many of the traders and clubs we have seen at Donnington in the past had not the courtesy to contact us to say they would not be attending, but also disgusted that they had so little consideration for the VW enthusiasts.
A refund and apology has been offered and gratefully accepted. It looks like VCE were shafted as well so once the cheque arrives I’ll no longer wish bad things happen to them.
I still say Stoneleigh is an excellent venue for this sort of event and hope they have another more successful go. Earlier in the year would make sense to avoid clashing with Easter – perhaps this explains why the attendance of clubs and trade was so low. Since they have provided an excellent response I’ll give it another go.
Tuesday, April 10, 2007
Puffer on the pool
With all the gubbins installed it was time to test the Puffer on the water. I’m lucky in having access to a 15ft diameter swimming pool for this sort of thing. Mind you this took a hell of a lot of assembly so I think I deserve a good sail from time to time !
Anyway, the boat sits OK in the water with a slight list toward the side the speed control is sitting. It’s pretty level though so something’s right for a change.
Under power it becomes obvious that more weight is needed at the back. Drive is next to useless with massive cavitation. Time to come back to the side for some more lead art the side and back.
Next time things are lot better. Although there is no obvious sitting down at the stern the propeller moves the boat forward instead of creating foam.
Suprisingly the steering is good enough to sail in circles. I wasn’t sure what the turning circle was going to be but it less than 15ft – nearer 6 which was good news. Sailing any sort of model boat in a confined space is nerve-wracking enough and this one has a lot more detail than most.
After 20 minutes or so the battery, which like an idiot I forgot to charge up properly for the test, is giving up. But I’m confident that the next launch can be on the boating lake.
Monday, April 09, 2007
Handrails
One of the more challenging jobs on any steam locomotive is fitting of boiler handrails. There is very little to beat a wonky set for ruining the look of a model and you can’t hide bad workmanship.
In theory all you do is drill the pre-marked holes, bend a bit of 0.45mm brass wire, slip the handrail knobs on and affix to the model.
The reality is loads of frustrating messing around trying to get the bends in the right place. The knobs are never the right length (people who use split pins instead don’t have this problem but I don’t get on with them) and where are the holes in the boiler supposed to go ?
This kit had some markings for the holes. The rest I had to measure. This wasn’t too bad although more by luck than judgement.
The wire bending started in the middle. I formed the curve around a series of round things such as bottles and pens. Plugging it into the front middle fixing gave me the position for the corners. After this things were suprisingly easy. Fixing was carried out with tiny amounts of low melt solder and lots of flux.
This job is one of those that goes well or badly. No middle ground. This time I was lucky, or if you prefer, very skilful.
Sunday, April 08, 2007
Rip off "VW" show

Today I went to a VW show.
It was a bit of surprise to see it advertised a few weeks ago as the venue was the agricultural showground at Stoneleigh. When I first owned my Beetle VW Action was held there and it was a fantastic show. The venue is an excellent choice for a car show with lots of space indoors and out plus tarmac roads around the site. I was looking forward to it.
The day dawned bright and sunny. Unfortunately my van is not quite back on the road yet and the Beetle is very much still broken, to my eternal shame I had to turn up in a non VeeDub.
My heart sank on arrival as I discover the signs said "Mini and VW show". Still I thought, perhaps there will be some useful cross-fertilisation between the two marques.
On arrival at the hall I paid my 8 quid to get in. This is on the steep side but the NAC is notoriously expensive to hire, hence the departure of VW Action years ago. The woman taking the money looked at me as though I was stupid as I proffered 13 pounds hoping for a fiver in change. She preferred to use coins. And rest her elbow on the bag of notes it appeared.
Two feet past the ticket booth a burly security man took the ticket off me. What the point of this exercise was wasn’t immediately clear since I couldn’t have got in without paying short of parachuting in from the ceiling. Once past him there was no proof of payment and therefore no point in challenging visitors who might have nipped in through a back door.
Then I walked into the main hall and started wandering around. There were lots of people and lots and lots of Mini stuff. Perhaps the VeeDub stuff was in the next hall I thought so went through.
Well, I was correct. The VeeDub stuff was in the next hall. Around half a dozen people selling models, a stand of plastic camping implements and not a lot else.
Outside, the autojumble was similar – mostly mini stuff with a couple of bits of VW.
The "Show & Shine" didn’t improve things either. Mixing it up with the cars for sale didn’t help of course. When I left there were still less than 20 vehicles present.
On the way out there were VW people ranting at the crowd going in. I’ve never seen this before but as well as being angry they wanted to stop fellow enthusiasts being ripped off.
If Mini’s are your thing then the show was OK – pricey but OK. For VW fans it was (in my opinion) a con.Of course then the reason for the immediate removal of the ticket became obvious. With no proof there is no chance of getting money back. There is probably no point reporting the organisers to the local Trading Standards Department unfortunately.
In my opinion, and the opinions of several other including at least one trader, Vintage & Classic International are thieves. They deliberately advertised a show that didn’t really exist. I can’t honestly believe that they are so incompetent that this was the best that could be put on. They simply didn’t try. If I were a really cynical person I might think that the Mini show was happening anyway and someone decided to stick a few adverts out and claim a VW show as well to make a bucket load more money.
Personally I hope some terrible misfortune happens to each and every member of staff. And their families. And their friends. I only travelled 7 miles to get to the show. I can only imagine what people who had been on the road for an hour or more feel.
I still think Stoneleigh is an excellent venue for a car show and so I suspect did the hundreds of people who turned up. Shame this bunch of crooks had to ruin the reputation.
In the future I will be sticking to shows organised by enthusiasts such as Stanford Hall and Vanfest. At least they care about more than just the money.
Update 11/4/07: VCE replied to my angry e-mail with some interesting news.
Saturday, April 07, 2007
York Show
Five hours in a car is a long stretch, at least for someone who hates long motorway journeys as much as I do. But the York show is worth the discomfort every year.
First of all there is York itself, a fabulous city. Small enough to walk around comfortably but with enough interesting things to see to fill a few days. There are even a couple of very good model shops about 20 minutes walk apart. I managed to acquire a Russian plastic kit for an Oakley class lifeboat along with some other bits and pieces. A nearby craft shop furnished me with me with a much needed new easy to read steel rule. Even the dolls house shop in the same road is useful if you want details for 1:12 scale model boats !
Over the bank holiday weekend the buskers are out in force so there is no shortage of entertainment. In fact even if you don’t go to the model railway show you have a good time.
The show itself takes place at the racecourse – about 20 minutes walk from the centre of town. A shuttle bus runs between the station and show as well during the day.
I’m not going to try and describe the event properly, suffice to say that all six floors (OK, three floors and three mezzanines) were full. The quality of exhibits was better than average with some huge layouts for those who want to watch the trains go by, and smaller models for the more discerning amongst us.
Trade is also good. The biggest omission in the show is a huge RTR supplier. You can get standard off the shelf items but York has always been a modellers show so the emphasis is on supplying parts for people who make stuff. This suits me down to the ground. I like a bit of RTR as much as anyone but when you go to some shows and see ten stands selling the same items you have to wonder why they bother.
Maddest product of the show award must go to the packs of individual leaves on sale from Greenscene. John was busy demonstrating them by building a wall climber plant. It looked good and was suprisingly quick. He claims it’s quite relaxing as well !
To be honest we only had about three hours and that’s not enough. Next year perhaps a weekend needs to be made of it again.
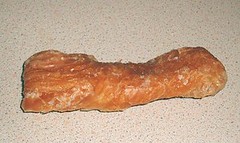
Oh, and the picture shows one of the great Yorkshire delicacies – a Yum Yum – available from the better class of baker. Another reason to head north at this time of year.
First of all there is York itself, a fabulous city. Small enough to walk around comfortably but with enough interesting things to see to fill a few days. There are even a couple of very good model shops about 20 minutes walk apart. I managed to acquire a Russian plastic kit for an Oakley class lifeboat along with some other bits and pieces. A nearby craft shop furnished me with me with a much needed new easy to read steel rule. Even the dolls house shop in the same road is useful if you want details for 1:12 scale model boats !
Over the bank holiday weekend the buskers are out in force so there is no shortage of entertainment. In fact even if you don’t go to the model railway show you have a good time.
The show itself takes place at the racecourse – about 20 minutes walk from the centre of town. A shuttle bus runs between the station and show as well during the day.
I’m not going to try and describe the event properly, suffice to say that all six floors (OK, three floors and three mezzanines) were full. The quality of exhibits was better than average with some huge layouts for those who want to watch the trains go by, and smaller models for the more discerning amongst us.
Trade is also good. The biggest omission in the show is a huge RTR supplier. You can get standard off the shelf items but York has always been a modellers show so the emphasis is on supplying parts for people who make stuff. This suits me down to the ground. I like a bit of RTR as much as anyone but when you go to some shows and see ten stands selling the same items you have to wonder why they bother.
Maddest product of the show award must go to the packs of individual leaves on sale from Greenscene. John was busy demonstrating them by building a wall climber plant. It looked good and was suprisingly quick. He claims it’s quite relaxing as well !
To be honest we only had about three hours and that’s not enough. Next year perhaps a weekend needs to be made of it again.
Oh, and the picture shows one of the great Yorkshire delicacies – a Yum Yum – available from the better class of baker. Another reason to head north at this time of year.
Friday, April 06, 2007
Bogie
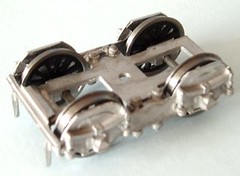
The bogie is supposed to be an easy bit of the Armstrong model locomotive kit to build. With the wheels in place you locate the sideframes into the slots in the side of the centre casting. Then stick a casting with guard irons on the front.
Of course that is fine in OO. With EM wheels a bit of extra clearance is needed to keep the rims away from the whitemetal.
First I used the common trick of reducing the thickness of the sideframe castings with a big file. Whitemetal is always moulded on the chunky side so losing a mil isn’t a problem.
Next the parts are located quite as tightly as the manufacturer intended. Another mil is gained each side this way. I did remember to check that they didn’t stick out of the sides of the locomotive when finished !
Low melt solder is wonderful for this sort of job. You get to tack the parts in place to make sure everything fits and then ladle more metal in once happy. Purists will point out that the top of the springs aren’t quite in line with the bottom but you can only tell if the loco is running over your head, and then that’s the least of your worries.
Thursday, April 05, 2007
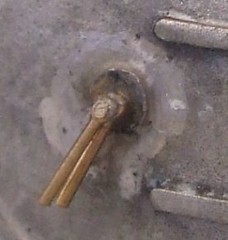
Steering
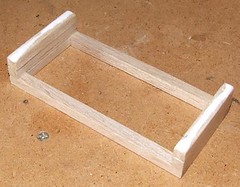
With the Puffer’s drive system sorted I looked at the steering system. Fortunately my Dad is building the same kit and on the plan that shows how this works. Basically a servo is mounted under the bridge with a wire running across the deck to the rudder.
The plan doesn’t show how the servo is to be held in space so I improvised the tray shown with some bits of balsa. The long bars are one servo wide and my plan is to glue the ends under the deck.
Because the balsa was a bit soft I varnished it a couple of times with some quick drying domestic varnish found in the garage. If it ever needs protecting from water than this boat is in bigger trouble than anything some varnish can solve !
Wednesday, April 04, 2007
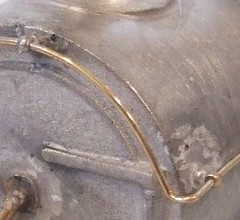
Alignment tool
Turning the static Puffer into a full working radio control boat isn’t too difficult. The first job is fitting the motor.
All the experts stress the importance of keeping the motor shaft and propeller shaft in line. Although any slight disparity is taken care of by the coupling , the less this has to do the more efficient the drive will be.
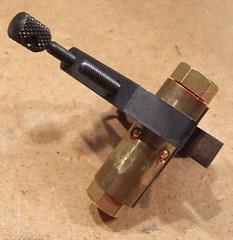
I’ve used a coupling that is basically a universal joint with inserts in the end for the prop and motor shafts. Keeping this straight while fiddling around in the hull wasn’t going to be easy. So I made a tool.
The alignment tool is pretty simple. All it is is a brass tube slit along its length with four holes drilled in the sides to let the pivots poke through. The tool slides over the coupling and is clamped up solid.
I screwed the coupling in place and attached the motor. It still flopped around a bit but was held in place well enough to allow bits of wood to be shoved under to support it. Silicone sealant provides the “glue” holding things in place. Hopefully this combined with soft balsa supports will give a quiet drive system.
All the experts stress the importance of keeping the motor shaft and propeller shaft in line. Although any slight disparity is taken care of by the coupling , the less this has to do the more efficient the drive will be.
I’ve used a coupling that is basically a universal joint with inserts in the end for the prop and motor shafts. Keeping this straight while fiddling around in the hull wasn’t going to be easy. So I made a tool.
The alignment tool is pretty simple. All it is is a brass tube slit along its length with four holes drilled in the sides to let the pivots poke through. The tool slides over the coupling and is clamped up solid.
I screwed the coupling in place and attached the motor. It still flopped around a bit but was held in place well enough to allow bits of wood to be shoved under to support it. Silicone sealant provides the “glue” holding things in place. Hopefully this combined with soft balsa supports will give a quiet drive system.
Monday, April 02, 2007
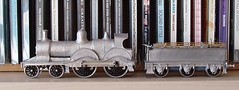
Locomotive display
While reorganising my workshop after a sudden injection of tools, I took the opportunity to give myself some useful shelf space. Not so I can store more stuff, but to allow the display of part completed projects.
Putting a model on display like this means it can be examined at leisure to look for any faults. In my case the CD rack background providing verticals will amplify these so even I can’t ignore them.
On the shelf at the moment is the Armstrong locomotive. It now has the appropriate lumps on top of the boiler. These are fixed with low-melt solder and after a fair bit of fiddling around look pretty vertical. Sighting along the boiler shows them to be pretty much in line as well.
The only major item to be completed is the bogie, which while pretty in a Midland Railway type of way, needs its sideframes to be accurate. Then I get into the real work of detailing the beast.
Sunday, April 01, 2007
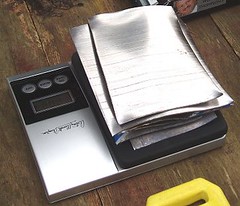
Ballast
How much lead does it take to get a Caldercraft Clyde Puffer down to the waterline ? About 4.5kg.
To work this out I have the advantage of being able to borrow my Mum’s scuba diving weights. These are nicely marked and come in 1kg sizes. Simply pile them into the hull until it’s at the right level and you know how much lead is required.
The final ballast was cut from sheet and weighed on some Anthony Worral Thompson scales. Not his own you understand as he’d doubtless moan about lead poisoning or something, but some cheapo one with his mugshot and imitation scribble on the outside. I assume that having the cookery elf grinning out of the box put people off, hence the bargain price for a very nice digital weighing machine.
Subscribe to:
Posts (Atom)