Thursday, December 31, 2009

Dampervan rudder

Dampervan rudderIf this thing is to work on water I had better sort out some steering. The easiest way to do this appeared to involve a ready to use rudder as found on the racks of most model boat parts suppliers.

It's only when I came to fit the thing I realised that they are designed to be used in boats with nice deep keels and decks and no campers with only a thin bit of plastic between the inside and outside. This left the nylon tubed far too long. In fact even when I shortened it as much as possible, so that there was only just enough threaded section for the retaining nut to grip there was about 10mm of tube above the plastic.

While I could have abandoned this and scratchbuilt a rudder, or acquired a Robbie version which I think is more amenable to this sort of application, I just fitted some plastic tube around the nylon shaft so that the nut could be tightened up fully onto this and grip the interior. Then copious amounts of epoxy glue were smeared around to keep the water out of the van. Leakiness is not something I want to emulate from the prototype !

Standing the model on its wheels required some trimming of the brass paddle with tin snips though.

Purists will note that the real vehicle was controlled using a barge style tiller hinged on the back or an outboard motor when the van engine failed. My rudder may be in the wrong place but one painted black I doubt anyone will notice the subterfuge. And if they do I don't care as making a tiller work is much harder and as I always say, this is my model, if you don't like it, build your own !

Wednesday, December 30, 2009

Dowelling


Dowelled drawer
Originally uploaded by Phil_Parker

Apparently glue alone is not enough to hold the drawers of my tool chest together. Proper cabinet makers don't believe in screws either, not even nice brass ones. The only way to strengthen the joins is to use dowels.

I decided that it would be nice, since they were to be on display, if the dowels were in a contrasting colour to the pale maple of the sides. Mentioning this to my tutor he pointed me in the direction of a supplier I hadn't expected - Cornwall Model Boats.

He was right too. On the website there were several thicknesses of dowel made from walnut (the tree, you can't whittle the nuts in your Christmas bowel) for basically no money. I ordered several lengths and these arrived a couple of days later in a postal tube.

A few minutes on my pillar drill and a bit of hammering and glue later - the drawer sides are now firmly attached to the fronts and the contrasting colour look as nice as expected. Pity about the slightly dodgy joints but the ambition is there and I'll be happy if I can open them and the thing not fall apart.

Tuesday, December 29, 2009

VW Wheels

What with the propeller sticking out of the bottom of the Damper van, the model now won't sit properly on the workbench. I can't be bothered to keep sticking it on a small box, this vehicle needs wheels.

In the kit some very nice two part wheels are provided that fit inside rubber tyres which have a good tread patter. The only problem is that they don't look like Volkswagen wheels. If you wish to pretend your plastic campers have blinged up their van with some new alloys, then you're fine. Sadly Top Gear didn't do this, they stuck with the original VW steel items.

A proper modeller would at this point head off in search of the correct wheels for the model. I can't be bothered. A reasonable version ought to be achievable by simply sticking a decent size hub cab in place. That would leave the holes round the edge and cover the incorrect boss. All I needed was a hubcap.

Eyes and wheels VW used slightly domed hubcaps on vehicles from the late 1960's. Something like a hollowed out mint imperial would look about right but be a bit useless once immersed in water. The search was on for suitable sized buttons. While looking in a local haberdashers, I spotted something even better - teddy bear eyes. A sheet of these cost a couple of quid.
Back on the workbench I removed the backs and pupils leaving a suitably curved plastic part. Sticking this in place with epoxy gave the desired results. OK so something 2 or 3 mm smaller would have been better but these are near enough for this model. You won't see then when it sails anyway.

Monday, December 28, 2009

Anyone got a giant Gin & Tonic ?

Thick ice

For the last couple of years, I've tried to organise a "Boxing Day Sail" at our model boat club. Despite the humorous title, these have never attracted many people so this year we moved the date to the day after boxing day. Maybe people have immediate post-Christmas plans resulting in the poor turnout. Well that was the hope.

As it turned out, the date change worked. 5 hardy souls arrived at the waters edge with boats on a fine sunny winters morning.

When I say waters edge, what I mean is "giant ice cube masquerading as a pond". Thanks to the recent cold spell the entire waters surface was over an inch thick with ice. I smashed the stuff in our harbour and hauled a chunk out as you can see. Maybe it's a realistic model iceberg, just the thing for Titanic fans, but pretty useless for watery modeling activities.

Footie Sailing Of course we are British. A little bit of frozen water isn't going to deter us goddammit. Beating the ice with various implements, shoving it under the surrounding sheet or skimming lumps across the width of the lake freed up enough wet water to get some tiny models afloat. A yacht, fishing boat, lifeboat and even Slingshot saw action.

OK, not the long and pleasant sail expected but we had a good laugh in the sunshine and in the end, that's what it's all about.

Sunday, December 27, 2009

Festive finds

This is the season for doing good works and I'm doing mine by reducing the piles of stuff going to landfill. Best of all it has resulted in finding a source of free electronic bits. Oh yes it has.
I work part time in a local cinema which is part of a larger entertainment complex. Since it's Christmas the theatre part is full of pantomime. Ooooooh yes it is. To extract a bit of money from the parents, and to provide a valuable service to the kids, the management sell a variety of light up things. After all, who doesn't need a flashing light sabre, illuminated fairy wand or light up cutlass ?

These items are produced in huge quantities somewhere in the China where the quality control is questionable. That means there is a pile of duds to be found. Where ? Behind you ! These would head into the rubbish bin were I not to intercept them.

Back on the workbench the plastic bits are removed and what I'm left with is a string of LEDs and occasional bits of circuitry. Red, green and most excitingly blue, lights. In the sword hilts I find flashing LEDS and on others there is a little circuit to flash and entire string. Blue LEDs are a couple of quid a pop at Maplin and even the normal colours cost some money. There are even dodgy cheapo AA batteries.
At the moment I have no idea what this stuff is going to be used for. Most likely it will sit in a drawer for years but one day I'm sure a small light will be required and then I'm sorted.

So there you have it. Free stuff. Now does anyone need a plastic cutlass or sword that doesn't light up ? I've got quite a few now. Oh yes I have.

Saturday, December 26, 2009

Beemer

BMW kitLet me give you a bit of what management consultants call a "heads up". One day I will be King. It's an obvious move really, I'd have thought of it before but at school careers officers don't seem to suggest this sort of job, preferring to rattle on about being an accountant. I think I will be a very good king - at least I won't be any worse that the idiots we've elected to the job of ruling the country for last several decades.

One of my first improvements will be in the area of transport. If you drive, then you know there are two major problems with the UK road system: Too many cars and lots of terrible drivers. I plan to fix this with one simple act.

Owning a BMW will become punishable by death.

Since the most psychopathic drivers are those in what da kidz call "Beemers" then you'll immediately see the wisdom of my plan. I've mentioned this to plenty of people and they generally admit I'm right. All except for one consultant I worked next to for a few months. Strangely though, the rest of the office agreed with me.

Anyway, for Christmas someone thought it funny to by me a Revell kit for a BMW Z8.

Since it was Christmas, a day that ends surprisingly early with a feast of gogglebox watching with a tummy full of food, and what with me getting fidgety if I don't do something while watching telly I had a go at putting it together. Since I wasn't BMW kit bitsfussed about the end result and building the kit was easier than storing the box it seemed like a plan. Oh, and I had some Organic Raspberry Beer to help matters along.

In the plastic packing I found a box containing a kit. Some acrylic paints and a weird double ended paint brush. There aren't many bits to assemble and the diagrams seems to show a lot of painting while you go along rather than sticking bits together.

The kit bits fit nicely. Perhaps a bit of flash cleaning would have improved matters but not much. The interior tub fits the chassis which in turn fits the body well enough. There are chromed parts which are horrid in the way all chromed plastic is - too shiny and the coating is too thick.

Delicious Organic Rasberry BeerOn the other hand that paints were excellent. Coverage was good and drying time, important when you can't be bothered to wait, very quick. The brush marks don't show too much either. In fact the aluminium colour was better than many enamel versions I've experienced. If I have a complaint it's that the coats came out a bit thick and would obscure detail. It didn't stick to the chromed bits either. I had to use enamel here.

I did chicken out of painting the body silver, polishing the plastic with some Brasso wadding followed by T-cut looks just as good, sort of. Well better than just plastic anyway and to do it properly it would have needed spraying and I couldn't be bothered.

The wheels were fun and have nicely made rubber tyres. Apparently the fronts are wider than the rears. Not sure if this is right but reversing this put the brake calipers at the bottom instead of the side. By the way, I enameled these and the paint stuck well over the acrylic. BMW owners like calipers the colour of their eyes...

There is only one option for the builder to choose and that's hood up or down. I went for the former to keep the dust out and 'cause it hides the slightly slapdash interior. The acrylic gives too shiny a finished for a cloth covering so out came the matt enamel.

So, after a Dr Who (OKish), a Poirot (pretty but dull and I wasn't paying enough attention so can't remember whodunnit) and a bit of a thing with Clive Anderson being smug (that doesn't narrow it down much does it) I have a model car. It's a nice enough kit to stick together. There's not much detail but enough for most people. Model car anoraks will spend hours adding and refining bits but for a kit to stick together in lieu of Lego, it's a bit of fun. Presumably it looks like the real thing but I only ever see them in my rear view mirror flashing me to get out of the way (30 in a 30 limit, get a move on !!) or disappearing off into the distance.

One day I will get my own back.

BMW Z8

Friday, December 25, 2009

Merry Christmas

Xmas Garratt
Merry Christmas to everyone reading this blog. I hope the morning finds you healthy, happy and full of chocolate in front of a tree festooned with sparkly things.

Now stop looking at this rubbish and get back to playing with all your new toys !

Thursday, December 24, 2009

Pleasure in plastic

Front end suspensionThis is a fun rather than a serious project and I've found one of the good bits. Since the model is based on a plastic kit, where I can, I'm just sticking bits together.

In fact I'd forgotten just how much pleasure there is in simply chopping a part of a sprue and sticking it to the other bits. The front end suspension assembly took me just over 20 minutes to put together and that involved paying some attention to the instructions. The results look pretty accurate as far as I know and if they don't well I don't care very much as when the model is in action as it will all be under water.

Of course there is a bit of concern at the strength of the parts. The kit is designed as a static model after all. Everything is well washed with Mek though to ensure everything is well stuck so hopefully all will be OK. If it isn't some blobs of superglue will sort things out.

But this was 20 minutes of of pleasure. All the bits fitted. No fettling was required. No test and fit, just fit and glue. At the end of the job I had a complicated looking assembly that would have taken forever in brass of whitemetal. Makes me fancy an Airfix Spitfire next...

Back endAnyway, at the back end there was a touch of work to do. The kit version of Volkswagens engine is modelled very completely but would get in the way big time if I fitted it . I chopped things up so the stub axles are in place but the driveshafts inwards have gone to make way for the propeller. This bit is more of a worry as there isn't much support - the suspension parts aren't meant to do it all on their own - and I worry that the back wheels will just cave in at some point. Again, Mr Superglue will be coming to the rescue if required.

Never mind, I have kit for a VW engine to put together as well just for the fun of it. Well it seems a shame to waste the bits.

Wednesday, December 23, 2009

Power !!!

Motor InSince this is a model of a prototype vehicle built by the Top Gear team it's going to need a big engine. This one is a whopper. A Graupner motor gearbox unit that should be capable of shooting this vessel forward at breakneck speed, or at least give it the ability to trouble the skin of any passing rice pudding.

Fitting was surprisingly easy. Drill a hole in the back of the tub that forms the interior and poke the shaft through. A couple of bass wood lumps carved a bit are glued under the lugs sticking out of the sides of the gearbox. More glue (5 Star adhesive epoxy) seals the shaft/plastic exit.

I wasn't sure what size propeller to use. The unit comes with a 30mm one which I worried might bash the bottom of the model so a 20mm version was put on order. However I think the larger version will be OK as it just clears the plastic bits. The engine cover (a part I wish was fitted to early Bay Window vans, especially the 1971 model) isn't fitted until I am confident that the prop is OK.

You might have guessed that this is all a bit unplanned. I make something and see if it fits. Perhaps some working drawings and proper planning would be better but this is a fun project. Besides, I'm rubbish at drawings.

Tuesday, December 22, 2009

Stoppering holes

Filling HolesThe T25 kit is a pretty good basis for a boat. The body is a tub to which you attach the chassis. Of course the kitmakers didn't consider us model boaters when designing the model. While I can deal with all the big holes, it's the small ones that are likely to sink this project.

Scraps of plasticard have been glued under the gaps left to fit gear levers and other detail parts. I'm not planning an interior so these won't be glued up in the normal way. The plastic is fixed in place with tube glue (Revell Contacta) and then a wash of Mek Pak. I want to make sure there are no gaps !

Of course I did remember to test fit the chassis so I knew which ones had to be left uncovered. It would have been very easy to have these up with a well glued plate and then have a tough job scraping the stuff off again.

Monday, December 21, 2009

Snowy track

Snowy trackPretty isn't it ?

When I don't have to drive to work, snow is lovely to look at. The garden railway is a bit buried at the moment but looks magical. I suppose I should consider adding a snow plough to the stock list but I prefer to think my little line it looks like one of those narrow gauge railways that doesn't see very much action. The ones usually descrbed as "slumbering".

Strange how we love hardly used railway isn't it ? Those lines that limped on from year to year making a loss and gradually falling apart. Rolling stock that looks "rustic" but must have been pretty uncomfortable to ride in. Trains that would have been hopeless as reliable transport but just the thing for enthusiasts with no where in particular to go.

Still, the photographs look nice.

Sunday, December 20, 2009

Scaleway kits


Scaleway kits
Originally uploaded by Phil_Parker

I've been playing trains seriously for a long while. Longer than I care to think about in fact. Yet I'm still surprised to find goodies for sale that I didn't know about. One such item is in the Scaleway point range - a kit for a 24 inch point.

This is a big surprise because these kits used to be manufacturer just around the corner from where I live. The main retail outlet was in Warwick, about 5 miles away. SMP track components have been the mainstay of our layouts for over 20 years. But the sharpest turnout available was 36 inch radius.

SMP has now been taken over by Marcway Models and according to their website and the very helpful man on the 'phone - 2 feet radius is available and that is great news for those of us knocking up small model railway layouts. OK a large express model locomotive is going to struggle but if your preferred prototypes are small tank engines then it's the business.

Normally I would just buy the components, copper clad sleepers and nickel silver rail, but assembling a turnout would seem to make an interesting magazine piece so I needed the kits. Mind you at £4.99 each plus £2.99 deliver (next day too !) there's not much of a saving to be made.

Saturday, December 19, 2009

Trinders, Banbury

Trinder Bros Ltd, BanburyWhen was the last time you saw a toy shop in a town centre. In fact with the demise of Woolworths, how easy is to buy a toy nowadays when we aren't in the run up to Christmas ?

Luckily for Banbury, they have Trinders. Downstairs it is a proper traditional toy shop with a big Lego display, dolls, Playmobile and other stuff. The sort of place I would have loved as a child (we were lucky, our town had a similar shop called "Toytown" and it was heaven) and still feel drawn to because I've never grown up properly.

Upstairs though is modellers paradise. If you want plastic kit, games workshop, model railways (OO and N), a small selection of model boat kits, diecast vehicles and aircraft stuff then you are in luck. Best of all there is a huge range of materials such as steel rod in various thicknesses, balsa, plastics etc. All the glues and fixings, of which there is a huge range, are behind the counter. On the cabinet by the stairs were displayed radio gear (27mhz, 40mhz and 2.4ghz) and brushless motors. Yes, high performance brushless motors in a shop 5 minutes walk from M&S. That and three flavours of enamel including specialist fuel proff versions.

The owner knows his stuff too. Guiding my Dad through the racks of little bits for some fixings, he also managed to flog me a radio set plus paint and glue. We chatted for quite a long while and he's genuinely interested.

As we came out I said, "I had forgotten just how good it is in there." and I still think that. Banbury is a nice town. Trinders makes it worth the visit on it's own.

No website, but here is a link to a map.

Friday, December 18, 2009

Ingredients: 1 plastic kit

T25 camper kitWhile I might admire the card kit Damper Van, I didn't ever intend it to float. That's too much like hard work and even if I managed it, the result would be a floating card kit. I planned a beautifully detailed model showing this offspring of the unholy matrimony between VeeDub and barge...

Anyway, plastic floats better than paper so my starting point is the biggest injection moulded kit I can find for the base vehicle. After discovering that the Revell kit I sought was out of production, I tracked one down on eBay, where I paid rather more than the 2 quid written on the box ! This is of course prototypical as the Top Gear version was also sourced from the famous on-line auction !

At 1/25 the model is smaller than the card version but I reckon there is still space for radio gubbins. I'll be ignoring the left hand driveness of the kit and will have to scratchbuild the correct roof but at least the fiddly bits are done for me.

And before you ask, no it won't work on land. Reading the article on building a 1/10 DKW in Model Boats magazine would have dissuaded me from trying this even if I was daft enough to think I could make a proper amphibious vehicle. I'm sure it's possible but that way involves many, many hours of hard work and development not to mention proper engineering. This is to be a boat. Admittedly one that is camper van shaped but a boat most definitely.

Thursday, December 17, 2009

Damper Van

Cardboard damperI know what you are thinking, "A badly made card kit, how is that a project ?"

You are right. This is a badly made card kit. I put it together pretty quickly from one of the spin off products from the BBC TV series Top Gear found in a charity shop. For those who don't know the programme, this is an amphibious camper van "built" by Richard Hammond for one of the teams challenges. It's based on a VW T25 or Wedgie and proved to be pretty hopeless as a boat, sinking in the reservoir pretty quickly.

Of course this didn't worry me. I love VeeDubs and I love model boats. As soon as I saw the programme I knew I wanted to build one of these.

As with any project you need to start by amassing some prototype information. The real Damper Van was built by M&P Steelcraft (Not Richard Hammond) based on a knackered VW picked up by the production team on eBay. It was converted and then trailered to the site for filming. The shots on the road were (as many Top Gear stunts are) staged purely for televisual purposes. In fact the telly people broke the rudder doing this as it was never supposed to be attached when on terra firma !

Real anoraks will also spot that a subsequent challenge to cross the channel involved a different van with a higher bow and slightly wider hull. This was just as successful as a boat. If you want one of these, them Marks & Spencer make a toy that doesn't appear to be available in the UK.

Anyway, with no plans available I was chuffed to find a well engineered card kit on sale in a cheap book shop. A couple of hours work and I have a 3D model suitable for taking measurements from. If I was really keen, gluing the parts rather than relying on the clever locking tab system would produce a good looking model. A bit of bracing and some varnish and I reckon it would even float. I have a better idea though...

In the meantime, if you want to see the real vehicle, visit the Beaulieu motor museum. And send me some photos please !

You can buy the kit from Amazon if you fancy having a go.

Wednesday, December 16, 2009

Wooden Drawers

DrawersLast night of woodworking college for this term and I was in a rush to try and get my tool chest into a state where I can finish it off without recourse to the workshop. All that was required was to get the drawer parts done. The rest was glue.

The ends needed rebating to accept the sides and this was carried out using the special drill that makes square holes. In the original article the author used a router but it's difficult to do this without rebating the whole end. The drill works much better for this job leaving only a little cleaning up with sharp chisels.

Next the big router was used to make a grove in the back of the drawer faces to hold the plywood bases. This is a vicious tool whose set up involves undoing a whacking great nut and making a bespoke shield to keep fingers out of the whirly bits. Operation is via a gear lever affair rather than a button. You slow the thing down by hanging on the lever applying the brake !

Finally the ripsaw finished off the sides and bases to give me kits that just needed some PVA and a lot of clamps for assembly. With a bit of sanding they even fit in the box so once I make some runners I'll progress from making bits to sticking them all together. And the pile of wood will become a piece of furniture.

Tuesday, December 15, 2009

Finished Kinkade Cottage

Finished Kinkade Cottage
Paint your garden - that's the last job in Kinkade cottage land. A quick coat of grass green Humbrol followed with a wash of green acrylic. The later because I don't have many yellow-greens in stock and can't be bothered to go and buy any more. Let's face it, I normally use flock powder for foliage not paint !

Colour came from dry-brushed acrylics. I've no idea what sort of bushes these are supposed to be, the model making isn't that hot, but from a distance they look OK. As mentioned, I was after a Sunday Supplement look and I think it looks pretty good.

As a project, this was great fun. I'd recommend it to anyone who wants a break from "serious" modelling. Just whack some colours around and if you don't like the results then bung it in the bin. Maybe these kits should be available in a box with "In case of fine scale frustration, break glass and have some fun" on the outside !

Monday, December 14, 2009

CCT in Hornby Magazine

January Hornby MagazineThis month's "Parker's Guide" in Hornby Magazine's January issue covers the very useful CCT kit from Parkside.

After the previous issue with a loco kit this might seem like a step back but we all need rolling stock and a long wheelbase van can be challenging to get running properly. In an effort to make the build a bit more interesting and the resulting vehicle a better runner, I compensated it using a MJT etched brass rocking axle.

It's also the first vehicle I've finished in BR blue - positively modern image for me !

The magazine has a new look with much more use made of the photographs. I'd guess this is an effort to compete with others who have improved their use of imagery over the last few years.

Sunday, December 13, 2009

Multiple track plans

It seems that between Christmas and New Year, I will be off work as the whole place shuts down. I recall a Cyril Freezer article in a very old Railway Modeller magazine where he mentions that for children, the long school holidays are an excellent time to build a layout - well, I don't get 6 weeks but 10 days isn't bad and a little layout shouldn't take that long. Obviously not all the work will be carried out in this time - that's not the point - but I can get the basics sorted to leave the detailing work and fun bits.

Before this I need to decide on the track plan. Thanks to Michaels post a few weeks ago, I have options and just need to take my pick. To do this I need to see things full size, so I laid out the point plans on the new baseboard. A loco from the Bachmann beginners range was all I had to hand plus a couple of wagons so these stood in as my rolling stock to test siding lengths and clearances.

To start with I decided to ignore the plan based around a traverser. It's nice and ingenious but I need some points to test locomotives over. I don't want a model that is just an engine shed either as it will be acting as a background for photos of all sorts of stock. Mind you, I did work out how to make the traverser work. Think length of studding being rotated by some Meccano gears with the table attached to a nut threaded on...

Anyway, Option 3 First:


which looks a bit like this:

Option 3

albeit without the loco lift at this point. Michael suggests an engine shed frontage along the nearest edge and a coaling stage at the far end hiding the exit from the baseboard. If I had a stud of large engines this would be a nice idea and an excellent way of displaying them. Should you want to make the model up in a clear case in some way I can see it looking good on a shelf and far more interesting than a case with shelves to show off your stud.

Option 2 was initially my preferred plan.


A flip-over fiddle yard wouldn't be difficult to arrange and thanks to the clever arrangement, you can simulate a run round loop so the train can come in with the loco at the front and then get to the back of the wagons for shunting. I specifically didn't want a model that required pole or rope shunting as it simply doesn't look right in 4mm:1ft scale thanks to the lack of mass in the wagons.

Option 2

I like the idea of a platform on the plan - this is a layout for everyone since you can run passenger trains. A single car DMU, railcar or even autocoach would be ideal and if a cassette based fiddle yard is employed, ought to be easy to operate. As for freight, the clever bit is the ability to bring a train into the platform and exit on the opposite and correct track. Imagine you are dealing with a normal station cut in half by an over bridge.

Which leaves Option1:


That turns out to be the plan that I fancy building. It's very shuntable, the three sidings give you an excellent inglenook. I was surprised how many wagons I could fit into them, although I have cheated by using a Y-point here. To get into the engine shed though, a conventional point is used which allows proper testing of locomotives. The shed itself cries out "Airfix" to me and hides a potential exit from the board.

Option 1

However the model can be operated completely within the confines of the box which the others can't and I quite like that. I also like the warehouses in the background and already have a picture in minds eye of how they will look. In fact I have an idea how the whole model will turn out, especially the atmosphere of a run down corner of the rail network.

Anyway, that's the track sorted out, unless I change my mind again, now I need to work out how the rest of the model works so I can finish the baseboard.

Saturday, December 12, 2009

Ian Allan, Birmingham

Ian Allan BirminghamHere is irony. The first shop to be affected by the refurbishment of Birmingham New Street station was Ian Allan's excellent transport bookshop. One of the escalators goes straight through the shop, or at least where the shop used to be.

Every cloud has a silver lining though apparently and in this case the enforced move has pushed the shop about 50 feet along the road and into premises occupied for many years by a Christian bookshop. I'd assumed that this move would result in a consolidation to a single floor rather than the two small ones at the old place.

How wrong I was. There are still two floors but each has the area of the old place and makes this the biggest in the chain. In fact the upper one might be even bigger. The space isn't empty either - from somewhere there is a whole lot of extra stock as the shelves are full and the cabinets chocka. Old favourites such as the extensive specialist magazine rack downstairs are still there - although the sign requesting you don't treat it like a library hasn't made the move !
The ground floor is still military books and new titles. Upstairs is railways, maritime, trams, plastic kits and RTR railways. If you imagine a branch of Waterstones but every section is labeled "Railways" then you get the idea.

The extra space is wonderful. The shop looks modern and airy. There are no more poky corners. OK, so the customers are still the same but lets hope the slightly more prominent and pleasent location encourages more of them !

Ian Allan website

Friday, December 11, 2009

Red roof

Kinkade RoofThe instructions for this cottage tell you to paint the roof purple. That is quite frankly, madness.

Airfix never told you to paint a Spitfire orange did they ? That was back in the 1960's too when people didn't know as much. Quite how the "Painter with light" managed to decide mauve was somehow found on a building roof is beyond me. Maybe he's OK with light and rubbish with pigment...

Anyway, this bit was easy. Deciding that a red roof would look nice I whacked on a coat of Humbrol rust colour and then dry brushed with a pale brown from the bottom upwards to highlight the edges. Finally some thinned track colour was dropped into the crevices and Mt Capillary Action pulled it along and into the gaps.

Strangely, since I've not been taking this painting all that seriously, the effect is very nice to my eyes. I might use it again on a proper model one day.

Thursday, December 10, 2009

Sunday supplement windows

The Kinkade cottage is a solid lump of resin. Therefore the windows are as transparent as mud. The only way anyone will think that they are glass and peering closely will reveal a sylvanian scene within is if I deploy my greatest artistry and produce something of exceptional quality.

No. Not really. Solid windows never really look right.

However my goal with this model is to produce something that could be found in the back pages of the rubbish Sunday magazine you get with the newspaper. In one of those adverts that include the phrase "Send no money now" while offering the chance to pay in 37 installments, all the time hoping you don't notice that you are buying tat for the price of a small car.

Anyway, my method, should you fancy fleecing credulous Daily Express (is there any other sort) readers is this: Frames carefully painted with Humbrol 147 (Light grey). Panes painted with the same colour. Once this is dry a drop of thinned yellow acrylic, from the pots that came in the box with the cottage, is plopped into each pane. It dries slightly unevenly with most of the pigment around the edge thus simulating the effect of light shining out from the room within. Lovely.

Wednesday, December 09, 2009

Clamping challenge

Clamping the boxOnce I was comfortable making dovetail joints, a process that took another test piece and quite a bit more chiseling, work started on the carcase of my tool chest.

First job - prepare the wood. While I had planned down (in a machine thank goodness) the oak for the outside, so much wood had been removed that the leftover plank threw a strop and warped slightly. Luckily I had been paying attention when first instructed in the art of the thicknesser I'd remembered the instruction not to take more than 10mm off any wood, "or it could move". My wood certainly had, on a flat surface it wobbled. Not much and a skim of a couple of mm sorted it out but this prompted me to get on with the other lumps of tree and get them within spitting distance of the right thickness so they too could settle.

Anyway, with the plank ready for use I carefully marked and then cut my dovetails. Things went well and I was chiseling away quite happily. The fit of some joints was best described as "snug" but they could be persuaded in. Handy hint: don't bash the bits together with a mallet, it attracts attention in the workshop. Use the vice, it's much quieter.

Before assembly, the front and back edges were routed out to give me a rebate for the plywood. It's a job that takes longer to set up than to do but will make the resulting box look better than it would if I just nailed the ply to the sides.

Once all had been glued up, I needed to smooth down the joints. My preference would have been a sander but apparently you are supposed to use a plane for this job. Well that's what proper cabinet makers do.

So the box had to be held in place which is where the problems started. Gripping a box this big isn't easy and as you can see we had to improvise with 3 sash clamps and an off cut to get the thing fixed to the bench.

After this I attacked it with a plane. Attacked is the right word. I don't know if it was the wood, the plane or that I'd started a new job the day before, done 12 hours work that day and hadn't been sleeping properly, but things just didn't go well. The blade would shave the wood and then dig in for no reason. By the time I'd worked over three sides my previously smooth sides were like a rutted field. I knocked off early before I did any more damage.

A couple of days later, at home in the garage, the box was clamped to the bench and worked over again. First with a plane that I had freshly sharpened which did improve things a little. Then with the sander and gradually finer grades of paper. This improved things a lot. Cabinet makers know nothing. Machine tools are better.

Tuesday, December 08, 2009

Funky microstrip

Funky microstrip

Digging around in the boxes under trade stands at exhibitions can be enormously rewarding. I've picked up many of the little bits that are so handy for model making this way. It seems that if it's not a Hornby choo choo then some traders are happy to chuck it in a box marked 50p.

This is A Good Thing. And explains why I have boxes of tiny packets. So many that sadly I can no longer remember what is in most of these leading to many duplicates.

I am certain though that I have never seen this stuff before. Strips of plastic made by someone other than Slaters. Supplied in a wide selection of colours.

Why ?

Who decided that what a modeller needed was a variety of colours ? It's not like it wouldn't be easier to just produce white. Or black which is also useful.

Each pack has a reasonably consistent range of colours too. Did someone at P&E Modelling Accessories have the job of counting each colour into a packet ? If so, did the product vanish from the market because they went mad ?

Monday, December 07, 2009

Painted stone wall

Painted stone wallDespite being back on enamels, I'm still fighting the Kinkade cottage painting.

With the acrylic painted removed using a toothbrush and some washing up liquid, a nice grey base coat was applied with some car primer. OK, I know this is technically an acrylic again but it sticks unlike the painty sort. Anyway, I pretty quickly added to this with some stones picked out in greys (different ones rather than the supplied very similar versions), browns and creams.

Once dry a couple of washes with the thinned track colour went on to try and bring out the mortar. With my pessimist hat on I wasn't surprised when the paint sat on the surface of the stone and eshewed the valleys between them. This thing just doesn't want to painted ! Another attempt dotting thinned paint onto sides washed with clean turps seemed to go better but I still wasn't convinced. For a model rather than an ornament I might have lived with this as the overall effect wasn't bad for worn stone. This is supposed to be pretty though, so I dry-brushed the raised faces with Humbrol stone colour and then pale grey.

This finally seems to have produced the desired effect which I suppose shows that persistence pays off in the end and we don't always get it right first time.

Note: I know the photo doesn't really show the effect. It will once I do the other bits. You need the contrasts with the grey primer. Honest.

Sunday, December 06, 2009

Baseboard top

Work really gets in the way of modelling doesn't it ?

All I've managed to do with the box file layout is get a bit of wood to act as the baseboard top and even that was just a quick trip to Torries hardware and thier magic wood cutting machine.

I now own a bit of 6mm thick plywood 74cm long and 20.5cm wide. Not very big. In fact it looks a lot smaller than I had thought. A lot smaller. It's a good fit in the box though.

Under the board I've breaking with tradition and will be using softwood framing instead of more ply. Some inch by 1/4 inch would be ideal but I'll see what I can get. Before doing this some idea of how the points are operated would be a good idea. I might need to allow for cut outs if there is to be any rivers/canals running through the model.

So, by next week I hope to have sprinkled some point plans on the wood to see what fits.

Saturday, December 05, 2009

Peugeot 206 indicator stalk repair

To commute to work, I bought a 10 year old Peugeot 206. It's green, has quite a lot of toys and apart from a wing mirror held together with tape, seems pretty good. But a week last Thursday it developed an "entertaining" fault - without my intervention the left indicator would start flashing. Waggling the stalk seemed to stop this but is hardly what you need to be doing when navigating Coventry's traffic in the dark !

A quick search on the web revealed this to be a common problem with older 206's and also showed the fix - but without any photos. So, having performed the relatively easy task, I thought you'd be interested in seeing some. Anyway, the Haynes manual isn't very clear on this job and doesn't bother telling you the size of tools required.

Peugeot 206 indicator repair 1
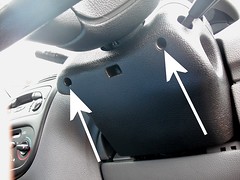
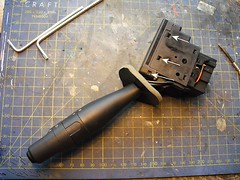
Stage 1 - Remove the plastic casing for the steering column. For this you need a T20 Torx screwdriver (That's a star shapped one, don't try normal screwdrivers as you'll damage the fixings - and one in a multi-tool will be too short and fat) .

Halfords had sold out of the normal ones but do a set of Allan key style versions for a tenner so that's that I used. Undoing the screws releases the top part of the casing and allows it to be pulled away. The bottom part can then be unclipped. Haynes tells you to remove the volume control stalk but I left it plugged in in the foot well. Just be careful not to catch it with your feet.


Peugeot 206 indicator repair 2
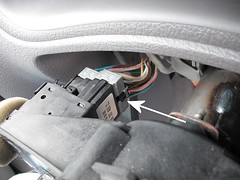
Stage 2 - Unplug the connectors. Each has a black clip (arrowed) which pushes in. The plugs then slide off easily but be careful not to tug the wires too much.

I didn't bother disconnecting the battery to do this job but suspect that it would be a sensible move. When you re-connect it beware that some electronic things may need looking at - not sure if the stereo holds it code without power for instance.


Peugeot 206 indicator repair 3
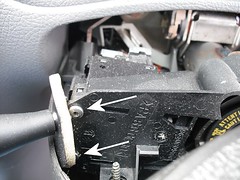
Stage 3 - A T10 Torx screwdriver is needed to undo these screws. The switch then slides out sideways. It took a bit of a wiggle to get it past the fascia panel. Unlock the steering column adjustment as this helps a bit.

At this point you could just replace the switch if you can find one. If that's the plan just plug the new one and reassemble the casing.


Peugeot 206 indicator repair 4Stage 4 - I'm too stingy to buy a new part if I can fix the old one. Hence the switch was taken to the modelling board and the top removed by pushing the plastic tabs using a small screwdriver. A bit of care here as this is plastic.

Cleanliness is important here too, don't work in an area full of detritus as we don't want anything untoward getting in the switch. Watch the springs under the lid too - they shouldn't come off but it's wise to keep an eye on them.


Peugeot 206 indicator repair 5
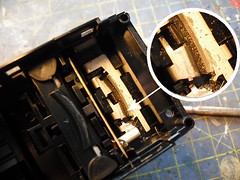
Stage 5 - Here is the culprit. Metal shavings. When you move the stalk, a steel contact slides in the metal grove you can see here. After many years and a lot of indicating, it wears and deposits filings in the contacts. These sit at the bottom of the track and sometimes make the circuit causing the indicators to flash. When I wiggled the stalk this was moving them enough to stop the problem - but it was only going to get worse.

Blowing them away and brushing out the grove fixed things. I also took a moment to smooth off the contact (not shown in the photo) with some emery paper as well and hope this will stop the wear for a while.

Reassembly is the reverse of the above. When putting the top on the switch, make sure the spikey thing at the end of the stalk engages with the silvery grooved thing otherwise when you turn the light switch it won't turn them on. If you don't fiddle though, this will already be in the right position.

Do test the unit before putting it in the back of the car - any stiffness in movement probably means something's not gone back right. Incidentally, the stalk sticking out the opposite side of the switch to the operating stalk is part of the self-cancelling mechanism and should go in and out as you work the switch.

I carried out this work a week ago and haven't had any problems with the indicators since. This work is (IMGHO) well within the capability of any DIY'er and for an hours effort can save you quite a lot of cash. Good Luck and happy flashing !

Legal note: This is a record of what I did. If you try the same and it doesn't work, don't blame me !
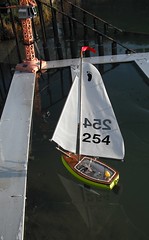
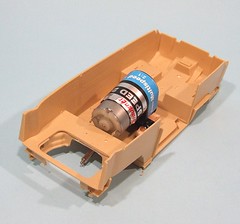
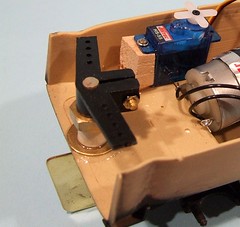
Friday, December 04, 2009

Acrylic grief

I have started painting my Thomas Kinkade cottage. As the instructions told me, the walls received a coat of pale grey and then some of the stones were picked out with dark grey and brown. Finally, after 24 hours a wash of dark grey was to unify the look and fill in the mortar lines.

Sadly, it looks rubbish. The photo doesn't do it justice, it's much worse than that.

The dark grey is hardly darker than the light version so the tonal difference between stones was tiny. The dark grey was hopeless as a mortar colour but adding some black darkened it up enough.

Worst of all though, the mortar wash removed the picked out stones. Acrylic always seems to do this when I use it. Which is why I prefer enamel.

And even if everything had worked, the results still wouldn't look like those shown on the instruction leaflet. The walls have a definite brown hue. At a guess the professional painter had a different palette to that provided by the pots on the box.


So, it's back to my normal paint drawer. While I'm at it the roof will not be purple.

Thursday, December 03, 2009

Kinkade cottage

Kinkade HouseMy maturing pile of modelling projects includes all sorts of rubbish. It's not just home to high quality etched kits that will one day be made into exquisite miniature representations of whatever they are supposed to look like. No, sometimes I like to do stuff for fun. Simple stuff. Stuff that doesn't matter.

And I sometimes pick my projects by the size of the box. Biggest box wins. Which is why the current workbench occupant is a Thomas Kinkade cottage presented to me in a box with some acrylic paints and purchased from a cheap bookshop - the place that things that don't sell go to die.

In the box is a rather nicely moulded resin cottage. No one will mistake it as an example of a building nicked from Pendon. It's more in the style of a "collectible" sourced from the back of a Sunday newspapers free magazine. Pretty enough but a bit cartooney. Incidentally, Thomas Kinkade is apparently a real person, a highly collected artist no less. Although the web site doesn't mention it he even produces, via Bachmann, a range of On30 train sets and rolling stock intended for those Americans who feel the need of a model railway around the Christmas tree.

The model in my hands is obviously the by-product of the huge Kinkade empire. It's a sort of paint by numbers kit except you are colouring a 3D object and there are no numbers, just a sheet of instructions.

Never mind - I like painting things and this looks good relaxing evening entertainment as I get used to the daily commute. Who knows, perhaps it will inspire me to get out the casting gear and make my own Sunday Supplement Specials !

Wednesday, December 02, 2009

Dovetail test piece

Wednesday means college night. I'm still on the furniture making course and this term I've been building a tool chest. The oak for the carcase has been planed to thickness and chopped to size. Before I start on the real thing, time has been taken to practise the corner joints.

Our tutor is a bit old fashioned and won't admit there is a tool to make dovetail joints. We have to do it the hard way with saws and chisels. I suppose this the best way to learn but I have to admit that I like using the machinery. It's good fun and the results are better. Ultimately I suppose a bit of satisfaction is lost but when you are hacking away at a lump of dead tree, it's a small price to pay.

On the positive side, oak is a whole lot easier to work than softwood. Give me a sharp chisel and even I can carve shavings off instead of just making mush as I did on the softer material. In fact the carving is actually a very pleasant process. I'd still like to try the machine though...

Tuesday, December 01, 2009

Roof

Oxford RoofI took this picture a couple of weeks ago when I visited Oxford. The vantage point is the tower in the centre of town where this an excellent view of the tops of buildings.

While I was up there it occurred to me that it's not very different from the view we have of most model railways. Whereas in real life we see things from eye level, to get this at a show means sticking your backside out into the aisle and rubbing the barrier with your nose. We all do it but it's not how any model is first seen.

Isn't the top of a building unexpectedly complicated ? This is a simple one but in addition to the usual ridge tiles and chimneys, of which there are several variants, you get some valleys with lead work and a surprising amount of slipped tiles. Most of the chimneys are capped in some way too. Surrounding buildings are a maze of air conditioning and duct work. Models tent to be a whole lot tidier.

Even really iconic buildings can look odd from the air. Try this link to the roof of the Selfridges building in Birmingham. Doesn't look so tidy now does it ?