Wednesday, April 30, 2008

Footplate and bufferbeams

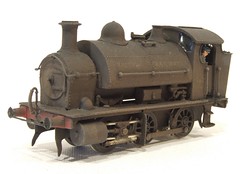
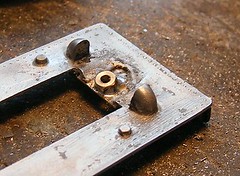
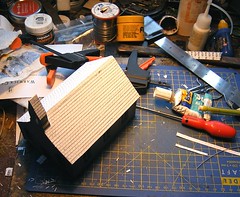
Now for some big chunks of metal. First the bufferbeams are a two part lamination. I tinned the top and bottom a little and then clamped them together using some clips and ran solder round the edge. A big (50W) iron, lots of flux and taking things slowly did the job - at least they haven't fallen apart yet ! What I hoped is that the heat transfer from the edge soldering would have activated the tinning. If not there is some much at the perimeters they aren't going anywhere.

I deliberately overdid the solder to hide the cusp inevitably found on etched parts. This model locomotive is supposed to be made of solid engineering material not thin wisps of brass and nickel !

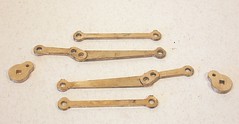
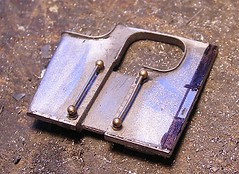
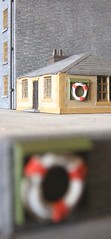
Overlays for a couple of plates and the coupling hook surround were sweated on with a gas torch. The iron would work but take longer. Rivets are half etched on the back of the plates. I punched these with a slightly blunted screw with the part face down on a bit of lead. My rivet press only goes up to 7mm rivets and these looked to be man sized versions. Another time I'd consider drilling and soldering a brass pin in the hole to get the size as even these are a bit wimpy.

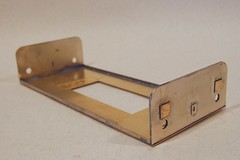
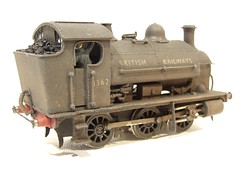
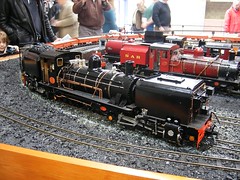
Much to my surprise the 50 watt iron was man enough to attach the beams to the brass footplate. It worked for the valances too. I couldn't tell on the prototype photos if these were set back at all but on balance I don't think they are. If I'm wrong it's only a tiny amount.

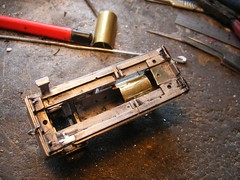
I'll admit to finding a use for the chassis during this job. It was used to jig the buffers into position. I fixed the rear beam and then held the front one against the end of the chassis so I knew it would fit. I've tried other methods but this way guarantees that you don't start hacking at a chassis to get the body on top. Not a problem with this kit but on others I have built in the past. Hmmmmmm.

Tuesday, April 29, 2008

Ruston rods


Ruston rods
Originally uploaded by Phil_Parker.
Gauge 1 kits are different from 4mm ones. Heavier mainly.

Laminating the rods up for this model locomotive is exactly the same as for a smaller kit - just bigger. The results weigh in at over 25g. I've built loco kits that are nearly as light as that !

Weight means heat retention too. I made the mistake of picking a part up around 20 seconds after I'd finished soldering it. I dropped it again pretty quickly with a yelp and went off to cool my fingertips under the tap...

For a diesel the rods are odd. The strange take-off to the jackshaft drive for example which hinges on the rear pivot (I know I've put one lamination on wrong and will fix it so don't bother telling me) what's that about ?

Greenhouse door hinges

Today I have been mostly glazing a greenhouse. It's a second hand one given to our neighbour to free up space in our garden for a nice new one that sits ominously in it's packing on the patio. Yesterday we set up the base and lifted an intact aluminium frame over the fence. Today we put the glass back in, a job that should take a couple of hours.

To be honest most of the glazing went well. There were some niggles - the parts come from two nearly identical buildings which had slight differences. A few mm in the width of a pane of glass make a big difference when you are trying to fit it in a space slightly too small. The scar on my left arm from a childhood encounter with a window makes me especially wary of glass anyway. What's the point of a material you can't fit with a hammer ?

The biggest problem was the door. Originally this was a sliding effort but one of the top rollers was broken and the bracket that held the bottom in had gone missing. Apparently greenhouses without doors aren't a good idea so we needed to fill the hole in one end.
I can't make sliding doors but hinged ones are a possibility. After a bit of playing around it looked like fitting a couple of hinges to make the door swing might work. A dig in the garage unearthed a couple that looked promising and some bolts to attach them to the frame.

Some slight alterations to each hinge we needed and several bits of aluminum frame were hacked away with a junior hacksaw both to accommodate the hinge and allow the door to swing. Obviously these were carefully planned and measured, not just hacked away until things worked...

The door is held shut by a simple hasp nicked from our shed which has a proper lockable one - worth more than the shed contents I think. In fact the whole job was done for no money as we recycled all the bits or used up old items stored for a rainy day. This makes it a very Green house !

Monday, April 28, 2008

Chassis and axleholes


Ruston axlehole
Originally uploaded by Phil_Parker.
Happily there isn't much to say about the chassis. Four bits of nickel silver slot together neatly and can be fixed with a soldering iron. Working on a reasonably flat surface and checking things are square is all that was required.

The bearings show up why I'm building a pre-production model. The supplier is used to big fat proper gauge 1 axles, not the weedy Slaters ones to be used here so while the outside of the bearing is pretty much spot on, the inside is hopeless. For this model I'll bush the hole out but on production versions the Brummies will be told to drill the right size hole. That way when you buy one of these kits you'll have no problems – I hope you appreciate the pain I have to go through so you get to enjoy building your model :-)

Sunday, April 27, 2008

Jotika


Wood strips
Originally uploaded by Phil_Parker.
I love seeing behind the scenes, finding out how things are made. So today I was pleased to have the chance to visit model boat kit manufacturer Jotika with the rest of the KMBC members and poke around.

We learned loads. How to make plywood for example. The veneers are stuck together with 150 tons of pressure. Get your finger stuck in that press and you'll certainly know about it ! Once dried the wood is sanded down to give the correct thickness to an accuracy of a fraction of a millimetre.

Parts are then CNC milled on one of two machines. The larger one seems to spend nearly all its time making parts for the firms most popular kit - HMS Victory. It seems that this is the kit that all modellers of sailing ships aspire to. Looking at the impressive range I suppose I can understand why but they don't appeal to me.

On the other hand there is a large range of radio control models as well. I'll confess that I didn't know quite how many they produced. Of course I need another project like a hole in the head but if I am shopping in the future then having seen the care an attention to detail that goes into each model I'm sold.

The thing that struck us all most were the huge amounts of wood around the place. Just inside the door there is a serious bandsaw which reduces large chunks of tree (Jotika buy 2 a year and then leave these to season) to planks ready for finishing. There's also a huge chunk of scrap wood. Much of this has the good bits taken out but they are pretty exacting in their standards.

The main workshop has the saw for producing strip which it does in seconds making 6 strips at a time, hence the pile in the photo. There's also milling, sanding and other machines including a massive guillotine - another finger reducing bit of equipment if you are stupid !

We all really enjoyed the visit and were made to feel really welcome. Cynics might say that this was good salesman ship but I definitely felt we saw a family firm working hard. Trips like this are one of the benefits of club membership - you aren't going to get a personal tour as they haven't got time to stop work, sales are good so they need to keep the customers happy.

Saturday, April 26, 2008

Ruston Diesel kit


ruston kit
Originally uploaded by Phil_Parker.
My background for photographs is an A0 sheet of cardboard Blu-tacked to the wall. Normally this is more than sufficient for anything I want to take a picture of, but this time I struggled. to fit everything on.

The problem item is my next kit - a Ruston Diesel locomotive in Gauge 1 from Mercian Models. In 4mm scale this would be a tiddler. Here the etches are huge and thick. I'm not sure how big the finished model will be but it's going to dwarf most of the things I've built to date.

The parts look pretty similar to any other etched kit apart from the size. Assmebly looks like it should be reasonably simple with only bonnet forming providing a challenge.

Oh well, watch this space to find out how I get on.

Friday, April 25, 2008

Floating boxes


floaty resin
Originally uploaded by Phil_Parker.
Our On30 layout needs some details. Specifically lots and lots of packing cases. Now we could build then all individually. Each would be a beautiful model, unique and interesting and make the heart sing.

Life's too short for that though. No-one cares anyway - they just see a mass of miniature boxes and then move on to see if the next door trader has the latest Bachby locomotive for 10 pence less than that other guy...

So, we've made 4 and will cast copies in polyester resin. That means I have to make a mould. This didn't go exactly as planned. You see the boxes are wooden covered with plasticard. And as I discovered, they float in the mould mix. Looks like I need to glue them down then pour the mould stuff in.

Thursday, April 24, 2008

Paint cobwebs


cobwebs
Originally uploaded by Phil_Parker.
With the Slingshot season approaching I'm painting my Dad's boat as he's going to have a go. The last time he tried anything like this was in the 1960's with slot cars. Apparently slot racing was big then - clubs scratchbuilt huge circuits and then converted 1/32nd Airfix kits to run on them.

Anyway, his racing colours were royal blue with a yellow nose so that's how he want his boat painted.

The yellow will be a fluorescent colour that I've used before. Sprayed over a matt yellow base it took an age to get a decent colour depth. The paint from Revell has to be dried as you use it or runs happen.

It's awful stuff to spray and weirdly produces fluorescent cobwebs over everything in the garage. I think this isn't a conventional paint but a sort of plastic. It's certainly has more in common with jelly than paint.

Wednesday, April 23, 2008

1361 - Finished


1361 finished
Originally uploaded by Phil_Parker.

OK, so the blog has been a bit behind. Yesterday this model locomotive was ready for paint, now it's done. This wasn't down to an overnight miracle, just my writing catching up.

The primer coat looked pretty good when applied. There were a few small areas that needed a touch of filler but nothing much. I did plan a pretty heavy weathering job so the finished didn't need to be perfect.

When I went for the black paint my Humbrol tin was beyond saving but I found a pot of Railmatch coal black. I don't remember buying this but as it was on the shelf and liquid (one I broke into the bottle - the cap had sealed itself on and needed pliers to remove) I decided to experiment.

The paint sprayed OK, perhaps a little less thinners were needed than normal but there wasn't much in it. Coverage was excellent and the finish OK once I'd built up enough depth of colour. Coal black is slightly glossy - I hoped this would let the decals sit better than on a matt surface.

Transfers were a mixed bag from my transfers stocks. I think the "British Railways" are waterslide and the numbers Presfix. The loco actually ran with its GWR numberplates so one day I'll get hold of a set but for the minute, this will do.

Finally the model saw a lot of thinned dirty colours. First up was rust which went well right up until the end of the paint cup and then nearly all the pigment shot out over the front. Spraying thinners on didn't diminish the effect but it wasn't entirely unrealistic and subsequent coats of dark brown and grey hid the problem. I even blew a coal black/grey mix along the top to give a smoke residue. The real locomotive was absolutely filty as far as I can tell from photographs. Since it's only a Great Western Railway engine, I didn't think the crew would bother cleaning it much either. :-)

If there is a problem it's that the paint dried very quickly and leaves a slightly textured effect which is probably more appropriate to a 7mm scale model rather than 4mm. Perhaps this is an area where enamel rather than cellulose thinners would be better. The later flash off so fast, which is why I use them, that the paint doesn't get change to spread.

Anyway, glazing (Krystal Klear) a crew (Langley) and some coal (from the coal merchant) in the bunker finished the job.

The end result looks pretty good to me. If you compare it to the original as I bought it, then the work has made a big improvement. After some careful lubrication and a session on the rolling road I've ended up with a nice runner too. In fact at least half an hour was spent later yesterday evening just running the model back on forth on my metre long test track for the satisfaction doing this gives. I look forward to pressing this locomotive into use on the layout.

Tuesday, April 22, 2008

1361 in the metal


1361 in the metal
Originally uploaded by Phil_Parker.
Everything on the locomotive is now soldered together. The front handrail has been replaced with one that runs over the smokebox door, a job that only required a little swaering to complete.

The buffers have been replaced, although to be honest the originals wern't bad. I'd bought some Gibson ones so they were going on.

The smokebox handle has been carved off and replaced with a brass version. This always gives the model a lift.

It all looks right, and not nearly as wobbly as the angle of the photos appears to show. Time for paint.

Boiler section


Boiler section
Originally uploaded by Phil_Parker.
I keep plonking the locomotive body on to its chassis and checking it looks right. This matters more (I think) than strict accuracy. The area under the tank has always looked odd - there is too much air.

The kit didn't come with anything to represent the boiler bottom, hence the big gap. I had to scratchbuild this bit using a section of brass tube. Ideally this would go back to the firebox but if I wanted to get the motor in that wasn't possible.

One feature the kits does have is a pair of unprototypical sandboxes ove the centre wheels The ought to be replaced with springs but I left them in place as they help hide the foreshortened boiler. They look pretty nice too.

With the space filled in, this loco looks a lot better - more waddling saddle tank than 9F.

Sunday, April 20, 2008

Cabside - what ?


1361 cabside
Originally uploaded by Phil_Parker.
I don't know what's going on here. The cab sides of the 1361 overlap the front by over a mm. The black areas had to be removed and the rest blended into the saddle tank. Even the GWR didn't rivet into thin air !

It wouldn't be so bad if the cab wasn't a touch short anyway. Ideally I'd shorted the tank but that would be a lot of work and lose some nice rivet detail.

Slingshot testing


slingshot preperation
Originally uploaded by Phil_Parker.

First test session for the Slingshots today. It rained.

My boat wasn't competitive, hopefully this is just the batteries not taking a proper charge and will improve later in the season. For now I'll blame the organisers since the new handicap system means I have to start behind everyone else :-)

Still, we had 5 boats circling the pool and some good fun. Not bad for a wet Sunday morning.

Saturday, April 19, 2008

Derby 2008


Derby Crowd
Originally uploaded by Phil_Parker.
Some things don't happen at model railway shows. They aren't populated by nubile young women. You'll have a better than average number of people who will know what a flange is and why you'd want to care about it. And by lunchtime you won't have to queue to get in.

As the photo shows, the last one was wrong. At twenty minutes to twelve there was a line of people that took 15 minutes to work through and even then it was back to the same length behind us. Once in though, there was little sign of them. Luckily Derby Civic centre is large enough for you to move around reasonably freely in most areas.

To be honest while it's a nice show, Derby isn't one I worry too much about. In the middle of the show season it's perilously close to York so I'm fairly well supplied with bits and pieces already. The trade is good but not usually enough to make me want to trek up the line.

One feature that sets the show apart from other is the use of a suite to show foreign railways. This display alternates between European and American. This year it was stetsons on for a display of the USA. With an American model beckoning it made the trip worth the effort.

This was borne out when we spent over an hour in just this section of the hall. There was lots of chat, especially with the excellent NMRA guys, and some new (to me) trade. Despite not planning to buy any loco kits, Unit Models enticed some cash out of me for an interesting On30 conversion kit for a Bachmann HO model.

I know this would be a good show though when the first layout we saw was Port Foxdale, one of the smallest and cutest Isle of Man layouts out there. If I was being picky I would say it's over detailed now and looking a bit too busy but the public love this sort of thing and I liked the new original signs that enlarged the display.

Another highlight was my own clubs N gauge layout "Meacham". I'd only ever seen this in the clubrooms before now where it looks average. In a dark hall with the operators concentraiting on keeping things running and it really comes into its own. The crowd got a good show and hopefully there will be a few bookings received from this. It deserves to get out and about a lot more.

Layout of the show for me though was Idleway - 5 feet of OO. With Peco track and Wills buildings you might not think it sounds impressive but for me this is the sort of layout that needs prominence in the hobby. The sort of model anyone could build. It's not too big, nor complicated. It's just very achievable.

Derby, for some reason I've never understood, has a display of model boats. Once upon a time they were interesting but I didn't worry too much. Now I'm into the hobby more attention is paid. I loved the steamboat photographed as I have a similar hull and plan awaiting attention. All I need a steam plant to put in it.

The show moves out to an out of town venue next year and changes date to mid May. While I understand why this is happening, it's a shame for those of us who don't want to drive. The train journey is nice and you get to see around the town as well. I wonder if a little atmosphere will be lost too.

Friday, April 18, 2008

Woodex 2008


Wooden faces
Originally uploaded by Phil_Parker.
Yay for free entry. That wondrous ticket price that lets you go to exhibitions just for the fun of it and see unusual things. That's how I ended up taking a quick trip around the corner to see the national wood turning and carving show.

Wood turning is a but like pottery as far as I can tell. Both involve the material rotating and being formed by hand whilst making a mess. Both look great fun to do and very satisfying in a weirdly tactile way.

Around half the event was given over to displays of peoples work. Obviously there were a lot of bowls and vases but even within this selection the imagination was incredible with very few duplicate items. The vase with a zip fitted impressed me a lot.

The trouble is that even though I have enough hobbies I still came away with a pack of pens to turn. Somewhere around here I do have a little lathe that I've never used. I fancy trying to carve a chain from solid wood as well - there is a set of instructions on my bookshelf I think.

Enough from me, go and have a look at the photos to see what was there.

This is NOT a bodge


frontfixing
Originally uploaded by Phil_Parker.
No, the front footplate fixing bolt had to be removed because it got in the way of the chassis. I know I should have tested this when I scratchbuilt it but I didn't.

So with the body in pieces I soldered a bit of scrap etch in place and then fixed the fixing nut on this. Al done with new C&L 100 degree solder which allows you to fix whitemetal to brass without tinning the later first. Magic !

Oh, and I would have worked out a way to do this without taking the body to bits eventually. Honest.

Thursday, April 17, 2008

1361 in bits


1361 bits
Originally uploaded by Phil_Parker.
Time to return (again) to an old project. When I left the 1361 it had a working chassis and a wonky body with hardly any paint. For the last few montsh it has sat on a shelf shaming me to get stuck in again.

So I started looking at the body. Now the plan had been to tidy it up a little and then get some paint on. However the best laid plans etc. - I ended up waggling a few bits and soon had it in the state you see here. A kit with old paint and glue leftovers on some of the pieces.

Obviously this is a good thing. I can clean the old glue off and re-solder the whole thing back together. It was a bit wonky around the back end anyway so things will get better.

Bow-pen fun


Lined speeder
Originally uploaded by Phil_Parker.
Lining has always been a black art for me. Despite watching people do it and reading all the books, I still shy away. Most of my models are unlined and usually black with dirt.

Given a wooden On30 crew speeder to paint I feel the sides look a bit blank with just paint so I decided to have a go with the bow-pen. The lines were marked with pencil to get things lined up first. In this case I worked 1mm in from the edge of the panel.

A good quality pen was loaded with neat Humbrol cream paint and off I went. A few test lines were tried on the cutting pad to make sure the paint would run - then I tried working on the model.

The secret as far as I can tell is to be confident. With nothing to lose I went for it and surprised myself. The lines aren't half bad. Straight and consistent, everything I wanted.

The corners I did by brush and they are much less defined. If I needed to do a "proper job" I think a simple plastic guide would be in order but for the minute this will do. It's going to get some weathering anyway to hide the imperfections. It's amazing what you can get away with on a dirty model.

Micra washer jets


Micra washer nozzle
Originally uploaded by Phil_Parker
My sister has an old shape Nissan Micra. To date I've managed to argue that this is far too modern a car for me to fiddle around with, these things have to go to dealers 'cos the evil manufacturers make then so they can't be fixed by your average grease monkey.

However even I ought to be able to fix a blocked windscreen washer she said.

So I bought a Haynes manual and started reading. I didn't know what the problem is other than water wasn't coming out so I read the lot. It's scary - the car appears to be built around the washer bottle. To get at it the front wheel, wheelarch liner and possibly front bumper and one headlight have to be removed. That sounds like a whole lot of no fun.

When the car turns up, there is, to my great relief, water coming out - just not very much. A quick check by unplugging tubes shows fluids get to the nozzles OK so there problem must be in there.

Uncliping the nozzles (long nose pliers required) is easy and I shot them through with half of the products under the sink plus some I have in the garage. The holes were poked with a pin and that did seem to make a difference. Once re-connected there was water coming out of all holes, just not very much.

So another poking and squirting session ensues. Here's a handy hint though; the washer nozzle is an assembly of several parts if the inlet tube comes away from the rest of the unit, it has broken off. At the factory they are two separate parts and clip together. If you are holding two parts the clip has broken. All is not lost though as you can (or at least I could) fix this with superglue. Make sure the nozzle innards are complete first. They are a bronze spring, ball bearing and rubber O-ring. This forms a non-return valve.

Anyway, more poking ans spraying got the jets back to use and spraying on the middle of the screen. I suspect the problem was crud from the bottom of the washer bottle judging by the black horrid stuff that came out of the nozzle. The moral probably is, keep the bottle topped up so you don't try and squirt the muck from the bottom though the system.

And if you are buying a Micra, make sure the washer pump works.

Tuesday, April 15, 2008

Westbourne Model Centre


westbourne models
Originally uploaded by Phil_Parker.
Sorry about the photo - there were some road works outside the shop when I visited. Don't be too disappointed though, because the unobstructed view isn't that more exciting. To enjoy this shop you need to get inside.

Walking in the first thing you notice is that there are boat kits on the left. Not just a couple and not just plastic kits with a token couple of Ripmax items, but a wall full of shelves stacked with kits. A wall that disappears into the distance. I didn't count but reckon there are around a hundred in stock. With each kit being in a box 4-5 feet long that's a lot of box space !

Then there are the fittings. Even a big model boat show would struggle to have that many fittings on all the stands. I found at least one range I'd never heard of but will be using in the future.

The rest of the shop is a mix of aircraft (a nice Shorts plane hung from the ceiling) with a similar range of bits although a lot fewer kits. Various wood and metals filled stands in the middle. Even a small selection of plastic kits are offered along with all the glues and paints you could want.

I understand the shop has been around for 20 years - it shows too as there are plenty of boxes with odd items in. Great news for the model shop afficiando like myself who can resist a dig.

The staff are incredibly friendly too. While I was there the man in charge spent the time advising people on the phone. At least one hadn't bought his kit from Westbourne but needed advice on motors and mechanical gubbins. He still got it, which I hope means the next kit comes from someone other than a box shifter !

They say that the best time to visit the supermarket is when you have just eaten - the urge to impulse buy is reduced. Similarly the best time to visit Westbourne is at the start of the day when you don't need to carry a new kit around for hours. And you have decided not to buy any new projects until some of the others are finished. That's how I managed to get out without too much added to my stock.

Mind you, I did enjoy my day out and they do have an excellent website.

Sunday, April 13, 2008

Battery fun


lead end
Originally uploaded by Phil_Parker.
For a while now the van battery has had to be left disconnected when not in use or it runs down. I'd assumed a slight short and planned to take a look eventually. For the time being a set of quick disconnects on the leads made things pretty quick and easy so it wasn't high on my list of things to do during the cold, wet, winter.

Last weeks snow made things dramatically worse though. The battery appeared to die. I recharged it but that didn't help. I had only 8v on the cab voltmeter. So I charged it again and it made no difference.

A check with the voltmeter on the battery showed I have nearly 12v at the back of the van so there was something wrong en route. My money was on the main lead from batter to starter motor which I knew had chafed in the past. After just a little bit of contortionism I managed to remove this and tried to get a replacement.

Here's the rub - the nearest thing I can buy at Halfords is a 30 inch long positive lead. I need 36 inches. Guess who gets to search the motor factors (FLAPS) this week for a longer lead ?

Derby confusion

Now I don't know how this happened but next weekend I'd thought I was taking Flockburgh to sunny Derby. However I got the paperwork mixed up and it seems we aren't going after all. Sorry if you'd planned to say hello - there are still lots of other things to look at though !

Saturday, April 12, 2008

Large Scale Model Rail Show 2008


Garrat locomotive
Originally uploaded by Phil_Parker.

There are no end of modelling events at this time of year. This one probably wouldn't draw me if it wasn't 10 minutes drive from my front door. Much as I love garden railway sized models and do plan an outdoor layout one day - the 16mm Association show a couple of weeks ago would probably suffice. But it is handy so it would seem rude not to attend.

The show is given over to models 7mm scale upwards although mostly it's G gauge and 16mm stuff. It's probably the only chance to see 14 layouts in one hall so the £7.50 admission price probably isn't bad value.

The event can be summed up by one sign rendered especially pointless. In the cafe area it says "Please do not smoke". Normally I'd agree as no-one wants their atmosphere polluted but this time - well I suspect we were breathing a air that was half made up of steam, smoke, meths, gas and coal fumes. Not unpleasant in the way that only oily steam engines manage to be but a far cry from the normal exhibition hall atmosphere !

My picture shows a 16mm scale Garratt locomotive which I could have watched for hours. It chugged around pulling an enormous train with steam coming out of all the right places and a lovely soft exhaust beat. For those who want an idea I filmed it for your pleasure.

Favourite layout was an O gauge model - Newchappel Junction. It's quite simply the best 7mm model I have seen for many years. The trackplan is a terminus station which run out past a generous sized goods yard. Instead of disappearing into a tunnel followed by a fiddle yard, you get a junction (obviously) and a circuit of double track. Trains therefore leave the station, circulate around a few times and then return to the platform or yard. There is no hidden or unsceniced trackwork and despite not running to a timetable the trains actually appear to come and go for a purpose.

The weird thing is that this is a 51ft long model which has been on the circuit for 25 years and yet I don't remember it. Apparently it even appeared at the same show last year ! I must have been asleep when I visited.

Anyway, trade was pretty good although many people would recognise stands from the 16mm event. This was a better for but I'd gone to see Mercian Models and pick up some projects that will be appearing on this blog very soon. G1 modellers take note.

Mind you if my lottery ticket comes up tonight then I'm going back to the show. There is a GRS Garratt kit I fancy and Barrett Engineering has started doing G1 live steam kits designed for non-engineers. City of Truro would for £1650 (I think, didn't write it down), sounds like a bargain to me !

More pictures here

Thursday, April 10, 2008

Thames workboat


thames workboat
Originally uploaded by Phil_Parker.
Last week I had a trip to the smoke for a training session. Since this knocked off at lunchtime I had some time to wander. The point where my feet got tired and I found a tube station to get me back to Marylebone was Westminster.

Of course Westminster is on the Thames so there are plenty of boats to watch. Most are tourist vessels which don't interest me much but right by the bridge there was this little work boat moored by the landing stage.

I'd estimate the length to be between 30 and 40 feet. Sadly it's got limited appeal for modelmaking as the deck is so open. I'm not sure where you'd hide the radio gear, batteries or other gubbins unless you worked in a very large scale.

Presumably the open deck allows a large number of people to be accomodated in case the boat is used for rescue work. You could get all the way around if fishing things out of the river too...

Tuesday, April 08, 2008

Unified by talc


Painted chapel
Originally uploaded by Phil_Parker.
All those brightly painted slates were a bit loud. I'm modelling Scotland not Milan. North of the border they like their rooftops restrained and non-showy.

I think it was one of Iain Rice's books that earned it's purchase price by putting me on to talcum powder as an aid to painting. Somehow it seems working the popular gift for grannies into the surface brings colours together whilst giving a nice matt finish. I understand the later (the surface is microscopically bumpy, hence no sheen) but not the former, which I attribute to witchcraft.

Talc likes wet paint to stick so I washed the slates over with Humbrol 69 (Tank grey), dried it with a hairdryer to a tacky state and then worked the powder in with stiff brushes. The result was too white and chalky but another wash of grey sorted this out by tainting the talc.

I've looked at the result under various light sources and think it's one of the best painted roofs I've ever done. Trouble is I might have to go back and treat the other buildings now to bring them up to this standard !

Monday, April 07, 2008

Painting the roof


roof painted
Originally uploaded by Phil_Parker.
With the roof tiled it needed colour. The first coat is easy, dark grey (Humbrol 66) slightly thinned so it flows nicely over the paper.

Then individual slates are picked out is different colours. I think I used about 6 variations on the standard grey. Some were darker but most lighter. One is even more green than grey. The result looks too gaudy but I'll tone it down with a wash of grey later.

This looks like a worse job than it is. An old pointy brush, the sort that's long since lost its sharp point but is still got tightly grouped bristles, and slightly larger than scale slates help. I've tried to do this will lesser brushes and keeping the paint on a single slate is impossible and frustration is inevitable.

Sunday, April 06, 2008

Paper slates


Church roof
Originally uploaded by Phil_Parker.
I hate this doing the roof of a model building. It's the most prominent part and right under everyones nose, so the work needs to be top quality. But you have to produce hundreds of identical slates.

I cut strips of paper 5mm wide. These are marked 3mm from the edge. This is the visible slate and the other 2mm is the overhang. The division between each slate is cut with a pair of nail scissors. The the strip is separated from the sheet and stuck to the roof with PVA taking care to get it nice and straight. And make sure the gaps between slates are staggered.

This little roof took at least 3 hours. Once it's done people won't even notice if I get it right. Still, at least it's the sort of job you can do while half watching a DVD (The sound barrier since you ask) and while away the time. Not sure that makes it any more fun though.

Saturday, April 05, 2008

Lifebelts


lifebeltsd
Originally uploaded by Phil_Parker.
Much as I enjoyed noodling around with plastic to produce some lifebelt stands, it would have been better if I'd used a ruler occasionally. Then I might have noticed that the supporting poles were only going to be about 4mm long.

Short poles look odd, to me at least, so the strips of plastic were removed and the holders fitted to walls instead.

This is what comes of using over scale parts. The lifebelts are suitable for the generously proportioned drowner as they came from Langley Models 4mm spares pots - i.e. 125% of the size required for the layout. Never mind. Maybe there are some fat people in the water.

Friday, April 04, 2008

Lifebelt stands


lifebelt stands
Originally uploaded by Phil_Parker.
You can't have a quayside without some lifebelts - we don't want our plastic men to fall on the varnish water and, errr, drown, do we ?

I like a little bit of noodling around with plasticard offcuts. A square of leftover from a boat kit, some microstrip in the drawer for bits to short to go back in the packet and posts from some strip I cut for something else once.

A few minutes fiddling around gave me these stands. I didn't measure anything other than the backboards - and then only by placing the lifebelt on them to make sure it fitted. Somebody probably makes a kit for these but this was nice, easy and cheap.

Wednesday, April 02, 2008

Bollards


bollards
Originally uploaded by Phil_Parker.
Gotta get some detail on the extension board...

OK if we have boats they need to be tied up at the quayside. That means something to tie them to. That means we need some bollards.

This is easy in 4mm scale - a quick trip to Langley gets some nice cast whitmetal ones. They are a bit big for the smaller scale though. Now if I had a lathe they've be a simple turning job, but I don't. Rigging up an electric drill might work but even easier is raiding the "boat bits" box. A set of Ripmax ships bollard looked about right and with the base chopped off and painted black I think they work.

Lucky for me the designs varied a lot. In fact they may even have been locally manufacturer so no one can complain I've got it wrong.

Tuesday, April 01, 2008

Numberplate bolt


number plate
Originally uploaded by Phil_Parker.
I wonder how some things happen. Last Saturday I was driving out of the car park and there was a horrible grinding noise from the front of the van. My first thought was that the spoiler had finally given up the ghost and was dragging along the road. A quick look showed it was the numberplate doing the dragging.

One of the fixing bolts had come off and the plate hang down. Since it's aluminum (the nice black and silver sort as the van is old enough to avoid the horrid reflective version) it didn't shatter but stayed intact if a little bent.

Removing the other bolt was easy but I wondered how long the nut from the back of the other one had been missing. I guess that was the problem as I'd heard a familiar twang when reversing - familiar because parking over some high kerbs cause the spoiler to rub when a fat bloke like me sits in the drivers seat. This twang must have been the numberplate flicking the bolt out.

Fortunately this is an easy fix. Dig a spare bolt out of the drawer and re-fit. Obviously I had a spare as the holes aren't equally spaced on the 'plate and I like to use a black bolt on the black bit and a pale grey one on the silver. Still I suppose I can live with indignity of two grey bolts. For a while anyway.